Table of Contents
Advertisement
All rights reserved. No part of this publication may be reproduced, distributed, or transmitted in any form
or by any means, including photocopying, recording, or other electronic or mechanical methods, without the
prior written permission of the publisher, except in the case of brief quotations embodied in critical reviews
and certain other noncommercial uses permitted by copyright law. For permission requests, write to the
publisher.
THANK YOU FOR YOUR PURCHASE OF THE GMRS-PRO. THIS GMRS RADIO (WITH UHF/VHF
SCANNER CHANNELS) WILL DELIVER YOU SECURE INSTANT RELIABLE COMMUNICATION.
PLEASE READ THIS MANUAL CAREFULLY BEFORE USE
Copyright © 2022 by BTECH
Advertisement
Table of Contents

Related Manuals for BTECH GMRS-PRO


Summary of Contents for BTECH GMRS-PRO
- Page 1 For permission requests, write to the publisher. THANK YOU FOR YOUR PURCHASE OF THE GMRS-PRO. THIS GMRS RADIO (WITH UHF/VHF SCANNER CHANNELS) WILL DELIVER YOU SECURE INSTANT RELIABLE COMMUNICATION. PLEASE READ THIS MANUAL CAREFULLY BEFORE USE...
-
Page 2: Table Of Contents
VISIT BAOFENGTECH.COM AND MIKLOR.COM FOR DOWNLOADS AND HELP Contents Chapter 1. - Initial Setup ......................6 Safety Information ........................... 6 Exposure to Radio Frequency Energy ....................8 FCC NOTICE AND DECLARATION ....................... 9 FCC LICENSE REQUIRED FOR GMRS OPERATION ................9 FCC SAR (Specific Absorption Rate) .................... - Page 3 VISIT BAOFENGTECH.COM AND MIKLOR.COM FOR DOWNLOADS AND HELP APP Introduction ........................20 Connecting GMRS-PRO with a Cellphone/Tablet ................ 20 For Android Users ......................... 20 For iOS Users ..........................20 Using The App ..........................20 Pairing Your Cellphone/Tablet to the Radio ..................20 App Permissions ..........................
- Page 4 VISIT BAOFENGTECH.COM AND MIKLOR.COM FOR DOWNLOADS AND HELP Icon Descriptions ........................... 40 Electronic Compass ........................43 Edit Frequency and Memory Settings ..................45 Split Screen Display ........................46 Radio Menu Settings ........................47 FM Radio ............................47 Signaling Settings ........................... 48 Radio Settings ..........................
- Page 5 VISIT BAOFENGTECH.COM AND MIKLOR.COM FOR DOWNLOADS AND HELP Appendix B ............................. 59 CPS Menu ................................59 General Settings ..............................59 Connection Management ........................... 61 SCAN ................................... 62 Channel & Groups .............................. 62 Programmable Buttons ............................62 Firmware Version ............................... 62 Battery ................................
-
Page 6: Chapter 1. - Initial Setup
• Qualified technicians shall service this equipment only. • Do not modify the radio for any reason. • Use only BTECH supplied or approved batteries and chargers. • Do not use any portable radio that has a damaged antenna. If a damaged antenna comes into contact with your skin, a minor burn can result. - Page 7 VISIT BAOFENGTECH.COM AND MIKLOR.COM FOR DOWNLOADS AND HELP • Do not expose the radio to direct sunlight over a long period of time, nor place close to a heating source. • When transmitting with a portable radio, hold the radio in a vertical position with the microphone 3 to 4 centimeters (1.25 to 1.5 inches) away from your lips.
-
Page 8: Exposure To Radio Frequency Energy
VISIT BAOFENGTECH.COM AND MIKLOR.COM FOR DOWNLOADS AND HELP Exposure to Radio Frequency Energy Your BTECH radio is designed to comply with the following national and international standards and guidelines regarding exposure of the human body to radio frequency electromagnetic energy. -
Page 9: Fcc Notice And Declaration
Cellular Radiotelephone Service transmissions. FCC LICENSE REQUIRED FOR GMRS OPERATION The GMRS-PRO operates on GMRS (General Mobile Radio Service) frequencies, which require an FCC (Federal Communications Commission) license. You must be licensed prior to transmitting on any of the channels, which are comprised of GMRS channels. - Page 10 VISIT BAOFENGTECH.COM AND MIKLOR.COM FOR DOWNLOADS AND HELP You will be issued a call sign by the FCC, which should be used for station identification when operating the radio on these channels. You should also cooperate by engaging in permissible transmissions only, avoiding channel interference with other GMRS users, and being prudent with the length of your trans- mission time.
-
Page 11: Fcc Sar (Specific Absorption Rate)
VISIT BAOFENGTECH.COM AND MIKLOR.COM FOR DOWNLOADS AND HELP FCC SAR (Specific Absorption Rate) SAR tests are conducted using standard operating positions accepted by the FCC with the device transmitting at its highest certified power level in all tested frequency bands, although the SAR is determined at the highest certified power level, the actual SAR level of the device while operating can be well below the maximum value. -
Page 12: Features And Functions
VISIT BAOFENGTECH.COM AND MIKLOR.COM FOR DOWNLOADS AND HELP Features and Functions •GMRS Transceiver and UHF&VHF Scanner •APP Programming. •Multiple Bluetooth connection methods •Radio short message function •GPS positioning system •Partner location and direction reporting system •Multiple emergency functions •High-Capacity Lithium-Ion battery(3000mAh) •Broadcast FM receiver 87-108 Mhz. -
Page 13: What's In The Box
VISIT BAOFENGTECH.COM AND MIKLOR.COM FOR DOWNLOADS AND HELP What's In the Box This transceiver comes shipped with the following items in the box: •GMRS-PRO Radio Body •3000 mAh Lithium-Ion battery pack •TYPE-C USB Charging Cable •Optional belt clip •Optional screwdriver... -
Page 14: Assembly
VISIT BAOFENGTECH.COM AND MIKLOR.COM FOR DOWNLOADS AND HELP Assembly Before the radio is ready for use, we need to attach the antenna and battery pack, as well as charge the battery. Attaching the belt clip There are two screws in the belt clip package. Use the included screwdriver to fix the belt clip on the radio body. -
Page 15: Battery
VISIT BAOFENGTECH.COM AND MIKLOR.COM FOR DOWNLOADS AND HELP Battery Before attaching or removing the battery make sure your radio is turned off by turning the power/volume knob all the way counter-clockwise. Installation Make sure the battery is aligned in parallel with the radio body with the lower edge of the battery about 1-2cm below the edge of the radio. -
Page 16: Charging And Battery Maintenance
VISIT BAOFENGTECH.COM AND MIKLOR.COM FOR DOWNLOADS AND HELP Charging and Battery Maintenance Charging The battery should be fully charged before initial use. Optimum battery efficiency will be achieved after three full battery charge and discharge cycles. The radio should be off during charging. -
Page 17: Prolonging The Life Of Your Battery
VISIT BAOFENGTECH.COM AND MIKLOR.COM FOR DOWNLOADS AND HELP four to five hours before you start using your radio. •Use only batteries approved by the original manufacturer. •Never attempt to disassemble your battery pack. •Do not expose your batteries to fire or intense heat •Dispose of batteries in accordance with local recycling regulations. -
Page 18: Battery Storage
VISIT BAOFENGTECH.COM AND MIKLOR.COM FOR DOWNLOADS AND HELP •Dust can interfere with the contacts on the battery. If necessary, wipe the contacts with a clean cloth to ensure proper contact with radio and charger. Battery Storage Partially charge your battery before long-term storage in order to prevent damage from over discharge. -
Page 19: Gmrs Frequency Chart, Channel Guide
VISIT BAOFENGTECH.COM AND MIKLOR.COM FOR DOWNLOADS AND HELP GMRS Frequency Chart, Channel Guide... -
Page 20: App Introduction
VISIT BAOFENGTECH.COM AND MIKLOR.COM FOR DOWNLOADS AND HELP APP Introduction Connecting GMRS-PRO with a Cellphone/Tablet For Android Users Go to Google Play and, Search for “BTECH GMRS Programmer” For iOS Users Go to the App Store and Search “BTECH GMRS Programmer” Using The App While the App is connected to the radio, it will have full control. -
Page 21: App Permissions
VISIT BAOFENGTECH.COM AND MIKLOR.COM FOR DOWNLOADS AND HELP Figure 1 Figure 2 2) Select YES to allow Bluetooth connection 3) Bluetooth pairing requires confirmation of Bluetooth authorization, select PAIR to confirm the pairing status as seen in Figure 2. You do not need to allow access to the contacts and call history App Permissions The App will request permission to use the Location, Nearby Devices, Microphone, and... -
Page 22: Accessing The Android Settings Menu
VISIT BAOFENGTECH.COM AND MIKLOR.COM FOR DOWNLOADS AND HELP 4) Select Pair New Device- this will connect your phone or tablet to your radio. The App will store these connections for the next time you wish to use the App. You can store more than one radio, and you can name them differently in the App to make sure you are working on the proper unit. -
Page 23: Accessing The Ios Settings Menu
VISIT BAOFENGTECH.COM AND MIKLOR.COM FOR DOWNLOADS AND HELP Accessing the iOS Settings Menu Figure 4 Figure 5 Figure 6 iOS Main Screen Click the gear Icon Settings Menu Click the 3 bars on lower left... -
Page 24: Control Interface
VISIT BAOFENGTECH.COM AND MIKLOR.COM FOR DOWNLOADS AND HELP Control Interface [Select Channel]: click the desired channel square to switch to the channel, and the radio will emit a "beep" tone. [Low /High Power]: Refers to the output power of the current channel. [Single CH]: Refers to monitoring the frequency of a single channel. -
Page 25: Editing A Channel
VISIT BAOFENGTECH.COM AND MIKLOR.COM FOR DOWNLOADS AND HELP Editing a Channel Long press the desired channel square, and you will be taken to the [Edit Channel] screen. Enter your changes, and when you complete the editing of the channel parameters, click the 3 dots then select [SAVE] to save the Channel Parameters. - Page 26 VISIT BAOFENGTECH.COM AND MIKLOR.COM FOR DOWNLOADS AND HELP Make sure radio is connected to the phone before adding channels, and for RX only channels, set TX Freq to 0. [Title]: Means the channel name, you can name the channel anything you desire. [RX/TX Freq]: Click to edit transmit and receive frequencies.
-
Page 27: Settings Menu
VISIT BAOFENGTECH.COM AND MIKLOR.COM FOR DOWNLOADS AND HELP Settings Menu [Volume]: Adjust the volume of the device. [Squelch Level]: Squelch level adjustment, 0 is the weakest required signal level to monitor (loose or open squelch), the larger the number (tight squelch), the stronger the received signal strength needs to be heard. -
Page 28: General Settings
VISIT BAOFENGTECH.COM AND MIKLOR.COM FOR DOWNLOADS AND HELP General Settings [WX Mode]: Use this to select Off, Monitor (to Listen), or Alert (NOAA Warnings only) After using Monitor, you may need to adjust the squelch tighter to quiet the receiver- found under Device Settings- see figure 9 previous page [WX Channel]: Choose the local NOAA channel [TX Time Limit]: Set the time limit for device transmit. -
Page 29: Wx Mode
VISIT BAOFENGTECH.COM AND MIKLOR.COM FOR DOWNLOADS AND HELP WX Mode [Off]: Use this to turn off all NOAA broadcasts [Monitor]: Choose this to activate the NOAA receiver [Alert]: Choose this to activate the NOAA Alert Mode- the only time NOAA Broadcast will be heard is when there is a weather alert or civil emergency. - Page 30 VISIT BAOFENGTECH.COM AND MIKLOR.COM FOR DOWNLOADS AND HELP [Microphone Gain]: Set the microphone gain of the internal microphone. [Wireless Mic Gain]: Set the microphone gain of the wireless microphone. [Headphone Mode]: Set the access mode of the headphone system (voice mode or call (phone) mode). [Keep Headset Connected]: Select the continuous connection and operation via the headset [Tone]: Turn on/off the beep tone on the device.
-
Page 31: Connection Management
VISIT BAOFENGTECH.COM AND MIKLOR.COM FOR DOWNLOADS AND HELP Connection Management Slide [SCAN]to the right , to scan for active Bluetooth devices and begin pairing operations. Slide to the left to turn off. Figure 13... -
Page 32: Scan
VISIT BAOFENGTECH.COM AND MIKLOR.COM FOR DOWNLOADS AND HELP Scan Used to check for active frequencies. Click the Start frequency to set the lower frequency limit, and End to set the higher frequency limit. This will set the scan range of frequencies Click the >| to start the scan. -
Page 33: Channels & Groups
VISIT BAOFENGTECH.COM AND MIKLOR.COM FOR DOWNLOADS AND HELP Channels & Groups Click [NEW] to create a new group. Click on the new group name to enter channel information. After entering all channel information, click the up arrow to synchronize to number 2 to 6 channel groups of the walkie-talkie. -
Page 34: Programming P1, P2, P3 Buttons
VISIT BAOFENGTECH.COM AND MIKLOR.COM FOR DOWNLOADS AND HELP Programming P1, P2, P3 buttons The programming button can define the short cut operation of P1-P3 button, among them, T-CALL is 1750HZ, Radio Switch is turn ON/OFF FM radio. Description of button function in Menu Listing in Appendix B. - Page 35 VISIT BAOFENGTECH.COM AND MIKLOR.COM FOR DOWNLOADS AND HELP Firmware Version Updates: When there is firmware that can be updated, click on the firmware version to update the firmware. When you finish the upgrade, if the keyboard light flashes and the screen does not light up, please press and hold the P1 and P2 keys at the same time to restore the factory settings.
-
Page 36: App Screen
VISIT BAOFENGTECH.COM AND MIKLOR.COM FOR DOWNLOADS AND HELP App Screen Click to return to the main interface Click to enter the message option screen Means the cell phone will be muted, if the speaker is ON, the radio and cell phone will sound at the same time. -
Page 37: Radio Operation
VISIT BAOFENGTECH.COM AND MIKLOR.COM FOR DOWNLOADS AND HELP Radio Operation ① Power and volume switch Turn the top knob clockwise to switch on. Turn the knob to increase or decrease volume level. When using a wireless BT hand microphone or earphone, please note the Speaker setting in the HT App needs to be Off or Auto, both settings will make the volume knob to not function. - Page 38 ⑦ Keypad Function Keys Refer to the detailed explanation below for detailed key functions ⑧ Headphone jack Dedicated headphones can be connected. Please note this is not an M plug, it is a special customized earphone. Contact BTech to purchase it.
-
Page 39: Keypad Functions
VISIT BAOFENGTECH.COM AND MIKLOR.COM FOR DOWNLOADS AND HELP Keypad Functions Up key Page up. ① ② OK/Enter key In the menu mode, press this key to enter the menu setting and to set and accept changes made. ③ Menu key Turn on the menu function. -
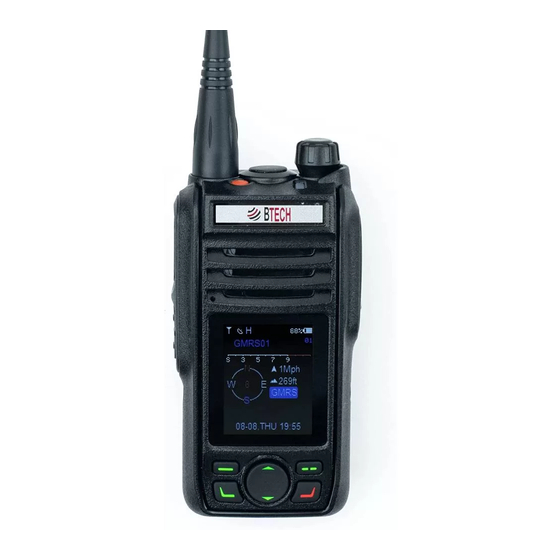
Page 40: Icon Descriptions
VISIT BAOFENGTECH.COM AND MIKLOR.COM FOR DOWNLOADS AND HELP Icon Descriptions ① Radio. Represents the normal standby state of the radio. ② GPS on. On behalf of the GPS function. GPS is turned on by default when powering on. ③ Transmit Power icon. H stands for high power and L stands for low power ④... - Page 41 VISIT BAOFENGTECH.COM AND MIKLOR.COM FOR DOWNLOADS AND HELP ⑪ Main band After dual standby is turned on, the frequency of the main band will be red and with red arrow. ⑫ Repeater Shift Direction “+” means transmit shift up in frequency “-”...
- Page 42 VISIT BAOFENGTECH.COM AND MIKLOR.COM FOR DOWNLOADS AND HELP ⑯ Altitude The altitude of the current location of the device ⑰ ID Name The device name of this device, you can customize the ID name in the menu (Signaling setting) ⑱ Status bar After receiving the GPS or connecting the mobile phone, the actual time and date of satellite time service or network time service will be displayed.
-
Page 43: Electronic Compass
VISIT BAOFENGTECH.COM AND MIKLOR.COM FOR DOWNLOADS AND HELP Electronic Compass Sensor prompt icon. ① The "=" icon in the middle of the electronic compass means that it is disturbed by the external environment. You need to enter the [Compass] menu and perform correction operations according to the on-screen instructions. - Page 44 VISIT BAOFENGTECH.COM AND MIKLOR.COM FOR DOWNLOADS AND HELP Tip: Try to keep the device away from strong magnets, which will affect the device sensors. If it is sometimes close to a strong magnet, the screen will prompt an “=” icon, and the icon will be restored immediately after it is moved away, and no correction is required at this time.
-
Page 45: Edit Frequency And Memory Settings
VISIT BAOFENGTECH.COM AND MIKLOR.COM FOR DOWNLOADS AND HELP Edit Frequency and Memory Settings ① Refers to the next digit of the cursor. ② Press to move down the list. ③ Cursor. Under the current cursor, you can use the up or down keys to select the specific value you need. -
Page 46: Split Screen Display
VISIT BAOFENGTECH.COM AND MIKLOR.COM FOR DOWNLOADS AND HELP Split Screen Display ① ② ③ ① User's name or call sign is displayed when Dual Watch is off. ② Display the last contact information received. Such as the name or call sign of the other party plus location information and direction. Display a list of recently received contact information. -
Page 47: Radio Menu Settings
VISIT BAOFENGTECH.COM AND MIKLOR.COM FOR DOWNLOADS AND HELP Radio Menu Settings FM Radio Press the menu key to enter the menu, turn on the FM radio, and press the up key to scan the available frequencies up. Press the down key to scan down the available frequencies, press the [OK] button to exit the radio Signaling mode ID: Your Name ID... -
Page 48: Signaling Settings
VISIT BAOFENGTECH.COM AND MIKLOR.COM FOR DOWNLOADS AND HELP Signaling Settings ID: Set ID to be sent. Location: Allow Location (obtained from GPS) to be sent. Position: Allow Position to be sent. Allow Position Check: Allow other members to find your position. Radio Settings Dual-Watch: If active, it will be watching for activity on two channels, Press the up and down keys to switch between the main band and sub band, and press the side key to switch the waiting channel. -
Page 49: Adding A New Frequency
VISIT BAOFENGTECH.COM AND MIKLOR.COM FOR DOWNLOADS AND HELP Adding A New Frequency Tip: The GMRS-PRO only allows the creation of new channels between channel groups 2-6 ① Add a regular frequency Create a new frequency list in a new group, then press the [Enter] button to add to the channel list. -
Page 50: Sound Setting
VISIT BAOFENGTECH.COM AND MIKLOR.COM FOR DOWNLOADS AND HELP Sound Setting Speaker: ON means the speaker is always on. OFF means the speaker is always off. AUTO means automatic adaptation, when the earphone is connected, the speaker is silent and the headphone is active. Mic Gain: Adjust the sensitivity of the microphone, there are three levels: High, Mid, Low to select from. -
Page 51: Connecting External Bluetooth Devices
VISIT BAOFENGTECH.COM AND MIKLOR.COM FOR DOWNLOADS AND HELP Devices Connecting External Bluetooth 1. Connect to Bluetooth PTT Turn on the radio, then press the orange key twice OR select [Pairing] in the menu to enter the pairing state. A 'BEEP' will be heard and a red-green light flashing means the radio is now in pairing status. Long press the Bluetooth PTT, the Bluetooth PTT is now in pairing status, after 10 seconds, the connection will be successful. - Page 52 VISIT BAOFENGTECH.COM AND MIKLOR.COM FOR DOWNLOADS AND HELP No matter which Bluetooth device is connected, the need to enter the pairing state. To view the status of the paired device, please check the connection management of the APP...
-
Page 53: Noaa Weather Channels
VISIT BAOFENGTECH.COM AND MIKLOR.COM FOR DOWNLOADS AND HELP NOAA Weather Channels [WX Scan]: Turns on weather scan, the device will always be in the scan state until it finds a signal WX Channels 162.550MHz 162.450MHz 162.400MHz 162.500MHz 162.475MHz 162.525MHz 162.425MHz [WX Alert]: Turn on this option, and when the NOAA weather warning message is received, the device will sound an alarm, and the weather message will be heard. -
Page 54: Weather Monitor Alert Description
VISIT BAOFENGTECH.COM AND MIKLOR.COM FOR DOWNLOADS AND HELP Weather Monitor Alert Description NOAA weather stations in North America have the ability to send out weather alerts. What this means is when there is any incident of severe weather (listed below) or a possible weather event, they will send a 1050 Hz tone which will open receivers tuned to the frequency or channel, and start to play audio for those in alert mode. -
Page 55: Radio Menu
VISIT BAOFENGTECH.COM AND MIKLOR.COM FOR DOWNLOADS AND HELP Appendix A Radio Menu FM Radio Select the Frequency 88-108 MHz of the FM Radio Signaling Send Message Enter Text Message to See Page 47 Send Call Call other members of See Page 47 your group Check Check location of your... -
Page 56: Radio Settings
VISIT BAOFENGTECH.COM AND MIKLOR.COM FOR DOWNLOADS AND HELP OFF: Not Checked Radio Settings Dual Watch RX 2 channels at same On: Checked time Off: Not Checked Scan Allow Scan ON: Checked Off: Not checked Talk Around Set TX and RX ON: Checked frequencies to same Off: Not checked... -
Page 57: Sound Settings
VISIT BAOFENGTECH.COM AND MIKLOR.COM FOR DOWNLOADS AND HELP Speaker Auto Automatic detection Sound Settings of ear piece Speaker On Speaker Off (Muted) Mic Gain Sets Level of Microphone Sensitivity High BT Mic Gain Sets Level of Bluetooth Microphone High Sensitivity Keep Connected Keep Bluetooth Device ON: Checked... - Page 58 VISIT BAOFENGTECH.COM AND MIKLOR.COM FOR DOWNLOADS AND HELP Time Zone Set the time zone of the Used to correct Time radio clock Zone selection Pairing Enable Bluetooth Pairing ON: Checked OFF: Unchecked (Turns off once pairing is completed) NOAA WX Scan Scan of nearby NOAA Stations WX Channel...
-
Page 59: Cps Menu
VISIT BAOFENGTECH.COM AND MIKLOR.COM FOR DOWNLOADS AND HELP Appendix B CPS Menu Team Create a Team Select members to be on your team Join A Team Join an existing team Nearby People Show People nearby Show a map with locations of nearby people Device Settings Volume... - Page 60 VISIT BAOFENGTECH.COM AND MIKLOR.COM FOR DOWNLOADS AND HELP Alert WX Alert warnings turn on audio (See page 55) WX Channel WX1 to WX7 Select local NOAA broadcast (See page TX Time Limit Set Tx Time out timer 10 to 300 sec or Unlimited (no timer) TX Hold Time TX off delay...
-
Page 61: Connection Management
VISIT BAOFENGTECH.COM AND MIKLOR.COM FOR DOWNLOADS AND HELP High Wireless Mic Gain Sets the sensitivity of the wireless mic Medium High Headphone Mode Voice Mode Switches between Radio and Phone Call Mode Mode Automatically detect when Keep Headset head set is plugged in Connected Tone Turn on /off radio beep... -
Page 62: Scan
Shows FW revision number Battery Shows Battery Voltage Wireless PTT Power Shows Wireless PTT module battery level Contact Us Contact Information for BTech (opens web In APP browser) User Manual Opens browser to online user manual In APP Settings ID Signaling... - Page 63 VISIT BAOFENGTECH.COM AND MIKLOR.COM FOR DOWNLOADS AND HELP ID Signaling Location On/Off Set with “Nickname” Allow Position Check On/Off Time to Live Maximum Forwarding Times Channel Manager Add/Delete Channels Channel Group Import or Create New Manager Channel Groups Offline Maps Satellite (Google) Download Maps Terrain (Google)
-
Page 64: Morse Code
VISIT BAOFENGTECH.COM AND MIKLOR.COM FOR DOWNLOADS AND HELP High PTT Button Select Button for PTT Function PTT Lock Lock PTT on Use with Caution Speed Set Speed of Morse 1-200 words per Code minute Morse Code Pitch Set sidetone pitch 320 to 3000 Hertz Speed Set Characters per... - Page 65 VISIT BAOFENGTECH.COM AND MIKLOR.COM FOR DOWNLOADS AND HELP activated, the radio speaker is muted (does not function on REPT channels). Toggle Scan Turn Scan On/Off Toggle Talk Around Turns On/Off Talk Around Toggle TX Enable Turn Channel TX Enable On/Off Transmit Power Switch Switches TX power to High or Low...
-
Page 66: Dcs Table
VISIT BAOFENGTECH.COM AND MIKLOR.COM FOR DOWNLOADS AND HELP on Sub-Band DCS Table Table C.1. DCS Codes Number Code Number Code Number Code Number Code D023N D025N D026N D031N D032N D036N D043N D047N D051N D053N D054N D065N D071N D072N D073N D074N D114N D115N D116N... - Page 67 VISIT BAOFENGTECH.COM AND MIKLOR.COM FOR DOWNLOADS AND HELP D411N D412N D413N D423N D431N D432N D445N D446N D452N D454N D455N D462N D464N D465N D466N D503N D506N D516N D523N D526N D532N D546N D565N D606N D612N D624N D627N D631N D627N D631N D632N D645N D645N D654N D662N...
- Page 68 VISIT BAOFENGTECH.COM AND MIKLOR.COM FOR DOWNLOADS AND HELP D244I D245I D246I D251I D252I D255I D261I D263I D265I D266I D271I D274I D306I D311I D315I D325I D331I D332I D343I D346I D351I D356I D364I D365I D371I D411I D412I D413I D423I D431I D432I D445I D446I D452I D454I...
-
Page 69: Ctcss Table
VISIT BAOFENGTECH.COM AND MIKLOR.COM FOR DOWNLOADS AND HELP CTCSS Table Table C.2. CTCSS Frequencies Number Number Frequency Number Frequency Number Frequency Frequency 67.0 69.3 71.9 74.4 77.0 79.7 82.5 85.4 91.5 94.8 97.4 88.5 103.5 107.2 110.9 100.0 114.8 118.8 123.0 127.3 131.8... -
Page 70: Specifications
VISIT BAOFENGTECH.COM AND MIKLOR.COM FOR DOWNLOADS AND HELP SPECIFICATIONS General Frequency Range: 87-108MHz (FM Radio ONLY) 136-174MHz (RX Only) 400-520MHz (RX Only) GMRS Channel (RX/TX) Memory Channel: 30 Channels * 6 Groups Frequency Stability: ±2.5ppm Antenna impedance:50 ohm Operating temperature:-20~+60℃ Operating voltage:7.4V Battery capacity:2600 mAh Charging port: USB TYPE-C Size :58(W)x125(H)x35(D)mm... - Page 71 VISIT BAOFENGTECH.COM AND MIKLOR.COM FOR DOWNLOADS AND HELP Transmit Specifications RF Power: 5W Wide Band Narrow Band Modulation: 16K0F3E 11K0F3E Adjacent channel power ≥70db ≥60db FM noise ≥45db ≥43db Spurious and harmonic ≥60db ≥60db Audio response ±1~- 3db(0.3~3khz) ±1~- 3db(0.3~2.55khz) Modulation distortion ≤3% Receive Specifications...
Need help?
Do you have a question about the GMRS-PRO and is the answer not in the manual?
Questions and answers