
Related Manuals for Kärcher K1900


Summary of Contents for Kärcher K1900
- Page 1 Electric Pressure Washer English ..4 Español . . . 20 Français. . . 38 K1900 1.106-111.0 K1910 1.106-117.0 8.641-719.0-1 9/16...
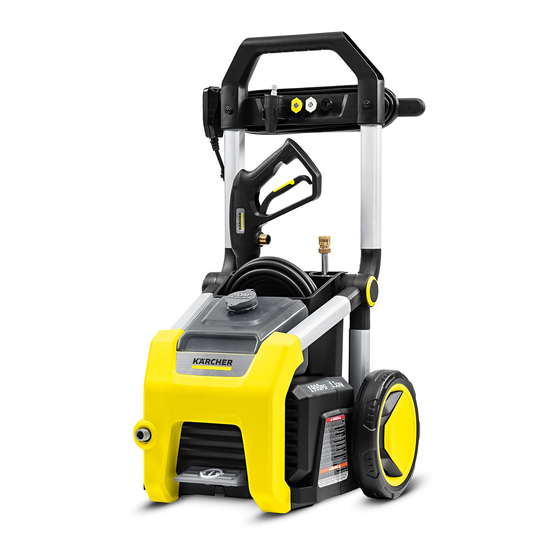
- Page 2 Machine Parts List 1. Water Inlet 2. High Pressure Outlet 3. Hose Connector 4. ON/Off Pedal 5. Power Cord Cleat 6. Nozzles 7. Turbo Nozzle 8. High Pressure Hose 9. Spray Wand 10. Spray Gun 11. Handle 12. Plug Storage 13.
-
Page 4: Table Of Contents
K1900 Pressure Washer Please read and comply with these Hazard Levels original instructions prior to the initial operation of your appliance and store them for later use Indicates “an imminently hazardous or subsequent owners. situation which, if not avoided, will result in death or serious injury.”... - Page 5 ● Do not operate the product when ● Keep all connections dry and off the fatigued or under the influence of ground. ● Do not touch plug with wet hands. alcohol or drugs. ● Keep operating area clear of all ●...
-
Page 6: Assembly Instructions
components rated less than 1900 psi ● Never use the pressure washer to working pressure (including but not draw in water contaminated with solvents, limited to spray guns, hose and hose connections). e.g. paint thinners, gasoline, oil, etc. ● Before servicing, cleaning or ●... -
Page 7: Operating Instructions
2. Push the handle into place. Operating Instructions 1. Thread one end of the high pressure hose tightly onto the high pressure outlet on the unit. 3. Install the hose connector to the water inlet. 2. Thread the other end of the high pressure hose onto the spray gun inlet. - Page 8 3. Insert the spray wand into the spray 6. Plug the Ground Fault Circuit gun. Tighten the quick connect knob. Interrupter (GFCI) into a working outlet. We recommend that you test the GFCI as part of the start up procedure each time you use the machine.
-
Page 9: Using The Accessories
8. Turn on the machine by stepping pattern can cover an area of 4 to 8 down on the foot pedal. inches (10 to 20 cm), depending on the distance between the tip and the surface being cleaned. The 40° Nozzle is efficient for general purpose cleaning. -
Page 10: Taking A Break
protect the internal parts of the 2. Fill the soap tank with Kärcher pressure washer for a longer life. detergent. For Kärcher detergents, check your retailer or visit our website: www.Karcher.com/us Never Use: ● Bleach, chlorine products and other corrosive chemicals ●... -
Page 11: Shutting Down & Cleaning Up
2. Turn pressure washer OFF by 3. Press trigger to release water stepping on the foot pedal. pressure. 4. Release trigger and engage the gun Shutting Down & safety lock. Cleaning Up 1. Turn the machine off by stepping on the foot pedal and unplug the cord from the outlet. -
Page 12: Winterizing & Long Term Storage
6. Unthread and disconnect the high damage during storage in the pressure hose from the machine. winter months. Maintenance Instructions Cleaning the Water Inlet Filter 1. Disconnect the connector from the water inlet. 2. Rinse out the water inlet filter in warm Winterizing &... -
Page 13: Cleaning Tips
Cleaning Tips House Siding (With or without detergent). Pre-rinse cleaning surface with fresh ● Before cleaning any surface an water. If using detergent, apply to inconspicuous area should be surface at low pressure. For best cleaned to test spray pattern and results, limit your work area to smaller distance for maximum cleaning sections of approximately 6sq. -
Page 14: Optional Accessories
removing extremely stubborn stains, necessary to move the spray nozzle use the Turbo Nozzle. even closer to the surface for greater dirt cutting action. Cars, Boats and Patio and Lawn Furniture Motorcycles (With or without detergent). (With or without detergent). Pre-rinse furniture and surrounding Pre-rinse vehicle with fresh water. - Page 15 Pump Guard Specially formulated to protect your pressure washer from freezing, corrosion and premature wear. The Pump Guard also adds lubrication to valves and seals to prevent sticking. Highly recommended for all Kärcher pressure washers! Part Number 9.558-998.0 English 15...
-
Page 16: Troubleshooting
Troubleshooting Disconnect the unit from the power source before making any repairs. Symptom Cause Solution Power Cord not Plug in Power Cord. plugged in. Electrical Outlet does Try a different outlet. not supply adequate power. Tripped GFCI plug. Press “Reset” button on GFCI plug. Motor will not start Tripped Circuit Breaker. - Page 17 Symptom Cause Solution Pump is sucking in air. Check that hoses and fittings are air tight. Turn off machine and purge pump by squeezing trigger gun until a steady flow of water emerges through the nozzle. Output pressure Water inlet filter is Remove garden hose adapter and varies high clogged.
- Page 18 Symptom Cause Solution Spray wand not Insert the spray wand into the trigger properly attached. gun. Carefully press in against the spring tension and twist into the Spray wand locked position. leaks Broken o-ring or plastic Visit www.karcher-help.com or locate insert.
- Page 19 English 19...
Need help?
Do you have a question about the K1900 and is the answer not in the manual?
Questions and answers
j ai 1 karcher 1900 il a la pression la moitier il se fait un bruit quand je pese sur la poigniée
Your Kärcher K1900 may be producing half the pressure and making noise due to the pump sucking in air. This can happen if hoses or fittings are not airtight. To fix this, check all hoses and fittings for tight connections. Then turn off the machine and purge the pump by squeezing the trigger gun until a steady flow of water comes out of the nozzle.
This answer is automatically generated