Beckhoff C9900-U332 Manual
Hide thumbs
Also See for C9900-U332:
- Installation and operating instructions manual (17 pages) ,
- Manual (29 pages)
Table of Contents
Advertisement
Quick Links
Advertisement
Chapters
Table of Contents

Subscribe to Our Youtube Channel
Related Manuals for Beckhoff C9900-U332


Summary of Contents for Beckhoff C9900-U332
- Page 1 Manual | EN C9900-U332 Battery pack 2022-4-14 | Version: 2.0...
-
Page 3: Table Of Contents
3 Product overview............................ 8 Structure ............................ 8 Name plate ............................ 9 4 Commissioning............................ 10 Transport and unpacking ......................... 10 Dimensions ............................ 12 Control cabinet installation ...................... 13 Connect battery pack........................ 16 5 Decommissioning............................ 18 6 Maintenance ............................. 21 7 Technical data............................ 22 8 Appendix .............................. 23 Service and support......................... 23 Approvals............................ 24 C9900-U332 Version: 2.0... - Page 4 Table of contents Version: 2.0 C9900-U332...
-
Page 5: Notes On The Documentation
Copyright © Beckhoff Automation GmbH & Co. KG. Publication of this document on websites other than ours is prohibited. Offenders will be held liable for the payment of damages. All rights reserved in the event of the grant of a patent, utility model or design. -
Page 6: For Your Safety
Exclusion of liability Beckhoff shall not be liable in the event of non-compliance with this documentation and thus the use of the battery packs outside the documented operating conditions. Description of safety symbols The following safety symbols are used in these operating instructions. -
Page 7: Fundamental Safety Instructions
• the operating instructions are in good condition and complete, and always available for reference at the location where the products are used. C9900-U332 Version: 2.0... -
Page 8: Product Overview
Product overview The battery pack C9900-U332 serves as energy storage for PCs with 24 V power supply unit and integrated UPS and continues to supply the PC with energy in the event of a power failure. It allows backing up the data to a hard disk or flash media (e.g. -
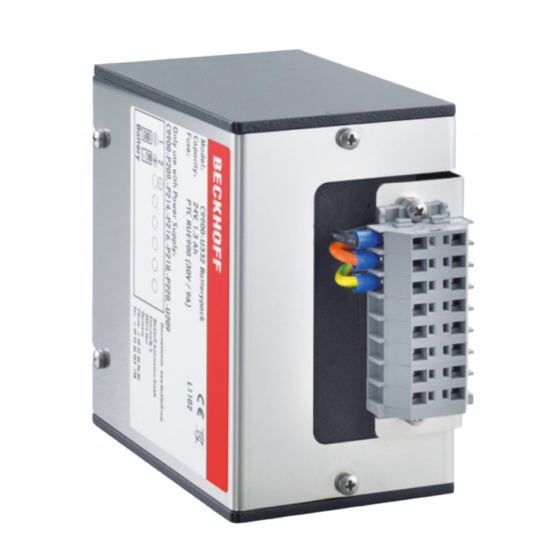
Page 9: Name Plate
Product overview Name plate The name plate provides information about the battery pack equipment. Fig. 2: C9900-U332_name plate Table 2: Key for C9900-U332 name plate Description Model Nominal capacity Internal resistance Fuse Revision Address of the vendor Coded production date Symbols Note: here are the symbols applicable to the battery pack such as CE, EAC, UKCA, . -
Page 10: Commissioning
1. Check the packaging for transport damage. 2. Remove packaging. 3. Keep the packaging for possible future transport. 4. Check your delivery for completeness by comparing it with your order. 5. Check the contents for visible shipping damage. Version: 2.0 C9900-U332... - Page 11 Commissioning 6. In case of discrepancies between the package contents and the order, or in case of transport damage, please inform Beckhoff Service (see Chapter 8.1 Service and support [} 23]). C9900-U332 Version: 2.0...
-
Page 12: Dimensions
Figure 5 shows the dimensions of the battery pack for horizontal mounting on the DIN rail. Fig. 5: C9900-U332_dimensions horizontal mounting Figure 6 shows the mounting template for mounting without DIN rail. 4x M4 Fig. 6: C9900_U332_mounting without DIN rail Version: 2.0 C9900-U332... -
Page 13: Control Cabinet Installation
Position the openings either on opposite walls or in the same wall at least 2 m apart. Control cabinet installation The battery pack C9900-U332 is designed for installation in control cabinets of machine and plant technology. The environmental conditions specified for operation must be observed (see chapter 7 Technical data [} 22]). -
Page 14: Fig. 7 C9900-U332_Conversion Mounting Plate
1. Place the battery pack on the DIN rail via the rear side (section A). 2. Tighten the four hexagon socket screws of the mounting notches (section B). ð You have installed the battery pack on the DIN rail. Fig. 9: C9900_U332_mounting on DIN rail Version: 2.0 C9900-U332... -
Page 15: Fig. 10 C9900-U332_Mounting Plate
1. Place the battery pack with the marked locations of the mounting plate (see Fig. 10) in front of the pre- pared drill holes. 2. Insert the M4 fastening screws into the drill holes. 3. Tighten the fastening screws. C9900-U332 Version: 2.0... -
Page 16: Connect Battery Pack
Terminal for looping through wires of the supply line to the PC You can connect two wires on each side of a terminal of the terminal strip. For this purpose, you must use double wire end sleeves (see Fig. 12). Version: 2.0 C9900-U332... -
Page 17: Fig. 12 C9900-U332_Double Wire End Sleeve
Battery Power 24 V 24 V DC ext. switch L max = 10 m 1,5 mm / AWG14 Power status UPS Output 24 V DC 24 V/3,4 Ah 30 V/9 A C9900-U332 battery pack Fig. 13: C9900-U332_wiring diagram C9900-U332 Version: 2.0... -
Page 18: Decommissioning
1. Hold the battery pack tightly so that it cannot fall down when the fastening screws are loosened. 2. Remove the fastening screws at the marked points (see Fig. 15). 3. Remove the battery pack from the control cabinet. Version: 2.0 C9900-U332... -
Page 19: Fig. 15 C9900-U332_Mounting Plate
5. Remove the two M3 x 10 screws and the clamp on the front of the battery pack (section E). 6. Pull the angle plate over the front from the housing (section F). Fig. 17: C9900-U332_removal angle plate C9900-U332 Version: 2.0... -
Page 20: Fig. 18 C9900-U332_Removal Of Batteries
You can then dispose of the components as follows: • Dispose of batteries properly. • Send plastic parts (polycarbonate, polyamide (PA6.6)) for plastics recycling. • Take the angle plate to the metal recycling collection point. Version: 2.0 C9900-U332... -
Page 21: Maintenance
• Detergents with scouring or abrasive components • Metal cleaning objects such as razor blades or steel spatulas Repair Only the manufacturer may repair the device. If a repair should be necessary, contact Beckhoff Service (see Chapter 9.1 Service and support [} 23]). C9900-U332... -
Page 22: Technical Data
Technical data Technical data Product designation C9900-U332 Dimensions (W x H x D) 68.7 x 106.6 x 143.8 mm Weight 2.4 kg Electrical data Nominal voltage: 24 V Capacity: 1.3 Ah (2022 change to 1.2 Ah) (discharge over 20 hours) -
Page 23: Appendix
Telephone: + 49 (0) 5246/963-0 Fax: + 49 (0) 5246/963-198 email: info@beckhoff.de The addresses of the worldwide Beckhoff subsidiaries and agencies can be found on our website at http:// www.beckhoff.com/. You will also find further documentation for Beckhoff components there. -
Page 24: Approvals
Appendix Approvals The device has the following approvals: • CE • EAC • UKCA You will find all other applicable approvals on the name plate of your device. Version: 2.0 C9900-U332... - Page 25 C9900-U332_double wire end sleeve..................Fig. 13 C9900-U332_wiring diagram ....................... Fig. 14 C9900-U332_disassembly from the DIN rail ................Fig. 15 C9900-U332_mounting plate....................... Fig. 16 C9900-U332_removal mounting plate ..................Fig. 17 C9900-U332_removal angle plate ....................Fig. 18 C9900-U332_removal of batteries....................C9900-U332 Version: 2.0...
- Page 26 List of tables List of tables Table 1 Key for C9900-U332 structure ..................... Table 2 Key for C9900-U332 name plate ....................Table 3 Pin assignment terminal strip....................... Version: 2.0 C9900-U332...
- Page 28 More Information: www.beckhoff.com/c9900-u332 Beckhoff Automation GmbH & Co. KG Hülshorstweg 20 33415 Verl Germany Phone: +49 5246 9630 info@beckhoff.com www.beckhoff.com...
Need help?
Do you have a question about the C9900-U332 and is the answer not in the manual?
Questions and answers