
Related Manuals for SHARE 6100 X-Port


Summary of Contents for SHARE 6100 X-Port
- Page 1 SHARE 6100 X-Port User Manual V2.2 2021.07 深圳赛尔智控科技有限公司 SHENZHEN SHAREUAV TECHNOLOGY Co., Ltd.
- Page 3 For update information, visit website http://www.shareuavtec.com/en and click on the product page for this product. Do Not allow people under the age of 18 to use the SHARE 6100 X-Port. Do Not modify or disassemble the SHARE 6100 X-Port. SHARE UAV accepts no liability for damage, injury or any legal responsibility incurred directly or indirectly from the use of this product.
-
Page 4: Table Of Contents
目录 1. Product Overview.........................2 1.1 6100X-port Introduction....................... 2 1.2 Features..........................2 1.3 In the box..........................3 1.4 Parameter..........................3 2. Installation............................. 4 2.1 Camera Introduction......................4 2.2 SkyPort installation....................... 5 2.3 Camera mounted to other aircraft..................6 2.4 Connect cable........................7 3. Camera Operation........................8 3.1 Power On..........................8 3.2 Take photo..........................9 3.3 Video recording........................10... -
Page 5: Product Overview
1. Product Overview SHARE 6100 X-Port camera with gimble is a surveying and mapping product equipped with 61 million pixel sensor and professional-grade surveying and mapping lens, with vertical angle as the main direction of image acquisition. At the same time, the use of the... -
Page 6: In The Box
Case Reader Cover Cover Cloth Cable absorber ball 2pcs 1.4 Parameter SHARE 6100 X-Port Power DC 13.6 ~ 48 V Duration Depend on UAV On/Off Auto On/Off Data copy Storage card, R/W via USB 3.0 card reader Storage 256 GB... -
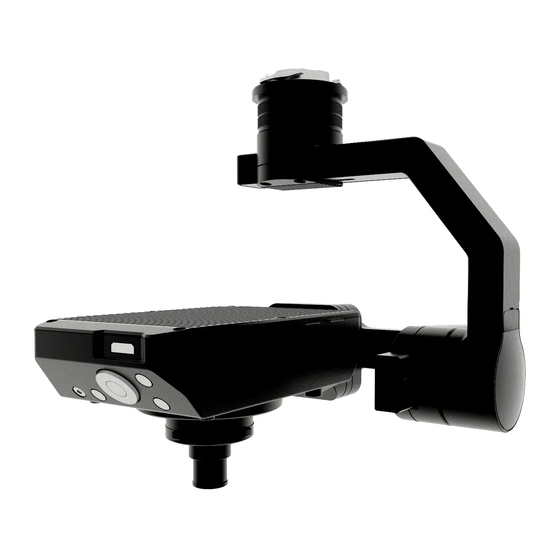
Page 7: Installation
Pic1 Interface Pic 1 shows the interface of the SHARE 6100 X-Port camera. Among them, HDMI is mini HDMI interface, TF is POS card slot, LED is camera working status indicator, SD1 is camera card slot1, J30J-15 is camera cable interface. -
Page 8: Skyport Installation
Pic2 SD card setting 2.2 SkyPort installation Installation steps: (1)Remove SkyPort cover of the drone, press and hold the release button; (2) Remove SkyPort cover of the camera, align the white point of the camera with the red point of the drone, and embed it in the installation position; (3)... -
Page 9: Camera Mounted To Other Aircraft
2.3 Camera mounted to other aircraft Pic4 Mounted to gimble Pic 5 Mounting holes at the bottom of the camera (1)The user needs to disassemble the gimble and camera with the screwdriver as shown in Pic 4, pull out the connection cable between the gimble and camera, and connect the camera and the aircraft with J30J-15P equipped to complete power supply and control;... -
Page 10: Connect Cable
2.4 Connect cable Pic6 J30J-15P J30J-15P Definition: Shutter and Hot PPS Pin TTL Pin Shoe Pin Power Pin Name J30J-15P C/A2547H-4 E/A2547H-5 XT30 D/A2510HM-3P- PIN1: Shutter Power Line PIN1&2:NC PIN2: Hot shoe Connect to 1-DC Functio PIN1:PPS PIN3:GND signal + Camera 13.6-48V PIN4:GND... -
Page 11: Camera Operation
3. Camera Operation 3.1 Power On 3.1.1 Power by DJI SkyPort, turn on automatically when drone is on Pic 7 Pilot ground station steps of power on: Mount the 6100X-port on the DJI drone, and make sure the installation is (1)... -
Page 12: Take Photo
16 -- single point solution 34 -- floating point solution 50 -- fixed solution Receive trigger The trigger times that camera should execute times camera received shutter times Actually shutter times of the camera RtkFlag, SD (4)During the startup of the camera, a time setting or camera setting interface will appear on the photo transmission interface. -
Page 13: Video Recording
Pic 9 DJI M300 RTK Pilot screen he left bottom window Take working with DJI M300RTK for example, camera is on, t shows the real-time image. As the indoor light is insufficient and the image is black. User can press the ‘photo’ button on controller to test the photo function. 3.3 Video recording 3.3.1 Operation Pic 10... - Page 14 3.3.2 Video file format Pic 11 The default video format of the camera is 1080P (XAVC S HD). Users can modify the video file format by remote control as required. 【 Attention 】 When the video file is set to 4K (XAVC S 4K) format, the camera image transmission will enter the black screen state! 3.3.2 Storage recording file XAVC S 4K and XAVC S HD formats are stored as .MP4 files, stored in:...
-
Page 15: Camera Setting
Open DJI Pilot – Mission Flight -- Create a Route -- Mapping -- Create a mapping area – Custom Camera – Add Camera – Camera Setting -- Overlap setting (2)SHARE 6100 X-Port parameter: Photo resolution (W) Sensor size (W) Focal length 9504px 35.7mm... - Page 16 Click the three points in the upper right corner of the screen and select Payload. On this screen, users can adjust the camera exposure mode, shutter speed, and switch on and off the camera. (3)Camera parameters Pic 14 As shown in Pic 14, in the camera image transfer interface, click the icon in the red frame①...
-
Page 17: Camera Repair
Copy the data, Remove the memory card from the camera, and put into USB 3.0 card reader, connect to computer, there are 3 D drive and GPS drive. 1. Open Share Data Manager, select the corresponding camera and aircraft model, and enter the home page;... -
Page 18: Camera Maintenance
Lens distortion has been checked and adjusted before dispatching. Please do not disassemble or alter the camera by yourself. Especially the camera lens. If you need to design or modify the camera to install and mount, please contact Share technical support. -
Page 19: After Sales
It is recommended to return the camera to Share for a paid replacement of the shutter, so as to avoid the impact of equipment strain on flight operations 12. -
Page 20: After Sales Service
Pic 16 6100X-port Case layout SHARE 6100 X-PortKeep the cover of the transport case upward, and do not place it upside down. Avoid severe vibration and turbulence during transportation. 5.2 After sales service (1) Hardware warranty terms: 1 year warranty since delivery. During the warranty period, Party B shall only undertake the delivery, maintenance and quality guarantee of Party A's goods within the territory of the People's Republic of China. - Page 22 Official Website YouTube FaceBook If you have any questions about the product Please contact us via email: INFO@SHAREUAVTEC.COM SHENZHEN SHARE UAV TECHNOLOGY CO.,LTD...
Need help?
Do you have a question about the 6100 X-Port and is the answer not in the manual?
Questions and answers