Table of Contents
Advertisement
Advertisement
Table of Contents

Related Manuals for Roland E-4


Summary of Contents for Roland E-4
- Page 1 E-4 (Version 1.02) Owner’s Manual...
-
Page 2: Table Of Contents
Table of contents Table of contents Replaying Recorded Audio from the Beginning (Restart) 30 Panel Descriptions ..............3 Swapping Inputted Notes by Step (SCATTER) ..... 31 Top Panel.................. 3 Rear Panel ................5 Adding Reverberation (REVERB) ........33 Configuring the Mic Input (MIC IN) ........6 Setting the Menu .............. -
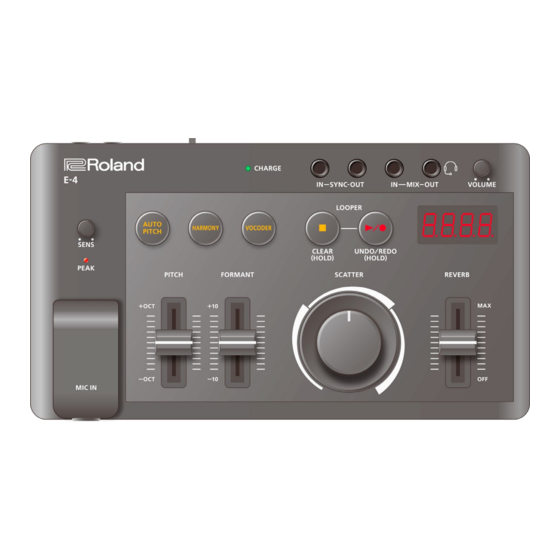
Page 3: Panel Descriptions
(lit): Charging. Green (lit): Charging is completed. Green orange (blinking): A charging error occurred. Please contact your dealer or a Roland customer service center. CHARGE indicator https://roland.cm/service When not charging via USB port: (lit):The remaining battery power is low. Charge the battery. - Page 4 Panel Descriptions * If an external device is connected to the SYNC IN jack, the unit synchronizes with the clocks inputted to the SYNC IN jack, regardless of the MIDI Clock Sync setting. * Use cables with stereo miniature phone type plugs to connect to/from the MIX IN/OUT jacks. Do not use cables with monaural mini phone type plugs, as these cables do not work.
-
Page 5: Rear Panel
Panel Descriptions Rear Panel A. [POWER] switch Turns the power on/off. B. USB port (USB Type-C ® Use a commercially available USB 2.0 cable (Type-A to C, or Type-C to C) to connect this port to your computer. This is used to transfer USB MIDI and USB audio data. * Do not use a USB cable that is designed only for charging. -
Page 6: Configuring The Mic Input (Mic In)
Configuring the Mic Input (MIC IN) Configuring the Mic Input (MIC IN) Preventing accidental sounds (LOW CUT FILTER) Move the [REVERB] slider while holding down the [AUTO PITCH] button. Value Explanation Sets the cutoff frequency of the low cut filter. 10, 25, 50, 100... - Page 7 Configuring the Mic Input (MIC IN) Reducing feedback (NOISE GATE) Move the [REVERB] slider while holding down the [HARMONY] button. Value Explanation Sets how much floor noise you want to reduce. OFF, -q, -18, -Inf...
-
Page 8: Correcting The Pitch (Auto Pitch)
Correcting the Pitch (AUTO PITCH) Correcting the Pitch (AUTO PITCH) This effect adjusts or corrects the pitch of your voice. Press the [AUTO PITCH] button to make it light up. AUTO PITCH turns on. This blinks when the “robot” setting is on. - Page 9 Correcting the Pitch (AUTO PITCH) Setting a fixed pitch for your voice (ROBOT) This sets how the pitch is corrected when the AUTO PITCH is on. Move the [PITCH] slider while holding down the [AUTO PITCH] button. When a setting besides “Auto” is selected, your voice changes to an uninflected robotic voice with a fixed pitch. Value Explanation Sets the voice at a fixed pitch two octaves lower.
- Page 10 Correcting the Pitch (AUTO PITCH) Setting the correction depth (AUTO PITCH DEPTH) This sets how much the pitch is corrected when the [AUTO PITCH] button is pressed thereafter. * This only works when “Auto” correction method is selected. Move the [FORMANT] slider while holding down the [AUTO PITCH] button.
- Page 11 Correcting the Pitch (AUTO PITCH) Setting the key and scale for pitch correction (KEY, SCALE) Move the [PITCH] slider while holding down the [HARMONY] button. This sets the key and scale to which the pitch is corrected when the [AUTO PITCH] button is pressed thereafter. When the method of pitch correction is set to “Auto”, the pitch is adjusted to the scale;...
-
Page 12: Adding Harmonies (Harmony)
Adding Harmonies (HARMONY) Adding Harmonies (HARMONY) This feature adds a harmony to your voice. Press the [HARMONY] button to make it light. This turns HARMONY on. - Page 13 Adding Harmonies (HARMONY) Setting the harmony key and scale (KEY, SCALE) Move the [PITCH] slider while holding down the [HARMONY] button. Value Explanation Sets the minor scale of the key you select. A N (Am)– AbN (Abm) Creates harmonies based on chromatic scale steps in fixed proportions, which are independent of the key ChrN (Chromatic) or scale.
- Page 14 Adding Harmonies (HARMONY) Setting the harmony type (HARMONY TYPE) Move the [FORMANT] slider while holding down the [HARMONY] button. The chord structure for each type is shown below. The values shown in parentheses apply when using minor scale settings. Value Voice 2 Voice 3 Voice 4...
-
Page 15: Using A Vocoder Voice To Alter The Sound (Vocoder)
Using a Vocoder Voice to Alter the Sound (VOCODER) Using a Vocoder Voice to Alter the Sound (VOCODER) This feature changes your voice to a vocoder voice. A vocoder is an effect that combines the sounds of a built-in synthesizer (carrier) with your voice input (modulator). Press the [VOCODER] button to make it light up. - Page 16 Using a Vocoder Voice to Alter the Sound (VOCODER) Setting the carrier waveform (WAVEFORM) Setting the carrier waveform changes the harmonic structure of the sound. Move the [FORMANT] slider while holding down the [VOCODER] button. Value Explanation Sawtooth wave with only a small amount of the fundamental frequency Saľ2 (Saw2)–Sa.49 (Saw49) Sawtooth wave Sa.50 (Saw50)–Saľ1 (Saw1)–Sq.49 (Square49)
- Page 17 Using a Vocoder Voice to Alter the Sound (VOCODER) Adding a chord (HARMONY) Press the [HARMONY] button. You can press the [HARMONY] button to add more carrier voices. You can also set the pitch of the carrier. Setting the carrier to a fixed pitch Ø...
- Page 18 Using a Vocoder Voice to Alter the Sound (VOCODER) Controlling the vocoder from an external device (KEY IN) Long-press the [AUTO PITCH] button, [HARMONY] button and [VOCODER] button at the same time to enter the menu. Press the [VOCODER] button to make it light up. “KEY.I”...
-
Page 19: Using The Looper
Using the Looper Using the Looper The looper is a feature that records your performance or what you say/sing into the mic, and plays this back over and over in a loop while letting you overdub new parts or just play back what you recorded. “Recording”... -
Page 20: Using The Looper As A Master External Device (Using The Internal Clock)
Using the Looper Using the Looper as a Master External Device (Using the Internal Clock) Recording audio input Press the [â/ó] (play/record) button. Recording starts when you press the button. If recording is already in progress, playback starts. “rEC” is displayed, and the [â/ó] (play/record) button lights up red (recording/overdubbing). To finish the recording, press the [â/ó] (play/record) button again. - Page 21 Using the Looper Stopping audio that’s playing back (or switching to standby) Press the [ð] (stop) button during playback. Playback stops when you press the button. The display indicates “STOP”.
- Page 22 Using the Looper Playing back recorded audio Record once, and then stop recording. Ø Recording audio input Press the [â/ó] (play/record) button when recording has stopped. Playback begins when you press the button. SYNC OUT clock returns to the beginning (when set to do so). During playback, the [â/ó] (play/record) button lights up and “PLAY”...
- Page 23 Using the Looper Layering audio recordings (overdub) Press the [â/ó] (play/record) button when playback or recording is stopped. Playback begins. The [â/ó] (play/record) button lights up green. Press the [â/ó] (play/record) button again. Recording starts when you press the button. During recording, the [â/ó] (play/record) button lights up red and “rEC”...
-
Page 24: Using The Looper In Sync With External Device Clocks
Using the Looper Using the Looper in Sync with External Device Clocks Recording audio input Press the [â/ó] (play/record) button. The unit enters record standby mode, and “rEC” blinks in the display. Recording starts when the next clock is inputted. During recording or overdubbing, “rEC”... - Page 25 Using the Looper Stopping audio that’s playing back (or switching to standby) Press the [ð] (stop) button during playback. The display indicates “STOP”, and playback stops when the next clock is inputted.
- Page 26 Using the Looper Playing back recorded audio Record once, and then stop recording. Press the [â/ó] (play/record) button when playback or recording is stopped. Playback starts when the next clock is inputted. During playing back, the [â/ó] (play/record) button blinks green and “PLAY” is displayed. How the looper’s state changes with the synchronization type The sync works differently depending on how the external device is connected.
-
Page 27: Setting The Clock Timing
Using the Looper Setting the Clock Timing The dot in the bottom right of the display appears when the unit is waiting for a clock timing from an external device. Press the [AUTO PITCH] button, [HARMONY] button and [VOCODER] button at the same time. Switches the unit to menu mode. -
Page 28: Erasing The Recorded Audio (Clear)
Using the Looper Erasing the Recorded Audio (Clear) Long-press the [ð] (stop) button. “CLr” blinks in the display. The data is cleared once you take your finger off the button. -
Page 29: Undoing/Reverting An Overdub (Undo/Redo)
Using the Looper Undoing/Reverting an Overdub (Undo/Redo) Long-press the [â/ó] (play/record) button. “UndO” or “rEdO” blinks in the display. The undo (or redo) operation is executed once you take your finger off the button. -
Page 30: Replaying Recorded Audio From The Beginning (Restart)
Using the Looper Replaying Recorded Audio from the Beginning (Restart) Hold down the [ð] (stop) button and press the [â/ó] (play/record) button during playback. The recorded audio plays back again from the beginning. -
Page 31: Swapping Inputted Notes By Step (Scatter)
Swapping Inputted Notes by Step (SCATTER) Swapping Inputted Notes by Step (SCATTER) The scatter effect swaps the loop playback for different steps, and then changes the playback direction and gate length to add a digital-type groove to the loop playback. Turn the [SCATTER] dial. - Page 32 Swapping Inputted Notes by Step (SCATTER) Setting the type for each slot You can set the type you want for each SCATTER slot. Operation Displayed value Explanation Selects the SLOT1 type. [AUTO PITCH] + [SCATTER] 1_1–1_19 [HARMONY] + [SCATTER] Selects the SLOT2 type. 2_1–2_19 [VOCODER] + [SCATTER] Selects the SLOT3 type.
-
Page 33: Adding Reverberation (Reverb)
Adding Reverberation (REVERB) Adding Reverberation (REVERB) Adjust the depth of the reverb with the [REVERB] slider. When turned off, reverb is not applied. - Page 34 Adding Reverberation (REVERB) Using effects other than reverb Move the [REVERB] slider while holding down the [VOCODER] button to select an effect. Value Explanation Adds reverberation. Rvb (Reverb) Adds an echoing sound. Echo (Echo) Repeats the sound of your voice in sync with the tempo. DIy (Delay) Adds a stereo feel to the sound.
-
Page 35: Setting The Menu
Setting the Menu Setting the Menu Press the [AUTO PITCH], [HARMONY] and [VOCODER] buttons at the same time. The unit enters menu mode. Use the buttons and sliders to make the settings. For details, refer to the parameters below. When you are finished, press the [AUTO PITCH], [HARMONY] and [VOCODER] buttons at the same time. System settings Item Controller... - Page 36 Setting the Menu Item Controller Value Explanation [REVERB] slider Sets which synchronization signal is used by this unit. Avto, Int, Avto (Auto): Inputted clocks are accepted. NIDI, USB (Auto, Int., MIDI, Int (Int): The unit operates according to its internal clock. USB) NIDI (MIDI): Only MIDI input is accepted.
-
Page 37: Connecting To A Computer Or Mobile Device
Connecting to a Computer or Mobile Device Connecting to a Computer or Mobile Device You can transmit and receive audio and MIDI data by connecting a USB cable from your computer or mobile device (smartphone or tablet) to this unit. You don’t need to install a device driver on your computer or other device to do this (the unit supports USB Audio Device Class 2.0 specs). -
Page 38: Restoring The Factory Default Settings (Factory Reset)
The [â/ó] (play/record) button button blinks. To cancel the factory reset, turn off the power. Press the [â/ó] (play/record) button button. The factory reset is executed. When all buttons are blinking, turn the power of the E-4 off and then on again. -
Page 39: Main Specifications
Main Specifications Main Specifications AUTO PITCH HARMONY VOCODER Effect Type PITCH FORMANT SCATTER REVERB LOOPER Maximum Recording Time Approximately 24 seconds Display 7 segments, 4 characters (LED) SYNC (IN, OUT) jacks: Miniature phone type MIX (IN, OUT) / HEADSET jacks: Stereo miniature phone type (Stereo, CTIA) Connectors MIDI (IN, OUT) jacks: Stereo miniature phone type MIC IN jack: Stereo phone type... -
Page 40: Signal Flow
Signal Flow Signal Flow... -
Page 41: Midi Implementation Chart
MIDI Implementation Chart MIDI Implementation Chart AIRA Compact Model:E-4 Date: Feb. 7, 2022 Version 1.02 Function Transmitted Recognized Remarks Basic Default Memorized Channel Changed 1–16 1–16 Mode Default Mode 3 Mode 3 Messages Altered Note 0–127 Number : True Voice ********** 0–127... - Page 42 MIDI Implementation Chart Owner’s Manual ©2022 Roland Corporation...
Need help?
Do you have a question about the E-4 and is the answer not in the manual?
Questions and answers