Chapters
Table of Contents

Related Manuals for V-ZUG GK41TG


Summary of Contents for V-ZUG GK41TG
- Page 1 V-ZUG Ltd GK41TG Gaskochfeld Gas hob Placa de cozinhar a gás Газовая варочная панель [de] Gebrauchsanleitung [en] Instruction manual [pt] Instruções de serviço [ru] Правила пользования...
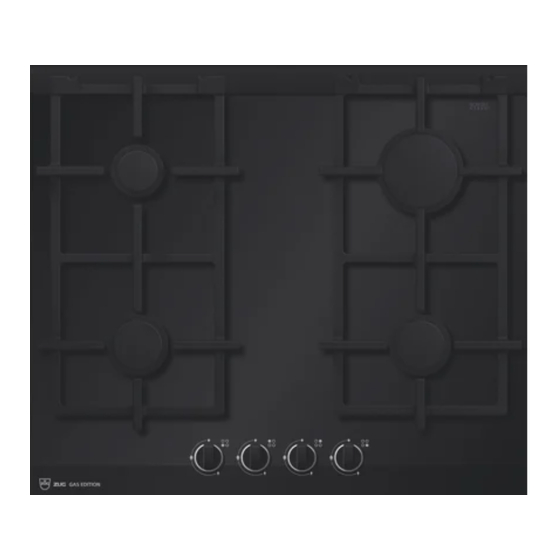
- Page 2 Rost Normalbrenner bis 1,9 kW Bedienknebel Schnellbrenner bis 2,8 kW " Sparbrenner bis 1,1 kW Pan supports Semi-rapid burner (up to 1.9 kW) Control knobs Rapid burner (up to 2.8 kW) " Auxiliary burner (up to 1.1 kW) Grelhas Queimador semi-rápido de até 1,9 kW Comandos Queimador rápido de até...
-
Page 3: Table Of Contents
Inhaltsverzeichnis Ø [ d e ] G e b r a u c h s a n l e i t u n g Sicherheitshinweise ..............3 Kochgefäße ................. 6 Geeignete Kochgefäße ..............6 Ihr neues Gerät ................5 Zubehör ....................5 Hinweise bei der Benutzung.............6 Gasbrenner .................5 Reinigung und Pflege .............. - Page 4 Gefahr der Verpuffung! Verletzungsgefahr! Bei Ansammlung von unverbranntem Gas Kochgefäße, die beschädigt sind, die nicht ■ in geschlossenen Räumen besteht Verpuf- die richtige Größe aufweisen, deren Rand fungsgefahr. Das Gerät nicht der Zugluft über das Kochfeld hinausragt oder die aussetzen. Die Brenner können sonst aus- schlecht aufgestellt sind, können schwere gehen.
-
Page 5: Ihr Neues Gerät
Ihr neues Gerät Zubehör Auf Seite 2 finden Sie eine Übersicht über Ihr Gerät sowie über die Leistung der Brenner. Je nach Modell sind beim Kochfeld folgende Zubehörteile inbe- griffen. Diese sind auch über den Kundendienst erhältlich. Zusatzrost Kaffeekocher Zur ausschließlichen Benut- zung auf dem Sparbrenner und mit Kochgefäßen, die einen kleineren Durchmesser... -
Page 6: Ausschalten Eines Brenners
Ausschalten eines Brenners Einige Sekunden nach Abschalten des Brenners ist ein dump- fes Geräusch zu hören. Dies ist normal und bedeutet, dass das Drehen Sie den betreffenden Bedienknebel nach rechts, bis die Sicherheitssystem deaktiviert wurde. Position 0 erreicht ist. Achten Sie auf höchste Sauberkeit. Bei verschmutzten Zündker- zen funktioniert das Anzünden nicht fehlerfrei. -
Page 7: Reinigung Und Pflege
Reinigung und Pflege Reinigung Achtung! Keine Dampfreiniger verwenden. Das Kochfeld kann dadurch ■ Ist das Gerät einmal abgekühlt, reinigen Sie es mit einem beschädigt werden. Schwamm, Wasser und Seife. Keine Scheuermittel, Metallschwämme, scharfen Gegen- ■ Reinigen Sie die Oberflächen der Brennereinzelteile nach jeder stände, Messer oder ähnliches verwenden, um angetrock- Benutzung und in kaltem Zustand. -
Page 8: Technischer Kundendienst
Störung Mögliche Ursache Lösung Der Brenner schaltet sich Sie haben den Bedienknebel nicht genügend Sobald der Brenner gezündet hat, den Bedienkne- sofort nach Loslassen des lange gedrückt. bel noch einige Sekunden gedrückt halten. Bedienknebels aus. Die Ritzen des Brenners sind verschmutzt. Ritzen des Brenners säubern. - Page 9 Table of contents Ú [ e n ] I n s t r u c t i o n m a n u a l Safety precautions ..............9 Cooking pans................12 Suitable pans ..................12 Your new appliance ..............11 Accessories ..................11 Precautions for use .................
- Page 10 read the instructions and warnings on the Risk of electric shock! operation of gas burners. Do not clean the appliance using steam ■ cleaners. Risk of poisoning! Cracks or breaks in the glass may carry The kitchen will become hot and humid and Risk of electric shock! ■...
- Page 11 Your new appliance Accessories Page 2 shows an overall view of your new appliance as well as the burner power. Depending on the model, the hob may include the following accessories. These can also be acquired from the Technical Assistance Service. Additional coffee maker support Only for use on the auxiliary...
- Page 12 Switching off a burner A few seconds after the burner is switched off, a sound (thud) will be produced. This is not a fault - this means that the safety Turn the corresponding control knob clockwise to the 0 setting. device is no longer operating.
- Page 13 Cleaning and maintenance Cleaning Caution! Do not use steam cleaners. This could damage the hob. ■ Once the appliance is cool, use a sponge to clean it with soap and water. Never use abrasive products, steel scourers, sharp ■ implements, knives, etc. to remove bits of hardened food After each use, clean the surface of the respective burner parts from the hob.
- Page 14 Technical Assistance Service When contacting our Technical Assistance Service, please soon as possible. For the warranty to be valid, the appliance provide the product number (E-Nr.) and production number must not have been tampered with, or used inappropriately. (FD) of the appliance. This information is given on the The applicable warranty conditions are those set out by the specifications plate located on the lower section of the hob and company's representative office in the country of purchase.
-
Page 15: Indicações De Segurança
Índice ì [ p t ] I n s t r u ç õ e s d e s e r v i ç o Indicações de segurança............15 Recipientes para cozinhados..........18 Recipientes apropriados ..............18 O novo aparelho ...............17 Acessórios..................17 Advertências para utilização............ - Page 16 Não deixe que as crianças brinquem com o Perigo de lesões! aparelho. Não permita a limpeza e Os recipientes que apresentem danos, ■ manutenção do aparelho pelo utilizador a com um tamanho inadequado, que crianças sem vigilância. ultrapassem as margens da placa de cozedura ou que estejam mal Perigo de deflagração! posicionados, podem provocar graves...
-
Page 17: O Novo Aparelho
O novo aparelho Acessórios Na página 2 encontra uma vista geral do seu aparelho, assim como a potência dos queimadores. Dependendo do modelo, a placa de cozedura pode incluir os seguintes acessórios. Estes também podem ser adquiridos junto do Serviço de assistência técnica. Grelha suplente para cafeteira Para utilizar exclusivamente... -
Page 18: Apagar Um Queimador
Apagar um queimador Alguns segundos depois de se apagar o queimador, emitir-se-á um som (som seco). Tal não é sinónimo de avaria, significa Rode o comando correspondente para a direita até à apenas que a segurança está desactivada. posição 0. Mantenha a limpeza máxima. -
Page 19: Limpeza E Manutenção
Limpeza e manutenção Limpeza Atenção! Não utilize máquinas de limpeza a vapor. Poderá danificar a ■ Deixe o aparelho arrefecer e limpe-o com uma esponja, água e placa de cozedura. detergente. Nunca utilize produtos abrasivos, esfregões de aço, objectos ■ Depois de cada utilização, limpe a superfície dos respectivos cortantes, facas, etc. -
Page 20: Serviço De Assistência Técnica
Anomalia Causa possível Solução Há um cheiro a gás na Está uma torneira aberta. Fechar as torneiras. cozinha. Acoplamento incorrecto da botija. Verificar se o acoplamento está correcto. Possível fuga de gás. Fechar a torneira geral de segurança, arejar o espaço onde se encontra e contactar imediata- mente um técnico de instalação autorizado para fazer a revisão e certificação da instalação. - Page 21 Оглавление î [ r u ] П р а в и л а п о л ь з о в а н и я Правила техники безопасности..........21 Посуда .................... 24 Подходящая посуда ................24 Ваша новая варочная панель ............ 23 Дополнительное...
- Page 22 знаниями о приборе, могут использовать Перегретый жир и масло легко ■ прибор только под присмотром или после возгораются. Не оставляйте подробного инструктажа и осознания всех нагревающийся жир или масло без опасностей, связанных с эксплуатацией присмотра. Если возгорание произошло, прибора. не заливайте огонь водой. Накройте сковороду...
- Page 23 Ваша новая варочная панель Дополнительное оборудование На странице 2 представлен внешний вид вашей варочной панели и указана мощность конфорок. В зависимости от модели, в комплекте с варочной панелью может поставляться следующее дополнительное оборудование. Его можно также приобрести в нашем сервисном центре. Дополнительная...
- Page 24 Выключение конфорки неисправности, а означает, что отключилась система газ- контроля. Поверните соответствующую ручку вправо до отметки 0. Содержите варочную панель в чистоте. Если свечи загрязнились, поджиг будет работать плохо. Периодически Уровни мощности очищайте их небольшой щеточкой с неметаллической щетиной. Ручки плавной регулировки позволяют отрегулировать нужную Имейте...
- Page 25 Очистка и уход Очистка и т. п. для устранения остатков пригоревшей пищи с поверхности варочной панели. Когда варочная панель остынет, протрите ее с помощью губки, Не пользуйтесь ножами, скребками и другими подобными ■ воды и мыла. инструментами для очистки стыка между стеклянной Каждый...
- Page 26 Неполадка Возможная причина Решение Сразу после отпускания Ручка не была удержана в нажатом состоянии в После зажигания пламени удержите ручку в нажа- ручки пламя на конфорке течение нужного времени. том состоянии в течение еще нескольких секунд. гаснет. Отверстия горелки загрязнены. Очистите...
- Page 27 ©V-ZUG Ltd, CH-6301 Zug 2014 V-ZUG Ltd Industriestrasse 66, CH-6301 Zug vzug@vzug.ch, www.vzug.com Cod. 9000802432 (B) J708.350-2...
Need help?
Do you have a question about the GK41TG and is the answer not in the manual?
Questions and answers