V-ZUG GK47TIMAS Operating Instructions Manual
Hide thumbs
Also See for GK47TIMAS:
- Operating instructions manual (48 pages) ,
- Installation instructions manual (12 pages) ,
- Installation instructions manual (9 pages)
Table of Contents
Advertisement
Quick Links
Advertisement
Table of Contents

Related Manuals for V-ZUG GK47TIMAS


Summary of Contents for V-ZUG GK47TIMAS
- Page 1 Operating instructions GK47TIMAS | GK47TIMPS Induction hob...
- Page 2 The product family (model number) corresponds to the first alphanumerics on the identification plate. These operating instructions apply to: Type Product family GK47TIMPSZ 31079 GK47TIMASC, GK47TIMASZ 31083 Variations depending on the model are noted in the text. © V-ZUG Ltd, CH-6301 Zug, 2017...
-
Page 3: Table Of Contents
Contents 1 Safety precautions 5 Symbols used ...................... 5 General safety precautions ................. 6 Appliance-specific safety precautions............... 7 Instructions for use .................... 7 2 Disposal 10 3 Using for the first time 11 4 Your appliance 12 Appliance overview..................... 12 Operating and display elements .............. 13 How induction hobs function ................ 14 Pan detection....................... 14 Flexible cooking .................... 14... - Page 4 9 Technical data 33 Product fiche...................... 33 10 Index 34 11 Notes 36 12 Service & Support 39...
-
Page 5: Safety Precautions
Safety precautions Symbols used Denotes important safety precautions. Failure to observe said precautions can result in injury or in damage to the appliance or fittings! Information and precautions that should be observed. Information on disposal Information about the operating instructions ▸... -
Page 6: General Safety Precautions
1 Safety precautions General safety precautions ▪ Read the operating instructions before using the appliance for the first time! ▪ This appliance can be used by children aged 8 and above and by persons with reduced physical, sensory or mental cap- abilities, or lack of experience and/or knowledge, provided they are supervised or have been instructed on the safe use of the appliance and have understood the hazards involved. -
Page 7: Appliance-Specific Safety Precautions
1 Safety precautions Appliance-specific safety precautions ▪ WARNING: If the surface has a crack running through the thickness of the material, switch the appliance off and discon- nect it from the mains to avoid possible electric shock. ▪ WARNING: The appliance and its accessible parts get hot during use. - Page 8 1 Safety precautions Correct use ▪ The appliance is designed for use in the home for preparing food. No liabil- ity is assumed for any damage caused by improper use or incorrect hand- ling. ▪ Any repairs, modifications or manipulations to the appliance, especially any electrically live parts, may only be carried out by the manufacturer, its Cus- tomer Services or a similarly qualified person.
- Page 9 1 Safety precautions Caution: Risk to life ▪ Packaging materials, e.g. plastic film and polystyrene, can be dangerous for children. Danger of suffocation! Keep packaging material away from chil- dren. How to avoid damaging the appliance ▪ In case of overheating, switch the hotplate off and allow it to cool down completely.
-
Page 10: Disposal
Disposal Packaging ▪ All packaging materials (cardboard, plastic film (PE) and polystyrene (EPS)) are marked and should be collected for recycling and disposed of in an en- vironmentally friendly way. Disconnection ▪ Disconnect the appliance from the mains. With a fixed appliance, this is to be carried out by a qualified electrician! Safety ▪... -
Page 11: Using For The First Time
Using for the first time The appliance must be installed and connected to the electricity sup- ply in accordance with the separate installation instructions. Have a qualified fitter/electrician carry out the necessary work. During the first few hours of use, a cooking zone can give off an un- pleasant smell. -
Page 12: Your Appliance
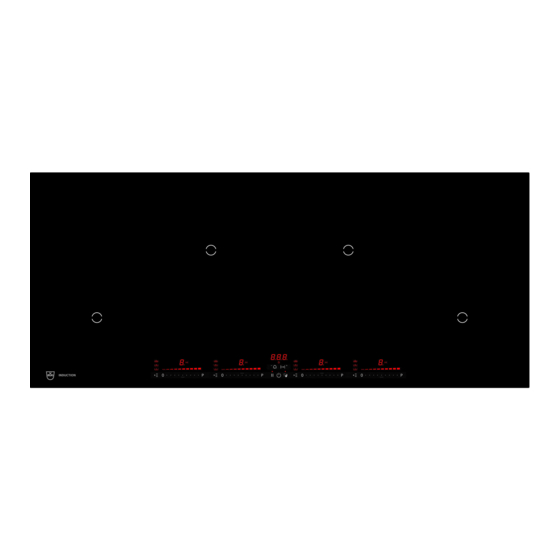
Your appliance Appliance overview GK47TIMPSZ ▪ 2 cooking zones ø 210 mm (back) ▪ 2 cooking zones ø 180 mm (front) GK47TIMASC, GK47TIMASZ ▪ 2 cooking zones ø 210 mm (back) ▪ 2 cooking zones ø 180 mm (front) -
Page 13: Operating And Display Elements
4 Your appliance Operating and display elements Never rest objects on the operating elements! This can cause damage to the appliance and unintended operating errors. Buttons Appliance ON/OFF Slider (for setting the power level) PowerPlus Wipe protection ON/OFF Pause cooking ON/OFF and Operating time / function as restore function plus button... -
Page 14: How Induction Hobs Function
4 Your appliance How induction hobs function Induction hobs work very differently from conventional hobs or hot plates. The induction coils under the glass ceramic plate produce a rapidly changing mag- netic field which directly heats up the magnetic base of the cookware. The glass ceramic plate is only warmed by the hot cookware. -
Page 15: Cookware
4 Your appliance Cookware Suitable cookware Only cookware with a full magnetic base is suitable for use with the induction hob. This can be checked in the follow ways: ▪ A magnet sticks anywhere on the base of the cookware. ▪... -
Page 16: Operating The Appliance
Operating the appliance Switching the appliance on and off All the appliances are operated in the same way. ▸ To switch the appliance on: Depress the button for 1 second. – flashes in all the power level displays. – If no other entry is made, the appliance switches off again after about 10 seconds for safety reasons. -
Page 17: Overview Of Power Levels
5 Operating the appliance Overview of power levels Power level Cooking method Melting Butter, chocolate, gelatine, sauces, approx. 40 °C Keep warm Keeps food warm, approx. 65 °C Simmering Water temperature stays below boiling point, approx. 94 °C Melting, gentle warming Butter, chocolate, gelatine, sauces Swelling Rice Continued cooking,... -
Page 18: Keep Warm Function
5 Operating the appliance Keep warm function The keep warm function keeps cooked food warm at approx. 65 °C. Switching the keep warm function on ▸ Touch the button 2×. – The symbol illuminates. – illuminates in the power level display. Switching the keep warm function off ▸... - Page 19 5 Operating the appliance Switching PowerPlus on ▸ Touch on the slider. – is illuminated in the display. – After 10 minutes, it automatically reverts to power level If the cookware is removed, PowerPlus is interrupted. PowerPlus con- tinues as soon as the cookware is placed back on the cooking zone. Ending PowerPlus before time ▸...
-
Page 20: Automatic Boost
5 Operating the appliance 5.10 Automatic boost Do not leave the hob unattended when using the automatic boost. Risk of boiling over, burning on and igniting! All the cooking zones are equipped with a selectable automatic boost. With this function, a cooking zone heats at power level for a certain length of time (see table). -
Page 21: Operating Time
5 Operating the appliance 5.11 Operating time Do not leave the hob unattended during use. Risk of boiling over, burning on and igniting! With the operating time function, a Cooking zone switches off automatically after a set time 1–99 min.. Setting the operating time ▸... - Page 22 5 Operating the appliance Switching the operating time function off before time ▸ Touch the button. ▸ Touch the slider for the required cooking zone. ▸ Touch the buttons at the same time. – flashes in the display. – The cooking zone continues to run. End of the operating time When the operating time is up –...
-
Page 23: Timer
5 Operating the appliance 5.12 Timer The timer functions like an egg timer (1–99 min.). It can be used at any time and independently of all other functions. Setting the timer ▸ Switch the appliance on. ▸ Touch the button. –... -
Page 24: Childproof Lock
5 Operating the appliance 5.13 Childproof lock The childproof lock is to prevent the appliance from being accidentally switched on. Switching the childproof lock on ▸ Switch the appliance on. Ensure all cooking zones are switched off. ▸ Touch the buttons at the same time. -
Page 25: Restore Function
5 Operating the appliance 5.14 Restore function If the appliance has been inadvertently switched off with the button, the set- tings can be restored within 6 seconds. ▸ Switch the appliance on. – The indicator light for the button flashes. ▸ Touch the button. -
Page 26: User Settings
User settings The following user settings can be set and stored individually: User setting Setting value Factory setting Acoustic signal loudness Medium High Acoustic signal No acoustic signal at end of Automatically off after operating time / 10 secs. timer Automatically off after 1 min. -
Page 27: Changing User Settings
6 User settings Changing user settings ▸ With the appliance switched off, simultaneously hold the but- tons depressed for 3 seconds. – An acoustic signal is emitted. ▸ Touch both sliders left of display 3. For appliances with only one slider, simply touch the available slider. -
Page 28: Care And Maintenance
Care and maintenance Clean the appliance only when it has completely cooled down. Risk of burns! Always clean the hob after use. This prevents food residue from burning on. Dried-on or burned-on food residue is harder to clean off. Use of improper cleaning techniques can result in damage to the markings or surface. - Page 29 7 Care and maintenance Cleaning For good results, follow these cleaning instructions. ▸ To clean thoroughly, remove most of the soiling using a hob scraper or a special cleaning sponge for glass ceramic hobs. ▸ Add a few drops of a suitable cleaning fluid to the cold hob surface and rub over the surface using kitchen towel or a clean cloth.
-
Page 30: Trouble-Shooting
Trouble-shooting What to do if … … the appliance is not working and all the displays are dark? Possible cause Solution ▪ The fuse or circuit breaker for ▸ Change the fuse. electrical installations in the ▸ Reset the circuit breaker. home is defective. - Page 31 8 Trouble-shooting flash alternately in the display? Possible cause Solution ▪ The automatic safety shut-off ▸ Switch the cooking zone back on again was triggered. if required. If a cooking zone has been running for longer without any settings be- ing changed, the appliance switches the cooking zone off automatic- ally, after how much time depends on the power level set.
- Page 32 8 Trouble-shooting … are illuminated in the display? Possible cause Solution ▪ An object (e.g. paper) ▸ Remove any objects in the drawer underneath the hob is underneath the hob. obstructing the air intake. ▸ Touch any button to cancel the error. ▸...
- Page 33 Technical data Product fiche In accordance with EU Regulation No. 66/2014 Model number GK 31079 Type designation GK GK47TIMPSZ Number of cooking zones Heating technology Induction cooking zone Diameter of round cooking zones Energy consumption per Wh/kg 173.8 192.8 191.7 177.1 cooking zone Energy consumption of...
- Page 34 Index Appliance Notes ............... 36 Switching on and off ...... 16 Appliance overview ........12 Appliance-specific safety Operating and display elements....13 precautions ..........7 Buttons .......... 13 Automatic boost ..........20 Displays.......... 13 Switching on........ 20 Operating time..........21 Changing ..........
- Page 35 10 Index Technical data ..........33 Technical questions........39 Timer ............... 23 Changing .......... 23 Ending before time...... 23 Setting .......... 23 Trouble-shooting ........... 30 Type..............2 User settings..........26 Changing .......... 27 Switching off before time .... 27 Using for the first time........11 Validity...............
- Page 36 Notes...
- Page 39 V‑ZUG service centre. Technical questions, accessories, warranty extensions V-ZUG is happy to help you with any general administrative or technical queries, to take your orders for accessories and spare parts and to inform you about our progressive ser- vice agreements.
- Page 40 To switch cooking zone off ▸ Touch on the slider. To switch appliance off Touch the button. 1021051-R04 V-ZUG Ltd, Industriestrasse 66, CH-6301 Zug Tel. +41 58 767 67 67, Fax +41 58 767 61 61 info@vzug.com, www.vzug.com Service Centre: Tel. 0800 850 850...
Need help?
Do you have a question about the GK47TIMAS and is the answer not in the manual?
Questions and answers