
Related Manuals for ZANKER KHRN383K


Summary of Contents for ZANKER KHRN383K
- Page 1 Benutzerinformation Kochfeld User Manual Notice d'utilisation Table de cuisson KHRN383K...
-
Page 2: Table Of Contents
BESUCHEN SIE UNSERE WEBSITE, UM: Anwendungshinweise, Prospekte, Informationen zu Fehlerbehebung, Service und Reparatur zu erhalten: www.zanker.de/support INHALTSVERZEICHNIS 1. SICHERHEITSHINWEISE.................2 2. SICHERHEITSANWEISUNGEN............... 4 3. MONTAGE......................7 4. GERÄTEBESCHREIBUNG................9 5. TÄGLICHER GEBRAUCH................10 6. TIPPS UND HINWEISE...................13 7. REINIGUNG UND PFLEGE................14 8. FEHLERSUCHE....................14 9. - Page 3 Jahren und Personen mit schweren Behinderungen oder Mehrfachbehinderung sollten vom Gerät ferngehalten werden, wenn sie nicht ständig beaufsichtigt werden. Kinder sollten beaufsichtigt werden, um sicherzustellen, • dass sie nicht mit dem Gerät. Halten Sie sämtliches Verpackungsmaterial von Kindern • fern und entsorgen Sie es ordnungsgemäß. WARNUNG: Das Gerät und die zugänglichen Geräteteile •...
-
Page 4: Sicherheitsanweisungen
oder an einen Schaltkreis angeschlossen werden, der vom einem Programm regelmäßig ein- und ausgeschaltet wird. ACHTUNG: Der Kochvorgang muss überwacht werden. Ein • kurzer Kochvorgang muss kontinuierlich überwacht werden. WARNUNG: Brandgefahr: Lagern Sie keine Gegenstände • auf den Kochflächen. Metallische Gegenstände wie Messer, Gabeln, Löffel und •... - Page 5 • Entfernen Sie das gesamte • Vergewissern Sie sich, dass das Gerät Verpackungsmaterial. ordnungsgemäß installiert ist. Lockere und • Montieren Sie ein beschädigtes Gerät unsachgemäße Kabel oder Stecker (falls nicht und benutzen Sie es nicht. vorhanden) können die Klemme • Halten Sie sich an die mitgelieferte überhitzen.
- Page 6 Kontaktöffnungsbreite von mindestens Gerät, auf dem Gerät oder in der Nähe 3 mm ausgeführt sein. des Geräts. 2.3 Gebrauch WARNUNG! Risiko von Schäden am Gerät. WARNUNG! • Stellen Sie kein heißes Kochgeschirr auf Verletzungs-, Verbrennungs- und das Bedienfeld. Stromschlaggefahr. • Legen Sie keine heißen Topfdeckel auf die Glasoberfläche des Kochfeldes.
-
Page 7: Montage
Betriebszustand des Gerätes anzeigen. • Informationen zur Entsorgung des Geräts Sie sind nicht für den Einsatz in anderen erhalten Sie von Ihrer Geräten vorgesehen und nicht für die Gemeindeverwaltung. Raumbeleuchtung geeignet. • Trennen Sie das Gerät von der Stromversorgung. 2.6 Entsorgung •... - Page 8 3.5 Aufbau R 5mm min. min. 500mm 50mm min. 55mm min. 12 mm min. 28 mm min. 20 mm DEUTSCH...
-
Page 9: Gerätebeschreibung
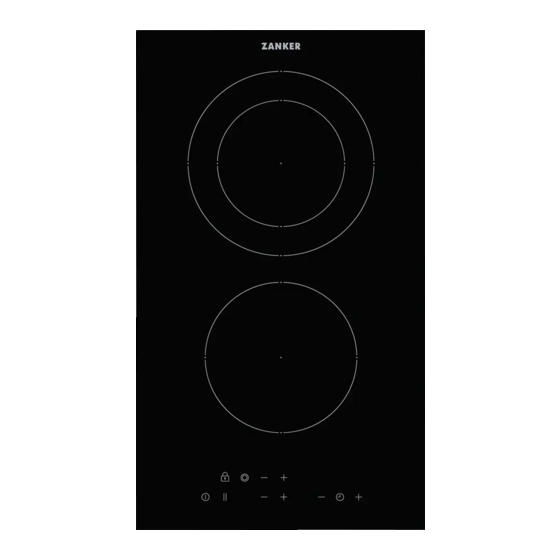
3.6 Montage mehrerer Kochfelder 490 mm min. 500 mm 270 mm 4. GERÄTEBESCHREIBUNG 4.1 Anordnung der Kochflächen Kochzone Bedienfeld 120/180 120/180 145 mm 4.2 Bedienfeldlayout Bedienen Sie das Gerät über die Sensorfelder. Die Anzeigen, Kontrolllampen und akustischen Signale informieren Sie über die aktiven Funktionen. Sensor‐... -
Page 10: Täglicher Gebrauch
Sensor‐ Funktion Kommentar feld Verriegelung / Kindersiche‐ Verriegeln / Entriegeln des Bedienfelds. rung Pause Ein- und Ausschalten der Funktion. Ein- und Ausschalten des äußeren Kreises. Kochstufenanzeige Zeigt die Kochstufe an. Kochzonen-Anzeigen des Zeigt an, für welche Kochzone die Zeit eingestellt Timers wurde. - Page 11 5.2 Automatische Abschaltung Restwärmegrad der Kochzonen an, die Sie gerade verwenden. Mit dieser Funktion wird das Kochfeld in Die Anzeige kann ebenso erscheinen: folgenden Fällen automatisch • für die benachbarten Kochzonen, auch ausgeschaltet: wenn Sie sie nicht benutzen, • Alle Kochzonen sind ausgeschaltet, •...
- Page 12 Ausschalten der Funktion: Berühren Sie Die vorherige Heizstufe wird aktiviert. , um die Kochzone auszuwählen und 5.8 Verriegelung berühren Sie dann . Die verbleibende Zeit zählt rückwärts bis 00. Die Kontrolllampe der Sie können das Bedienfeld sperren, wenn Kochzone erlischt. Kochzonen eingeschaltet sind.
-
Page 13: Tipps Und Hinweise
5.10 OffSound Control (Ein- und Ihre Einstellungen werden übernommen, Ausschalten des Signaltons) sobald das Kochfeld automatisch ausgeschaltet wird. Schalten Sie das Kochfeld aus. Berühren Sie Haben Sie die Funktion auf eingestellt, 3 Sekunden lang. Das Display wird ein- ertönt der Signalton nur in folgenden Fällen: und ausgeschaltet. -
Page 14: Reinigung Und Pflege
Kochstufe Verwendung für: Dauer Tipps (Min.) 4 - 5 Kartoffeln dünsten. 20 - 60 Max. ¼ l Wasser für 750 g Kartof‐ feln verwenden. 4 - 5 Kochen Sie größere Mengen an Le‐ 60 - Bis zu 3 l Flüssigkeit plus Zutaten. bensmitteln, Eintopfgerichten und Suppen. - Page 15 8.1 Was zu tun ist, wenn ... Störung Mögliche Ursache Problembehebung Das Kochfeld kann nicht ein‐ Das Kochfeld ist nicht oder nicht Prüfen Sie, ob das Kochfeld ord‐ geschaltet oder bedient wer‐ ordnungsgemäß an die Span‐ nungsgemäß an die Spannungsver‐ den.
-
Page 16: Technische Daten
Störung Mögliche Ursache Problembehebung Das Bedienfeld fühlt sich heiß Das Kochgeschirr ist zu groß oder Stellen Sie großes Kochgeschirr Sie legen es zu nah an das Be‐ nach Möglichkeit auf die hinteren dienfeld. Kochzonen. Es ertönt kein Signalton, wenn Der Ton ist ausgeschaltet. Schalten Sie den Ton ein. -
Page 17: Energieeffizienz
Sie diesen Teil (falls Gebrauchsanleitung. vorhanden). B. Kleben Sie ihn auf die Garantiekarte und behalten Sie diesen Teil (falls vorhanden). 10. ENERGIEEFFIZIENZ 10.1 Produktinformationen* Modellbezeichnung KHRN383K Kochfeldtyp Einbau-Kochfeld Anzahl der Kochfelder Heiztechnik Strahlungsbeheizung Durchmesser der kreisförmigen Kochfelder (Ø) Vorne mittig 14,5 cm... -
Page 18: Informationen Zur Entsorgung
Energieverbrauch pro Kochfeld (EC electric coo‐ Vorne mittig 188,0 Wh/kg king) Mitte hinten 191,6 Wh/kg Energieverbrauch des Kochfelds (EC electric hob) 189,8 Wh/kg * Für die Europäische Union gemäß EU- • Legen Sie nach Möglichkeit immer Deckel Richtlinie EU 66/2014. Für Weißrussland auf das Kochgeschirr. - Page 19 Rücknahmepflichten der Vertreiber dorthin geliefert wird; in diesem Fall ist die (Folgende Hinweise gelten ergänzend in Abholung des Altgerätes für den Endnutzer Deutschland) kostenlos. Wer auf mindestens 400 m² Verkaufsfläche Die vorstehenden Pflichten gelten auch für Elektro- und Elektronikgeräte vertreibt oder den Vertrieb unter Verwendung von sonst geschäftlich an Endnutzer abgibt, ist Fernkommunikationsmitteln, wenn die...
-
Page 20: Safety Information
VISIT OUR WEBSITE TO: Get usage advice, brochures, trouble shooter, service and repair information: www.zanker.de/support CONTENTS 1. SAFETY INFORMATION.................20 2. SAFETY INSTRUCTIONS................22 3. INSTALLATION....................24 4. PRODUCT DESCRIPTION................26 5. DAILY USE...................... 27 6. HINTS AND TIPS.................... 30 7. CARE AND CLEANING...................31 8. - Page 21 Keep all packaging away from children and dispose of it • appropriately. WARNING: The appliance and its accessible parts become • hot during use. Keep children and pets away from the appliance when in use and when cooling down. If the appliance has a child safety device, it should be •...
-
Page 22: Safety Instructions
Do not use the appliance before installing it in the built-in • structure. Do not use a steam cleaner to clean the appliance. • If the glass ceramic surface / glass surface is cracked, • switch off the appliance and unplug it from the mains. In case the appliance is connected to the mains directly using junction box, remove the fuse to disconnect the appliance from power supply. - Page 23 • Make sure that the parameters on the • Remove all the packaging, labelling and rating plate are compatible with the protective film (if applicable) before first electrical ratings of the mains power use. supply. • Make sure that the ventilation openings •...
-
Page 24: Installation
scratches on the glass / glass ceramic. These lamps are intended to withstand Always lift these objects up when you extreme physical conditions in household have to move them on the cooking appliances, such as temperature, surface. vibration, humidity, or are intended to signal information about the operational 2.4 Care and cleaning status of the appliance. - Page 25 3.5 Assembly R 5mm min. min. 500mm 50mm min. 55mm min. 12 mm min. 28 mm min. 20 mm ENGLISH...
-
Page 26: Product Description
3.6 Installation of more than one hob 490 mm min. 500 mm 270 mm 4. PRODUCT DESCRIPTION 4.1 Cooking surface layout Cooking zone Control panel 120/180 120/180 145 mm 4.2 Control panel layout Use the sensor fields to operate the appliance. The displays, indicators and sounds tell which functions operate. -
Page 27: Daily Use
Sensor Function Comment field Lock / Child Safety Device To lock / unlock the control panel. Pause To activate and deactivate the function. To activate and deactivate the outer ring. Heat setting display To show the heat setting. Timer indicators of cooking To show for which zone you set the time. - Page 28 5.2 Automatic Switch Off • when hot cookware is placed on cold cooking zone, The function deactivates the hob • when the hob is deactivated but the automatically if: cooking zone is still hot. • all cooking zones are deactivated, The indicator disappears when the cooking •...
- Page 29 • Minute Minder You can use this function when the hob is When you deactivate the hob, you activated and the cooking zones do not also deactivate this function. operate. The heat setting display shows 5.9 Child Safety Device To activate the function: touch and then This function prevents an accidental touch...
-
Page 30: Hints And Tips
6. HINTS AND TIPS WARNING! Cookware made of enamelled steel and with aluminium or copper bottoms Refer to Safety chapters. can cause a colour change on the glass- ceramic surface. 6.1 Cookware • The bottom of the cookware must be as 6.2 Examples of cooking applications thick and flat as possible. -
Page 31: Care And Cleaning
7. CARE AND CLEANING otherwise, the dirt can cause damage to WARNING! the hob. Take care to avoid burns. Use a special hob scraper on the glass surface Refer to Safety chapters. at an acute angle and move the blade on the surface. - Page 32 Problem Possible cause Remedy You can hear a constant beep The electrical connection is incor‐ Disconnect the hob from the electri‐ noise. rect. cal supply. Ask a qualified electri‐ cian to check the installation. An acoustic signal sounds and You put something on one or Remove the object from the sensor the hob deactivates.
-
Page 33: Technical Data
information about guarantee period and Authorised Service Centres are in the guarantee booklet. 9. TECHNICAL DATA 9.1 Cooking zones specification Nominal Power (Max heat setting) Cooking zone Cooking zone diameter [mm] Middle front 1200 Middle rear 700 / 1700 120 / 180 For optimal cooking results use cookware no larger than the diameter of the cooking zone. -
Page 34: Energy Efficiency
10. ENERGY EFFICIENCY 10.1 Product information* Model identification KHRN383K Type of hob Built-In Hob Number of cooking zones Heating technology Radiant Heater Diameter of circular cooking zones (Ø) Middle front 14.5 cm Middle rear 18.0 cm Energy consumption per cooking zone (EC elec‐... -
Page 35: Informations De Sécurité
VISITEZ NOTRE SITE WEB POUR : Obtenir des conseils d’utilisation, des brochures, un dépanneur, des informations sur le service et les réparations : www.zanker.de/support TABLE DES MATIÈRES 1. INFORMATIONS DE SÉCURITÉ..............35 2. CONSIGNES DE SÉCURITÉ................37 3. INSTALLATION....................40 4. - Page 36 et complexe doivent être tenus à l'écart de l’appareil, à moins d'être surveillés en permanence. Veillez à ce que les enfants ne jouent pas avec l’appareil. • Ne laissez pas les emballages à la portée des enfants et • jetez-les convenablement. AVERTISSEMENT : L'appareil et ses parties accessibles •...
-
Page 37: Consignes De Sécurité
comme un minuteur, ou branché à un circuit qui est régulièrement activé/désactivé par un fournisseur d'énergie. ATTENTION : Toute cuisson doit être surveillée. Une • cuisson courte doit être surveillée en permanence. AVERTISSEMENT : Risque d'incendie : N'entreposez rien • sur les surfaces de cuisson. - Page 38 • Suivez scrupuleusement les instructions • Ne laissez pas le câble d’alimentation d'installation fournies avec l'appareil. électrique s’emmêler. • Respectez l'espacement minimal requis • Assurez-vous qu'une protection contre les par rapport aux autres appareils et chocs est installée. éléments. • Installé le collier anti-traction sur le câble. •...
- Page 39 • Assurez-vous que les orifices d'aération • Ne placez pas de feuilles d’aluminium sur ne sont pas obstrués. l’appareil. • Ne laissez pas l'appareil sans surveillance • Les récipients de cuisson en fonte, en durant son fonctionnement. aluminium ou dont le fond est endommagé •...
-
Page 40: Installation
3. INSTALLATION • Pour remplacer le câble d'alimentation AVERTISSEMENT! endommagé, utilisez le type de câble suivant : H05V2V2-F qui supporte une Reportez-vous aux chapitres concernant température de 90 °C ou plus. Contactez la sécurité. un service après-vente agréé. Le câble de raccordement ne peut être remplacé... - Page 41 min. 12 mm min. 28 mm min. 20 mm 3.6 Installation de plusieurs tables de cuisson 490 mm min. 500 mm 270 mm FRANÇAIS...
-
Page 42: Description De L'appareil
4. DESCRIPTION DE L'APPAREIL 4.1 Agencement des zones de cuisson Zone de cuisson Bandeau de commande 120/180 120/180 145 mm 4.2 Configuration du bandeau de commande Les touches sensitives permettent de faire fonctionner l'appareil. Les affichages, les voyants et les signaux sonores indiquent les fonctions activées. Touche Fonction Commentaire... -
Page 43: Utilisation Quotidienne
Touche Fonction Commentaire sensitive Affichage du minuteur Pour indiquer la durée, en minutes. Pour choisir la zone de cuisson. Pour augmenter ou diminuer la durée. Pour sélectionner un niveau de cuisson. 4.3 Affichage du niveau de cuisson Afficheur Description La zone de cuisson est désactivée. La zone de cuisson est activée. - Page 44 Pour activer la bague extérieure : touchez le symbole. L’indicateur apparaît. Niveau de cuisson La table de cuisson s'éteint au bout de Pour désactiver la sonnerie extérieure : appuyez sur le symbole jusqu’à ce que 6 heures l’indicateur disparaisse. , 1 - 2 5.6 Minuteur 3 - 4 5 heures...
- Page 45 5.9 Dispositif de sécurité enfant minuteur pour régler la durée. Lorsque le temps est écoulé, un signal sonore retentit et Cette fonction permet d'éviter une utilisation 00 clignote. involontaire de la table de cuisson. Pour arrêter le signal sonore : appuyez sur Pour activer la fonction : activez la table de cuisson avec .
-
Page 46: Conseils
6. CONSEILS AVERTISSEMENT! Les récipients de cuisson avec un fond en émail, en aluminium ou en cuivre Reportez-vous aux chapitres concernant peuvent laisser des traces sur la surface la sécurité. vitrocéramique. 6.1 Récipients de cuisson 6.2 Exemples en matière de cuisson •... -
Page 47: Entretien Et Nettoyage
Réglages de Utilisez pour : Durée Conseils la températu‐ (min) Faire bouillir de l’eau, cuire des pâtes, saisir de la viande (goulasch, bœuf braisé), cuire des frites. 7. ENTRETIEN ET NETTOYAGE sucre et les aliments contenant du sucre, AVERTISSEMENT! car la saleté peut endommager la table de cuisson. - Page 48 Problème Cause possible Solution Le fusible a disjoncté. Assurez-vous que le fusible est la cause du dysfonctionnement. Si les fusibles disjonctent de manière ré‐ pétée, faites appel à un électricien qualifié. Vous ne réglez pas le niveau de Mettez de nouveau en fonctionne‐ cuisson dans les 10 secondes.
-
Page 49: Caractéristiques Techniques
Problème Cause possible Solution Le bandeau de commande de‐ L’ustensile est trop grand ou vous Placez les récipients de grande tail‐ vient chaud au toucher. le placez trop près du bandeau de le sur les zones de cuisson arrière, commande. si possible. -
Page 50: Rendement Énergétique
B. Collez-la sur la carte de garantie et conservez cette partie (le cas échéant). 10. RENDEMENT ÉNERGÉTIQUE 10.1 Informations produits* Identification du modèle KHRN383K Type de table de cuisson Table de cuisson encas‐ trable Nombre de zones de cuisson Technologie de chauffage Radiant Diamètre des zones de cuisson circulaires (Ø) -
Page 51: Matière De Protection De L'environnement
* Pour l’Union européenne conformément au • Dans la mesure du possible, placez Règlement UE 66/2014. Pour la Biélorussie toujours les couvercles sur les récipients conformément à la norme STB 2477-2017, de cuisson. annexe A. Pour l’Ukraine conformément à la •... - Page 52 867373641-A-092022...
Need help?
Do you have a question about the KHRN383K and is the answer not in the manual?
Questions and answers