
Subscribe to Our Youtube Channel
Related Manuals for ZANKER KEI6440XXK


Summary of Contents for ZANKER KEI6440XXK
- Page 1 Gebruiks- Notice Benutzer- User manual aanwijzing d'utilisation information Table de cuis- Kookplaat Kochfeld KEI6440XXK...
-
Page 2: Table Of Contents
Inhoud Veiligheidsinformatie _ _ _ _ _ _ _ _ _ _ _ _ _ _ _ _ _ 2 Onderhoud en reiniging _ _ _ _ _ _ _ _ _ _ _ _ _ _ _ 10 Veiligheidsvoorschriften _ _ _ _ _ _ _ _ _ _ _ _ _ _ _ 3 Probleemoplossing _ _ _ _ _ _ _ _ _ _ _ _ _ _ _ _ _ 11 Beschrijving van het product _ _ _ _ _ _ _ _ _ _ _ _ _ 5 Montage _ _ _ _ _ _ _ _ _ _ _ _ _ _ _ _ _ _ _ _ _ _ 12... -
Page 3: Veiligheidsvoorschriften
• Zonder toezicht koken op een kookplaat met vet of olie kan gevaarlijk zijn en brandgevaar opleveren. • Probeer brand nooit met water te blussen, maar schakel in plaats daarvan het apparaat uit en bedek de vlam, d.w.z. met een deksel of blusdeken. •... - Page 4 • Zorg ervoor dat het apparaat correct is geïnstalleerd. • Gebruikers met een pacemaker moeten een afstand Losse en onjuiste stroomkabels of stekkers (indien van minimaal 30 cm bewaren van de inductiekook- van toepassing) kunnen ervoor zorgen dat de con- zones als het apparaat in werking is.
-
Page 5: Beschrijving Van Het Product
Verwijdering • Haal de stekker uit het stopcontact. • Snijd het netsnoer van het apparaat af en gooi dit Waarschuwing! Gevaar voor letsel of verstikking. weg. • Neem contact met uw plaatselijke overheid voor in- formatie m.b.t. correcte afvalverwerking van het ap- paraat. -
Page 6: Dagelijks Gebruik
Tiptoets Functie Een kookstanddisplay De kookstand weergeven. Timerindicatie van de kookzone. Geeft aan voor welke zone u de tijd instelt. Het timerdisplay. Geeft de tijd in minuten weer. Het verhogen of verlagen van de kookstand. De tijd verlengen of verkorten. Kookzone instellen. - Page 7 • U een kookzone niet uitschakelt of de kookstand ver- andert. Na enige tijd gaat branden en wordt het apparaat uitgeschakeld. Zie hieronder. • De verhouding tussen warmte-instelling en tijden van de automatische uitschakelingsfunctie: • — 6 uur • — 5 uur •...
-
Page 8: Nuttige Aanwijzingen En Tips
Stel de timer in nadat u de kookzone hebt geselec- Stel eerst de kookstand in. teerd. Raak om deze functie te starten aan. Het symbool U kunt de kookstand vóór of na het instellen van de ti- verschijnt gedurende vier seconden. mer selecteren. - Page 9 Een pan is geschikt voor een inductiekookplaat Energie besparen als… • Doe indien mogelijk altijd een deksel op het kookge- • ... een beetje water op de hoogste kookstand binnen rei. korte tijd wordt verwarmd. • Zet het kookgerei op de kookzone voordat u deze in- •...
-
Page 10: Onderhoud En Reiniging
Ver- Gebruik om: Tijd Tips Nominaal war- stroomverbruik ming stan 3 - 4 Stomen van groenten, vis en 20 - 45 min Enkele eetlepels vloeistof toe- 10 – 15 % vlees voegen 4 - 5 Aardappelen stomen 20 - 60 min Gebruik max. -
Page 11: Probleemoplossing
Probleemoplossing Probleem Mogelijke oorzaak Oplossing U kunt het apparaat niet inschake- Schakel het apparaat opnieuw in en len of bedienen. stel de kookstand binnen 10 secon- den in. U hebt twee of meer tiptoetsen te- Raak slechts één tiptoets tegelijk gelijk aangeraakt. -
Page 12: Montage
Probleem Mogelijke oorzaak Oplossing Er is een storing opgetreden in het Schakel het apparaat uit. Verwijder gaat branden. apparaat, omdat er kookgerei is het hete kookgerei. Schakel na on- drooggekookt. De oververhittings- geveer 30 seconden de kookzone beveiliging voor de kookzones en opnieuw in. - Page 13 Montage min. 500mm min. 50mm min. min. 2 mm min. 2 mm > 20 mm < 20 mm min. 500 mm min. 500 mm 30 mm 12 mm 57 mm 12 mm 57 mm 28 mm 41 mm 28 mm 41 mm 38 mm 31 mm...
- Page 14 min. 12 mm min. R 5mm 2 mm min. 55mm min. 38 mm min. 2 mm...
-
Page 15: Technische Informatie
1) De beveiligingsdoos is als toebehoren niet in elk land verkrijgbaar. Neem contact op met uw plaatselijke leverancier. Technische informatie Modell KEI6440XXK Prod.Nr. 949 594 331 01 Typ 58 GAD D5 AU 220 - 240 V 50 - 60 Hz... - Page 16 De verpakkingsmaterialen zijn milieuvriendelijk en informatie over het recyclen van dit product, kunt u herbruikbaar De kunststof onderdelen zijn gemar- contact opnemen met de gemeente, de keerd, bijv.: >PE<,>PS<, enz. Gooi het verpakkingsma- gemeentereiniging of de winkel waar u het product hebt teriaal weg in de juiste afvalcontainer bij uw plaatselijke gekocht.
-
Page 17: Safety Information
Contents Safety information _ _ _ _ _ _ _ _ _ _ _ _ _ _ _ _ _ 17 Care and cleaning _ _ _ _ _ _ _ _ _ _ _ _ _ _ _ _ _ 24 Safety instructions _ _ _ _ _ _ _ _ _ _ _ _ _ _ _ _ _ 18 Troubleshooting _ _ _ _ _ _ _ _ _ _ _ _ _ _ _ _ _ _ _ 25 Product description _ _ _ _ _ _ _ _ _ _ _ _ _ _ _ _ _ 20... -
Page 18: Safety Instructions
• Never try to extinguish a fire with water, but switch off the appliance and then cover flame e.g. with a lid or a fire blanket. • Do not store items on the cooking surfaces. • Do not use a steam cleaner to clean the appliance. •... - Page 19 the mains at all poles. The isolation device must • Do not put flammable products or items that are wet have a contact opening width of minimum 3 mm. with flammable products in, near or on the appliance. • Use only correct isolation devices: line protecting •...
-
Page 20: Product Description
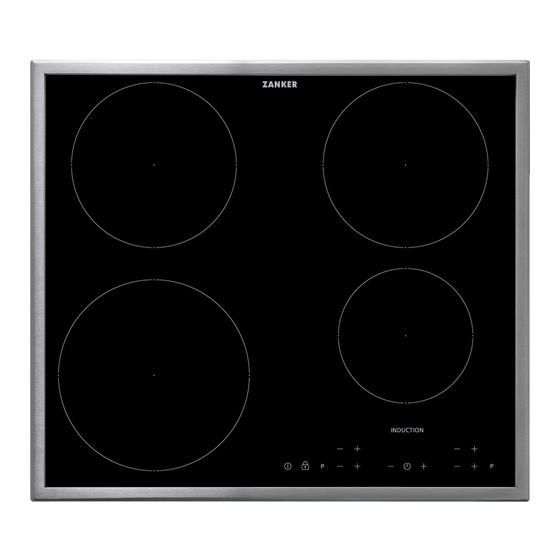
Product description General overview Induction cooking zone 180 mm 180 mm Induction cooking zone Induction cooking zone 145 mm 210 mm Control panel Induction cooking zone Control panel layout Use the sensor fields to operate the appliance. The displays, indicators and sounds tell which functions operate. -
Page 21: Daily Use
Sensor field Function To select a cooking zone. Heat setting displays Display Description The cooking zone is deactivated. The Keep Warm function operates. The cooking zone operates. The Automatic Heat-up function operates. The cookware is incorrect or too small, or there is no cookware on the cooking zone. - Page 22 power function increases the power to the maximum setting. Touch at the same time to deacti- level for one cooking zone in the pair. The power in the vate the cooking zone. second cooking zone automatically decreases. The Automatic Heat Up heat setting display for the reduced zone changes be- You can get a necessary heat setting in a shorter time if tween two levels.
-
Page 23: Helpful Hints And Tips
Lock • Touch for 4 seconds. The symbol comes on. When the cooking zones operate, you can lock the con- • Deactivate the appliance with trol panel, but not . It prevents an accidental change To deactivate The Child Safety Device of the heat setting. -
Page 24: Care And Cleaning
generated by the cooking zone. For the minimum diam- It means that the cooking zone with the medium heat eters see the Technical Information chapter. setting uses less than a half of its power. The Examples of cooking applications The data in the table is for guidance only. The relation between the heat setting and the cooking zone consumption of power is not linear. -
Page 25: Troubleshooting
glass surface at an acute angle and move the Clean the appliance with a moist cloth and some blade on the surface . detergent. – Remove after the appliance is sufficiently At the end rub the appliance dry with a clean cool: limescale rings , water rings, fat stains, cloth. -
Page 26: Installation
Problem Possible cause Remedy There is an error in the appliance. Disconnect the appliance from the and a number come on. electrical supply for some time. Dis- connect the fuse from the electrical system of the house. Connect it again. If comes on again, speak to the service centre. - Page 27 Assembly min. 500mm min. 50mm min. min. 2 mm min. 2 mm > 20 mm < 20 mm min. 500 mm min. 500 mm 30 mm 12 mm 57 mm 12 mm 57 mm 28 mm 41 mm 28 mm 41 mm 38 mm 31 mm...
- Page 28 min. 12 mm min. R 5mm 2 mm min. 55mm min. 38 mm min. 2 mm...
-
Page 29: Technical Information
1) The protection box accessory may not be available in some countries. Please contact your local supplier. Technical information Modell KEI6440XXK Prod.Nr. 949 594 331 01 Typ 58 GAD D5 AU 220 - 240 V 50 - 60 Hz... - Page 30 Packaging material nents are identified by marking: >PE<,>PS<, etc. Dis- card the packaging materials as household waste at the The packaging materials are friendly to the envi- waste disposal facilities in your municipality. ronment and can be recycled. The plastic compo-...
-
Page 31: Consignes De Sécurité
Sommaire Consignes de sécurité _ _ _ _ _ _ _ _ _ _ _ _ _ _ _ 31 Entretien et nettoyage _ _ _ _ _ _ _ _ _ _ _ _ _ _ _ 39 Instructions de sécurité _ _ _ _ _ _ _ _ _ _ _ _ _ _ _ 32 En cas d'anomalie de fonctionnement _ _ _ _ _ _ _ 40 Description de l'appareil _ _ _ _ _ _ _ _ _ _ _ _ _ _ 34 Installation _ _ _ _ _ _ _ _ _ _ _ _ _ _ _ _ _ _ _ _ _ 41... -
Page 32: Instructions De Sécurité
• Il peut être dangereux de laisser chauffer de la graisse ou de l'huile sans sur- veillance sur une table de cuisson car cela pourrait provoquer un incendie. • N'essayez jamais d'éteindre un feu avec de l'eau. Mettez à l'arrêt l'appareil puis couvrez les flammes, par exemple avec un couvercle ou une couverture ignifuge. - Page 33 • Ne laissez pas le câble d'alimentation s'emmêler. • Si la surface de votre table de cuisson est endom- magée (éclat, fêlure, etc.), débranchez-la de la prise • Assurez-vous que le câble d'alimentation ou la fiche électrique pour éviter tout risque de choc électrique. (si présente) n'entrent pas en contact avec les surfa- ces brûlantes de l'appareil ou les récipients brûlants •...
-
Page 34: Description De L'appareil
• Nettoyez régulièrement l'appareil afin de maintenir le Avertissement Risque de blessure ou revêtement en bon état. d'asphyxie. • Ne pulvérisez pas d'eau ni de vapeur pour nettoyer • Contactez votre service municipal pour obtenir des l'appareil. informations sur la marche à suivre pour mettre l'ap- •... -
Page 35: Utilisation Quotidienne
Touche sensitive Fonction Pour allumer et éteindre l'appareil. Pour verrouiller ou déverrouiller le bandeau de comman- Pour activer la fonction Booster. Affichage du niveau de cuisson. Pour indiquer le niveau de cuisson. Voyants du minuteur des zones de cuis- Pour indiquer la zone à laquelle se réfère la durée sélec- son. - Page 36 Arrêt automatique Appuyez sur . Le symbole apparaît sur l'af- fichage. Cette fonction arrête l'appareil automatiquement si : Appuyez immédiatement sur . Le symbole apparaît sur l'affichage. • Toutes les zones de cuisson sont désactivées ( Appuyez immédiatement sur à plusieurs repri- ses jusqu'à...
-
Page 37: Conseils Utiles
pour régler la durée souhaitée. Une fois le temps écoulé, le signal sonore retentit et clignote. • Arrêt du signal sonore : appuyez sur Verrouillage Pendant l'utilisation des zones de cuisson, vous pouvez verrouiller le bandeau de commande, à l'exception de la touche . - Page 38 Sur les zones de cuisson à induction, un champ élec- • Un cliquètement : des commutations électriques se tromagnétique puissant chauffe les récipients très rapi- produisent. dement. • Un sifflement, un bourdonnement : le ventilateur fonctionne. Récipients de cuisson compatibles avec les zones Les bruits décrits sont normaux et ne constituent de cuisson à...
-
Page 39: Entretien Et Nettoyage
Utilisation : Durée Conseils Consommation veau énergétique no- minale cuis- 1 - 2 Sauce hollandaise, faire fondre : 5 - 25 min Remuez de temps en temps 3 – 5 % du beurre, du chocolat, de la gé- latine 1 - 2 Solidifier : omelettes baveuses, 10 - 40 min Couvrez pendant la cuisson. -
Page 40: En Cas D'anomalie De Fonctionnement
Nettoyez l'appareil à l'aide d'un chiffon humide et Et enfin, essuyez l'appareil à l'aide d'un chiffon d'un peu de détergent. propre. En cas d'anomalie de fonctionnement Problème Cause probable Solution Vous ne pouvez pas allumer l'appa- Allumez de nouveau l'appareil et ré- reil ou le faire fonctionner. -
Page 41: Installation
Problème Cause probable Solution Une erreur s'est produite dans l'ap- Débranchez l'appareil de l'alimenta- et un chiffre s'affichent. pareil. tion électrique pendant quelques mi- nutes. Déconnectez le fusible de l'installation domestique. Rebran- chez l'appareil. Si s'allume à nouveau, contactez votre service après-vente. - Page 42 Montage min. 500mm min. 50mm min. min. 2 mm min. 2 mm > 20 mm < 20 mm min. 500 mm min. 500 mm 30 mm 12 mm 57 mm 12 mm 57 mm 28 mm 41 mm 28 mm 41 mm 38 mm 31 mm...
- Page 43 min. 12 mm min. R 5mm 2 mm min. 55mm min. 38 mm min. 2 mm...
-
Page 44: Caracteristiques Techniques
1) L'enceinte de protection n'est pas disponible dans tous les pays. Veuillez contacter votre revendeur local. Caracteristiques techniques Modell KEI6440XXK Prod.Nr. 949 594 331 01 Typ 58 GAD D5 AU 220 - 240 V 50 - 60 Hz... - Page 45 Tous les matériaux d'emballage sont écologiques notre sécurité, s’assurant ainsi que les déchets seront et recyclables. Les composants en plastique sont traités dans des conditions optimum. identifiables grâce aux sigles : >PE<,>PS<, etc. Veuil- Pour obtenir plus de détails sur le recyclage de ce lez jeter les matériaux d'emballage dans le conteneur produit, veuillez prendre contact avec les services de approprié...
-
Page 46: Sicherheitsinformationen
Inhalt Sicherheitsinformationen _ _ _ _ _ _ _ _ _ _ _ _ _ _ 46 Reinigung und Pflege _ _ _ _ _ _ _ _ _ _ _ _ _ _ _ _ 54 Sicherheitshinweise _ _ _ _ _ _ _ _ _ _ _ _ _ _ _ _ _ 47 Fehlersuche _ _ _ _ _ _ _ _ _ _ _ _ _ _ _ _ _ _ _ _ _ 55 Gerätebeschreibung _ _ _ _ _ _ _ _ _ _ _ _ _ _ _ _ 49 Montage _ _ _ _ _ _ _ _ _ _ _ _ _ _ _ _ _ _ _ _ _ _ 56... -
Page 47: Sicherheitshinweise
• Schalten Sie das Gerät nicht über eine externe Zeitschaltuhr oder eine sepa- rate Fernsteuerung ein. • Kochen mit Fett oder Öl auf einem unbeaufsichtigten Kochfeld ist gefährlich und kann zu einem Brand führen. • Versuchen Sie nicht einen Brand mit Wasser zu löschen, sondern schalten Sie das Gerät aus und bedecken Sie die Flamme mit einem Deckel oder ei- ner Feuerlöschdecke. - Page 48 • Vor der Durchführung jeglicher Arbeiten muss das • Legen Sie kein Besteck und keine Topfdeckel auf Gerät von der elektrischen Stromversorgung ge- die Kochzonen. Sie werden heiß. trennt werden. • Schalten Sie die Kochzonen nach jedem Gebrauch • Stellen Sie sicher, dass Sie das richtige Kabel für aus.
-
Page 49: Gerätebeschreibung
stets an, wenn Sie es auf dem Kochfeld umsetzen nde Reinigungsschwämmchen, Lösungsmittel oder möchten. Metallgegenstände. Reinigung und Pflege Entsorgung Warnung! Das Gerät könnte beschädigt werden. Warnung! Verletzungs- oder Erstickungsgefahr. • Reinigen Sie das Gerät regelmäßig, um eine Abnut- • Für Informationen zur ordnungsgemäßen Entsor- zung des Oberflächenmaterials zu verhindern. -
Page 50: Täglicher Gebrauch
Sensorfeld Funktion Ein- und Ausschalten des Geräts. Verriegelung/Entriegelung des Bedienfelds. Einschalten der Power-Funktion. Kochstufenanzeige. Zeigt die Kochstufe an. Kochzonen-Anzeigen des Timers. Zeigen an, für welche Kochzone die Zeit eingestellt wur- Timer-Anzeige. Zeigt die Zeit in Minuten an. Erhöhung oder Verringerung der Kochstufe. Erhöhen oder Verringern der Zeit. - Page 51 • Nach dem Einschalten des Geräts wird keine Koch- Berühren Sie unmittelbar danach wiederholt, stufe gewählt. bis die gewünschte Kochstufe angezeigt wird. Nach 3 Sekunden leuchtet auf dem Display. • Das Bedienfeld ist mehr als 10 Sekunden mit ver- schütteten Lebensmitteln oder einem Gegenstand Berühren Sie zum Ausschalten der Funktion bedeckt (Topf, Tuch usw.).
-
Page 52: Praktische Tipps Und Hinweise
Timer . So wird verhindert, dass die Kochstufe versehent- lich geändert wird. Kurzzeitmesser Stellen Sie erst die Kochstufe ein. Mit dem Kurzzeitmesser stellen Sie ein, wie lange eine Berühren Sie zur Aktivierung der Funktion. Das Kochzone für einen einzelnen Kochvorgang einge- Symbol wird 4 Sekunden lang angezeigt. - Page 53 Kochgeschirr für Induktionskochzonen • Klicken: Bei elektronischen Schaltvorgängen. • Zischen, Surren: Das Gebläse läuft. Wichtig! Benutzen Sie für die Induktionskochzonen nur Die beschriebenen Geräusche sind normal und wei- geeignetes Kochgeschirr. sen nicht auf einen Defekt hin. Kochgeschirrmaterial Energiesparen • Geeignet: Gusseisen, Stahl, emaillierter Stahl, Edel- So sparen Sie Energie stahl, ein mehrlagiger Topfboden (wenn vom Her- steller als geeignet markiert).
-
Page 54: Reinigung Und Pflege
Verwendung: Zeit Tipps Nennleistungs- hstu- aufnahme 2 - 3 Köcheln von Reis und Milchge- 25 - 50 Min. Mindestens doppelte Menge 5 – 10 % richten, Erhitzen von Fertigge- Flüssigkeit zum Reis geben, richten Milchgerichte zwischendurch umrühren 3 - 4 Dünsten von Gemüse, Fisch, 20 - 45 Min. -
Page 55: Fehlersuche
Fehlersuche Problem Mögliche Ursache Abhilfe Das Gerät kann nicht eingeschaltet Schalten Sie das Gerät erneut ein oder bedient werden. und stellen Sie innerhalb von 10 Se- kunden die Kochstufe ein. Zwei oder mehr Sensorfelder wur- Berühren Sie nur ein Sensorfeld. den gleichzeitig berührt. -
Page 56: Montage
Problem Mögliche Ursache Abhilfe Im Gerät ist ein Fehler aufgetreten, Schalten Sie das Gerät aus. Das leuchtet auf. da ein Kochgeschirr leer gekocht heiße Kochgeschirr entfernen. ist. Der Überhitzungsschutz der Schalten Sie die Kochzone nach et- Kochzonen und die Abschaltauto- wa 30 Sekunden wieder ein. - Page 57 Montage min. 500mm min. 50mm min. min. 2 mm min. 2 mm > 20 mm < 20 mm min. 500 mm min. 500 mm 30 mm 12 mm 57 mm 12 mm 57 mm 28 mm 41 mm 28 mm 41 mm 38 mm 31 mm...
- Page 58 min. 12 mm min. R 5mm 2 mm min. 55mm min. 38 mm min. 2 mm...
-
Page 59: Technische Daten
Sie den Schutzboden nicht verwenden. 1) Der Schutzboden ist möglicherweise in einigen Ländern nicht erhältlich. Wenden Sie sich an Ihren Händler vor Ort. Technische Daten Modell KEI6440XXK Prod.Nr. 949 594 331 01 Typ 58 GAD D5 AU 220 - 240 V 50 - 60 Hz... - Page 60 Die Verpackungsmaterialien sind umweltverträg- gefährdet. Weitere Informationen über das Recycling lich und wieder verwertbar. Kunststoffteile sind dieses Produkts erhalten Sie von Ihrer Gemeinde, Ihrer mit internationalen Abkürzungen wie z. B. >PE<, >PS< Müllabfuhr oder dem Geschäft, in dem Sie das Produkt usw.
- Page 64 www.electrolux.com/shop 892955897-A-412012...
Need help?
Do you have a question about the KEI6440XXK and is the answer not in the manual?
Questions and answers