Table of Contents
Advertisement
Quick Links
Advertisement
Table of Contents

Related Manuals for ITT Engineered Valves Advantage 2.1


Summary of Contents for ITT Engineered Valves Advantage 2.1
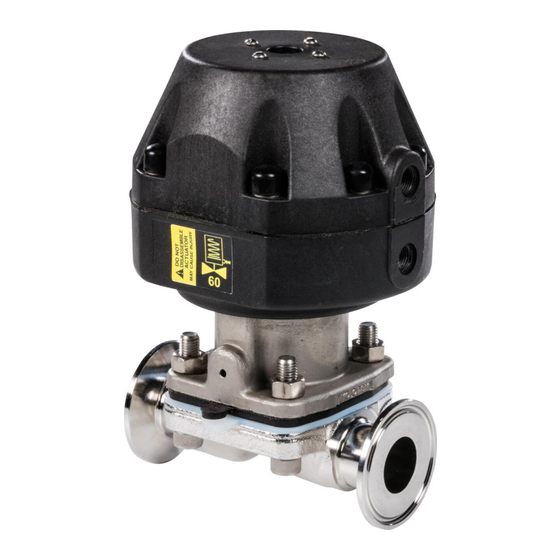
- Page 1 Maintenance Manual Advantage® 2.1 Actuator...
-
Page 3: Table Of Contents
Table of Contents Table of Contents 1 Introduction and Safety ............................ 2 1.1 Safety message levels ..........................2 1.2 User health and safety ..........................2 2 Product Description ............................4 2.1 Actuator identification ..........................4 2.2 Bonnet description............................. 5 2.3 Valve diaphragm identification........................6 3 Maintenance............................... -
Page 4: Introduction And Safety
1.2 User health and safety General precautions This product is designed and manufactured using good workmanship and materials, and meets all appli- cable industry standards. This product should be used only as recommended by ITT. WARNING: • Misapplication of the valve can result in injury or property damage. Select valves and valve components of the proper materials and make sure that they are consistent with your specific performance requirements. - Page 5 • Ensure that the contents of the operating instructions have been fully understood by the personnel. Instruction and training can be carried out by either ITT or the reseller of the valve by order of the operat- ing company WARNING: California Proposition 65 Cancer http://www.P65Warnings.ca.gov.
-
Page 6: Product Description
Ad- vantage 2.1 actuator Model number The actuator model number is located on the ITT identification tag. The model number is a four digit number defining the actuator as follows. Table 1: Actuator Code Description Advantage 2.1 actuator... -
Page 7: Bonnet Description
2.2 Bonnet description Table 4: Examples Model number Description B308 Advantage 2.1 actuator, double acting, series 8 B216 Advantage 2.1 actuator, fail close, series 16 with a spring set Identification tag Line Description Valve serial number Valve size and model number Valve diaphragm type Maximum recommended actuation pressure 2.2 Bonnet description... -
Page 8: Valve Diaphragm Identification
2.3 Valve diaphragm identification 2.3 Valve diaphragm identification Diaphragm tab codes All diaphragm materials and physical properties are batch traceable via permanent codes molded into the diaphragm tabs. The molding date, grade of diaphragm, and size provide traceability to original batch records. -
Page 9: Maintenance
Action if problem is found External valve parts Excessive wear or corrosion • Replace the affected parts • Contact ITT to obtain replace- ment parts or for specific in- structions Non sealed bonnet Fluid weeping from the plug Replace the valve diaphragm... -
Page 10: Fastener Torque Table For Valve Body To Topworks
3.4 Disassemble the valve Depressurize the system. Use regulated air pressure to position diaphragm so that valve is slightly open. You may need to use air pressure to actuate the valve. Tighten the bonnet fasteners in a crisscross pattern. For more information, see 3.3.1 Fastener torque table for valve body to topworks on page Make multiple crisscross passes to build up torque to the final table value. - Page 11 3.5 Replace the valve diaphragm The replacement diaphragm should be identical in size and grade to the original diaphragm. If replacing a PTFE diaphragm, then follow these steps. Install the new elastomer backing cushion over the tube nut. Invert the PTFE diaphragm by pressing the center of the diaphragm face with your thumbs while holding the edge of the diaphragm with your fingers.
-
Page 12: Adjust The Travel (Closing) Stop
3.6 Adjust the travel (closing) stop If replacing a PTFE diaphragm, re-invert the diaphragm. If the actuator mode of operation is fail open or fail close, select one of these steps. If the actuator Then ... mode of opera- tion is ... Fail open Reduce the air pressure until the back of the diaphragm is flat against the bonnet. -
Page 13: Change The Compressor, Tube Nut, And Snap Ring
3.7 Change the compressor, tube nut, and snap ring Turn the lower nut counterclockwise while continuing to prevent the adjusting bushing from rotating until the valve stops leaking. Tighten the jam nuts together. 3.7 Change the compressor, tube nut, and snap ring To switch diaphragm types between EPDM and PTFE, the tube nut must be changed. -
Page 14: Lubrication Requirements
If present, remove the switch package. Disconnect the air lines. ITT recommends that the following steps be performed on a bench with the body removed from the actuator: Disassemble the valve. For more information, see Disassemble the valve in this manual. -
Page 15: Replace The Actuator Diaphragm And Spring For Fail Close Actuator
One fixture exists for the series 3, 5, and 8 actuators and one for the series 16 actuator. If present, remove the switch package. Disconnect the air lines. ITT recommends that the following steps be performed on a bench, with the body removed from the actuator: Disassemble the valve. -
Page 16: Replace The Actuator Diaphragm For Double Acting Actuator
3.12 Replace the actuator diaphragm for double acting actuator If present, remove the switch package Disconnect the air lines. ITT recommends that the following steps be performed on a bench with the body removed from the actuator: Disassemble the valve. -
Page 17: Tighten The Actuator Cover To Cover Fasteners
3.13 Tighten the actuator cover to cover fasteners Remove the actuator top plate and actuator diaphragm. Remove the indicating spindle Install the new actuator diaphragm (top hat up). Be sure the actuator diaphragm is positioned so the diaphragm bolt holes line up with the cover bolt holes with no stretching of the diaphragm. -
Page 18: Parts Listing And Cross-Sectional Drawings
4 Parts Listing and Cross-Sectional Drawings 4 Parts Listing and Cross-Sectional Drawings 4.1 Advantage 2.1 actuator parts List of parts Figure 10: Fail closed actuator with compressor detail Item Description Tube Nut Snap Ring Backing Cushion PTFE Diaphragm Compressor Advantage® 2.1 Actuator Maintenance Manual... -
Page 19: Certifications
5 Certifications 5 Certifications 5.1 Declaration of Conformity Advantage® 2.1 Actuator Maintenance Manual... - Page 20 5.1 Declaration of Conformity Advantage® 2.1 Actuator Maintenance Manual...
-
Page 21: Declaration Of Incorporation
5.2 Declaration of Incorporation 5.2 Declaration of Incorporation Advantage® 2.1 Actuator Maintenance Manual... - Page 22 5.2 Declaration of Incorporation Advantage® 2.1 Actuator Maintenance Manual...
- Page 23 Visit our website for the latest version of this document and more information: www.engvalves.com ITT Engineered Valves 33 Centerville Road Lancaster, PA 17603 Form M-Adv2.1.en-US.2022-06 ©2022 ITT Inc. or its wholly-owned subsidiaries The original instruction is in English. All non-English instructions are translations of the original instruction.
Need help?
Do you have a question about the Engineered Valves Advantage 2.1 and is the answer not in the manual?
Questions and answers