Advertisement
Quick Links
Dial Indicator / Comparator
DIAL GAUGE
Thank you for purchasing the Niigata Seiki Dial Gauge.
Used with a Magnetic Base or Indicator Stand, this gauge will show the difference in height or position
relative to a zero point set at a reference position.
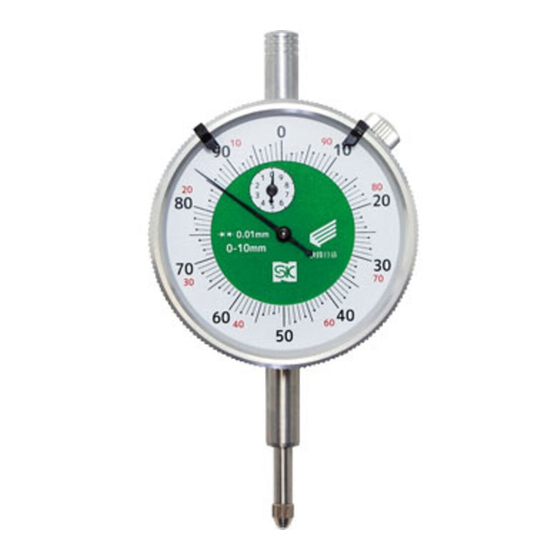
■
APPLICATIONS
・Comparing parts to a master part during inspection
・Measuring machine tools positioning accuracy
●For safe and proper use of this product, please read this
instruction manual before use and follow the procedures
described. Please keep manual where it is accessible to
user for future reference.
●Keep this manual with the instrument if transferred or
leased to a third party.
●For inquiries about this product, please contact dealer or
Niigata Seiki at the address listed on the following page.
■
PART IDENTIFICATION, FUNCTION
① Limit Markers
② Pointer
( Needle )
③ Main Scale
( Indicator Face )
⑦ Stem
( φ8mm )
①Limit Markers
............
②Pointer ( Needle )
......
③Main Scale
...............
④Bezel Clamp Screw Clamps Scale to prevent
⑤Revolution Counter
⑥Rev. Counter Scale
PROFESSIONAL
④ Bezel Clamp
Screw
⑤ Revolution
Counter
⑥ Rev. Counter
Scale
⑧ Spindle
⑨ Contact Point ( Probe )
For marking acceptance
range for Pass/Fail testing
Shows measurement on Main
Scale
Main Scale, rotate Bezel ( ⑩ )
to turn
...
rotation
...
Pointer indicates Main Scale
×100
...
Each division is Main Scale
×100
Model No.
・Measuring runout for rotary shafts
・Checking vise parallelism on milling machines
・Measuring flatness of surfaces and assemblies
・Confirming machine tool feed distance
SAFETY NOTIFICATIONS
Throughout this manual, "
RISK OF PERSONAL INJURY OR PROPERTY
DAMAGE if not followed.
The "
PROHIBITED, and the "
REQUIRED step or necessary condition.
※
Model DI-10 shown
⑩ Bezel
⑦Stem
...........................
⑧Spindle
........................
⑨Contact Point
⑩Bezel
...........................
⑪Flat Rear Plate
⑫Lug
..............................
⑬Mounting Hole
⑭Rear Plate with Lug Accessory back cover for
User Manual
DI-10KD
DI-10
DI-1058
" symbol indicates
" symbol indicates something which is
" symbol Indicates
⑪ Flat Rear Plate
⑫ Lug
[ Accessories ]
⑭ Rear Plate
※
To Use the Rear Plate with
Lug, unscrew the Standard Flat
Rear Plate screws, replace,
and use screws to secure.
For holding and mounting
Gauge
Shaft moves up and down
with measurement
............
Probe which contacts
workpiece
Rotate to turn Main Scale ( ③ )
............
Standard back cover
Alternate mounting point
............
For mounting Gauge
...
mounting Gauge using Lug
WDI-0158SP
WDI-0558SP
WDI-1058SP
⑬ Mounting
Hole
( φ6. 5mm )
with Lug
Advertisement

Related Manuals for Niigata seiki PROFESSIONAL DI-10KD


Summary of Contents for Niigata seiki PROFESSIONAL DI-10KD
- Page 1 ●For inquiries about this product, please contact dealer or PROHIBITED, and the “ ” symbol Indicates Niigata Seiki at the address listed on the following page. REQUIRED step or necessary condition. ■ PART IDENTIFICATION, FUNCTION ※...
- Page 2 SAFETY PRECAUTIONS Please Observe Always follow the procedures specified below in order to prevent harm to yourself or others, and to prevent damage to property. ■Content marked as follows indicates risk of injury or damage if not followed. WARNING Indicates risk of personal injury or property damage if not followed. ■These symbols mark content that must be observed.
- Page 3 HOW TO USE - Preparation ①Confirm that the Contact Point and Rear Cover are tightly fastened. If loose, tighten Contact Point and Rear Plate Screws. ②Attach to the Gauge Holder using the Stem or Rear Lug. Mounting Gauge by other than Stem or Lug will cause inaccuracy and product damage. ③Confirm that Pointer and Revolution Counter movement is smooth.
- Page 4 ( For reference, we recommend a calibration interval of 3~4 months when used in a factory. ) Outside Japan, Please contact distributor or place of purchase to inquire about calibrations services. Niigata seiki Co., Ltd. 6-15-22, Tsukanome, Sanjo, Niigata, Japan, 955-0055 Tel. : +81-256-31-5670 Fax. : +81-256-39-7730 MAIL intl.sales@niigataseiki.co.jp...