
Subscribe to Our Youtube Channel
Related Manuals for ROSSO MOTORS E-QUAD T


Summary of Contents for ROSSO MOTORS E-QUAD T
- Page 1 ROSSO E-QUAD T ELECTRIC ATV OWNERS MANUAL - PRIOR TO FIRST USE, READ THIS MANUAL COMPLETELY AND ATTENTIVELY! IMPERATIVELY FOLLOW THE SAFETY INSTRUCTIONS! NONOBSERVANCE CAN LEAD TO PERILOUS INJURIES! CAREFULLY KEEP THIS MANUAL!
-
Page 2: Safety Information
Rosso Motors recommends that you periodically review and reinforce the information in this manual with younger riders, and that you inspect and maintain your children’s electric ATV to insure their safety. - Page 3 DO NOT EXCEED THE WEIGHT LIMIT OF 90 POUNDS. Rider weight does not necessarily mean a person’s size is appropriate to fit or maintain control of the electric ATV. Maximum Operating Speed of 8MPH ALWAYS have parental/adult supervision while riding and instruction on the ATV’s use prior to riding for the first time.
- Page 4 Proper riding gear Always wear proper protective equipment such as an approved safety helmet, elbow pads and knee pads. A helmet may be legally required by local law or regulation in your area. A long-sleeved shirt, long pants and gloves are recommended. Always wear athletic shoes (lace-up shoes with rubber soles), never ride barefooted or in sandals, and keep shoelaces tied and out of the way of the wheels, motor and drive system.
-
Page 5: Handlebar Installation
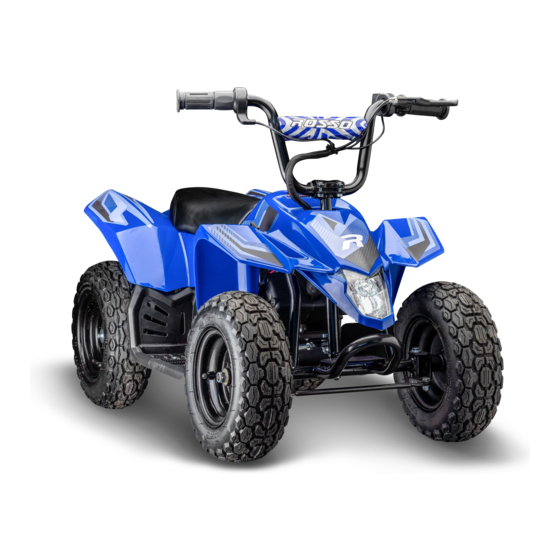
2. Handlebar installation ⚠ FAILURE TO PROPERLY ADJUST AND TIGHTEN BOLTS CAN CAUSE LOSS OF CONTROL RESULTING IN CRASHING AND INJURY ⚠ Place handlebars into position on the bracket on the top of the steering column, cover with the top handlebar bracket and install the 4 included bolts, adjust handlebars to desired position, add nuts to each bolt and tighten all hardware. - Page 6 eQuad T Components (a) Right handle: Throttle (f) Headlight (b) Left handle: Brake Lever & Light/Horn switch (g) Charging Port (Right) (c) Forward/Neutral/Reverse Switch On/Off Indicator Light (Left) (d) Ignition Switch & Controller(internal) (h) Battery(internal) (e) Taillight (i) 350W Motor eQuad T Operation Basic Operation With the ATV powered on, gently twist the throttle towards you until the desired...
- Page 7 The time for a full recharge is approx. 4-6 hours, the indicator on your charger will turn from GREEN when charging is complete. Always charge the battery immediately after riding. Unplug the charger from the outlet & charging port once charging has finished.
-
Page 8: Ignition Switch
⚠ Any changes or modifications to the unit unless expressly approved by the company responsible for compliance could void the users authority to operate the equipment ⚠ FCC instructions for battery charger: This equipment has been tested and found to comply with the limits for a Class B digital device, pursuant to PART 15 of the FCC Rules. - Page 9 Key Fob The e Quad t also features remote start/stop via the included fob. Once the ATV has been turned on remotely it can ONLY be turned off with the fob. Double Press to turn the eQuad ON ⚡ Press to turn the eQuad OFF ��...
- Page 10 eQuad Operations continued… Headlight/Horn switch Located on the left handle bar the green horn button can be pressed to honk the horn. The headlight switch is located directly beneath it and can be used to turn the headlight on and off. Pre-Ride Checklist: Brakes - Check the brakes for proper function.
-
Page 11: Maintenance And Care
Maintenance and Care ⚠ Ensure the power to the eQuad is turned off before performing any maintenance or cleaning ⚠ Brake adjustments Not all riders will have the same hand strength and the brakes should be adjusted so the rider is capable of engaging them properly. ⚠... - Page 12 Brake adjustments continued… Step 3 - If after adjusting the brake correctly, there is still brake rub, (contact between the brake disk and pad when the brake is not engaged) you can adjust the position of the caliper on the rotor with adjustment knob. Adjust the position and rotate the rear wheel manually until the wheel spins freely.
-
Page 13: Troubleshooting
Troubleshooting Problem Possible Cause Solution eQuad will not run eQuad not turned on Turn eQuad On (see page #7) Battery not charged Charge battery Loose connection Check connections battery, controller & main switch Throttle failure Check throttle connections or replace throttle Brakes are too tight Adjust brakes... - Page 14 eQuad T Parts Diagram Part Description Part Description Part Description Throttle assembly Gear drive mount Battery box (left side) Handlebar Chain guard cover (inner) Foot rest (left) Handlebar clamp Battery lock Front wheel Brake lever Batteries Alarm Left grip Rear fork Front axle (right) Seat Frame...
-
Page 15: Warranty
• Modified in any way; • Rented. ROSSO MOTORS is not liable for incidental or consequential loss or damage due directly or indirectly to the use of this product. For more information on your warranty please see our FAQ section online: www.rossomotors.com/pages/faq... - Page 16 11400 Twigg Place Unit 1 Richmond, BC, V6V3C1 CANADA E-Mail: hello@rossomotors.com Website: www.rossomotors.com Tel: 1-888-897-5909 © Rosso Motors, 2022. All Rights Reserved...
Need help?
Do you have a question about the E-QUAD T and is the answer not in the manual?
Questions and answers
Can you store the ATV in an unheated shed if it is plugged in to an electrical outlet