Advertisement
Advertisement
Table of Contents

Subscribe to Our Youtube Channel
Related Manuals for ROSSO MOTORS REATVB20


Summary of Contents for ROSSO MOTORS REATVB20
- Page 2 Rosso Motors recommends that you periodically review and reinforce the information in this manual with younger riders, and that you inspect and maintain your children’s E-ATV to insure their safety.
- Page 3 This product was manufactured for performance and durability but is not impervious to damage. Jumping or other aggressive riding can over-stress and damage the product, The rider assumes all risks associated with high-stress activity. Be careful and know your limitations. Risk of injury increases as the degree of riding difficulty increases, The rider assumes all risk associated with aggressive riding activities.
- Page 4 Assembly: ROSSO E-ATV requires minimum assembly. Please follow instructions below in order to get your E-ATV assembled properly The E-ATV is supplied with 2 boxes, one contains the ATV and hardware and the other one contains battery. 1.
- Page 5 2. Handlebar installation: Failure to properly adjust and tighten the bolts can cause loss of control and crash. Attach handlebar clamps and gear position indicator Handlebar Gear position Handlebar clamp clamp bolts indicator bolts 3. Inflate tires Inflate tires to the correct PSI before first ride and check pressure before each ride. Recommended tire pressure is: 7 PSI (Maximum: 20 PSI) 4.
- Page 6 Step 2: Insert the fuse in the fuse housing located on the battery positive (RED) wire Step 3: Remove battery security plate and place battery into the casing and secure/tighten the bolts Security plate Casing Step 3: Insert positive (RED) wire with fast connector that connected to the ATV into the Step 4: Connect plugs - until you hear “CLICK”...
-
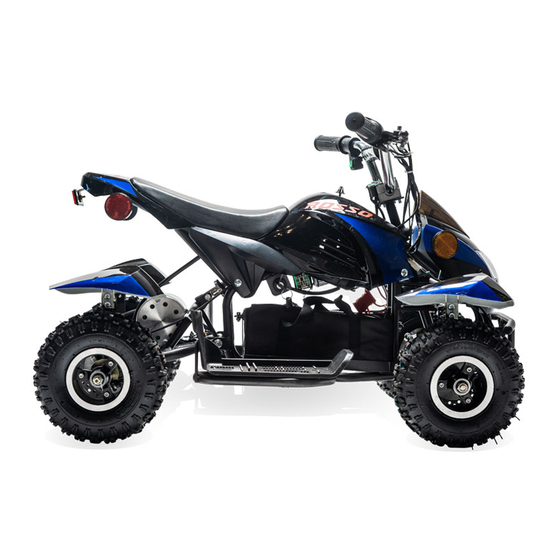
Page 7: Components Definition
5. Install reflectors (RED reflectors at the back of the ATV and ORANGE at the front) Front reflector Rear reflectors Components definition: Gear shifter Rear brake Throttle Front brake Head light Motor Controller Battery Operation controls: 1. Gear shifter switch F - Forward N - Neutral R - Reverse... - Page 8 2. Gear position indicator When gear shifter is in N (Neutral) position – (green light) is on When gear shifter is in R (Reverse) position – (red light) is on When gear shifter is in F (Forward) position – both lights are OFF 3.
- Page 9 5. Headlight switch Located on the left side of the handle bar I – Lights are ON 0 – Lights are OFF Headlight switch 6. Parking brake Located on the right side brake lever To engage: squeeze front brake lever and press down the brake knob To disengage: squeeze brake lever until the knob pops up Parking brake knob 7.
-
Page 10: Maintenance And Adjustments
Maintenance and adjustments MAKE SURE IGNITION (MAIN SWITCH) IS OFF BEFORE PERFORMING ANY MAINTANANCE OR ADJUSTMENTS 1. Brakes adjustment Failure to inspect and properly adjust brakes increases the risk of having an accident. Riding with worn brake pads can reduce braking performance and cause an accident. Check and adjust brakes before each ride To adjust cable play on the left (rear) brake lever –... - Page 11 2. Charging ROSSO E-ATV does not come with a fully charged battery, therefore you must charge it prior to use. Initial charge time should take no less than 12 hours – keep it plugged in even if the light turns green. Recharge time should take up to 12 hours, even if the light turns green.
- Page 12 Charging steps: Step 1: Turn main switch OFF Step 2: Plug charger into a wall – if the light on the charger does not light up, check power to the outlet. Step 3: Plug the charger into the charging port and tighten (located on the left side) Charging port...
-
Page 13: Pre-Ride Checklist
3. Chain adjustment Riding an ATV with a chain in poor condition or improperly adjusted can lead to serious injury. Always inspect, maintain and adjust the chain properly before each ride Before adjusting the chain, make sure the motor is cool. Do not touch motor after use. - Page 14 Frame and Handlebars - Check for loose, cracked or broken connections. Although broken frames are rare, it is possible for an aggressive rider to run into a curb or object and wreck, bend or break the frame. Hardware - Check and secure all fasteners (nuts, bolts) before every ride. If the unit is damaged, do not ride.
-
Page 15: Troubleshooting
Troubleshooting Problem Possible cause Solution Power does not turn on Fuse not installed/burnt out Replace fuse Main switch/ignition is off Turn main switch on Battery not connected Connect battery Battery not charged Charge battery Loose connection Check connections on the battery, controller, main switch Power ON but motor Throttle failure... -
Page 16: Wiring Diagram
Wiring diagram:... -
Page 17: Warranty
Warranty ROSSO MOTORS warranties this product to be free of manufacturing defects for a period of 90 days from date of purchase. This Limited Warranty does not cover normal wear and tear, tires, tubes or cables, or any damage, failure or loss caused by improper assembly, maintenance, storage or use of your...
Need help?
Do you have a question about the REATVB20 and is the answer not in the manual?
Questions and answers