Table of Contents
Advertisement
Available languages
Available languages
Quick Links
Instruction Manual For Induction Hob
Manuale di istruzioni per piano cottura a induzione
Návod k použití pro indukční varnou desku
Manual de instruções para placa de indução
Thank you for purchasing the Hoover induction hob. Please read this instruction
manual carefully before using the hob and keep it in a safe place for future reference.
MODEL: HIS642MCTT
N
I S
I A I A
FRANÇAIS
PORTUGUÊS
Advertisement
Table of Contents

Related Manuals for Hoover HIS642MCTT


Summary of Contents for Hoover HIS642MCTT
- Page 1 Návod k použití pro indukční varnou desku PORTUGUÊS Manual de instruções para placa de indução MODEL: HIS642MCTT Thank you for purchasing the Hoover induction hob. Please read this instruction manual carefully before using the hob and keep it in a safe place for future reference.
-
Page 2: Safety Warnings
Safety Warnings Your safety is important to us. Please read this information before using your cooktop. Installation Electrical Shock Hazard • Disconnect the appliance from the mains electricity supply before carrying out any work or maintenance on it. • Connection to a good earth wiring system is essential and mandatory. -
Page 3: Health Hazard
placed on this appliance at any time. • Please make this information available to the person responsible for installing the appliance as it could reduce your installation costs. • In order to avoid a hazard, this appliance must be installed according to these instructions for installation. - Page 4 safety standards. • However, persons with cardiac pacemakers or other electrical implants (such as insulin pumps) must consult with their doctor or implant manufacturer before using this appliance to make sure that their implants will not be affected by the electromagnetic field. •...
- Page 5 Important safety instructions • Never leave the appliance unattended when in use. Boilover causes smoking and greasy spillovers that may ignite. • Never use your appliance as a work or storage surface. • Never leave any objects or utensils on the appliance.
- Page 6 have a responsible and competent person to instruct them in its use. The instructor should be satisfied that they can use the appliance without danger to themselves or their surroundings. • Do not repair or replace any part of the appliance unless specifically recommended in the manual.
- Page 7 Care should be taken to avoid touching heating elements. Children less than 8 years of age shall be kept away unless continuously supervised. •This appliance can be used by children aged from 8 years and above and persons with reduced physical, sensory or mental capabilities or lack of experience and knowledge if they have been given supervision or instruction concerning use of the appliance in a safe way and...
- Page 8 CAUTION: The cooking process has to be supervised. A short term cooking process has to be supervised continuously. WARNING: In order to prevent tipping of the appliance, this stabilizing means must be installed. Refer to the instructions for installation. WARNING: Use only hob guards designed by the manufactuer of the cooking appliance or indicated by the manufacture of the appliance in the instruction for use as suitable or hob guards...
-
Page 9: Product Overview
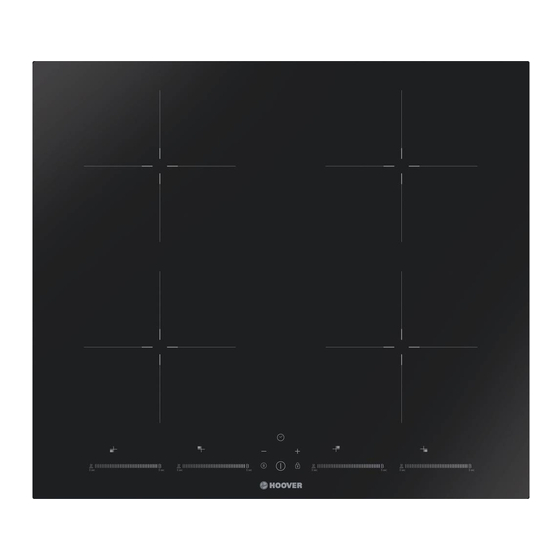
Product Overview Top View 1.2000 W zone, boost to 2600W 2.1500 W zone, boost to 2000W 3.2000 W zone, boost to 2600W 4.1500 W zone, boost to 2000W 5. Glass plate 6. Control panel Control Panel 1. Heating zone selection indicator 2. -
Page 10: A Word On Induction Cooking
A Word on Induction Cooking Induction cooking is a safe, advanced, efficient, and economical cooking technology. It works by electromagnetic vibrations generating heat directly in the pan, rather than indirectly through heating the glass surface. The glass becomes hot only because the pan eventually warms it up. iron pot magnetic circuit ceramic glass plate... -
Page 11: Choosing The Right Cookware
Choosing the right Cookware • Only use cookware with a base suitable for induction cooking. Look for the induction symbol on the packaging or on the bottom of the pan. • You can check whether your cookware is suitable by carrying out a magnet test. -
Page 12: Pan Dimensions
Pan dimensions The cooking zones are up to a limit, automatically adapted to the diameter of the pan. However the bottom of this pan must have a minimum of diameter according to the corresponding cooking zone. To obtain the best efficiency of your hob, please place the pan in the centre of the cooking zone. -
Page 13: When You Have Finished Cooking
a. If you don’t set the power within 1 minute, the induction hob will automatically switch off. You will need to start again at step 1. b. You can modify the heat setting at any time during cooking. c. If slide along the “—”, power will vary from stage 1 to stage 9. If the display flashes alternately with the heat setting... - Page 14 Using the Power Management Using power management you can set the total power to 2.5kW/ 3.0kW/ 4.5kW/ 6.5kW and 7.4kW. The default total power setting is the maximum power level. Setting the total power level to fit your requirement 1. Make sure the cooktop is turned off. Note: you can only set power management when the cooktop is turned off.
-
Page 15: Restrictions When Using
Using the Boost Boost is the function that one zone rising to a larger power in one second and lasting for 5 minutes. Thus you can get a more powerful and faster cooking. Using the Boost to get larger power 1. - Page 16 Using the Keep warm Keep warm is the function that one zone keep a lower power to make the temperature stable. Using the Keep warm to get stable temperature 1. Touch the left point of the slider that you wish to keep warm, then hold the button for 3 second, he cooking zone indicator will display “A”.
-
Page 17: Locking The Controls
3. To cancel the pause status, touch the Stop+Go function, then the cooking zone will go back to the power stage which you set before. Locking the Controls • You can lock the controls to prevent unintended use (for example children accidentally turning the cooking zones on). -
Page 18: Auto Shutdown Protection
Auto Shutdown Protection Auto shut down is a safety protection function for your induction hob. It shut down automatically if ever you forget to turn off your cooking. The default working times for various power levels are shown in the below table: Power level Default working timer (hour) -
Page 19: Setting The Timer To Turn One Cooking Zone Off
5. When the time is set, it will begin to count down immediately. The display will show the remaining time and the timer indicator will flash for 5 seconds. 6. Buzzer will bips for 30 seconds and the timer indicator shows “- - “... - Page 20 5. When the time is set, it will begin to count down immediately. The display will show the remaining time and the timer indicator flash for 5 seconds. NOTE: The red dot next to power level indicator will illuminate indicating that zone is selected. 6.
-
Page 21: Care And Cleaning
Care and Cleaning What? How? Important! Everyday soiling on 1. Switch the power to the • When the power to the cooktop is glass (fingerprints, cooktop off. switched off, there will be no ‘hot marks, stains left by 2. Apply a cooktop cleaner surface’... -
Page 22: Hints And Tips
Hints and Tips Problem Possible causes What to do The induction hob No power. Make sure the induction hob is cannot be turned on. connected to the power supply and that it is switched on. Check whether there is a power outage in your home or area. -
Page 23: Failure Display And Inspection
The induction hob or a Technical fault. Please note down the error cooking zone has letters and numbers, switch turned itself off the power to the induction hob unexpectedly, a tone off at the wall, and contact a sounds and an error qualified technician. -
Page 24: Technical Specification
Technical Specification Cooking Hob HIS642MCTT Cooking Zones 4 Zones Supply Voltage 220-240V~, 50-60Hz Installed Electric Power 2.5kw:2250-2750W or 3.0 kw:2700-3300W or 4.5kw:4050-4950W or 6.5kw:5850-7150W or 7.4kw:6600-7400W Product Size L×W×H(mm) 590X520X55 Building-in Dimensions A×B (mm) 560X490 Weight and Dimensions are approximate. Because we continually strive to improve our products we may change specifications and designs without prior notice. - Page 25 and the air inlet and outlet are not blocked. Ensure the Induction cooker hob is in good work state. As shown below Note: The safety distance between the hotplate and the cupboard above the hotplate should be at least 760mm. A(mm) B(mm) C(mm)
-
Page 26: Before Locating The Fixing Brackets
• there is adequate flow of fresh air from outside the cabinetry to the base of the • if the hob is installed above a drawer or cupboard space, a thermal protection barrier is installed below the base of the hob •... -
Page 27: Connecting The Hob To The Mains Power Supply
ensured to enhance its reliability. 4. The wall and induced heating zone above the table surface shall withstand heat. 5. To avoid any damage, the sandwich layer and adhesive must be resistant to heat. Connecting the hob to the mains power supply This hob must be connected to the mains power supply only by a suitably qualified person. - Page 28 This appliance is labelled in accordance with European Directive 2012/19/EU regarding electric and electronic appliances (WEEE). The WEEE contain both polluting substances (that can have a negative effect on the environment) and base elements (that can be reused). It is important that the WEEE undergo specific treatments to correctly remove and dispose of the pollutants and recover all the materials.
- Page 29 Product Information for Domestic Electric Hobs Compliant to Commission Regulation (EU) No 66/2014 Position Symbol Value Unit Model identification HIS642MCTT Type of hob: Electric Hob zones Number of cooking zones and/or areas areas Induction cooking zones Heating technology (induction cooking...
- Page 30 Central central Central right Front left Front central Front right ECelectric Rear left 193,5 Wh/kg cooking ECelectric Rear central Wh/kg cooking ECelectric Rear right 197.2 Wh/kg cooking ECelectric Central left Wh/kg cooking ECelectric Energy consumption for cooking zone Central central Wh/kg cooking or area calculated per kg...
-
Page 31: Avvertenze Di Sicurezza
Avvertenze di sicurezza La sua sicurezza è estremamente importante per noi. Legga sempre queste istruzioni prima di utilizzare il piano di cottura. Installazione Rischio di elettrocuzione • Staccare l'elettrodomestico dalla rete di alimentazione elettrica principale prima di effettuare lavori o operazioni di manutenzione sullo stesso. -
Page 32: Importanti Istruzioni Di Sicurezza
Importanti istruzioni di sicurezza • Leggere attentamente le istruzioni prima di installare ed utilizzare questo elettrodomestico. • Non appoggiare mai materiale o prodotti combustibili sull'elettrodomestico. • Comunicare queste informazioni alla persona responsabile dell'installazione dell'elettrodomestico in quanto potrebbe ridurre i costi di installazione. •... - Page 33 Funzionamento e manutenzione Rischio di elettrocuzione • Non cuocere se la superficie del piano di cottura è rotta o crepata. • Se la superficie del piano di cottura si rompe o crepa, spegnere l'elettrodomestico immediatamente nell'alimentazione principale (interruttore a parete) e contattare un tecnico qualificato. •...
- Page 34 sufficienza da provocare ustioni. • Fino a quando la superficie del vetro a induzione non si è raffreddata, non toccarla con parti del corpo, indumenti o altri oggetti che non siano recipienti di cottura appositi. • Oggetti metallici come coltelli, forchette, cucchiai o coperchi non devono essere posti sulla superficie del piano di cottura perché...
- Page 35 prendere fuoco. • Non utilizzare mai l'elettrodomestico come superficie di lavoro o per appoggiare oggetti. • Non lasciare mai oggetti o utensili sull'elettrodomestico. • Non mettere o lasciare oggetti magnetizzabili (ad esempio carte di credito, schede di memoria) o dispositivi elettronici (ad esempio computer, lettori MP3) vicino all'elettrodomestico, in quanto potrebbero essere influenzati dal campo elettromagnetico.
- Page 36 l'elettrodomestico. • I bambini o le persone con una disabilità tale da limitare la capacità di utilizzare l'elettrodomestico devono essere istruiti sull'uso da una persona responsabile e competente. La persona che fornisce le istruzioni deve essere convinta di averli istruiti in modo tale da potere utilizzare l'elettrodomestico senza rischio per se stessi o per le persone che si trovano nelle aree...
- Page 37 • Se il cavo di alimentazione dell’elettrodomestico dovesse essere danneggiato, farlo sostituire dal produttore, dal suo servizio tecnico o da un tecnico qualificato, per evitare rischi. • Questo elettrodomestico è destinato ad essere utilizzato in applicazioni domestiche e simili, come ad esempio: - in cucine per il personale in negozi, uffici e altri ambienti di lavoro;...
- Page 38 • I bambini non devono giocare con l’elettrodomestico. La pulizia e la manutenzione da parte dell'utente non possono essere effettuate da bambini senza supervisione. • AVVERTENZA: La cottura senza sorveglianza su un piano di cottura in presenza di grasso o olio nella pentola può...
- Page 39 mezzi di stabilizzazione. Fare riferimento alle istruzioni per l'installazione. AVVERTENZA: utilizzare unicamente protezioni per piani di cottura progettate dal produttore della cucina o indicate dal produttore dell'elettrodomestico nelle istruzioni d'uso come adatte, o ancora protezioni incorporate nell'elettrodomestico. L'utilizzo di protezioni non adatte può...
-
Page 40: Panoramica Del Prodotto
Panoramica del prodotto Vista dall’alto 1. Zona 2000 W, aumento a 2600 W 2. Zona 1500 W, aumento a 2000 W 3. Zona 2000 W, aumento a 2600 W 4. Zona 1500 W, aumento a 2000 W 5. Piatto in vetro 6. - Page 41 Come funziona la cottura a induzione La tecnologia della cottura a induzione è un metodo sicuro, tecnologicamente avanzato, efficiente ed economico. Funziona tramite vibrazioni elettromagnetiche che generano il calore direttamente nella pentola invece che indirettamente riscaldando la superficie in vetro. Il vetro si surriscalda perché si riscalda anche la pentola.
- Page 42 Scelta dei recipienti di cottura più appropriati • Utilizzare solamente recipienti di cottura adatti per la cottura a induzione. Verificare che sia presente il simbolo di induzione sull'imballaggio o sul fondo della pentola. • È possibile verificare se il recipiente di cottura è adatto effettuando una prova magnetica.
- Page 43 Dimensioni pentola Le zone di cottura vengono adattate automaticamente, fino ad un limite massimo, al diametro della pentola. Tuttavia, il fondo di questa padella deve avere un diametro minimo in funzione della zona di cottura corrispondente. Per ottenere la massima efficienza dal piano cottura, posizionare la pentola al centro della zona cottura.
- Page 44 ripartire dalla fase 1. b. L'impostazione di riscaldamento si può modificare in qualsiasi momento durante la cottura. c. Se si scorre lungo il "—", la potenza varierà dallo stadio 1 allo stadio 9. Se sul display compare il simbolo lampeggiante alternato all'impostazione di riscaldamento Questo significa quanto segue: •...
- Page 45 Uso della gestione della potenza Utilizzando la gestione della potenza si può impostare la potenza totale a 2,5 kW/ 3,0 kW/ 4,5 kW/ 6,5 kW e 7,4 kW. L'impostazione predefinita di potenza totale è il livello di potenza massima. Impostazione del livello di potenza totale in base alle proprie esigenze 1.
- Page 46 Utilizzo della funzione boost Boost è la funzione che permette l'aumento di una zona ad una potenza maggiore in un secondo e dura 5 minuti. In questo modo è possibile ottenere una cottura più potente e più veloce. Utilizzo della funzione boost per ottenere una potenza maggiore 1.
- Page 47 Uso della funzione mantenimento temperatura Keep Warm è la funzione che mantiene una zona ad una potenza inferiore per rendere stabile la temperatura. Utilizzo della funzione Keep Warm per ottenere una temperatura stabile 1. Toccare il punto sinistro del cursore che si desidera tenere in caldo, quindi tenere premuto il tasto per 3 secondi, l'indicatore della zona di cottura visualizzerà...
-
Page 48: Blocco Dei Comandi
Blocco dei comandi • I comandi si possono bloccare per evitare un uso involontario (ad esempio accensione involontaria delle zone di cottura da parte di bambini). • Quando i comandi sono bloccati, sono tutti disabilitati tranne il tasto di ON/OFF. Per bloccare i comandi Toccare il blocco comandi. -
Page 49: Utilizzo Del Timer
Quando la pentola viene rimossa il piano di cottura a induzione smette immediatamente di riscaldarsi e si spegne automaticamente dopo due minuti. Le persone portatrici di pacemaker possono utilizzare questo elettrodomestico solo sotto il controllo del proprio medico. Utilizzo del timer Il timer si può... - Page 50 6. L'avvisatore acustico si attiva per 30 secondi e l'indicatore del timer visualizza "- -" al termine del tempo impostato. Impostazione del timer per spegnere una zona di cottura Le zone di cottura impostate per questa funzione funzionano come segue: 1.
-
Page 51: Cura E Pulizia
Le altre zone di cottura continueranno a funzionare se erano state accese in precedenza. Impostazione del timer per spegnere più di una zona di cottura 1. Se si utilizza questa funzione per più di una zona di riscaldamento, l'indicatore del timer mostrerà il tempo più breve. (es. - Page 52 Schizzi di acqua Toglierli immediatamente con • Togliere al più presto possibile le bollente, ingredienti una paletta per pesce, un macchie lasciate da ingredienti fusi, fusi e schizzi coltello a paletta o un raschietto cibo zuccherino o schizzi. Se questi zuccherini caldi sul a lama adatti al piano di cottura residui vengono lasciati seccare sul...
- Page 53 I tasti a sfioro si Potrebbe esserci una sottile Accertarsi che la zona dei tasti a sfioro attivano a fatica. pellicola di acqua sui comandi, sia asciutta e utilizzare il polpastrello oppure state utilizzando la punta delle vostre dita per attivare i delle dita per attivare i comandi.
-
Page 54: Specifiche Tecniche
Le considerazioni di cui sopra derivano dalla valutazione e dal controllo delle anomalie comuni. Non smontare da soli l'elettrodomestico per evitare rischi e danni al piano di cottura ad induzione. Specifiche tecniche Piano cottura HIS642MCTT Zone di cottura 4 zone Tensione di alimentazione 220-240 V~, 50-60 Hz Potenza elettrica installata... -
Page 55: Installazione
Il peso e le dimensioni sono approssimativi. Le specifiche e il design potranno variare senza preavviso in quanto siamo sempre impegnati nella ricerca di continue innovazioni dei nostri prodotti. Installazione Scelta delle attrezzature di installazione Tagliare la superficie di lavoro rispettando le misure indicate sul disegno. Per l'installazione e l'uso è... - Page 56 Prima di montare il piano di cottura, assicurarsi che • il supporto sia squadrato e livellato e che non ci siano elementi strutturali che possano interferire con i requisiti di spazio • il supporto sia realizzato in materiale resistente al calore •...
- Page 57 Vite Staffa Foro per vite Fondo vetro staffa di fissaggio vite ST3. 5x8 Piano di lavoro/mobiletto della cucina Fondo Avvertenza 1. Il piano di cottura a induzione deve essere montato da personale o tecnici qualificati. La nostra società ha un team di professionisti a disposizione dei clienti.
- Page 58 Il cavo di alimentazione elettrica non deve entrare in contatto con componenti surriscaldati e deve essere collocato in modo tale che la sua temperatura non superi mai, in nessun punto, i 75°C. Verificare con un elettricista se l'impianto di cablaggio dell'abitazione è corretto senza necessità...
- Page 59 Informazione prodotto per piani di cottura elettrici conformi al Regolamento della Commissione (UE) nº 66/2014 Unità di Posizione Simbolo Valore misura Identificativo del modello HIS642MCTT Piano cottura Tipologia di piano cottura: elettrico zone Numero di zone e/o aree di cottura aree...
- Page 60 Centrale sinistra Centrale centrale Centrale destra Anteriore sinistra Anteriore Centrale Anteriore destra Posteriore ECelectric 193,5 Peso/kg sinistra cooking Posteriore ECelectric Peso/kg centrale cooking Posteriore ECelectric 197,2 Peso/kg destra cooking Centrale ECelectric Peso/kg sinistra cooking Consumo energetico per zona o area Centrale ECelectric Peso/kg...
- Page 61 Sicherheitshinweise Ihr Sicherheit liegt uns am Herzen. Lesen Sie vor der Benutzung des Kochfelds bitte diese Hinweise. Montage Stromschlaggefahr • Trennen Sie das Gerät von der Netzstromversorgung ab, bevor Sie Arbeiten oder Wartungsmaßnahmen daran durchführen. • Der Anschluss an eine zuverlässige Masseverbindung ist wesentlich und zwingend vorgeschrieben.
- Page 62 • Legen Sie niemals brennbare Materialien oder Produkte auf dem Gerät ab. • Geben Sie diese Hinweise an den Verantwortlichen für die Geräteinstallation weiter, weil das Ihre Installationskosten verringern könnte. • Um Gefahren zu vermeiden, muss dieses Gerät anweisungsgemäß installiert werden. •...
- Page 63 Gesundheitsgefahr • Dieses Gerät erfüllt die Sicherheitsvorschriften für elektromagnetische Vorrichtungen. • Personen mit einem Herzschrittmacher oder anderen elektrischen Implantaten (z. B. Insulinpumpen) müssen vor der Benutzung dieses Geräts Rücksprache mit ihrem Arzt oder dem Hersteller des Implantats halten, um sicherzustellen, dass dieses nicht vom elektromagnetischen Feld beeinflusst wird.
- Page 64 Schnittgefahr • Wenn die Schutzkappe eines Kochfeldreinigers zurückgeschoben ist, liegt dessen rasiermesserscharfe Klinge frei. Benutzen Sie einen Kochfeldreiniger mit größter Vorsicht und bewahren Sie ihn immer sicher und für Kinder unzugänglich auf. • Bei Unvorsichtigkeit besteht Schnitt- oder Verletzungsgefahr. Wichtige Sicherheitshinweise •...
- Page 65 • Achten Sie darauf, das Kinder weder mit dem Gerät spielen noch darauf sitzen, stehen oder klettern. • Bewahren Sie in Schränken über dem Gerät keine Sachen auf, die für Kinder interessant sein könnten. Kinder, die auf das Kochfeld klettern, könnten ernsthafte Verletzungen erleiden.
- Page 66 • Benutzen Sie keine Topfreiniger oder andere scheuernden Reinigungsmittel, um das Kochfeld zu reinigen, weil diese das Induktionsglas verkratzen können. • Ein beschädigtes Netzkabel muss vom Hersteller, dem zugelassenen Kundendienst oder ähnlichem Fachpersonal ausgewechselt werden, um Gefahren vorzubeugen. • Dieses Gerät ist für den Einsatz im Haushalt und ähnliche Anwendungen vorgesehen, wie z.B.: - Personalküchen in Geschäften, Büros und anderen Arbeitsumgebungen;...
- Page 67 • Kinder dürfen keinesfalls mit dem Gerät spielen. Kinder dürfen das Gerät nur unter Beaufsichtigung reinigen und instandhalten. • WARNUNG: Unbeaufsichtigtes Kochen auf einem Kochfeld mit Fett oder Öl kann gefährlich sein und zu einem Brand führen. Versuchen Sie NIEMALS, einen Brand mit Wasser zu löschen, sondern schalten Sie das Gerät aus und ersticken Sie die Flamme dann (z.
-
Page 68: Herzlichen Glückwunsch
Bedienungsanleitung als geeignet genannt wird oder Bestandteil des Kochfelds ist. Die Benutzung eines ungeeigneten Kochfeldschutzes kann zu Unfällen führen. Dieses Gerät verfügt nur für funktionale Zwecke über einen Erdungsanschluss. Herzlichen Glückwunsch zum Kauf Ihres neuen Induktionskochfelds. Wir empfehlen, dieses Gebrauchs-/Montageanleitung aufmerksam zu lesen, um sich umfassend damit vertraut zu machen, wie das Gerät korrekt installiert und bedient wird. - Page 69 Produktübersicht Draufsicht 1. 2000 W Zone, Boost auf 2600 W 2. 1500 W Zone, Boost auf 2000 W 3. 2000 W Zone, Boost auf 2600 W 4. 1500 W Zone, Boost auf 2000W 5. Glaskeramikfläche 6. Bedienfeld Bedienfeld 1. Heizzonenauswahlanzeige 2.
- Page 70 Hinweise zum Induktionskochen Induktionskochen ist eine sichere, moderne, effiziente und ökonomische Art des Kochens. Anstatt indirekt über die Glaskeramikfläche, wird bei dieser Technologie die Hitze durch elektromagnetische Schwingungen direkt unter dem Kochtopf erzeugt. Das Glas wird nur deswegen heiß, weil es letztlich durch den Topf erhitzt wird. Eisentopf Magnetkreis Keramische Glasplatte...
- Page 71 Wahl des geeigneten Kochgeschirrs • Benutzen Sie ausschließlich Kochgeschirr mit einem für das Induktionskochen geeigneten Boden. Achten Sie auf das Induktionssymbol auf der Verpackung oder am Boden des Kochtopfes. • Um zu prüfen, ob Ihr Kochgeschirr für das Induktionskochen geeignet ist, können Sie einen Magnettest machen.
-
Page 72: Kochfeld Einschalten
Pfannenabmessungen Die Kochzonen werden bis zu einem Grenzwert automatisch an den Durchmesser des Kochgeschirrs angepasst. Der Boden des Kochgeschirrs muss jedoch, entsprechend der entsprechenden Kochzone, einen Mindestdurchmesser aufweisen. Um die beste Effizienz Ihres Kochfelds zu erreichen, platzieren Sie das Kochgeschirr bitte in der Mitte der Kochzone. Der Basisdurchmesser des Induktionskochgeschirrs Kochzone Minimum (mm) - Page 73 Wenn abwechselnd mit der Leistungseinstellung auf dem Display blinkt bedeutet dies: • dass sich kein Topf auf der entsprechenden Kochzone befindet oder • dass der verwendete Kochtopf ist für das Induktionskochen ungeeignet ist oder • dass der Kochtopf ist zu klein ist oder sich nicht mittig auf der Kochzone befindet. Der Heizvorgang findet erst statt, wenn sich ein geeigneter Kochtopf auf der Kochzone befindet.
- Page 74 Verwenden des Power-Managements Mit dem Leistungsmanagement können Sie die Gesamtleistung auf 2,5 kW/3,0 kW/4,5 kW/6,5 kW und 7,4 kW einstellen. Die Standard-Gesamtleistungseinstellung ist die maximale Leistungsstufe. Einstellen der Gesamtleistung auf Ihre Anforderung 1. Vergewissern Sie sich, dass das Kochfeld ausgeschaltet ist. Hinweis: Sie können die Energieverwaltung nur einstellen, wenn das Kochfeld ausgeschaltet ist.
- Page 75 Mit dem Boost Boost ist die Funktion, dass eine Zone steigt zu einer größeren Leistung in einer Sekunde und dauert 5 Minuten. So können Sie ein leistungsfähigeres und schnelleres Kochen erhalten. Verwenden des Boosts, um größere Leistung zu erhalten 1. Berühren Sie die Bedienfeldtaste, die verstärkt werden soll, und halten Sie dann das „b“ 3 Sekunden lang gedrückt.
- Page 76 Benutzung der Warmhaltefunktion Die Pausenfunktion kann während des Garens jederzeit verwendet werden. Es ermöglicht, das Induktionskochfeld zu stoppen und Warmhalten ist die Funktion, dass eine Zone eine geringere Leistung hält, um die Temperatur stabil zu machen. Konstante Temperatur mit Hilfe der Warmhaltefunktion Berühren Sie den linken Punkt des Schiebereglers, den Sie warm halten möchten, und halten Sie dann die Taste für 3 Sekunden gedrückt.
- Page 77 Berührungstasten sperren • Sie können die Berührungstasten sperren, um eine unbeabsichtigte Benutzung zu verhindern (beispielsweise das Einschalten der Kochzonen durch Kinder). • Bei aktivierter Sperre sind bis auf die Funktion EIN/AUS alle Berührungstasten funktionslos. Sperre aktivieren Drücken Sie auf die Tastensperre. Die Zeitschaltuhr zeigt „Lo“. Sperre deaktivieren 1.
- Page 78 Automatischer Abschaltschutz Die automatische Abschaltung ist eine Sicherheitsfunktion für Ihr Induktionskochfeld. Sie schaltet das Kochfeld automatisch ab, falls Sie vergessen, es auszuschalten. Die Tabelle unten zeigt die standardmäßigen Betriebszeiten für die verschiedenen Leistungsstufen: Leistungsstufe Standard-Betriebsdauer (Std.) Nach dem Entfernen des Kochtopfs stoppt das Induktionskochfeld sofort den Heizvorgang und schaltet sich dann nach 2 Minuten automatisch aus.
- Page 79 4. Um die Zeiteinstellung abzubrechen, berühren Sie „-“ des Timers und gehen herunter auf „0“. 5. Wenn die Zeit eingestellt ist, beginnt sofort der Countdown. Das Display zeigt die verbleibende Zeit, und die Erinnerungsanzeige blinkt 5 Sekunden lang. 6. Der Summer wird 30 Sekunden lang ertönen und die Timer- Anzeige zeigt “- - “...
- Page 80 5. Wenn die Zeit eingestellt ist, beginnt sofort der Countdown. Das Display zeigt die verbleibende Zeit, und die Erinnerungsanzeige blinkt 5 Sekunden lang. HINWEIS: Der rote Punkt neben der Leistungsstufenanzeige leuchtet als Hinweis darauf, dass die Zone ausgewählt wurde. 6. Nach Ablauf der vorgegebenen Kochzeit zeigt das Kochfeld „H“ an und die entsprechende Kochzone wird automatisch ausgeschaltet.
-
Page 81: Instandhaltung Und Reinigung
Instandhaltung und Reinigung Was? Wie? Wichtig! Tägliche Verschmutzung 1. Schalten Sie das Kochfeld aus. • Wenn das Kochfeld ausgeschaltet ist, gibt von Glas (Fingerabdrücke, 2. Reinigen Sie das noch warme (aber es keinen Hinweis „Heiße Oberfläche“, Flecken, nicht zu heiße!) Glas mit einem obwohl die Kochzone noch heiß... -
Page 82: Hinweise Und Tipps
Hinweise und Tipps Problem Mögliche Ursache Abhilfe Das Induktionskochfeld lässt Kein Netzstrom. Kontrollieren Sie, ob das sich nicht einschalten. Induktionskochfeld an der Netzstromversorgung angeschlossen und eingeschaltet ist. Überprüfen Sie, ob ein Stromausfall vorliegt. Falls Sie alles kontrolliert haben und das Problem fortbesteht, wenden Sie sich an einen Elektriker. - Page 83 Problem Mögliche Ursache Abhilfe Das Induktionskochfeld oder Technische Störung. Notieren Sie sich bitte den Fehlercode, eine Kochzone hat sich unterbrechen Sie die Stromversorgung unerwartet abgeschaltet, ein des Induktionskochfelds, und wenden Sie Ton ertönt und ein Fehler sich dann an einen Elektriker. code wird angezeigt (in der Regel abwechselnd mit einer oder zwei Ziffern in der...
-
Page 84: Technische Daten
Technische Daten Kochfeld CIES642MCTT Kochzonen 4 Zonen Versorgungsspannung 220-240 V~ 50/60 Hz Installierte elektrische Leistung 2,5 kW: 2250-2750 W oder 3,0 kw: 2700-3300W oder 4,5kw: 4050-4950W oder 6,5 kW: 5850-7150 W oder 7,4 kW: 6600-7400 W Abmessungen L×B×H (mm) 590X520X55 Einbaumaße A×B (mm) 560X490... - Page 85 Achten Sie unbedingt darauf, dass das Induktionskochfeld ausreichend belüftet ist und weder Lufteinlass noch Luftauslass blockiert sind. Stellen Sie sicher, dass sich das Induktionskochfeld in einem guten Betriebszustand befindet. Wie unten gezeigt. Hinweis: Der Sicherheitsabstand zwischen dem Kochfeld und einem darüber befindlichen Küchenschrank muss mindestens mm betragen.
- Page 86 Vor dem Anbringen der Befestigungsklammern: Legen Sie das Gerät auf eine stabile, ebene Unterlage (Verpackung verwenden). Achten Sie darauf, dass die hervorstehenden Bedienelemente keinem Druck ausgesetzt werden. Anpassen der Halterungsposition: Fixieren Sie das Kochfeld nach der Montage, indem Sie es mit den vier Halterungen unten am Kochfeld an der Arbeitsplatte festschrauben (siehe Abbildung).
- Page 87 Anschluss des Kochfelds an die Netzstromversorgung Dieses Kochfeld muss von einem qualifizierten Fachmann an die Netzstromversorgung angeschlossen werden. Überprüfen Sie vor dem Anschließen des Kochfelds an die Netzstromversorgung: dass die vorhandene Elektroanlage für die Leistungsaufnahme des Kochfelds geeignet ist; dass die Netzspannung den Angaben auf dem Typenschild entsprechen; dass die vorhandenen Stromkabel für die auf dem Typenschild angegebene Last ausgelegt sind.
- Page 88 Dieses Gerät ist entsprechend der EU-Richtlinie 2012/19/EU für Elektro- und Elektronik-Altgeräte (WEEE) gekennzeichnet. Unter die WEEE fallende Elektro- und Elektronik-Altgeräte enthalten sowohl umweltschädliche Stoffe (die negativen Folgen für die Umwelt verursachen) als auch wiederverwendbare Grundstoffe. Es ist wichtig, dass die Elektro- und Elektronik-Altgeräte einer spezifischen Behandlung unterzogen werden, um die Schadstoffe korrekt zu entfernen und zu entsorgen und alle Materialien zurückzugewinnen.
- Page 89 Produktinformationen für Haushalts-Elektrokochfelder gemäß der Verordnung (EU) Nr. 66/2014 der Kommission Position Symbol Wert Einheit Modellbezeichnung HIS642MCTT Kochfeldtyp: Elektrokochfeld Anzahl der Zonen Kochzonen und/oder Bereiche -bereiche Induktionskochzonen Heiztechnologie (Induktionskochzone Induktionskochfelder n und -kochbereiche, Strahlungskochbereiche Strahlungskochzone n, Kochplatten) feste Platten Hinten links Ø...
- Page 90 Hinten links EC Elektrokochen 193,5 Wh/kg Hinten Mitte EC Elektrokochen Wh/kg Hinten rechts EC Elektrokochen 197,2 Wh/kg Mitte links EC Elektrokochen Wh/kg Leistungsaufnahme pro Kochzone oder -bereich Mitte, Mitte EC Elektrokochen Wh/kg pro kg Mitte rechts EC Elektrokochen Wh/kg Vorn links EC Elektrokochen 192,3 Wh/kg...
- Page 91 Consignes de sécurité Votre sécurité est importante pour nous. Veuillez lire ces informations avant d’utiliser votre table de cuisson. Installation Risque de choc électrique • Débranchez l’appareil du réseau électrique avant d’effectuer tout travail ou entretien sur celui-ci. • Le raccordement à un bon système de mise à la terre est essentiel et obligatoire.
- Page 92 • Veuillez mettre cette information à la disposition de la personne responsable de l’installation de l’appareil afin de réduire vos coûts d’installation. • Afin d’éviter tout danger, cet appareil doit être installé conformément aux présentes instructions d’installation. • Cet appareil doit être correctement installé et mis à la terre uniquement par une personne qualifiée.
- Page 93 • Toutefois, les personnes porteuses de pacemakers ou d’autres implants électriques (tels que des pompes à insuline) doivent consulter leur médecin ou le fabricant de l’implant avant d’utiliser cet appareil afin de s’assurer que leurs implants ne seront pas affectés par le champ électromagnétique.
-
Page 94: Consignes Importantes De Sécurité
avec une extrême prudence et toujours stocker en toute sécurité et hors de portée des enfants. • Le non-respect de cette précaution peut entraîner des blessures ou des coupures. Consignes importantes de sécurité • Ne laissez jamais l’appareil sans surveillance lorsqu’il est utilisé. - Page 95 montent sur la table de cuisson peuvent être gravement blessés. • Ne laissez pas les enfants seuls ou sans surveillance dans la zone où l’appareil est utilisé. • Les enfants ou les personnes ayant un handicap qui limite leur capacité d’utiliser l’appareil devraient avoir une personne responsable et compétente pour les instruire sur son utilisation.
- Page 96 • Cet appareil est destiné à un usage domestique et à d'autres applications similaires telles que : - espaces cuisine du personnel dans des boutiques, bureaux et autres espaces de travail ; - maisons de ferme ; - par les clients dans des hôtels, motels et autres espaces de type résidentiel ;...
- Page 97 • AVERTISSEMENT : Danger d’incendie : ne pas stocker d'éléments sur les surfaces de cuisson. • Attention : Si la surface est fissurée, éteignez l’appareil pour éviter tout risque d’électrocution, pour les tables de cuisson en vitrocéramique ou matériau similaire qui protègent les pièces sous tension •...
-
Page 98: Vue D'ensemble Du Produit
Vue d’ensemble du produit Vue de dessus 1. Zone 2000 W, boost à 2600 W 2. Zone 1500 W, boost à 2000 W 3. Zone 2000 W, boost à 2600 w 4. Zone 1500 W, boost à 2000W 5. Table de verre 6. - Page 99 Un mot sur la cuisson à induction La cuisson à induction est une technologie sûre, innovante, efficace et économique. Elle fonctionne au moyen de vibrations électromagnétiques qui génèrent de la chaleur directement dans la casserole plutôt qu’indirectement en chauffant la surface vitrée. La vitre devient chaude uniquement parce que la casserole la chauffe.
- Page 100 Choisir une bonne batterie de cuisine • Utilisez uniquement une batterie de cuisine adaptée à la cuisson à induction. Recherchez le symbole de l’induction sur l’emballage ou sur le fond de la casserole. • Vous pouvez vérifier si votre batterie de cuisine est adaptée en réalisant un test magnétique.
- Page 101 Dimensions de la casserole Les zones de cuisson sont, jusqu’à une limite, automatiquement adaptées au diamètre de la casserole. Cependant, le fond de cette casserole doit avoir un diamètre minimum en fonction de la zone de cuisson correspondant. Pour obtenir la meilleure efficacité de votre table de cuisson, placez la casserole au centre de la zone de cuisson.
- Page 102 c. c. Si vous glissez le long de la touche « — », la puissance va varier entre le niveau 1 et le niveau 9. clignote en alternance avec l’indication du réglage de cuisson Cela signifie que : • vous n’avez pas posé votre casserole sur la bonne zone ou •...
- Page 103 Utilisation du réglage de la puissance Grâce à la gestion de la puissance, vous pouvez régler la puissance totale sur 2,5 kW/3,0 kW/4,5 kW/6,5 kW et 7,4 kW. Le réglage par défaut de la puissance totale est le niveau de chauffe maximal.
- Page 104 Utilisation de la fonction Boost La fonction Boost permet d’augmenter la puissance d’un foyer en une seconde et ce pendant 5 minutes. De cette façon, la cuisson sera plus vive et plus rapide. Utilisation de la fonction Boost pour augmenter la puissance 1.
-
Page 105: Utilisation De La Fonction Maintien Au Chaud
Utilisation de la fonction Maintien au chaud La fonction Pause peut être utilisée à tout moment pendant la cuisson. Il permet d'arrêter la table de cuisson à induction et Garder au chaud est la fonction qu'une zone garde une puissance plus faible pour rendre la température stable. -
Page 106: Verrouillage Des Touches De Commande
2. Pour supprimer la condition de pause, appuyez sur la touche PAUSE ; le foyer de cuisson reviendra à la puissance qui était réglée avant le basculement en pause. Verrouillage des touches de commande • Vous avez la possibilité de verrouiller les touches de commande pour éviter leur utilisation inappropriée (par des enfants, par exemple). -
Page 107: Utilisation Du Temporisateur
Protection par arrêt automatique L’arrêt automatique est une fonction de protection de sécurité pour votre table de cuisson à induction. Elle s’éteint automatiquement si vous oubliez d’éteindre votre appareil. Les durées d’utilisation par défaut des différents niveaux de chauffe sont indiquées dans le tableau ci-dessous : Niveau de chauffe Temporisateur de travail par défaut (heure) - Page 108 4. Supprimez la durée en appuyant sur la touche « - » du temporisateur et en réduisant sur « 0 ». 5. Une fois le temps réglé, le décompte commence immédiatement. La touche de temporisation affiche le temps restant et l’affichage du temporisateur clignote pendant 5 secondes.
- Page 109 Une fois le temps réglé, le décompte commence immédiatement. L’écran affiche le temps restant et le temporisateur clignote pendant 5 secondes. REMARQUE : Le point rouge près de l’indicateur du niveau de chauffe s’allume pour indiquer que la zone de cuisson est sélectionnée.
-
Page 110: Entretien Et Nettoyage
Entretien et nettoyage Quoi ? Comment ? Important ! Saleté quotidienne sur 1. Mettez la table de cuisson hors • • Lorsque l’alimentation de la table de verre (empreintes digitales, tension. cuisson est coupée, il n’y a pas d’indication marques, taches laissées 2. -
Page 111: Conseils Et Astuces
Conseils et astuces Problème Cause possible Solution La table de cuisson à Pas d’électricité. Assurez-vous que la table de cuisson à induction ne peut pas être induction est branchée à l’alimentation allumée. électrique et qu’elle est allumée. Vérifiez s’il y a une panne d’électricité dans votre maison ou votre région. -
Page 112: Spécifications Techniques
Affichage et inspection des défaillances Si des événements anormaux surviennent, la table de cuisson à induction entrera automatiquement en condition de protection et affichera les codes de protection correspondants : Problème Cause possible Solution F3/F4 Défaillance du capteur de température de Veuillez contacter le la bobine d’induction fournisseur. - Page 113 Installation Choix du matériel d’installation Découpez la surface de travail selon les dimensions indiquées sur le dessin. Pour l’installation et l’utilisation, un espace d’au moins 5 cm doit être préservé autour du trou. Vérifiez que l’épaisseur de la surface du plan de travail soit d’au moins mm.
- Page 114 Avant d’installer la table de cuisson, assurez-vous que • la surface de travail est d’équerre et de niveau, qu’aucune partie n’interfère avec l’espace nécessaire • le plan de travail est constitué d’un matériau résistant à la chaleur • si la plaque est installée au-dessus d’un four, le four est équipé d’un système de ventilation interne •...
- Page 115 Verre patte de fixation ST3. 5*8 plan de travail/meuble de cuisine Face inférieure Attention 1. L’installation de la table de cuisson à induction doit être effectuée par du personnel qualifié. Nous avons des professionnels à votre service. N’effectuez en aucun cas cette installation vous- même.
- Page 116 La prise d’alimentation doit être raccordée, conformément à la norme en vigueur, à un disjoncteur unipolaire. La méthode de connexion est illustrée ci-dessous. • Si le câble est endommagé ou s’il doit être remplacé, l’intervention doit être réalisée par un technicien après-vente munis des outils appropriés, pour éviter tout accident.
- Page 117 Informations sur la table de cuisson électrique à usage domestique conforme aux normes de la Commission (UE) n° 66/2014 Position Symbole Valeur Unité Identification du modèle HIS642MCTT Table de cuisson Type de table de cuisson : électrique Nombre de foyers foyers et/ou de zones de...
- Page 118 Cuisson Arrière gauche 193,5 Wh/kg électrique CE Cuisson Arrière centre Wh/kg électrique CE Cuisson Arrière droite 197,2 Wh/kg électrique CE Cuisson Centre gauche Wh/kg électrique CE Consommation d’énergie par zone ou foyer Cuisson Centre centre Wh/kg de cuisson calculée par kg électrique CE Cuisson Centre droite...
- Page 119 Bezpečnostní upozornění Vaše bezpečnost je pro nás důležitá. Přečtěte si prosím tyto informace ještě před použitím varné desky. Instalace Nebezpečí úrazu elektrickým proudem • Před každou údržbou odpojte spotřebič od zdroje elektrického napájení. • Připojení elektroinstalace k dobrému uzemnění je nezbytné...
- Page 120 • Dejte prosím tyto informace k dispozici na osobě odpovědné za instalaci spotřebiče, mohly by snížit vaše náklady na instalaci. • Tento spotřebič musí být instalován podle návodu k instalaci, jinak hrozí nebezpečí. • Tento spotřebič musí být správně nainstalován a uzemněn pouze kvalifikovaným pracovníkem.
- Page 121 musí poradit před použitím tohoto zařízení se svým lékařem nebo výrobcem implantátu a ujistit se, že jejich implantáty nebudou ovlivněny elektromagnetickým polem. • Nedodržení těchto pokynů může vést k smrti. Nebezpečí horkého povrchu • Během používání se přístupné části spotřebiče zahřívají na vysokou teplotu a mohou vás popálit.
-
Page 122: Důležité Bezpečnostní Pokyny
Důležité bezpečnostní pokyny • Během použití nikdy nenechávejte spotřebič bez dozoru. Vaření způsobuje kouření a mastné rozlití, které se může vznítit. • Nepoužívejte spotřebič jako pracovní nebo odkládací plochu. • Na spotřebič nikdy nepokládejte žádné předměty nebo nástroje. • Nepokládejte ani nechávejte zmagnetizovatelné předměty (např. - Page 123 jeho používání. Tato osoba se musí přesvědčit, že mohou používat spotřebič bez nebezpečí pro sebe nebo své okolí. • Neopravujte ani nevyměňujte žádnou část spotřebiče, pokud to není v návodě výslovně doporučeno. Všechny další služby údržby smí provádět pouze oprávněný technik.
- Page 124 • Dávejte pozor, abyste se nedotkli topných článků. • Děti do 8 let by se neměly ke spotřebiči přibližovat, pokud je nesleduje dospělá osoba. • Tento spotřebič smějí používat děti starší 8 let a osoby se sníženými fyzickými, smyslovými nebo duševními schopnostmi nebo bez patřičných zkušeností...
- Page 125 VAROVÁNÍ! Aby se zabránilo převrácení spotřebiče, musí být nainstalován tento stabilizační prostředek. Viz návod k instalaci. VAROVÁNÍ! Používejte pouze víka pro varné desky navržená výrobcem varného spotřebiče nebo označená výrobcem spotřebiče v návodu k použití jako vhodné víko varné desky nebo víka pro varné desky zabudovaná do spotřebiče.
-
Page 126: Přehled Výrobku
Přehled výrobku Pohled shora 1. 2000 W zóna, zvýšení na 2600 W 2. 1500 W zóna, zvýšení na 2000 W 3. 2000 W zóna, zvýšení na 2600 w 4. 1500 W zóna, zvýšení na 2000 W 5. Skleněná deska 6. Ovládací panel Ovládací... - Page 127 Informace o indukčním vaření Indukční vaření je bezpečná, moderní, efektivní a úsporná technologie vaření. Funguje na základě elektromagnetických vibrací, které vytvářejí teplo přímo v nádobě, nikoliv nepřímo prostřednictvím zahřátí povrchu skla. Sklo je horké jen proto, že ho zahřálo vložené jídlo. Železný...
- Page 128 Výběr správné nádoby • Používejte jen nádoby vhodné pro indukční varné zóny. Podívejte se na symbol indukce na obalu nebo na spodní části nádoby. • Pomocí magnetu můžete zkontrolovat, zda je vaše nádobí vhodné. Přiložte magnet směrem ke spodní části nádoby. V případě, že je přitahován, je nádoba vhodná...
- Page 129 Rozměry nádoby Varné zóny jsou až do limitu automaticky přizpůsobeny průměru nádoby. Avšak dno této nádoby musí mít minimální průměr podle příslušné varné zóny. Abyste dosáhli co nejlepší účinnosti varné desky, umístěte nádobu do středu varné zóny. Průměr dna indukčního nádobí Varná...
- Page 130 Jestliže displej bliká střídavě s nastavením tepla To znamená, že: • jste neumístili nádobu na správnou varnou zónu nebo, • nádoba, kterou používáte, není vhodná pro indukční vaření nebo, • nádoba je příliš malá nebo není ve středu varné zóny. Pokud není...
- Page 131 Používání funkce řízení výkonu Pomocí funkce řízení výkonu můžete nastavit celkový výkon na 2,5 kW/3,0 kW/4,5 kW/6,5 kW a 7,4 kW. Výchozí nastavení celkového výkonu je maximální úroveň výkonu. Nastavení úrovně celkového výkonu tak, aby odpovídala vašemu požadavku 1. Ujistěte se, že je varná deska vypnutá. Poznámka: funkci řízení...
- Page 132 Použití funkce zesílení výkonu (boost) Zesílení výkonu (boost) je funkce, která u jedné zóny během jedné sekundy zvýší výkon na vyšší hodnotu a trvá po dobu 5 minut. Tím dosáhnete výkonnějšího a rychlejšího vaření. Použití funkce zesílení výkonu (boost) k získání vyššího výkonu 1.
- Page 133 Používání funkce udržování teplých pokrmů Funkci pauzy lze použít kdykoliv během vaření. Umožňuje zastavit indukční varnou desku a udržovat teplo je funkce, kterou jedna zóna udržuje nižší výkon, aby byla teplota stabilní. Používání funkce udržování teplých pokrmů k dosažení stabilní teploty Dotkněte se levého bodu posuvníku, který...
-
Page 134: Ochrana Proti Přehřátí
2. Chcete-li zrušit stav pozastavení, dotkněte se funkce Stop+Go a tepelná zóna se vrátí zpět do napájecího pódia, které jste nastavili dříve. Zablokování ovladačů • Ovladače můžete zablokovat, abyste zabránili neúmyslnému použití (například náhodnému zapnutí varných zón dětmi). • Jsou-li ovladače zablokovány, všechny ovladače kromě ovládání ON/OFF (ZAP/VYP) jsou deaktivovány. -
Page 135: Používání Časovače
Ochrana s automatickým vypnutím Automatické vypnutí plní funkci bezpečnostní ochrany pro indukční varnou desku. Ta se automaticky vypne, pokud ji zapomenete vypnout vy. Výchozí provozní časy pro různé úrovně výkonu jsou uvedeny v následující tabulce: Stupeň výkonu Výchozí provozní časovač (hodiny) Po odstranění... - Page 136 5. Je-li nastaven čas, začne se ihned odpočítávat. Na displeji se zobrazí zbývající čas a indikátor časovače bude blikat po dobu 5 sekund. 6. Po dokončení nastavení času bude bzučák pípat po dobu 30 sekund a indikátor časovače zobrazí „- -“. Nastavení...
- Page 137 Nastavení časovače pro vypnutí více než jedné varné zóny 1. Pokud tuto funkci použijete na více než jednu zónu ohřevu, bude indikátor časovače zobrazovat nejkratší nastavenou dobu. (Pokud je například u zóny 2 nastavena doba 3 minuty a u zóny 3 nastavena doba 6 minut, indikátor časovače bude zobrazovat „3“.) POZNÁMKA: Blikající...
-
Page 138: Péče A Čištění
Péče a čištění Jak? Důležité upozornění! Každodenní znečištění skla 1. Vypněte napájení varné desky. • Když je napájení varné desky vypnuté, (otisky prstů, stopy, skvrny 2. Naneste čistič na varnou desku, nefunguje indikátor horkého povrchu, a zanechané zatímco je sklo ještě teplé (ale ne přitom mohou být varné... -
Page 139: Rady A Tipy
Rady a tipy Problém Možné příčiny Co dělat Indukční varnou desku nejde Není napájení. Zkontrolujte, zda je indukční varná deska zapnout. připojená k napájení, a to je zapnuté. Zkontrolujte, zda není výpadek proudu ve vašem domě nebo okolí. Pokud jste zkontrolovali všechno a problém přetrvává, obraťte se na kvalifikovaného technika. -
Page 140: Technické Specifikace
Zobrazení závad a kontrola Pokud se objeví abnormalita, indukční varná deska vstoupí automaticky do ochranného stavu a zobrazí odpovídající ochranné kódy: Problém Možné příčiny Co dělat F3/F4 Porucha teplotního čidla indukční cívky Obraťte se prosím na dodavatele. F9/FA Obraťte se prosím na Teplotní... - Page 141 Instalace Výběr zařízení pro instalaci Vyřízněte pracovní plochu podle rozměrů ve výkresu. Za účelem instalace a použití musí být kolem otvoru zachován alespoň 5cm prostor. Ujistěte se, že tloušťka pracovní plochy je nejméně mm. Zvolte materiál tepelně odolného pracovního povrchu, aby nedošlo k větší deformaci způsobené tepelným zářením z varné desky. Podle níže uvedeného obrázku: TĚSNĚNÍ...
- Page 142 Před instalací varné desky zkontrolujte, zda • je pracovní plocha vyrovnaná a plochá a žádné konstrukční prvky nebrání splnění nároků na prostor, • je pracovní plocha vyrobena z tepelně odolného materiálu, • je-li varná deska instalovaná nad troubu, musí mít trouba vestavěný chladicí ventilátor, •...
- Page 143 Sklo Pojistná konzola Kašlu na ST3. 5*8 Pracovní deska / Spodní kryt kuchyňská skříňka Upozornění 1. Instalaci varné desky musí provést kvalifikovaná osoba nebo technik. V případě zájmu můžeme zprostředkovat vhodné odborníky. Nikdy se nepokoušejte provádět instalaci sami. 2. Varná deska nesmí být umístěna přímo nad myčkou nádobí, chladničkou, mrazničkou, pračkou nebo sušičkou, protože vlhkost by mohla poškodit elektroniku varné...
- Page 144 • Je-li kabel poškozený, nebo má být nahrazen, musí tuto práci provést pracovník poprodejního servisu s příslušnými nástroji, aby nedošlo k úrazu. • Je-li spotřebič připojen přímo k elektrické síti, musí být nainstalován vícepólový jistič s minimálním otvorem 3 mm mezi kontakty. •...
- Page 145 Produktové informace elektrických varných desek vyhovující směrnici komise (EU) č. 66/2014 Poloha Symbol Hodnota Jednotka Identifikační číslo modelu HIS642MCTT Elektrická varná Typ varné desky: deska zóny Počet varných zón a/nebo ploch plochy indukční varné zóny Technologie ohřevu Indukční varné (indukční varné zóny a plochy varné...
- Page 146 ECelectric Zadní levá 193,5 Wh/kg cooking ECelectric Zadní centrální Wh/kg cooking ECelectric Zadní pravá 197,2 Wh/kg cooking ECelectric Centrální levá Wh/kg cooking Spotřeba energie na varnou zónu nebo Centrální ECelectric Wh/kg plochu přepočtenou na kg centrální cooking ECelectric Centrální pravá Wh/kg cooking ECelectric...
- Page 147 Bezpečnostné upozornenia Vaša bezpečnosť je pre nás dôležitá. Skôr ako začnete varnú dosku používať, si prečítajte tieto informácie. Inštalácia Nebezpečenstvo úrazu elektrickým prúdom • Zariadenie odpojte od sieťového napájania predtým, ako na ňom budete vykonávať akúkoľvek prácu alebo údržbu. • Pripojenie k dobrému uzemňovaciemu systému je podstatné...
- Page 148 • Na toto zariadenie by sa nikdy nemali klásť horľavé materiály alebo výrobky. • Tieto informácie dajte k dispozícii osobe zodpovednej za inštaláciu zariadenia, pretože by sa tým mohli znížiť náklady na inštaláciu. • Aby ste sa vyhli nebezpečenstvu, toto zariadenie sa musí nainštalovať...
- Page 149 • Ľudia s kardiostimulátorom alebo inými elektrickými implantátmi (napríklad inzulínovými pumpami) sa musia pred používaním tohto zariadenia poradiť s lekárom alebo výrobcom implantátu, aby sa uistili, že ich implantáty nebudú ovplyvnené elektromagnetickým poľom. • Nedodržanie tohto odporúčania môže mať za následok smrť.
-
Page 150: Dôležité Bezpečnostné Pokyny
mimoriadne opatrní a vždy ju uchovávajte bezpečne a mimo dosahu detí. • Nedostatočná opatrnosť môže viesť k zraneniu alebo porezaniu. Dôležité bezpečnostné pokyny • Pri používaní nenechávajte zariadenie nikdy bez dozoru. Varenie spôsobuje fajčenie a mastné rozliatie, ktoré sa môže vznietiť. •... - Page 151 • V priestore, kde sa používa zariadenie, nenechávajte deti samotné alebo bez dozoru. • Deti alebo osoby s postihnutím, ktoré obmedzuje ich schopnosť používať zariadenie, by mala zodpovedná a kompetentná osoba poučiť o tom, ako sa používa. Táto osoba by mala byť spokojná, že môžu zariadenie používať...
- Page 152 klientmi hotelov, motelov a iných objektov obytného typu; – objekty na prenocovanie s raňajkami. • VAROVANIE: Spotrebič a jeho prístupné súčasti sa počas prevádzky zahrievajú na vysokú teplotu. • Dávajte pozor, aby ste sa nedotkli vyhrievacích prvkov. • Deti do 8 rokov sa musia zdržiavať mimo dosahu, ak nie sú...
- Page 153 • Zariadenie nie je určené na ovládanie pomocou externého časovača alebo samostatného systému diaľkového ovládania. UPOZORNENIE: Na proces varenia sa musí dohliadať. Pri príprave jedla s krátkou dobou varenia na jedlo nepretržite dohliadajte. VAROVANIE: Na zabránenie nakláňaniu spotrebiča sa musia namontovať...
-
Page 154: Prehľad Výrobku
Prehľad výrobku Pohľad zhora 1. 2000 W zóna, zvýšenie na 2600 W 2. 1500 W zóna, zvýšenie na 2000 W 3. 2000 W zóna, zvýšenie na 2600 w 4. 1500 W zóna, zvýšenie na 2000 W 5. Sklenená doska 6. Ovládací panel Ovládací... - Page 155 Slovo o indukčnom varení Indukčné varenie je bezpečná, vyspelá, efektívna a úsporná technológia varenia. Funguje na princípe elektromagnetických vibrácií vytvárajúcich teplo priamo v hrnci, nie nepriamo prostredníctvom ohrevu skleneného povrchu. Sklo je horúce len preto, lebo ho hrniec nakoniec zohreje. Železný...
- Page 156 Výber vhodného riadu • Používajte len riad s dnom vhodným na indukčné varenie. Pozrite sa, či sa obale alebo na dne hrnca nachádza symbol indukcie. • Vhodnosť riadu si môžete overiť aj vykonaním magnetického testu. Pohybujte magnetom smerom ku dnu hrnca. Ak sa pritiahne, hrniec je vhodný...
- Page 157 Rozmery hrnca Varné zóny sa, do určitej miery, automaticky prispôsobia priemeru hrnca. Dno tohto hrnca však musí mať minimálny priemer podľa príslušnej varnej zóny. Aby ste dosiahli najlepšiu účinnosť varnej dosky, umiestnite hrniec do stredu varnej zóny. Priemer dna indukčného riadu Varná...
- Page 158 Ak na displeji striedavo bliká a nastavenie teplotného stupňa Znamená to, že: • neumiestnili ste hrniec na správnu varnú zónu alebo • hrniec, ktorý používate, nie je vhodný pre indukčné varenie alebo • hrniec je príliš malý alebo nie je správne umiestnený v strede varnej zóny. Ak na varnú...
- Page 159 Používanie riadenia výkonu Pomocou riadenia výkonu môžete nastaviť celkový výkon na 2,5 kW/3,0 kW/4,5 kW/6,5 kW a 7,4 kW. Ako predvolené nastavenie celkového výkonu je nastavená maximálna úroveň výkonu. Nastavenie celkovej úrovne výkon podľa vašich požiadaviek 1. Uistite sa, či je varná doska vypnutá. Poznámka: riadenie výkonu môžete nastaviť...
- Page 160 Používanie funkcie Boost Boost je funkcia, ktorou sa výkon jednej zóny zvýši za sekundu a potrvá 5 minút. Tak môžete dosiahnuť výkonnejšie a rýchlejšie varenie. Používanie funkcie Boost na zvýšenie výkonu 1. Dotknite sa tlačidla ovládacieho panelu, ktorému chcete zvýšiť výkon, potom podržte „b“ na 3 sekundy.
- Page 161 Používanie udržiavania teploty Funkcia pozastavenia sa môže použiť kedykoľvek počas prípravy jedla. Umožňuje zastaviť indukčnú varnú dosku a udržiavať teplo je funkcia, že jedna zóna udržiava nižšiu energiu, aby bola teplota stabilná. Používanie udržiavania teploty na zaistenie stabilnej teploty Dotknite sa ľavého bodu posuvníka, ktorý...
- Page 162 2. Ak chcete zrušiť stav pozastavenia, dotknite sa funkcie Stop+Go a potom sa varná zóna vráti späť na napájací stupeň, ktorý ste nastavili predtým. Uzamykanie ovládačov • Ovládače môžete uzamknúť, aby ste zabránili ich neúmyselnému použitiu (napríklad aby deti náhodou nezapli varné zóny). •...
- Page 163 Ochrana automatickým vypnutím Automatické vypnutie je bezpečnostná ochranná funkcia indukčnej varnej dosky. Ak ju niekedy zabudnete po varení vypnúť, automaticky sa vypne. Predvolené časy prevádzky pre rôzne úrovne výkonu sú uvedené v nasledujúcej tabuľke: Úroveň výkonu Predvolený časovač prevádzky (hodina) Po odobratí...
- Page 164 5. Po nastavení sa čas začne okamžite odpočítavať. Na displeji sa zobrazí zostávajúci čas a indikátor časovača bude 5 sekúnd blikať. 6. Po dokončení nastavovacieho času zvuková signalizácia znie 30 sekúnd a indikátor časovača zobrazuje „- -“. Nastavenie časovača na vypnutie jednej varnej zóny Varné...
- Page 165 Nastavenie časovača na vypnutie viacerých varných zón 1. Ak sa táto funkcia použije pri viac ako jednej zóne ohrevu, na kontrolke časovača sa zobrazí najkratší čas. (napr. nastavenie času zóny č. 2 sú 3 minúty, nastavenie času zóny č. 3 je 6 minút, na kontrolke časovača sa zobrazí...
-
Page 166: Starostlivosť A Čistenie
Starostlivosť a čistenie Čo? Ako? Dôležité! Každodenné znečistenie 1. Vypnite napájanie varnej dosky. • Ak je napájanie varnej dosky vypnuté, skla (odtlačky prstov, stopy, 2. Naneste čistiaci prostriedok na varné nebude zobrazená indikácia „horúci škvrny zanechané dosky, kým je sklo ešte teplé (ale nie povrch“, ale varná... - Page 167 Rady a tipy Problém Možné príčiny Čo robiť Indukčná varná doska sa Nie je napájaná. Uistite sa, že je indukčná varná doska nedá zapnúť. pripojená k napájaniu a že je zapnutá. Skontrolujte, či vo vašom dome alebo oblasti nedošlo k výpadku prúdu. Ak ste všetko skontrolovali a problém pretrváva, zavolajte kvalifikovaného technika.
-
Page 168: Technické Údaje
Zobrazenie chýb a kontrola Ak dôjde k neštandardnej prevádzke, indukčná varná doska sa automaticky prepne do ochranného stavu a zobrazí príslušné ochranné kódy: Problém Možné príčiny Čo robiť F3/F4 Porucha teplotného snímača indukčnej Kontaktujte dodávateľa. cievky F9/FA Kontaktujte dodávateľa. Porucha teplotného snímača na bipolárnom tranzistore s izolovaným hradlom E1/E2... -
Page 169: Výber Miesta Inštalácie
Inštalácia Výber miesta inštalácie Vyrežte pracovnú dosku podľa rozmerov uvedených na obrázku. Pre účely inštalácie a používania je potrebné ponechať okolo otvoru najmenej 5 cm voľného priestoru. Uistite sa, že hrúbka pracovnej plochy je najmenej mm. Vyberte tepelne odolný materiál pracovnej plochy, aby ste zabránili väčším deformáciám spôsobeným žiarením tepla z varnej dosky. - Page 170 A (mm) B (mm) C (mm) D 50 mini 20 mini Prívod Výstup vzduchu vzduchu 5 mm Pred inštaláciou varnej dosky sa uistite, že • pracovná doska je štvorcová a rovná a žiadne štruktúry nie sú v rozpore s priestorovými požiadavkami, •...
- Page 171 Upravenie polohy držiakov Varnú dosku pripevnite na pracovnú dosku zaskrutkovaním 4 držiakov na spodnú stranu krytu varnej dosky (pozrite obrázok) po inštalácii. skrutka držiak otvor na skrutku spodný kryt Sklo Zadržiavacia konzola Srať na ST3. 5*8 pracovná doska/kuchynská spodný kryt skrinka Upozornenia 1.
- Page 172 Pripojenie varnej dosky k sieťovému napájaniu Túto varnú dosku smie pripojiť k sieťovému napájaniu len vhodne kvalifikovaná osoba. Pred pripojením varnej dosky k sieťovému napájaniu skontrolujte, či: elektroinštalácia v domácnosti vyhovuje odberu varnej dosky, napätie zodpovedá hodnote uvedenej na typovom štítku, prierez napájacieho kábla znesie zaťaženie uvedené...
- Page 173 Informácie o výrobku pre domáce elektrické varné dosky, ktoré sú v súlade s nariadením Komisie (EÚ) č. 66/2014 Pozícia Symbol Hodnota Jednotka Označenie modelu HIS642MCTT elektrická Typ varnej dosky: varná doska Počet zón a/alebo zóny plôch na varenie na oblasti varenie Indukčné...
- Page 174 Vzadu vľavo Elektrické varenie 193,5 Wh/kg Vzadu v strede Elektrické varenie Wh/kg Vzadu vpravo Elektrické varenie 197,2 Wh/kg V strede vľavo Elektrické varenie Wh/kg Vypočítaná spotreba energie na zónu alebo V strede, v strede Elektrické varenie Wh/kg plochu na varenie na kg V strede vpravo Elektrické...
-
Page 175: Advertências De Segurança
Advertências de segurança A sua segurança é importante para nós. Leia esta informação antes de utilizar a sua placa. Instalação Perigo de choque elétrico Desligue o aparelho da alimentação elétrica de rede ● antes de realizar qualquer manutenção de rotina. A ligação a um bom sistema de ligação à... - Page 176 Este aparelho deve ser instalado corretamente ● e ligado à terra apenas por uma pessoa devidamente qualificada. Este aparelho deve ser ligado a um circuito que ● incorpora um interruptor de isolamento que proporciona uma desconexão total da alimentação elétrica. A não instalação correta do aparelho poderia ●...
- Page 177 Durante a utilização, as partes acessíveis deste ● aparelho ficarão quentes o suficiente para causar queimaduras. Não permita que o seu corpo, roupa ou qualquer item ● que não seja um utensílio adequado entre em contacto com o vidro de indução até que a superfície fique fria.
- Page 178 afetados pelo seu campo eletromagnético. Nunca utilize o aparelho como sistema de ● aquecimento da divisão. Após a utilização, desligue sempre as zonas de ● cozedura e a placa como descrito neste manual (ou seja, utilizando os comandos táteis). Não confie na função de deteção de panelas para desligar as zonas de cozedura ao retirar as panelas.
- Page 179 podem riscar o vidro de indução. Se o cabo de alimentação estiver danificado, tem de ● ser substituído pelo fabricante, pelo agente de serviço ou por pessoas igualmente qualificadas de forma a evitar o perigo. Este aparelho destina-se a ser utilizado em meio ●...
- Page 180 Aviso: Se a superfície estiver rachada, desligue ● o aparelho para evitar a possibilidade de choque elétrico a partir de superfícies de placas de vitro- cerâmica ou de material similar que protegem peças sob tensão Não deve nunca utilizar um aparelho de limpeza a ●...
-
Page 181: Painel De Controlo
Apresentação do produto Vista superior 1. Zona de 2000 W, boost para 2600 W 2. Zona de 1500 W, boost para 2000 W 3. Zona de 2000 W, boost para 2600 W 4. Zona de 1500 W, boost para 2000 W 5. - Page 182 Uma palavra sobre cozedura por indução A cozedura por indução é uma tecnologia de cozinha segura, avançada, eficiente e económica. Funciona por vibrações eletromagnéticas gerando calor diretamente na panela, em vez de indiretamente através do aquecimento da superfície do vidro. O vidro fica quente apenas porque a panela eventualmente aquece-o.
- Page 183 Escolher os utensílios de cozinha adequados Utilize apenas utensílios de cozinha com uma base • adequada para cozinhar por indução. Procure o símbolo de indução na embalagem ou na parte inferior da panela. Pode verificar se os seus utensílios de cozinha são adequados •...
- Page 184 Dimensões das panelas As zonas de cozedura são, até um limite, adaptadas automaticamente ao diâmetro da panela. No entanto, o fundo da panela deve ter um diâmetro mínimo de acordo com a zona de cozedura correspondente. Para obter a melhor eficiência da placa, coloque a panela no centro da zona de cozedura.
- Page 185 a. Se não definir a potência no período de 1 minuto, a placa de indução desliga-se automaticamente. Terá de recomeçar no passo 1. b. É possível modificar a regulação do calor a qualquer altura durante a cozedura. c. Se deslizar ao longo do "—", a potência irá variar da fase 1 para a fase 9. Se o visor piscar alternadamente com a regulação do calor...
- Page 186 Utilizar a gestão da energia Utilizando a gestão de energia, pode definir a potência total para 2,5 kW/ 3,0 kW/ 4,5 kW/ 6,5 kW e 7,4 kW. A definição padrão de potência total é o nível máximo de potência. Definir o nível de potência total para se adaptar às suas necessidades 1.
- Page 187 Utilizar o boost O boost é a função em que uma zona sobe para uma potência maior num segundo e tem uma duração de 5 minutos. Pode assim obter uma cozedura com mais potência e mais rápida. Utilizar o boost para obter maior potência 1.
- Page 188 Utilizar a função "Manter quente" "Manter quente" é a função em que uma zona mantém uma potência mais baixa para tornar a temperatura estável. Utilizar a função "Manter quente" para obter uma temperatura estável 1. Toque no ponto esquerdo do comando deslizante que deseja manter quente e mantenha o botão premido durante 3 segundos;...
- Page 189 3. Para cancelar o estado de pausa, toque na função Stop+Go; a zona de cozedura irá voltar para a fase de potência que definiu antes. Bloquear os comandos Pode bloquear os comandos para evitar uma utilização involuntária (por • exemplo, crianças que acidentalmente ligam as zonas de cozedura). Quando os comandos são bloqueados, todos os comandos exceto o LIGAR/ •...
-
Page 190: Utilizar O Temporizador
Proteção de desligamento automático O desligamento automático é uma função de proteção de segurança na sua placa de indução. Desliga-se automaticamente caso se esqueça de desligar o que está a confecionar. Os tempos de funcionamento predefinidos para vários níveis de potência são mostrados na tabela abaixo: Nível de potência Temporizador de funcio-... - Page 191 5. Quando o tempo estiver definido, será iniciada imediatamente a contagem decrescente. O visor irá mostrar o tempo restante e o indicador do temporizador irá piscar durante 5 segundos. 6. O sinal sonoro irá soar durante 30 segundos e o indicador do temporizador mostra "- -"...
- Page 192 5. Quando o tempo estiver definido, a contagem decrescente será iniciada imediatamente. O visor irá apresentar o tempo restante e o indicador do temporizador irá piscar durante 5 segundos. NOTA: O ponto vermelho próximo do indicador do nível de potência irá...
-
Page 193: Cuidados E Limpeza
Cuidados e limpeza O quê? Como? Importante! Sujidade diária no 1. Desligue a alimentação da Quando a alimentação da placa vidro (impressões placa. estiver desligada, não haverá digitais, marcas, 2. Aplique um produto de indicação de "superfície quente", mas manchas deixadas limpeza de placas enquanto a zona de cozedura pode ainda estar... -
Page 194: O Que Fazer
Dicas e sugestões Problema Causas possíveis O que fazer Não é possível ligar a Não há energia. Certifique-se de que a placa de placa de indução. indução está conectada à fonte de alimentação e que está ligada. Verifique se há uma falha de energia na sua casa ou área. - Page 195 A placa de indução ou Falha técnica. Anote as letras e números de erro, uma zona de desligue a alimentação da placa de cozedura desligou-se indução na parede e contacte um inesperadamente, um técnico qualificado. sinal sonoro e um código de erro é exibido (normalmente alternando com um ou dois dígitos no...
-
Page 196: Especificações Técnicas
Especificações técnicas Placa para cozinhar HIS642MCTT Zonas de cozedura 4 zonas Tensão de alimentação 220-240 V~, 50-60 Hz Potência elétrica instalada 2,5 kw:2250-2750 W ou 3,0 kw:2700-3300 W ou 4,5 kw:4050-4950 W ou 6,5 kw:5850-7150 W ou 7,4 kw:6600-7400 W... - Page 197 Nota: A distância de segurança entre a placa quente e o armário acima desta deve ser de, no mínimo, 760 mm. (mm) (mm) (mm) 50 mini 20 mini Entrada de ar Saída de ar 5 mm Antes de instalar a placa, certifique-se de que: a superfície de trabalho é...
- Page 198 há um fluxo adequado de ar fresco do exterior do espaço de instalação para • a base da placa se a placa for instalada acima de uma gaveta ou armário, é instalada uma • barreira de proteção térmica sob a base da placa o interruptor de isolamento está...
- Page 199 4. A parede e a zona de aquecimento induzido acima da superfície da mesa devem resistir ao calor. 5. Para evitar qualquer dano, a camada sanduíche e o adesivo devem ser resistentes ao calor. Ligar a placa à rede elétrica Esta placa deve ser ligada à...
- Page 200 Este aparelho tem uma etiqueta de acordo com a Diretiva Europeia 2012/19/EU relativamente a aparelhos elétricos e eletrónicos (REEE). REEE inclui tanto substâncias poluentes (que podem ter um efeito nocivo no ambiente) e elementos base (que podem ser reutilizados). É importante que os REEE sejam submetido a tratamentos específicos para remover e eliminar corretamente os poluentes e recuperar todos os materiais.
- Page 201 Informação sobre produtos para placas elétricas domésticas em conformidade com o Regulamento (UE) n.º 66/2014 da Comissão Posição Símbolo Valor Unidade Identificação do modelo HIS642MCTT Tipo de placa: Placa elétrica Número de zonas zonas de cozedura e/ou áreas áreas Zonas de cozedura por indução...
- Page 202 Central central Central direita Dianteira esquerda Dianteira central Dianteira direita Confeção Traseira esquerda 193,5 Wh/kg elétrica CE Confeção Traseira central Wh/kg elétrica CE Confeção Traseira direita 197,2 Wh/kg elétrica CE Confeção Central esquerda Wh/kg elétrica CE Consumo de energia por zona ou área Confeção Central central Wh/kg...
Need help?
Do you have a question about the HIS642MCTT and is the answer not in the manual?
Questions and answers