Table of Contents
Advertisement
Quick Links
Advertisement
Table of Contents

Related Manuals for Anthem STR


Summary of Contents for Anthem STR
- Page 1 PREAMPLIFIER Operating Manual...
- Page 2 CAUTION RISK OF ELECTRIC SHOCK DO NOT OPEN CAUTION: TO REDUCE THE RISK OF ELECTRIC SHOCK, DO NOT REMOVE COVER (OR BACK). NO USER-SERVICEABLE PARTS INSIDE. REFER SERVICING TO QUALIFIED SERVICE PERSONNEL THE LIGHTNING FLASH WITH ARROWHEAD THE EXCLAMATION POINT WITHIN SYMBOL WITHIN AN EQUILATERAL AN EQUILATERAL TRIANGLE IS TRIANGLE IS INTENDED TO ALERT THE...
- Page 3 WARNING: installing this unit where foreign objects may fall onto this unit and/or this unit may be exposed to liquid dripping or splashing. On the top of this unit, do not place: • Containers with liquid in them, as they may fall and liquid may cause electrical shock to the user and/or damage to this unit.
- Page 4 IMPORTANT INFORMATION FOR UK CUSTOMERS: The wires in the mains lead on this product are colored in accordance with the following code: As these colors may not correspond with the colored markings identifying the terminals in your plug, proceed as follows: doubt consult a competent electrician.
- Page 5 Anthem and any related party assume no liability for the user’s failure to comply with any requirements. Electronics Inc. © Paradigm Electronics Inc. All rights reserved. The information contained herein may not be reproduced without notice as design improvements are incorporated.
-
Page 6: Table Of Contents
3.11 USB Audio ..... 17 ANTHEM ROOM CORRECTION (ARC™) 4.1 Before Starting ....20 4.2 ARC Software Installation . -
Page 7: Before Making Connections
Check that you have received all items listed below and report discrepancies to your dealer as soon as possible. In case the unit needs to be transported in the future, keep the packing materials. Retain the invoice that you received from your authorized Anthem dealer at time of purchase – without it, service will not be provided under warranty. -
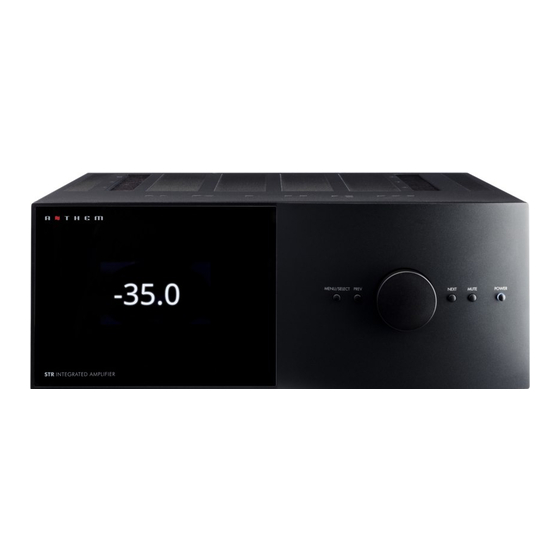
Page 8: Front Panel
1.3 FRONT PANEL Display Previous input or item Volume control and menu navigation Mute Power... -
Page 9: Rear Panel
1.4 REAR PANEL Coaxial digital audio inputs Optical digital audio inputs Factory use 12V DC / 50 mA trigger output IR input Phono ground terminal Moving coil phono input Moving magnet phono input... -
Page 10: Remote Control
1.5 REMOTE CONTROL Input Mute Volume... -
Page 11: Digital Input Connections
2.1 DIGITAL INPUT CONNECTIONS 24-bit / 192 kHz is supported by all digital inputs. If using sources that have an option for selecting between PCM and 2.2 ANALOG CONNECTIONS also four RCA line inputs. be altered. The MM input is suitable for turntables using moving-magnet and high-output moving-coil phono cartridges. The MC input uses input impedance and gain tailored to low-output moving-coil cartridges. - Page 12 The important ones relate to your input connections and speakers. If you’re using a subwoofer or subwoofers, Anthem Room Correction will set crossovers and levels for a perfect blend with the main speakers. The rest of the settings mostly relate to your preferences.
-
Page 13: Speaker Setup
3.1 SPEAKER SETUP If you will be using the personal computer version of ARC, you can skip this menu since it will be set while the program is running. Speaker Setup Speaker Edit Subwoofers PROFILE NAME by the one in ARC. SUBWOOFERS Although subwoofers are often thought of as something for home theater systems, their use is recommended for music as well. -
Page 14: Bass Management
3.2 BASS MANAGEMENT In this menu, information about your speakers is used to optimize bass performance. First, set your subwoofer’s frequency control to its highest frequency since the bass manager will determine how much upper your listening chair and hear changes instantly. The bass manager divides the audio range into two bands suitable for subwoofer/satellite speaker systems. -
Page 15: Listener Position
3.3 LISTENER POSITION Through these settings, sound coming from all speakers is coordinated to reach the listening area at the same time. This way, proper imaging is achieved. The channel with the greatest distance setting will have no delay while channels with shorter distance settings will be delayed accordingly. -
Page 16: Level Calibration
3.4 LEVEL CALIBRATION If using Anthem Room Correction, you can usually skip this menu because levels will be calibrated during measurement. The level of the test tones that play during ARC measurement can be adjusted here if necessary. Level Calibration... -
Page 17: Input Setup
3.5 INPUT SETUP Input Setup AES/EBU Phono MM Phono MC Add Input Insert Input Delete Input remaining steps. CONFIGURE HOME THEATER BYPASS movies, and it employs relays to hard-wire the input jacks to the outputs for the purest signal path. the volume, they will play extremely loudly. - Page 18 • Move the box to the green checkmark to save the changes. INPUT JACK CONVERT ANALOG signal processing is bypassed and only level adjustment remains. SPEAKER PROFILE ANTHEM ROOM CORRECTION (ARC™) MODE PRESET - Stereo - Mono - Both = Left cartridge when the left groove wall has less wear and sounds better than the right groove wall.
- Page 19 RUMBLE FILTER PHONO EQ predate the RIAA equalization standard. If no records in your collection were manufactured before the 1960s, you can skip the rest of this section. To make record grooves manageable, bass is reduced when records are manufactured, while the treble is emphasized. The main function of a phono preamp is to reverse this equalization upon playback, restoring the intended frequency response.
- Page 20 The following curve combines the two above and adds BASS SHELF The graph above represents the RIAA playback curve. Older phono curves use other amounts of bass boost, bass shelf, and treble cut, often expressed in this format: 500R-13.7 User year.
-
Page 21: Analog Input Levels
3.6 ANALOG INPUT LEVELS Through this menu, unwanted changes in volume when switching to or from an analog source can be prevented. This is output levels vary considrerably between models. Analog Input Levels Phono MM 0.0dB Phono MC 0.0dB 3.7 PREFERENCES Here you can set preferences as listed. -
Page 22: Network / Remote
3.8 NETWORK / REMOTE Network / Remote Status Device Name STR Pre Trigger Control Rear IR Front IR NETWORK STATUS This displays the unit’s IP address once connected to the local area network. DEVICE NAME This is the name that the unit broadcasts, and can be changed using up to 10 characters. -
Page 23: Save/Load Settings
3.9 SAVE/LOAD SETTINGS Save / Load Settings Save User Settings Save Installer Settings Load User Settings Load Installer Settings Load Defaults SAVE/LOAD USER AND INSTALLER SETTINGS RESET ON-THE-FLY SETTINGS LOAD DEFAULTS FACTORY RESET Use this only as a last resort if the unit becomes inoperable. Disconnect the power cord, wait at least 30 seconds, and re- connect it while holding the front panel power button. -
Page 24: System Information
ARC Date FIRMWARE VERSION AND UPDATES ensure that your unit has the latest version installed. This gets installed through Anthem Room Correction which Without network connection: • On www.anthemAV.com locate the software pertaining to your model. Proceed only if your version number is lower, indicating that it is older. -
Page 25: Usb Audio
3.11 USB AUDIO and running the media player on your computer that you normally use for playing music. - Extract XMOS-Stereo-USB-Audio-Class2-Driver.exe to Desktop and double-click it. DSD PLAYBACK 1. Install the Foobar2000 music player which is available from this web page: - Download foo_input_sacd-1.0.x.zip from: foo_input_sacd.fb2k-component to this directory: (Computer, OS) - Page 26 - In the Device pull-down list, select the following then click Apply: DSD : ASIO : XMOS USB AUDIO 2.0 ST 308F (or newer) If you have trouble with Foobar installation or use, please do not contact our tech support regarding it. A solution may be available using an online search.
- Page 27 Anthem Room Correction measures the output of each one relative to the listening area then through a special series of calculations adjusts the output accordingly. Its target responses have a psychoacoustic basis from research results, not just theoretically ideal curves.
-
Page 28: Before Starting
ARC to be run again. 4.2 ARC SOFTWARE INSTALLATION MOBILE APP VERSION: On the iTunes store, locate Anthem ARC Mobile and install it to your device. PERSONAL COMPUTER VERSION: https://www.anthemav.com/support/latest-software.php sure to enter the correct number otherwise the frequency response will be inaccurate. -
Page 29: Microphone Stand Assembly
4.3 MICROPHONE STAND ASSEMBLY If using the mobile device’s microphone, skip this section. or on the seat according to whichever way puts the microphone capsule in its proper position. 4.4 MICROPHONE POSITIONING This section mainly applies to the personal computer version and full ARC kit since the mobile app version will guide you when using the mobile device’s microphone or the dual-jack microphone. -
Page 30: Measurement
4.5 MEASUREMENT The remaining ARC instructions apply to the personal computer version. If using the mobile version, follow its instructions instead. • Connect the microphone and the unit to the computer. • Once the ARC program has completed its procedure, you can disconnect the computer. QUICK MEASURE SPEAKER POSITION HELPER initial ARC measurement shows that there is room for improvement. -
Page 31: Manual Mode And Targets
They can almost always be cured by repositioning speakers and repeating the measurement: 4.6 MANUAL MODE AND TARGETS When creating a new measurement, Manual and Automatic modes operate identically except that automatic mode does not require clicking on Measure, Calculate, and Upload between these stages. It also allows results to be viewed before upload, click OK when closing the window to apply the settings, then Calculate. - Page 32 WHAT NOT TO DO easier to hear peaks in response than dips. ARC doesn’t only level the peaks, but also the dips. With the equalization turned on it may be immediately apparent that boominess is gone, but it may take longer to notice that bass notes which were buried all along have become audible, and for this reason you might want to spend a week getting used to the new sound.
- Page 33 describe it as a more focused soundstage whereas others may refer to it as a reduced one. Preference aside, if one speaker is louder at some frequencies while the other speaker is louder at others, the center image can become widened, shifted, or do not appear to emerge in whole from the midpoint between the left and right speakers, when at equal distance from the listening position.
-
Page 34: Advanced Subwoofer Targets
4.7 ADVANCED SUBWOOFER TARGETS Use of these controls is recommended only for the advanced user who understands the subwoofer’s capabilities and behavior when fed low frequencies at high levels. As always, check whether changes are worthwhile by listening to a variety of source material before and after modifying targets. -
Page 35: Input Selection
5.1 POWER ON / OFF AND VOLUME according to setup menu setting. Front Panel Remote audio, press MUTE. audio, re ress M UTE. VOLUME Front Panel Remote MUTE Front Panel Remote mote 5.2 INPUT SELECTION front panel. Remote Front Panel THEN PRESS... -
Page 36: Levels
5.3 LEVELS Through this menu, subwoofer level, bass, treble, and balance can be adjusted. Levels Subwoofers 0.0dB Bass 0.0dB Treble 0.0dB Balance Centered Audio Menu Levels Mode Stereo Cycle through the options using the up/down buttons on the remote control or the volume control on the front panel and follow the help line at the bottom of the display. - Page 39 Anthem shall have no obligation to correct any defect that is not reproducible by Anthem. If inspection by Anthem discloses that the repair required is not covered by this warranty, regular repair charges shall apply.
- Page 40 +1 905-564-1994 www.anthemAV.com MAN0131 07-11-2017...
- Page 41 AVM 90/70 MRX 1140/740/540 Quick Start Guide Using the Remote Control Remote Control Battery Installation Remote Control Range of Operation Install batteries in the MRX/AVM remote control in the The MRX/AVM remote control operates best when used directions shown in the illustration below. within the range and distance shown in the illustration below.
- Page 42 Basic Connections (Continued) Speakers/Subwoofer (MRX 1140/740/540 ONLY) SUB IN SERIAL NO. LABEL Sources (All MRX/AVM Models) Note: MRX 540 does not include 2.2 HDMI HDMI IN HDMI OUT HDMI IN HDMI OUT ETHERNET OUT1 OUT2 Z2 OUT IN 1 IN 2 IN 3 IN 4 IN 5...
- Page 43 Anthem Web User Interface The Anthem Web User Interface is a new addition to the MRX/AVM line. With your MRX/AVM on the network you can adjust menu settings with a device connected to the same network as the MRX/AVM; a phone, tablet or computer will work as it resizes to the screen you are using.
- Page 44 Anthem and any related party assume no liability for the user’s failure to comply with any requirements. Anthem, AnthemLogic, ARC, Sonic Frontiers, and Paradigm are trademarks or registered trademarks of Paradigm Electronics Inc. © Paradigm Electronics Inc. All rights reserved.
Need help?
Do you have a question about the STR and is the answer not in the manual?
Questions and answers