
Related Manuals for Exquisit EKI801-5


Summary of Contents for Exquisit EKI801-5
- Page 1 Bedienungsanweisung mit Montageanweisungen Instructions for use and installation Instructions d’utilisation et d’installation EKI801-5...
-
Page 2: Table Of Contents
Sehr geehrte Kundin, sehr geehrter Kunde. Wir danken Ihnen für das Vertrauen, das Sie uns gewährt haben, indem Sie unser lnduktionskochfeld gewählt haben. Um dieses Gerät kennen zu lernen, empfehlen wir Ihnen, die Gebrauchsanweisung vollständig und aufmerksam zu lesen. Wir wünschen Ihnen viel Spaß mit diesem Gerät. INHALTSVERZEICHNIS SICHERHEITSHINWEISE ...................... -
Page 3: Sicherheitshinweise
SICHERHEITSHINWEISE Vorsichtsmaßnahme vor der Inbetriebnahme • Alle Teile der Verpackung abnehmen. • Das Gerät darf nur von einem Elektrofachmann eingebaut und angeschlossen werden. Der Hersteller kann nicht verantwortlich gemacht werden für Schäden, die durch Fehler beim einbauen oder anschließen verursacht werden. Benutzen Sie das Gerät nur im eingebauten Zustand. -
Page 4: Schütz Vor Beschädigung
• Wenn Sie kochen und braten, werden die Kochzonen heiß. Hüten Sie sich deshalb vor Verbrennungen während und nach der Benutzung des Geräts. • Achten Sie darauf, daß kein elektrisches Kabel von einem freistehenden oder eingebautem Gerät in Kontakt mit der Scheibe oder der heißen Kochzone kommt. - Page 5 • Glaskeramik ist unempfindlich gegen Temperaturschocks und sehr widerstandsfähig, jedoch nicht unzerbrechlich. Besonders spitze und harte Gegenstände, die auf die Kochfläche fallen, können sie beschädigen. • Töpfe und Ränder nicht an der Scheibe anstoßen. • Die Kochzonen nicht mit leerem Kochgeschirr benützen. •...
-
Page 6: Vorsichtsmaßnahmen Bei Geräteausfall
Vorsichtsmaßnahmen bei Geräteausfall • Sollte ein Fehler festgestellt werden, muß das Gerät ausgeschaltet und vom Netz getrennt werden. • Wenn Brüche, Sprünge oder Risse auf dem Glas auftreten: schalten Sie das Kochfeld sofort aus, schrauben Sie die Sicherung für das Kochfeld ab bzw. nehmen Sie diese heraus, und wenden Sie sich an unseren Kundendienst oder an Ihren Fachhändler. -
Page 7: Gerätebeschreibung
GERÄTEBESCHREIBUNG Technische Beschreibung EKI801-5 Gesamt Leistung 7400 W Energieverbrauch der Kochmulde EC 172.8 Wh/kg Kochzone vorne links Ø 180 mm Minimal Topfboden Durchmesser Ø 100 mm Nominal Leistung* 1400 W Booster Leistung* 1850 W- Standardisiertes Kochgeschirr Kategorie** Energieverbrauch EC 172.7 Wh/kg Kochzone hinten links Ø... -
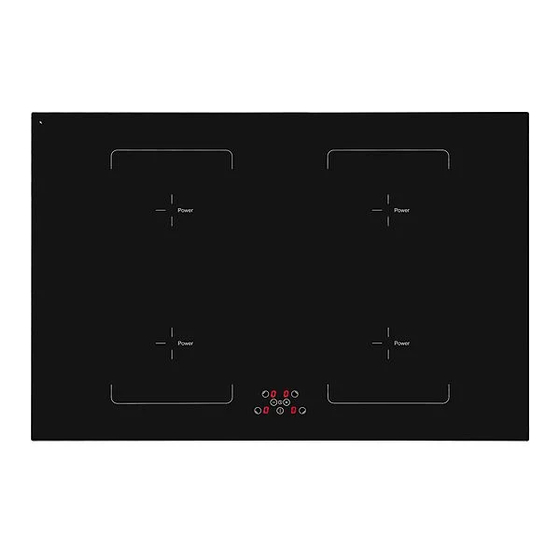
Page 8: Bedienfeld
Bedienfeld Timer und Auswahltaste Leistungs- Anzeige [ - ] Taste [ + ] Taste Leistungsanzeige Ein/Aus Taste Kochzonen-Leuchte Timer Taste BEDIENUNG DES KOCHFELDES Anzeige Anzeige Benennung Funktion Null Die Kochzone ist aktiviert 1…9 Leistungsstufe Einstellung der Leistung Topferkennung Topf nicht aufgesetzt oder nicht geeignet Fehleranzeige Fehler der Elektronik Restwärme... -
Page 9: Inbetriebnahme Des Kochfeldes
INBETRIEBNAHME DES KOCHFELDES Vor dem ersten Aufheizen Zuerst Ihr Gerät mit einem feuchten Lappen reinigen, dann trockenreiben. Benutzen Sie kein Reinigungsmittel, das eine bläuliche Färbung auf der verglasten Oberfläche verursachen könnte. Induktionsprinzip Eine Induktionsspule unterhalb jeder Kochzone erzeugt im Betrieb Induktionsströme im Topfboden. -
Page 10: Kochfeld Ein Und Ausschalten
Kochfeld ein und ausschalten Zuerst das Kochfeld einschalten und dann die gewünschte Kochzone auswählen. • Kochfeld: einschalten/ ausschalten : Betätigung Bedienfeld Anzeige Einschalten : Auf [ ] drücken [ 0 ] oder [ H ] Ausschalten : Auf [ ] drücken Keine oder [ H ] •... -
Page 11: Timer
Timer Mit dem Timer können Sie jeder Kochzone eine individuelle Kochdauer von 1 bis 99 Minuten zuweisen. • Timer einschalten: Betätigung Bedienfeld Anzeige Auswählen der Kochzone Auf [ ] drücken [ 0 ] [ 1 ] … [ 9 ] [ P ] Leistung auswählen Auf [ Zeitschaltuhr auswählen... -
Page 12: Kindersicherung / Verriegelung Des Kochfeldes
Kindersicherung / Verriegelung des Kochfeldes Um eine ungewollte Änderung der Kochzoneneinstellung zu vermeiden, können die Sensortasten (außer der Ein-/Austaste [ ]) verriegelt werden. • Verriegelung aktivieren: Betätigung Bedienfeld Anzeige Kochfeld einschalten Auf [ ] drücken [ 0 ] oder [ H ] Kochfeld verriegeln Gleichzeitig auf [ ] und [... -
Page 13: Koch Empfehlungen
KOCH EMPFEHLUNGEN Kochgeschirr Geeignete Materialien: Stahl, emaillierter Stahl, Gußeisen, Edelstahl mit magnetischem Boden, Aluminium mit magnetischem Boden Nicht geeignete Materialien: Aluminium und Edelstahl ohne magnetischem Boden, Kupfer, Messing, Glas, Steingut, Porzellan Die Topfhersteller spezifizieren ob ihre Produkte Induktionsgeeignet sind. So überprüfen Sie die Induktions-Kompatibilität der Töpfe: •... -
Page 14: Auswahl Der Leistungsstufen
Auswahl der Leistungsstufen (diese Angaben sind Richtwerte) 1 bis 2 Schmelzen, Auflösen, Zubereitung Saucen, Butter, Schokolade Gelatine, Yoghurt , 2 bis 3 Quellen, Auftauen, Warmhalten Reis, gefrorene Gerichte, Fisch, Gemüse 3 bis 4 Dampfgaren, Dünsten Fisch, Gemüse, Obst 4 bis 5 Dünsten, Quellen, Auftauen Fisch, Gemüse, Teigwaren, Getreide, Hülsenfrüchte,... -
Page 15: Umweltschutz
Eine Kochzone oder das gesamte Kochfeld schaltet ab : • Die Sicherheits-Abschaltung hat ausgelöst. • Es ist vergessen worden, eine Kochzone abzuschalten. • Es sind mehrere Sensortasten bedeckt. • Der Topf ist leer und überhitzt. • Durch eine Überhitzung hat die Elektronik automatisch die Leistung reduziert bzw. automatisch abgeschaltet. -
Page 16: Montagehinweise
MONTAGEHINWEISE Montage und Anschluss dürfen nur durch einen autorisierten Fachmann vorgenommen werden. Der Benutzer muss darauf achten, dass die an seinem Wohnsitz geltenden Normen und Bestimmungen eingehalten werden. Dichtung Einbau : Die Dichtung (2) nach Abnehmen der Schutzfolie (3) mit 2 mm Abstand von der Außenkannte des Glases aufkleben. -
Page 17: Elektroanschluss
ELEKTROANSCHLUSS • Zum Anschluss des Gerätes an das Elektronetz beauftragen Sie einen Elektrofachmann, der die landesüblichen Vorschriften der örtlichen Elektroversorgungsunternehmen genau kennt und sorgfältig beachtet. • Der Berührungsschutz betriebsisolierter Teile muss nach der Montage sichergestellt sein. • Ob die erforderlichen Anschlussdaten mit denen des Netzes übereinstimmen, finden Sie auf dem Typenschild. - Page 18 Dear customer, Thank you for having chosen our induction ceramic hob. In order to make the best use of your appliance, we would advise you to read carefully the following notes and to keep them for a later consulting. SUMMARY SAFETY ............................
-
Page 19: Safety
SAFETY Precautions before using • Unpack all the materials. • The installation and connecting of the appliance have to be done by approved specialists. The manufacturer can not be responsible for damage caused by building-in or connecting errors. • To be used, the appliance must be well-equipped and installed in a kitchen unit and an adapted and approved work surface. -
Page 20: Precautions Not To Damage The Appliance
• Metallic objects such as knives, forks, spoons and lids should not be placed on the hob surface since they can get hot. • In general do not place any metallic object except heating containers on the glass surface. In case of untimely engaging or residual heat, this one may heat, melt or even burn. -
Page 21: Precautions In Case Of Appliance Failure
• If a drawer is situated under the embedded appliance, make sure the space between the content of the drawer and the inferior part of the appliance is large enough (2 cm). This is essential to guaranty a correct ventilation. •... -
Page 22: Description Of The Appliance
DESCRIPTION OF THE APPLIANCE Technical characteristics Type EKI801-5 Total power 7400 W Energy consumption for the hob EC 172.8 Wh/kg Front left heating zone Ø 180 mm Minimum detection Ø 100 mm Nominal power* 1400 W Booster power* 1850 W-... -
Page 23: Control Panel
Control panel Timer and Selection key Power display [ - ] key [ + ] key Control light timer Power display On/off key Timer keys USE OF THE APPLIANCE Display Display Designation Function Zero The heating zone is activated. 1…9 Power level Selection of the cooking level. -
Page 24: Starting-Up And Appliance Management
STARTING-UP AND APPLIANCE MANAGEMENT Before the first use Clean your hob with a damp cloth, and then dry the surface thoroughly. Do not use detergent which risks causing blue-tinted colour on the glass surface. Induction principle An induction coil is located under each heating zone. When it is engaged, it produces a variable electromagnetic field which produces inductive currents in the ferromagnetic bottom plate of the pan. -
Page 25: Pan Detection
Pan detection The pan detection ensures a perfect safety. The induction doesn’t work: • If there is no pan on the heating zone or if this pan is not adapted to the induction. In this case it is impossible to increase the power and the display shows [ U ]. This symbol disappears when a pan is put on the heating zone. -
Page 26: Control Panel Locking
• To stop the cooking time : Action Control panel Display Zone selection Press key [ [ 0 ] To select « Timer » Press simultaneously [ ] and [ The remaining time To stop the « Timer » Press key [ [ 00 ] then stops If several timers are activated repeat the process. -
Page 27: Bridge Function
Bridge function This function allows to use 2 cooking zones at same time with the same features as a single cooking zone. Action Control panel Display Activate the hob Press key [ [ 0 ] or [ H ] Activate the bridge Press simultaneously the two left selection keys [ 0 ] appears on the... -
Page 28: Cooking Advices
COOKING ADVICES Pan quality Adapted materials : steel, enamelled steel, cast iron, ferromagnetic stainless-steel, aluminium with ferromagnetic bottom. Not adapted materials : aluminium and stainless-steel without ferromagnetic bottom, cupper, brass, glass, ceramic, porcelain. The manufacturers specify if their products are compatible induction. To check if pans are compatibles : •... -
Page 29: Examples Of Cooking Power Setting
Examples of cooking power setting (the values below are indicative) 1 to 2 Melting Sauces, butter, chocolate, gelatine Reheating Dishes prepared beforehand 2 to 3 Simmering Rice, pudding, sugar syrup Defrosting Dried vegetables, fish, frozen products 3 to 4 Steam Vegetables, fish, meat 4 to 5 Water... -
Page 30: Environment Preservation
One or all cooking zone cut-off : • The safety system functioned. • You forgot to cut-off the cooking zone for a long time. • One or more sensitive keys are covered. • The pan is empty and its bottom overheated. •... -
Page 31: Installation Instructions
INSTALLATION INSTRUCTIONS The installation comes under the exclusive responsibility of specialists. The installer is held to respect the legislation and the standards enforce in his home country. How to stick the gasket: The gasket supplied with the hob avoids all infiltration of liquids in the cabinet. His installation has to be done carefully, in conformity of the following drawing. -
Page 32: Electrical Connection
ELECTRICAL CONNECTION • The installation of this appliance and the connection to the electrical network should be entrusted only to an electrician perfectly to the fact of the normative regulations and which respects them scrupulously. • Protection against the parts under tension must be ensured after the building-in. •... - Page 33 Chère cliente, cher client, Nous vous remercions de la confiance que vous nous avez accordée en choisissant notre table de cuisson vitrocéramique à induction. Afin de bien connaître cet appareil, nous vous recommandons de lire attentivement cette notice d’utilisation dans son intégralité et de la conserver pour une consultation ultérieure. SOMMAIRE SECURITE ..........................
-
Page 34: Securite
SECURITE Précautions avant utilisation en cuisson • Retirez toutes les parties de l’emballage. • L’installation et le branchement électrique de l’appareil sont à confier à des spécialistes agrées. Le fabricant ne saurait être tenu responsable des dommages résultant d’une erreur d’encastrement ou de raccordement. -
Page 35: Precautions Pour Ne Pas Deteriorer Lappareil
• Les objets magnétisables (cartes de crédits, disquettes informatiques, calculatrices) ne doivent pas se trouver à proximité immédiate de l’appareil en fonction. • Ne placez aucun objet métallique autre que les récipients de chauffe. En cas d’enclenchement intempestif ou de chaleur résiduelle, celui-ci risquerait selon le matériau de chauffer, de fondre ou de commencer à... -
Page 36: Precautions En Cas De Defaillance De Lappareil
• Eviter que le sucre, les matières synthétiques ou une feuille d’aluminium ne touchent les zones chaudes. Ces substances peuvent au refroidissement provoquer des cassures ou d’autres modifications de la surface vitrocéramique: Etendre l’appareil et enlevez-les immédiatement de la zone de cuisson encore chaude (attention : risque de brûlures). -
Page 37: Autres Protections
Autres protections • Assurez-vous que le récipient de cuisson soit toujours centré sur la zone de cuisson. Le fond de la casserole doit autant que possible couvrir la zone de cuisson. • Pour les utilisateurs portant un régulateur de rythme cardiaque, le champ magnétique pourrait influencer son fonctionnement. -
Page 38: Description De L'appareil
DESCRIPTION DE L’APPAREIL Caractéristiques techniques Type EKI801-5 Puissance Totale 7400 W Consommation d’énergie de la table de cuisson EC 172.8 Wh/kg Foyer avant gauche Ø 180 mm Détection minimum Ø 100 mm Puissance nominale* 1400 W Puissance du booster* 1850 W- Catégorie de la casserole standard**... -
Page 39: Bandeau De Commande
Bandeau de commande : Affichage minuterie Touche [ - ] Touche [ + ] Affichage puissance Voyant Touche Touche Touche minuterie sélection minuterie Marche/Arrêt UTILISATION DE L’APPAREIL Affichage Affichage Désignation Fonction Zéro La zone de chauffe est activée 1…9 Niveau de puissance Choix du niveau de cuisson Détection de casserole Récipient manquant ou inapproprié... -
Page 40: Mise En Route Et Gestion De L'appareil
MISE EN ROUTE ET GESTION DE L’APPAREIL Avant la première utilisation Nettoyez votre appareil avec un chiffon humide, puis séchez-le. N’utilisez pas de détergent qui risquerait de provoquer une coloration bleutée sur les surfaces vitrées. Principe de l’induction Une bobine d’induction se trouve sous chaque foyer de cuisson. Lorsque celle-ci est enclenchée, elle produit un champ électromagnétique variable qui, à... -
Page 41: Detection De Recipient
Détection de récipient La détection de récipient assure une sécurité parfaite. L’induction ne fonctionne pas : • Lorsqu’il n’y a pas de récipient sur la zone de cuisson ou lorsque ce récipient est inadapté à l’induction. Dans ce cas il est impossible d’augmenter la puissance et dans l’afficheur le symbole [ U ] apparaît. -
Page 42: Verrouillage Du Bandeau De Commande
• Minuterie utilisée hors cuisson : Action Bandeau de commande Afficheur Activer la table de cuisson Appuyer sur [ Voyants de zone allumes Sélectionner « Minuterie » Appuyer simultanément [ 00 ] sur [ ] et [ [ 00 ] passe à 30,29… Diminuer la durée Appuyer sur [ - ] Augmenter la durée... -
Page 43: Fonction Bridge
Fonction Bridge Cette fonction permet de combiner 2 zones avec les mêmes fonctionnalités qu’une seule zone. Action Bandeau de commande Afficheur Mis en route Appuyer sur [ [ 0 ] ou [ H ] sur les 4 afficheurs Activer le bridge Appuyer sur les 2 zones de gauche [ 0 ] sur la zone avant et [ ∏... -
Page 44: Conseils De Cuisson
CONSEILS DE CUISSON Qualité des casseroles Matériaux adaptés : acier, acier émaillé, fonte, aluminium ou inox à fond ferromagnétique, Matériaux non adaptés : aluminium et inox à fond non ferromagnétique, cuivre, laiton, verre, céramique, porcelaine Les fabricants spécifient si leurs produits sont compatibles induction. Pour vérifier si des casseroles sont compatibles : •... -
Page 45: Exemples De Reglage Des Puissances De Cuisson
Exemples de réglage des puissances de cuisson (Les valeurs ci-dessous sont indicatives) Faire fondre Sauces, beurre, chocolat, gélatine 1 à 2 Réchauffer Plats pré-cuisinés Gonfler Riz, pudding et plats cuisinés 2 à 3 Décongélation Légumes, poisson, produits congelés 3 à 4 Vapeur Légumes, poissons, viande Pommes de terre à... -
Page 46: Protection De L'environnement
L’une des zones ou l’ensemble du plan de cuisson se déclenche : • Le déclenchement de sécurité a fonctionné • Celui-ci s’actionne dans le cas ou vous avez oublié de couper une des zones de chauffe • Il s’enclenche également lorsque une ou plusieurs touches sensitives sont couvertes •... -
Page 47: Instructions D'installation
INSTRUCTIONS D’INSTALLATION Le montage relève de la compétence exclusive de spécialistes. L’utilisateur est tenu de respecter la législation et les normes en vigueur dans son pays de résidence. Mise en place du joint d’étanchéité Le joint adhésif fourni avec l’appareil permet d’éviter toute infiltration dans le meuble. Sa mise en place doit être effectuée avec un grand soin suivant le croquis ci-dessous. -
Page 48: Connexion Electrique
CONNEXION ÉLECTRIQUE • L’installation de cet appareil et son branchement au réseau électrique ne doit être confiés qu’à un électricien parfaitement au fait des prescriptions normatives. • La protection contre les pièces sous tension doit être assurée après le montage. •... - Page 52 • die Fehlerbeschreibung. Zuständige Kundendienstadresse EGS GmbH Dieselstraße 1 33397 Rietberg / DEUTSCHLAND Kundentelefon für Deutschland: +49 (0)2944-9716791 Kundentelefon für Österreich: +49 (0)2944-9716791 (aus dem österreichischen Festnetz 0.14 Euro/min, Mobilnetz anbieterabhängig abweichend) (Reparaturaufträge können auch online eingegeben werden.) Internet: www.exquisit.de 29549-0...
Need help?
Do you have a question about the EKI801-5 and is the answer not in the manual?
Questions and answers