Viavi NSC-200 Quick Start Manual
Hide thumbs
Also See for NSC-200:
- User manual (108 pages) ,
- Quick card user manual (5 pages) ,
- Quick card user manual (4 pages)
Table of Contents
Advertisement
Quick Links
NSC-100 / NSC-200
Quick Start Guide
Benefits
y Simply test everything anywhere – PON, Ethernet, WiFi
y Verify true customer experience and physical network layer on all PON1, Ethernet, and
WiFi test interfaces
y Confirm PON service delivery is good before troubleshooting the premises
y Share reports directly via email
y Drive compliance of both direct and contracted staff with centralized, cloudbased
workflow and result management
Features
y GPON, XGSPON, Ethernet and WiFi tests, including throughput tests up to 2 Gbps
(10 Gbps for NSC-200)
y Ethernet 1G, 2.5G, 5G and 10G interfaces
y 3x3 WiFi antenna with 2.4 & 5GHz
y PON data analysis (PON-ID)
y PON power levels
y Job Manager
Preparation for use
When you unpack the unit, do the following:
y Inspect the unit for damage. If damaged, put back in box and contact VIAVI customer
service (see the Technical Assistance section on the next page).
y If undamaged, save the box and packing materials in case you need to ship the unit in
the future.
Before using the unit for the first time, do the following:
y Turn the unit ON.
y If the Power indicator is red, charge the battery.
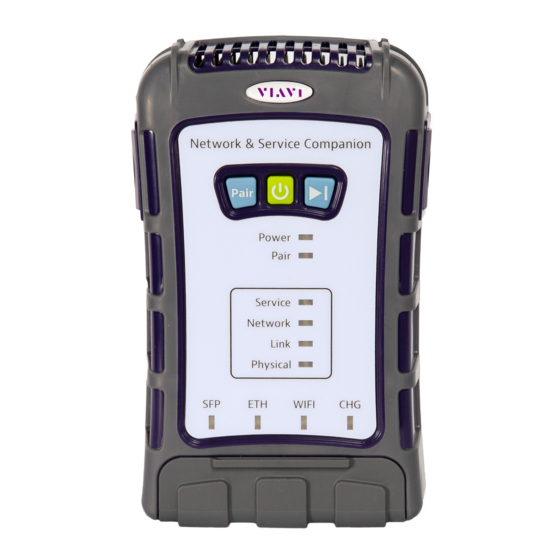
Status indicators
The indicators on the unit show the battery and network connect status, as follows:
Power – Indicates the power or battery status
y Blinking green – Powering up or down
y Solid green – Unit is on
y Solid yellow – Battery remaining is less than 30%
Power and Pair
y Solid red – Battery remaining is less than 10%
buttons
y Flashing red – Battery is very low and unit will shutdown soon
Power and Pair
indicators
Pair – Indicates the Bluetooth radio status
y Blinking – Waiting for pairing
y Solid – Paired with the mobile device
Service and Network
indicators
Service – Indicates the status of the service tests
Network – Indicates the the status of the service tests
Status indicators
Link – Indicates the status of the service tests
Physical – Indicates the status of the physical layer
SFP – Indicates the SFP+ port is the active port for the current test
ETH – Indicates the ethernet port is the active port for the current test
WiFi – Indicates the WiFi interface is the active interface for the current test
CHG – Indicates the charge status. The indicator is off when the unit is not plugged in
or charging.
y Blinking orange – Charging, battery is less than 90%
y Solid orange – Charging is almost complete
y Solid green – Charge complete
y Flashing red – Error in charging or powering the unit. Make sure you are using
the VIAVI charger supplied with the unit and try again.
The meter may need to be serviced by a Certified Repair Center. Before sending
in the unit for repair, contact VIAVI for an RMA.
Power and Pair buttons
The Power and Pair buttons are found near the top of the unit.
Pair – Press to pair with a Bluetooth device
Power – Press to turn the Companion on or off
Play – Used for the Delayed Start testing feature.
See the
User Guide
for more information.
Bottom view
SFP+ optical port
Ethernet port
(10/100/1000 Mbps)
USB 3.0 port
(Type A)
USB-C
charge port
Protective rubber door
Charging the battery
Connect the supplied AC adapter to the USB-C port on the unit to power the Companion or
charge the battery. A full charge could take up to an hour or so.
Test modes
The Companion has a simplified test structure: OneCheck
PON, OneCheck Ethernet, OneCheck WiFi, WiFi Expert,
Loopback, TWAMP Light, and Fusion Client features to
provide autotests and troubleshooting via the VIAVI Mobile
Tech app.
Run OneCheck for comprehensive autotests of your network
and access points.
Select a test from the Companion Main
menu, then select a profile to test.
Using the OneCheck dashboard
OneCheck provides a comprehensive dashboard that
shows results for Speedtests, Ping, Network, GPON,
WiFi access Points, etc.
For each panel in
OneCheck, you can get
more test result details
by touching the panel.
Advertisement
Table of Contents

Related Manuals for Viavi NSC-200


Summary of Contents for Viavi NSC-200
- Page 1 User Guide for more information. y Inspect the unit for damage. If damaged, put back in box and contact VIAVI customer service (see the Technical Assistance section on the next page). y If undamaged, save the box and packing materials in case you need to ship the unit in...
- Page 2 Near the top of the Main menu, you can select Show more to see details on your instrument, including all of the installed To get started, download the VIAVI Mobile Tech app from the App Store or Google Play. Enter your Username and Password, then select the Sign In button. The options.
Need help?
Do you have a question about the NSC-200 and is the answer not in the manual?
Questions and answers