Table of Contents
Advertisement
Available languages
Available languages
Advertisement
Table of Contents

Related Manuals for TEFAL IS3365E1


Summary of Contents for TEFAL IS3365E1
- Page 2 IS33...
- Page 3 * 모델에 따라 다름 * EN Depending on model / FR Selon modèle / TH แตกต่ า งกั น ไปในแต่ ล ะรุ ่ น / MS Mengikut model / ZH 根據型號而 定 / AR / RU / UK / TR KO 모델에...
- Page 4 * EN Depending on model / FR Selon modèle / TH แตกต่ า งกั น ไปในแต่ ล ะรุ ่ น / MS Mengikut model / ZH 根據型號而 定 / AR / RU / UK / TR KO 모델에 따라 다름...
- Page 5 CLICK fig. 1 fig. 2 fig. 3 CLICK fig. 4 fig. 6 fig. 5 fig. 7 fig. 8 fig. 9 fig. 10 fig. 11 fig. 12...
- Page 6 fig. 13 fig. 14 fig. 15 fig. 16 fig. 17 fig. 18 fig. 19 fig. 20 fig. 21 fig. 22 fig. 23 fig. 24...
- Page 7 fig. 25 fig. 26 fig. 27 fig. 28 fig. 29 fig. 30 CLICK fig. 31 fig. 32...
-
Page 8: Safety Instructions
SAFETY INSTRUCTIONS Please read these instructions carefully before first use and keep them in a safe place. • Never leave the appliance unattended whilst connected to the power supply, even if for a few moments, especially where children are present. •... - Page 9 • This product has been designed for domestic and indoor use only. Any commercial use, inappropriate use or failure to comply with the instructions, the manufacturer accepts no responsibility and the guarantee will not apply. • This is a floor appliance, never carry it while in use. •...
- Page 10 • The use of accessory attachments other than those provided by Tefal is not recommended and may result in fire, electric shock or personal injury. • Use caution when changing accessories or attachments, as they may contain hot water from condensation. Ensure that the attachments have cooled down to avoid contact with hot water.
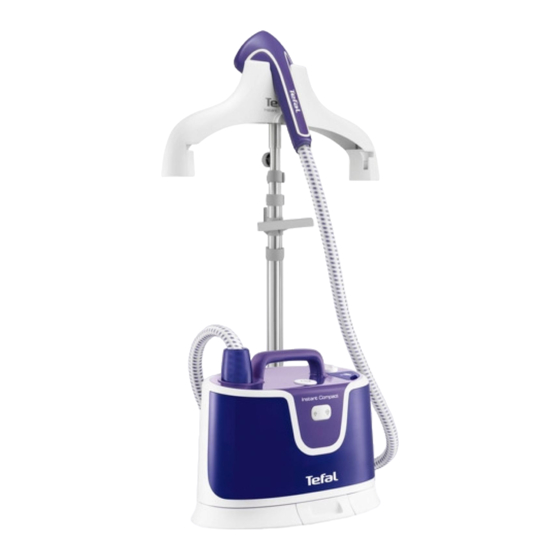
- Page 11 DESCRIPTION Steam head Variable steam settings Integrated hanger 15a. Stability leg Integrated collapsible hanger 15b. Stability leg Integrated hanger Pole fastening screw Trouser clips ON/OFF switch Steam head hook Housing Hanger holder "Anti calc" screwing cap & entry Hanger fastening screw Stability base Pole locking clips Press &...
-
Page 12: Filling The Water Tank
2 • Filling the water tank Dear Customer, Before delivery we undertake a quality control check on garment steamer. This garment steamer has been checked so a small residue of water may be left in the water tank. This garment steamer has passed the quality control check. IMPORTANT: Your product is designed to operate using untreated tap water. - Page 13 • Always hang the steam head in an upright position on the steam head hook when not in use. • During use, the hose may make a gurgling noise. This is a normal occurrence due to condensation. If the appliance begins to gurgle, rest the steam head on its support for a few moments in order to direct back the condensation into the appliance.
- Page 14 Assembly: • Remove the Press & Steam vertical support from its pouch. (fig. 15) • Make sure the telescopic pole is fully extended. • Hold the Press & Steam vertical support so that the handle is located downward and its "Press &...
-
Page 15: Maintenance And Cleaning
AFTER USE • Switch off the appliance by pressing the ON/OFF button. (fig. 23) • Unplug the appliance.(fig. 24) • Do not drain the water tank immediately right after use. Please wait one hour before draining. • Hang the steam head in an upright position on the hook steam head. Warning: never remove the Press &... -
Page 16: Troubleshooting
• Rinse appliance with cold water. - Pour 500 ml of water into the anti-calc opening - Pour 500 ml of water into the hole connection - Gently shake the appliance - Vertically tilt the appliance to empty the water into the sink •... - Page 17 Problems Possible causes Solutions Water runs through the There is condensation in Never use the steamer in the horizontal holes of the steam the hose. position. Hold the hose vertically head. outstretched and wait for the condensed water to return to the steamer. The steamer takes a Your steamer has a build- Follow the "easy descaling"...
-
Page 18: Consignes De Sécurité
CONSIGNES DE SÉCURITÉ Veuillez lire attentivement les instructions qui suivent avant la première utilisation et conservez-les dans un endroit sûr. • Ne laissez jamais l'appareil branché à la source d'alimentation sans surveillance, même pendant quelques instants, surtout en présence des enfants. •... -
Page 19: Recommandations Importantes
• Les enfants ne doivent ni nettoyer l’appareil ni s'occuper de son entretien sans surveillance. • L'appareil ne doit pas être utilisé s'il est tombé, comporte des traces de dommages, de fuites ou ne fonctionne pas correctement. Ne démontez jamais votre appareil. Pour éviter tout danger, faites-le examiner par un centre service agréé. - Page 20 • Ne pas essayer d'accrocher l'appareil lorsque vous utilisez le tuyau. • L'utilisation d'accessoires étrangers qui ne sont pas fournis par TEFAL n'est pas recommandée et peut entraîner des incendies, des chocs électriques ou des blessures corporelles.
- Page 21 DESCRIPTION Tête vapeur Réglage de vapeur Cintre intégré 15 a. Pieds 15 b. Pieds Cintre pliable intégré Vis de fixation du mât Cintre intégré Bouton Marche/Arrêt Pinces de pantalon Boîtier Crochet pour la tête vapeur Bouchon à vis du dispositif « anti-calcaire » Accroche cintre Base d'appui Vis de fixation du cintre...
-
Page 22: Remplissage Du Réservoir D'eau
2 • Remplissage du réservoir d'eau Cher client, Avant de livrer, nous procédons à un contrôle qualité sur le défroisseur pour vêtements. Ce défroisseur pour vêtements a été testé, c'est pourquoi il est possible que des gouttes d'eau soient présentes dans le réservoir d'eau. Ce défroisseur pour vêtements a passé le contrôle qualité avec succès. - Page 23 Conseils pour un résultat optimal avec votre défroisseur • Nous vous recommandons de vérifier l'étiquette d'entretien des vêtements pour les recommandations du fabricant avant le défroissage Nous vous recommandons également de faire un test sur une partie du vêtement, par exemple sur une couture intérieure. •...
-
Page 24: Après Utilisation
jusqu'à ce que la poignée s'accroche sur le crochet de verrouillage Press & Steam situé sur le mât. (schéma 16-17) • Le support vertical Press & Steam permet de garder le vêtement en place pendant le défroissage. • Lorsque vous défroissez une chemise, commencez par les manches. Faites passer une manche devant le vêtement, en biais, en utilisant le support vertical Press &... -
Page 25: Entretien Et Nettoyage
• Ne videz pas le réservoir d'eau immédiatement après utilisation. Attendez une heure avant de vider le réservoir. • Accrochez la tête vapeur en position verticale sur le crochet. Attention: ne retirez jamais l'accessoire Press & Steam pour le ranger avant qu'il ne soit complètement sec. -
Page 26: Dépannage
contraire des aiguilles d'une montre (jusqu'à ce que vous entendiez le clic) (fig. 32). • Replacez le bouchon du dispositif anti-calcaire en vissant complètement (fig. 30). • Remplissez le réservoir d'eau d'1 L d'eau du robinet. • Branchez l'appareil et faites échapper la vapeur jusqu'à ce que le réservoir soit vide. •... - Page 27 à sa hauteur et de la condensation se maximale, afin d'éviter la formation de la produit dans le tuyau. condensation. Si la cause du problème ne peut être établie, veuillez demander l'assistance d'un centre de service agréé www.tefal.com * Selon modèle...
- Page 28 คู ่ ม ื อ การใช้ ง านเพื ่ อ ความปลอดภั ย กรุ ณ าอ่ า นคู ่ ม ื อ การใช้ ง านต่ อ ไปนี ้ อ ย่ า งละเอี ย ดก่ อ น การใช้ ง านครั ้ ง แรก และเก็ บ เอาไว้ ใ นที ่ ป ลอดภั ย •...
- Page 29 • ห้ า มทำความสะอาดและดู แ ลรั ก ษาโดยเด็ ก ที ่ ไ ม่ ม ี ค น กำกั บ ดู แ ล • ห้ า มใช้ เ ครื ่ อ งใช้ ไ ฟฟ้ า นี ้ หากเครื ่ อ งตกลงพื ้ น , มี...
- Page 30 ให้ จ ั บ ที ่ ป ลั ๊ ก แล้ ว ดึ ง เพื ่ อ ถอดปลั ๊ ก • ปล่ อ ยให้ เ ครื ่ อ งเย็ น สนิ ท ก่ อ นเก็ บ เข้ า ที ่ •...
- Page 31 คำอธิ บ าย หั ว พ่ น ไอน้ ำ การตั ้ ง ค่ า การพ่ น ไอน้ ำ ที ่ เ ปลี ่ ย นแปลงได้ ที ่ แ ขวนผ้ า แบบเบ็ ด เสร็ จ ขารั บ น้ ำ หนั ก 15a.
- Page 32 5. ใส่ ห ั ว พ่ น ไอน้ ำ ไว้ ท ี ่ ส ่ ว นบนสุ ด ของที ่ แ ขวนผ้ า แบบเบ็ ด เสร็ จ 2 • การเติ ม น้ ำ ในแท้ ง ค์ น ้ ำ เรี ย น ผู ้ ม ี อ ุ ป การะคุ ณ ก่...
- Page 33 เคล็ ด ลั บ สำหรั บ ผลลั พ ธ์ ท ี ่ ด ี ย ิ ่ ง กว่ า ด้ ว ยเครื ่ อ งรี ด ไอน้ ำ ถนอมผ้ า ของคุ ณ • เราขอแนะนำให้ ค ุ ณ ตรวจสอบป้ า ยบอกวิ ธ ี ก ารซั ก ที ่ ต ิ ด ไว้ ท ี ่ เ สื ้ อ ผ้ า เพื...
- Page 34 • จั บ อุ ป กรณ์ เ สริ ม ของแผ่ น ช่ ว ยการรี ด & การพ่ น ไอน้ ำ ตามแนวตั ้ ง * เช่ น หู จ ั บ ที ่ ต ิ ด ตั ้ ง ในลั ก ษณะต่ ำ ลง จากนั...
- Page 35 หลั ง การใช้ ง าน • ปิ ด เครื ่ อ งใช้ ด ้ ว ยการกดที ่ ป ุ ่ ม เปิ ด /ปิ ด (รู ป ที ่ 23) • ถอดปลั ๊ ก เครื ่ อ งใช้ ไ ฟฟ้ า (รู...
- Page 36 - เทส่ ว นผสมอี ก ครึ ่ ง หนึ ่ ง ในช่ อ งการเชื ่ อ มต่ อ - ทิ ้ ง เอาไว้ ห นึ ่ ง คื น - เขย่ า เครื ่ อ งใช้ ไ ฟฟ้ า เบา ๆ - เทน้...
- Page 37 หากยั ง ไม่ ส ามารถหาสาเหตุ ข องปั ญ หาได้ ให้ ข อความช่ ว ยเหลื อ จากศู น ย์ บ ริ ก ารที ่ ไ ด้ ร ั บ อนุ ญ าตอย่ า งถู ก ต้ อ ง www.tefal.co.th * แตกต่ า งกั น ไปในแต่ ล ะรุ ่ น...
- Page 40 ‹...
- Page 48 安全指引 首次使用前,請細閱這些指引,並存放在安全 地方。 • 在產品仍連接電源時,不可離開,使產品無 人看管。尤其是有兒童在場時,即使短暫離 開也不可以。 • 時常謹記把產品電源拔除:入水、或沖洗水 箱前、清潔前、或每次使用後。 • 使用產品時應小心謹慎,因為產品會噴出蒸 氣。 • 本電器不是供身心障礙或缺乏經驗與知識的 人士 (包括兒童) 使用,除非由負責其安全的 人士監督或指導如何使用本電器。 • 此產品可由8歲或以上兒童、身心或感官弱能 的人士,或欠缺經驗及知識者使用,但必須 有足夠監督或指導,確保他們知道如何安全 地使用本產品,並瞭解當中涉及的風險。 • 兒童必須於成人指導下使用,請勿讓兒童將 本產品當作玩具。 • 不應讓兒童在沒有監督下,進行清潔或保養 工作。 • 若有以下情況下切勿使用本產品:曾跌在地 上,有明顯損壞,出現滲漏或無法正常運作。...
- Page 49 切勿拆開本產品。為免發生危險,請在認可 的服務中心進行檢查。 重要建議 • 此產品設計只作家居及室內使用。若作任何商業用途,不適當使用 或不遵照使用指引,製造商不會承擔任何責任,保用亦將無效。 • 本產品為座地設計,使用期間不可移動。 • 本電器只可由交流電驅動。首次使用前,請先檢查市電電壓是否與 電器資料表上的電壓一致。 • 接電如有不當,保用將會失效。 • 使用時,請將本電器插入至有接地線的插座。 • 鑑於實際規格差異,若於購買地以外的國家使用此電器,請先與認 可之保養服務中心確認。 • 經常保持喉管及噴頭位置高於水箱。 • 為確保你的安全,此電器用品完全符合有關的標準與規定(低電壓、 電磁兼容性、環保指令)。 印有此標誌的表面或其鄰近位置,在使用產品期間會非常燙熱。 • 在產品冷卻前,切勿接觸這些表面。 • 為減低接觸熱水或從蒸氣口噴出的蒸氣之機會,請於每次使用前檢 查產品,並在運作時使產品與身體保持適當距離。 • 使用時只可垂直上下移動。請勿將蒸氣頭置於水平位置使用,或向 後傾,否則可能令熱水噴出。 • 為減低觸電風險,切勿將產品浸入水中,或將蒸氣頭放入水中或其 他液體中。 • 接上或拔除電源前,必須確保產品已關掉。切勿只拉電線來拔除電 源,必須手執插頭,將其拔離電源插座。 • 執拾前必須先讓電器完全冷卻。 •...
- Page 50 • 切勿嘗試使用喉管把整件電器吊起。 • 不建議使用非特福TEFAL供應之其他配件,否則有可能引致火警、 觸電或身體受傷。 • 更換配件或附件時請格外小心,因為當中可能會有蒸氣凝結成的熱 水。確保附件已經冷卻,以免接觸熱水。 • 接觸燙熱部件、熱水或蒸氣都可引致燙傷。清空蒸氣產品時應小心。 水箱或產品內可能會存有熱水。 • 切勿直接把蒸氣噴向人、動物,或穿著衣服期間直接熨衣。 • 切勿剪斷或嘗試加長蒸氣喉管。 • 若使用拖板,請確保所需電流正確配對,並有接地插座及足夠長度 的電線。 • 所有開口或喉管不可投入任何物件 • 除了客戶自行清潔及一般保養之外,任何拆解必須由認可之保養服 務中心進行。 • 請將電器內外的所有包裝物料、貼紙及配件移除。 • 請於接駁電源之前,先檢查電器與電源線有否破損或損壞。 • 如電器無法正確操作、自身或電源線或插頭有損壞,則請勿使用。 為保障安全,此等部件必須由認可之保養服務中心更換。 • 除了客戶自行清潔及一般保養之外,任何拆解必須由認可之保養服 務中心進行。 • 本電器僅供室內使用。 • 使用前請先將電源線完全拉出,並請於接駁電源之前,先檢查電器 與電源線有否破損或損壞。 • 手套只適用於本蒸氣掛熨機(*視乎型號而定)。製造商不會因任何不...
- Page 51 描述 蒸氣噴頭 可調校蒸氣設定 綜合衣架 穩定腳架 15a. 整合式可折疊衣架 穩定腳架 15b. 整合式衣架 支柱固定螺絲 褲夾 開/關制 蒸氣噴頭勾 主體 衣架掛勾 防鈣化旋蓋和入口 衣架固定螺絲 穩定底座 支固定鎖 掛熨承托簾* 伸縮式支柱 掛熨承托簾儲存袋* 氣軟管及軟管出口和鎖夾 掛熨承托簾鎖定把手* 電線索帶 掛熨承托簾鎖定勾* 電線 隔熱手套* 移動手柄 纖維刷* 水箱注水口 絨毛刷* 使用前 衣物蒸氣掛熨機裝配 軟管裝配 插入,然後反時針轉動將其鎖緊 (圖3) 透過輕輕豎直拉動軟管,確認其已鎖緊。 支柱裝配 從底座中完全拉出...
- Page 52 水箱裝水 尊敬的使用者, 在交付產品之前,我們已對此掛熨機進行品質控制檢驗。此掛熨機已經過檢驗,因此 水箱中可能有殘留少許積水。此掛熨機已經通過品質檢驗。檢驗合格。 重要事項:本產品只適用於未經處理的自來水。若所在地區礦物含量甚高(請與當 地水務機構確認),可將未經處理的自來水與從零售商購得的蒸餾水混合使用,比 例各為50%。熱力將引起蒸發,令水中成份濃度提高。以下各種水可能包含有機廢 料、礦物或化學成份,可令電器出現噴溢、產生棕色污垢或快速損耗:乾衣機中的 水、香氣水、軟化水、冰箱、電池或空調中的水、雨水、開水、過濾水及瓶裝水。 此等種類的水均不宜使用,請只使用上述從零售商購得的蒸餾水 確保蒸氣掛熨機沒有接上電源。開啟水箱注水口,注滿水,然後關閉。(圖10,11 和 • 使用 警告:絕不可把衣物穿著在身上掛熨。 安裝 彈性喉管及蒸氣噴頭尾部在使用時,溫度可能極高。 這是正常現象並請小心使用, 並避免任何過長時間的接觸。 • 蒸氣掛熨機只適宜在平地上使用,地上不應有任何雜物影響蒸氣掛熨機底座不能平放 在水平表面。請勿阻塞產品下半部的開口處。請勿將產品用於非常厚的地氈或毛毯上。 • 解開 索帶,並完全拉出電線。 將插頭插入電源插座。(圖13) • • 按位於產品頂部的開/關 (ON/OFF)按鈕啟動。(圖14) • 產品會約於 60 秒後會開始產生蒸氣。 使用產品 • 將衣物掛在綜合衣架上,或用其他衣架懸掛在衣架掛勾上。 • 熨褲時,建議與衣夾*同時使用。 • 執起蒸氣噴頭,不要將蒸氣出口指向自己。 •...
- Page 53 • 使用時,喉管可能會發出水聲噪音。這是冷凝的正常現象。若裝置開始發出咯咯聲, 把蒸氣噴頭掛於支撐架上一會,以讓凝結的水珠再次導入裝置。同時,維持噴頭及軟 管豎直展開。 • 使用時,可伸縮支柱可能會出現水滴。這亦是冷凝的正常現象。 衣物蒸氣掛熨機達更佳效果之使用提示 • 建議掛熨前,先查看衣物護理標籤,瞭解製造商建議。亦建議先於不顯眼位置, 例如內縫邊,先進行測試,清楚效果。 • 扣好頸部鈕釦,以防止衣物在掛熨期間滑落。 • 把掛熨機纖維刷輕力按在纖維上,慢慢移動。 • 避免蒸氣噴頭與絲或絨直接接觸。 • 部分衣物反面會較易熨。 • 厚重的纖維掛熨時間可能需要較長。 • 若您需要靠近地板使用蒸氣頭,須經常將軟管提起至豎直位置,以避免凝水。若 軟管被夾緊,則會聽到水聲噪音。 • 若沒有蒸氣產生,聽到水聲噪音,或水從蒸氣噴頭滴出,應間中舉高蒸氣噴頭, 以去除喉內的凝水。 蒸氣設定 此款電器配有 2 個蒸氣設定,您可以依照自己熨燙的衣物選擇設定:從柔軟到厚衣物。 • 只有兩種設定的型號:接連按產品控制板上的蒸氣設定按鈕,就可以選擇。 燈色 蒸氣輸出 橙色 最小 綠色 最大 配件 加上配件前,請確定裝置已拔掉電源及完全冷卻。 使用配件前,請先查看製造商建議。...
- Page 54 • 將頂部插入整合式衣架,然後稍向下拉,直至掛熨衣物承托簾的手柄扣好在支柱上。 (圖16-17) • 掛熨衣物承托簾 在掛熨期間有助固定衣物位置。 • 蒸熨裇衫時,應先從衫袖開始。執住一邊衫袖,使用掛熨衣物承托簾,把袖覆蓋在衣物 上。 纖維刷 纖維刷有助解開纏在一起的纖維,加強蒸氣穿 透力。 • 將纖維刷連接到蒸氣噴頭上,只須把刷的底 部接上蒸氣噴頭的底部。輕輕把刷的頂部按 在蒸氣噴頭上,直至卡好在適當位置。(圖18) • 順著纖維的紋路或絨毛輕掃要掛熨的位置 。 (圖19) • 當裝置電源拔掉,並完全冷卻後,隨即拆下纖維刷。按著刷上的釋出鍵,同時向前拉, 便能拆下。 絨毛刷 絨毛刷是獨立配件,不能安裝在蒸氣噴頭上,可以獨立使用。 絨毛刷可去除毛髮、絨碎、動物毛,令效果更專業。 使用絨毛刷,可以順著纖維的紋理及絨毛慢慢刷衣物。(圖21) • • 以反方向刷便可清潔絨毛刷。建議用可棄置的舊布清潔絨毛刷。 • 要獲得完美效果,建議於掛熨衣服前,先使用絨毛刷。 手套 • 手套用來保護你沒有執住蒸氣噴頭的手免被蒸氣所傷。 使用手套,戴在負責提著或整理衣物的手上。(圖20) • 手套只供配合此蒸氣掛熨機使用,而非作其他用途。請勿清洗或 熨平手套。 使用後 •...
- Page 55 拔下電器插頭。(圖 24) • • 請不要在使用之後立即排空水箱。排空之前,請等待一個小時。 • 將蒸氣噴頭直立地掛在蒸氣噴頭掛勾上。 警告:裝置未完全乾透前,切勿拆除掛熨配件收藏。經常把掛熨衣物承托簾捲起 收藏。 切勿屈摺。 每次存放之前請排空水箱,以便將水垢沖洗出來。((圖25) • 寬鬆地捲起電線,帶上索帶,然後掛在支柱上的電線勾上。(圖28) • 警告:蒸氣噴頭未完全冷卻前,切勿觸摸。 移動運送 • 將 2 個穩定支腳收回。(圖26-27) • 要移動裝置,你可以提起可伸縮支柱或執著裝置的手柄。 請不要透過一體式衣架提起或搬運電器。 保養及清潔 輕鬆除垢 當每 6 個月或者當您感覺電器效能(蒸氣輸出量)下降時,執行一次此程序。 • 拔下電器插頭。 • 等待一小時,使電器完全冷卻。 • 從主體上拆下軟管:反時針轉動將其解鎖,然後向上拉動,拆下軟管。 • 旋下 防鈣化 旋蓋,將其拆下。(圖 30)。 • 使用冷水沖洗電器(冷態電器)。 - 向...
- Page 56 • 重新裝配上 防鈣化 旋蓋,將其完全旋上。(圖 30)。 • 向水箱注入 1L 自來水。 • 插上電器插頭,使其產生蒸氣,直至水箱中沒有水為止。 • 您的電器至此已可以再次使用。 警告: • 請不要透過蒸氣噴頭向加熱水箱中注水。 • 切勿將蒸氣噴頭浸入水中! • 電器熱時,請不要向加熱水箱中注入任何液體。 • 除垢時,僅應使用白醋溶液。 清潔 • 用濕布清潔裝置主體部分。 • 用濕布或不刮花的海棉清潔掛熨物料。請勿使用任何清潔劑,如肥皂或洗潔精。 解決疑難 問題 可能原因 解決方法 沒有蒸氣。 裝置未啟動。 檢查電器插頭已正確插入。按下開/關按 鈕。 大約 60 秒之後,電器開始產生蒸氣。 喉管有阻塞。 檢查喉管,確保沒有屈摺或扭曲。 檢查確認蒸氣噴頭未放置在地板上。...
- Page 57 掛熨配件在使用時分 掛熨配件沒有正確鎖定 確保掛熨配件手柄緊扣在勾上。不應水 離。 於勾上。 平或垂直移動。確認 4 節立柱完全伸出, 而且 3 個立柱鎖牢固鎖緊。 喉管發出水聲雜音。 你可能於接近地面位置 使用時經常舉高喉管,並調校支柱至最 使用蒸氣噴頭,喉管內 高,以免水份凝結。 出現凝結現象。 水從水箱溢出。 你可能於接近地面位置 使用時經常舉高喉管,並調校支柱至最 使用蒸氣噴頭,喉管內 高,以免水份凝結。 出現凝結現象。 若無法找出引致問題的原因,可尋求認可服務中心協助 * 根據型號而定...
- Page 59 ∫ « ∞ J K W Ô A « ∞ L Ô ∫ ∑ « ∞ L ∂ V º « ∞ & & & & & &...
- Page 60 c ¥ ¢ ∫ « ∞ ∑ & ‰ ´ « _ · ∑ J « ß ∫ « ∞ J K W Ô A « ∞ L Ô ∫ ∑ « ∞ L ∂ V º « ∞...
- Page 61 ‰ ∑ F ß ù b « ° F & c ¥ ¢ ∫ & c ¥ ¢ ∫ M ∑ ∞ L q « ≤ I O U ≤ Ë « ∞ « ∞ ∑ > ∞ W º °...
- Page 62 & & & & & ‘ ∞ I … « ® U ≠ d > ° d « ∞ u ∞ W ≈ “ « œ … ß U Ë > « ‹ H U “ « ∞ I >...
- Page 63 ¸ ª U ∞ ∂ v « ´ K ö ° ∞ L w « “ Ø § ± s ∞ ≤ ∑ q « ≠ v √ ´ K u ‰ K ∫ ` ∞ ≤ ¸ * ª U «...
- Page 64 U ¡ « ∞ L « Ê î e ∂ µ ¢ F > Â : ≥ U c ¥ ¢ ∫ ∂ j « ∞ > M ∑ ∞ L ‰ « ∑ F « ß >...
- Page 65 M ∑ « ∞ L e « ¡ √ § Å Ë ‰ ∑ F ß ù q « Æ ∂ ¸ ª U « ∞ ∂ ∞ Ò b ± u Ø O ¢ d  © u ª d «...
- Page 66 ‹ œ « ® U « ù ¸ c Á ° N ÿ ∑ H U ù • v « § ¥ Ô d...
- Page 68 ö ± ∞ º q « √ § ± s ‹ œ « ® U ≈ ¸ d … ∞ K L ∑ Z ∞ L M ‰ « ∑ F « ß ∂ q W Æ M U ¥ °...
- Page 69 • • • • • • •...
- Page 70 • • • • • • • • • • • • •...
- Page 71 • • • • • • • • • • • ‹...
- Page 72 15a. 15b.
- Page 73 • • • • • • • • • • • • • • •...
- Page 74 • • • • • • • • • • • •...
- Page 75 • • • • • • • • • • • • • •...
- Page 76 • • • • • Данную операцию следует выполнять раз в полгода и каждый раз, когда вы чувствуете, что эффективность работы прибора (выход пара) падает. • • • • • • • • •...
- Page 77 • • • • • • •...
- Page 78 Отпариватели для одежды Tefal IS33xxxx Изготовлено в Китае для холдинга “GROUPE SEB”, France (Groupe SEB, Chemin du Petit Bois Les 4 M - BP 172 69134 Ecully Cedex France) Груп СЕБ, Шмэн дю Пти Буа Ле 4 М – БП 17269134 Экюли Седекс Франс Официальный представитель, импрортёр...
- Page 79 • • • • • •...
- Page 80 • • • • • • • • • • • • •...
- Page 81 • • • • • • • • • • • • ‹...
- Page 82 15b. 15a.
- Page 83 • • • • • • • • • • • • • • •...
- Page 84 • • • • • • • • • • • • •...
- Page 85 • • • • • • • • • • • •...
- Page 86 • • • • • • Легке видалення накипу Цю операцію слід виконувати раз на півроку та кожного разу, коли ви відчуваєте, що ефективність роботи приладу (вихід пари) знижується. • • • • • • •...
- Page 87 • • • • • • • • • • •...
- Page 89 • • • • ̈ ̈ • • •...
- Page 90 • • • • • • • • • • • • • •...
- Page 91 • • • • • • • • • • ‹...
- Page 92 15a. 15b.
- Page 93 • • • • • • • • • • • • •...
- Page 94 • • • • • • • • • • • •...
- Page 95 • • • • • • • • • • • • •...
- Page 96 • • • • • • • Bu işlem her 6 ayda bir ya da cihazın (buhar çıkışı) performansının azaldığını hissettiğiniz anlarda tekrarlanmalıdır. • • • • • • • •...
- Page 97 • • • • • • • • • •...
- Page 99 안전 지침 처음 사용하기 전에 이 지침을 잘 읽고 안전한 장소 에 보관하십시오. • 전원이 연결되어 있는 경우, 잠시라도 기기를 방치하 지 마십시오. 특히 어린이가 있는 경우 주의하십시오. • 물 주입 전이나 헹굼 전, 세척 전, 매번 사용한 후에는 언제나 기기 플러그를 빼 두십시오. •...
- Page 100 • 이 제품은 가정용 및 실내용으로만 사용할 수 있도록 설계되었습니다. 상 업용으로 사용하거나 부적절하게 사용하거나 지침을 준수하지 않은 경우 제조사는 책임을 지지 않으며 보증이 적용되지 않습니다. • 이 제품은 바닥에 두고 사용해 주시고, 사용 중에는 절대로 옮기지 마십시 오. • 이 제품은 교류 전원에서만 기능하도록 설계되었습니다. 처음으로 사용 하기...
- Page 101 • 액세서리나 부착장치에는 응결에서 발생한 뜨거운 물이 들어 있을 수 있 으므로 교환할 때는 주의를 기울여야 합니다. 화상 위험이 있으므로 부착 장치가 완전히 식은 후에 사용하십시오. • 뜨거운 부품, 뜨거운 물 또는 스팀에 닿아 화상을 입을 수 있습니다. 스팀 제품을 비울 때에는 주의를 기울여야 하고, 물 탱크 안, 또는 기기 내부에 뜨거운...
- Page 102 제품 명칭 스팀 헤드 스팀 설정 버튼 일체형 옷걸이 고정용 다리 15a. 일체형 접이식 옷걸이 고정용 다리 15b. 일체형 옷걸이 기둥 조임 나사 바지 걸이 클립 전원 스위치 스팀 헤드 걸이 외관 옷걸이 홀더 "물때 제거" 조임 마개 및 입구 옷걸이...
- Page 103 2 • 물 주입 고객님께, 배송 전 저희는 의류용 스팀 다리미에 대한 품질 검사를 수행합니다. 이 의류용 스팀 다리미 에 대해서도 검사를 수행했기 때문에 물 탱크에 소량의 물이 남아 있을 수 있습니다. 이 의류 용 스팀 다리미는 품질 검사를 통과했습니다. 중요사항: 제품은...
- Page 104 • 사용하지 않을 때 스팀 헤드는 항상 스팀 헤드 걸이에 똑바로 서 있는 위치로 겁니다. • 사용 중일 때에는 호스에서 콸콸거리는 소음이 날 수도 있습니다. 이는 응결로 인한 정상적 인 상황입니다. 기기에서 콸콸거리는 소리가 나기 시작할 경우, 호스 내에 응결된 물방울이 다시...
- Page 105 조립 : • 파우치에서 블라인드를 꺼냅니다. (그림 15) • 높이 조절식 기둥을 최대 길이로 완전히 연장합니다. • 손잡이가 아래로 위치하고 Press & Steam 로고가 앞면에 오도록 블라인드의 세로 지지대 를 잡습니다. • 블라인드의 상부를 일체형 옷걸이 안쪽에 끼워 준 다음, 기둥의 블라인드 받침 고리에 걸 릴...
- Page 106 사용 후 • 전원 스위치를 눌러 기기의 전원을 끕니다. (그림 23) • 기기 플러그를 분리합니다.(그림 24) • 화상 위험이 있으므로 사용 직후에 물 탱크를 바로 비우지 않고, 약 한시간 정도 기다 리신 뒤 물 탱크의 물을 제거해주시기 바랍니다. • 스팀 헤드는 스팀 헤드 걸이에 똑바로 선 위치로 걸어둡니다. 경고: 블라인드가...
- Page 107 - 기기를 세로로 기울여 물을 개수대로 비워냅니다. • 호스를 다시 조립하고 시계 방향으로 돌려(딸깍 소리가 들릴 때까지) 완전히 잠겨 있 는지 확인합니다. (그림 32). • 물때 제거 마개를 완전히 조여 다시 조립하고 물이 새지 않으나 지나치게 조여 있지 않 도록 확인합니다. (그림...
- Page 108 스팀 다리미의 가열 시 스팀 다리미의 물때를 정 손쉬운 물때 제거 절차를 따릅니다 간이 오래 걸리거나 흰 기적으로 제거하지 않았 색 입자를 방출합니다 기 때문에 물때가 쌓여 있 습니다 블라인드 액세서리가 블라인드 액세서리가 제 옷걸이 안쪽에서 블라인드 액세서리를 다 비뚤어져 있습니다 대로...
Need help?
Do you have a question about the IS3365E1 and is the answer not in the manual?
Questions and answers