Bosch GID18A20GB Operating Instructions Manual
Built in/under freezer
Hide thumbs
Also See for GID18A20GB:
- Instructions for use manual (20 pages) ,
- Operating instruction (17 pages)

Related Manuals for Bosch GID18A20GB


Summary of Contents for Bosch GID18A20GB
- Page 1 GID.. de Gebrauchsanleitung en Operating instructions Notice d'utilisation Istruzioni per l' uso nl Gebruiksaanwijzing...
- Page 2 de Inhaltsverzeichnis en Index fr Table des matières...
-
Page 4: Hinweise Zur Entsorgung
Hinweise zur Entsorgung x Verpackung entsorgen x Altgerät entsorgen Warnung Sicherheits und Warnhinweise Bevor Sie das Gerät in Betrieb nehmen Technische Sicherheit Bei Beschädigung... -
Page 5: Beim Gebrauch
Beim Gebrauch Explosionsgefahr! Stromschlaggefahr! Explosionsgefahr! Gefrierverbrennungsgefahr! Gefrierverbrennungsgefahr! Kinder im Haushalt Allgemeine Bestimmungen... - Page 6 Bitte klappen Sie die letzte Seite mit den Abbildungen aus. Diese Gebrauchsanweisung gilt für mehrere Modelle. Abweichungen bei den Abbildungen sind möglich. ( nicht bei allen Modellen) Zum Einstellen, Temperaturwähler mit einer Münze drehen. mit grüner Kontroll Leuchte (leuchtet, wenn der Hauptschalter eingeschaltet ist).
-
Page 7: Raumtemperatur Und Belüftung Beachten
Raumtemperatur und Belüftung beachten Klimaklasse zulässige Raumtemperatur +10 C bis 32 C +16 C bis 32 C +18 C bis 38 C +18 C bis 43 C Belüftung Gerät anschließen Bei Geräten, die in nicht europäischen Ländern betrieben werden, ist auf dem Typenschild zu überprüfen, ob die angegebene Spannung und Stromart mit den Werten Ihres Stromnetzes... -
Page 8: Gerät Einschalten
Gerät einschalten Bild 2/2 Warnton ausschalten Bild 2/4 Temperatur einstellen Bild 2/1 Bild 3 Hinweise Ausstattung Temperaturanzeige in der Gerätetür Bild 3 schwarzer Bereich - richtige Gefriertemperatur gestrichelter Bereich - zu geringe Gefriertemperatur... -
Page 9: Gefrieren Und Lagern
Gefrierkalender Bild 4 Kälteakku Bild 5/A Gefriertablett Bild 5/B Eiswürfel herstellen Bild 6 Gefrieren und Lagern Tiefkühlkost einkaufen Gefriergut lagern Bild 7... -
Page 10: Max. Gefriervermögen
Max. Gefriervermögen Gefriervermögen Frische Lebensmittel einfrieren Lebensmittel selbst eingefrieren Zum Eingefrieren geeignet sind: Zum Eingefrieren nicht geeignet sind: Blanchieren von Gemüse und Obst Lebensmittel einordnen Bild 2/5 Hinweis Nutzinhalt... - Page 11 Lebensmittel verpacken Zum Verpacken geeignet sind: Ungeeignet sind: Zum Verschließen eignen sich: Supergefrieren Bild 2/3 Nach dem Einlegen der frischen Ware das Supergefrieren wieder ausschalten. Bild 3...
-
Page 12: Gefriergut Auftauen
Gefriergut auftauen Hinweis Gerät ausschalten und stilllegen Gerät ausschalten Bild 2/2 Gerät stilllegen Gefrierraum abtauen und reinigen Gehen Sie wie folgt vor: Bild 8 Achtung... -
Page 13: So Können Sie Energie Sparen
So können Sie Energie sparen Betriebsgeräusche Ganz normale Geräusche Brummen Blubbernde, surrende gurgelnde Geräusche Klicken Geräusche, die sich leicht beheben lassen Das Gerät steht uneben Das Gerät steht an" Schubladen, Körbe oder Abstellflächen wackeln oder klemmen Gefäße berühren sich... -
Page 14: Kleine Störungen Selbst Beheben
Kleine Störungen selbst beheben Was ist zu tun, wenn ..keine Kontroll Lampen leuchten Prüfen Sie: ... die Temperatur Warnlampe (rot) ständig leuchtet. Kundendienst Bild 9... -
Page 15: Information Concerning Disposal
Information concerning disposal x Disposal of packaging x Disposal of your old appliance Warning Safety and warning information Before you switch ON the appliance Technical safety If damage has occurred... -
Page 16: Children In The Household
Important information when using the appliance Risk of explosion! Risk of electric shock! Explosion hazard! Risk of low temperature burns! Risk of low temperature burns! Children in the household General requirements... - Page 17 Before reading the instructions, please fold out the back pages. This operating manual refers to several models. Diagrams may vary. (* not all models) To set the temperature, rotate the temperature selector with a coin. with green pilot light (lights when the master switch has been switched ON).
-
Page 18: Note Ambient Temperature And Ventilation
Note ambient temperature and ventilation The climatic class can be found on the rating plate. It specifies the ambient temperatures at which the appliance may be operated. The rating plate can be found inside the appliance at the bottom left hand side. Climatic category Permitted ambient temperature... -
Page 19: Switching On The Appliance
Switching ON the appliance Press the master switch Fig. 2/2, the green and red pilot lights switch ON (not all models). Warning signal is emitted (not all models). Switching OFF the warning signal (not all models). Press the warning signal OFF button Fig. -
Page 20: Freezing And Storing Frozen Food
Freezer calendar Fig. 4 The figures next to the symbols indicate the permitted storage period in months of the produce. If frozen produce is purchased, comply with the manufacturer's date or sell by date. Ice block Fig. 5/A (Quantity may vary). If a power failure or malfunction occurs, the ice blocks can be used to slow down the thawing process. -
Page 21: Max. Freezer Capacity
Max. freezer capacity Food should be frozen right through as quickly as possible. Only in this way are vitamins, nutritional values, appearance and taste retained. Therefore, you should not exceed the maximum freezing capacity of your appliance. Freezing capacity Information about the max. freezing capacity within 24 hours can be found on the rating plate. -
Page 22: Fast Freezing
Packing the food Suitable for packing are: Unsuitable are: Suitable for sealing are: Fast freezing Fig. 2/3 After inserting fresh produce into the freezer compartment, switch OFF fast freezing. Fig. 3... -
Page 23: Defrosting Frozen Produce
Defrosting frozen produce Note Switching OFF and disconnecting the appliance Switching OFF the appliance Fig. 2/2 Disconnecting the appliance Defrosting and cleaning the freezer compartment Proceed as follows: Fig. 8 Attention... -
Page 24: How To Save Energy
How to save energy S The freezer should be installed in a dry, well ventilated room, not exposed to direct sunlight and not placed near a heat source (radiator, etc.). S Do not block the ventilation openings in the appliance. S Allow warm food to cool down before placing it in the freezer. -
Page 25: Troubleshooting
Eliminating minor faults yourself Before you call customer service, please check whether you can eliminate the fault yourself based on the following information. A technician who is called out for consultation purposes will charge the customer, even if the appliance is still under guarantee. -
Page 26: Conseils Pour La Mise Au Rebut
Conseils pour la mise au rebut x Mise au rebut de l'emballage x Mise au rebut de l'ancien appareil Attention Consignes de sécurité et avertissements Avant de mettre l'appareil en service Sécurité technique... -
Page 27: Pendant L'utilisation
Si l'appareil est endommagé Pendant l'utilisation Risque d'explosion ! Risques d'électrocution ! Risque d'explosion ! Risque de gelures! Risque de gelures! -
Page 28: Présentation De L'appareil
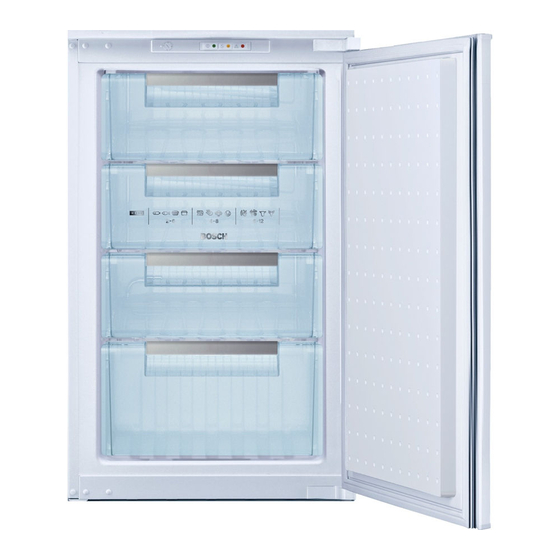
Les enfants et l'appareil Dispositions générales Présentation de l'appareil Exemple d'équipement Fig. 1 1 5 Bandeau de commande Grille de congélation Calendrier Tiroir de congélation Indicateur de température situé dans la contre porte de l'appareil... - Page 29 Pour procéder au réglage, tournez le sélecteur de température à l'aide d'une pièce de monnaie. avec voyant de contrôle vert (s'allume lorsque l'interrupteur principal est enclenché). (s'allume si la supercongélation est enclenchée). Pour l'éteindre, appuyez à nouveau sur la touche de supercongélation.
-
Page 30: Branchement De L'appareil
Branchement de l'appareil Sur les appareils destinés aux pays non européens, vérifiez si la tension de branchement et le type de courant spécifiés sur la plaque signalétique concordent bien avec ceux offerts par le secteur du pays concerné. La plaque signalétique se trouve en bas à... -
Page 31: Accumulateurs De Froid
Equipement Indicateur de température dans la porte de l'appareil Fig. 3 Plage noire: température de congélation correcte Plage hachurée: température de congélation insuffisante Calendrier Fig. 4 Accumulateurs de froid Fig. 5/A... -
Page 32: Congélation Et Rangement De Produits Surgelés
Tablette de congélation Fig. 5/B Fabrication de glaçons Fig. 6 Congélation et rangement de produits surgelés Achat de produits surgelés Rangement des produits surgelés Fig. 7... -
Page 33: Capacité De Congélation Max
Capacité de congélation max. Les aliments doivent congeler à c ur le plus rapidement possible pour qu'ils conservent vitamines, valeur nutritive, aspect et goût. Pour cette raison, ne dépassez pas la capacité de congélation maximale de votre appareil. Capacité de congélation Sur la plaquette signalétique, vous trouverez des indications concernant la capacité... -
Page 34: Emballage Des Aliments
Emballage des aliments Conviennent pour emballer les produits: Ne conviennent pas: Conviennent pour fermer: Supercongélation Fig. 2/3 Une fois que vous avez rangé les produits frais, éteignez à nouveau la supercongélation. Fig. 3... -
Page 35: Décongélation De Produits Surgelés
Décongélation de produits surgelés Remarque Coupure et mise hors service de l'appareil Coupure de l'appareil Fig. 2/2 Mise hors service Dégivrage et nettoyage du compartiment congélateur Veuillez procéder comme suit : Fig. 8 Attention... -
Page 36: Conseils Pour Économiser De L'énergie
Veillez bien à ce que l'eau de nettoyage ne pénètre pas dans le bandeau de commande. Ne lavez jamais aucune pièce de l'appareil au lave vaisselle. Les pièces risqueraient de se déformer. Conseils pour économiser de l'énergie S Installez le congélateur dans un endroit frais et bien aéré. -
Page 37: Remédier Soi Même Aux Petites Pannes
Remédier soi même aux petites pannes Dérangements et remèdes Il fait trop froid dans le compartiment congélateur. Aucun voyant de contrôle n'est allumé. Le voyant d'avertissement rouge (température) est allumé en permanence. Service après vente Fig. 9... -
Page 38: Avvertenze Per Lo Smaltimento
Avvertenze per lo smaltimento x Smaltimento dell'imballaggio x Rottamazione dell'apparecchio fuori uso Pericolo Avvertenze di sicurezza e pericolo Prima di mettere in funzione l'apparecchio Sicurezza tecnica In caso di danni... - Page 39 Nell'uso Pericolo di esplosione! Pericolo di scarica elettrica! Pericolo di esplosione! Pericolo di ustioni! Pericolo di ustioni!
-
Page 40: Conoscere L'apparecchio
Bambini in casa Norme generali Conoscere l'apparecchio Esempio per una dotazione Figura 1 1 5 Pannello comandi Griglia di congelamento Calendario di congelamento Cassetto di congelamento Indicatore di temperatura nella porta dell'apparecchio... -
Page 41: Pannello Comandi
Pannello comandi Figura 2/ 2A Selettore temperatura Per la regolazione, ruotare il selettore con una moneta. Posizione «1» temperatura meno fredda Posizione «7» temperatura più fredda Interruttore principale acceso/spento Con spia luminosa verde (è accesa quando l'interruttore principale è inserito). Pulsante superfreezer con spia luminosa gialla (É... -
Page 42: Collegare/Accendere L'apparecchio
Collegare l'apparecchio Per gli apparecchi destinati all'uso in paesi non europei, è necessario verificare sulla targhetta d'identificazione se la tensione ed il tipo di corrente indicati corrispondono ai valori della rete elettrica locale. La targhetta d'identificazione si trova in basso a sinistra nell'apparecchio. La sostituzione del cavo di alimentazione, se necessaria, deve essere eseguita solo da un tecnico. -
Page 43: Calendario Di Congelamento
Avvertenze S Se subito dopo la chiusura del vano congelatore la porta dovesse resiste ad una nuova apertura, è necessario attendere due o tre minuti, finché si compensa la depressione formatasi all'interno. S A causa del sistema di raffreddamento, le griglie di congelamento in più punti possono ricoprirsi rapidamente di brina. -
Page 44: Congelare E Conservare Alimenti Surgelati
Accumulatore del freddo Figura 5/A (se disponibili, il numero è differente). L'accumulatore del freddo ritarda il riscaldamento degli alimenti conservati in caso d'interruzione dell'energia elettrica o di guasto. Il periodo di conservazione più lungo si raggiunge in tal caso disponendo l'accumulatore nello scomparto superiore, direttamente sugli alimenti. -
Page 45: Max. Potenza Di Congelamento
Max. potenza di congelamento Gli alimenti devono congelarsi al più presto possibile anche nel loro interno. Solo così si conservano le vitamine, il potere nutritivo, l'aspetto ed il gusto. Perciò non si deve superare la capacità massima di congelamento dell'apparecchio. Possibilità... - Page 46 Confezionare alimenti Sono idonei per confezionare: Non sono idonei: Per sigillare le confezioni sono idonei: Superfreezer figura 2/3 Dopo avere introdotto i prodotti freschi, disattivare il superfreezer. figura 3...
-
Page 47: Scongelamento Di Alimenti Congelati
Scongelamento di alimenti congelati Secondo il tipo e la destinazione, scegliere tra le possibilità seguenti: S a temperatura ambiente, S in frigorifero, S nel forno elettrico, con/senza ventilatore ad aria calda, S nel forno a microonde. Avvertenza Non congelare di nuovo gli alimenti semiscongelati o scongelati. -
Page 48: Per Risparmiare Energia
Per risparmiare energia S Installare il congelatore in un ambiente fresco, ben ventilato, proteggerlo dall'irradiazione solare diretta e disporlo lontano dalle fonti di calore (caloriferi, ecc.). S Non ostruire le aperture di afflusso e deflusso dell'aria dell'apparecchio. S Introdurre gli alimenti caldi nel congelatore solo dopo che si sono raffreddati. -
Page 49: Eliminare Da Soli I Piccoli Guasti
Eliminare da soli i piccoli guasti Prima di rivolgersi al servizio assistenza, si prega di verificare se è possibile eliminare autonomamente il malfunzionamento, con l'aiuto delle avvertenze seguenti. Infatti in caso d'intervento del servizio assistenza viene comunque addebitato l'intero diritto fisso di chiamata del tecnico, anche durante il periodo di garanzia. -
Page 50: Aanwijzingen Over De Afvoer
Aanwijzingen over de afvoer x Afvoeren van de verpakking van uw nieuwe apparaat x Afvoer van het oude apparaat Waarschuwing Veiligheidsbepalingen en waarschuwingen Voordat u het apparaat in gebruik neemt Technische veiligheid... -
Page 51: Bij Het Gebruik
Bij beschadiging Bij het gebruik Kans op explosie! Kans op een elektrische schok! Gevaar voor explosie! Kans op verbranding! Kans op verbranding! -
Page 52: Kennismaking Met Het Apparaat
Kinderen in het huishouden Algemene bepalingen Kennismaking met het apparaat Overzicht Afb. 1 1 5 Bedieningspaneel Vriesrooster Vrieskalender Diepvrieslade Temperatuurindicatie in de deur van het apparaat... -
Page 53: Let Op Omgevings Temperatuur En Beluchting
Bedieningspaneel Afb. 2/2A Temperatuurkiezer Om in te stellen: de temperatuurkiezer met een muntstuk draaien. Stand 1" = warmste temperatuur Stand 7" = koudste temperatuur Hoofdschakelaar Aan/Uit met groen controlelampje (brandt als de hoofdschakelaar is ingeschakeld). Supervriestoets met geel controlelampje (brandt als het supervriessysteem is ingeschakeld.) Om uit te schakelen: supervriestoets opnieuw indrukken (het supervriessysteem wordt niet... -
Page 54: Apparaat Aansluiten
Apparaat aansluiten Bij apparaten die in niet Europese landen worden gebruikt op het typeplaatje controleren of de aansluitspanning en de stroomsoort overeenkomen met de waarden van uw elektriciteitsnet. Het typeplaatje bevindt zich links onderaan in het apparaat. Een eventueel noodzakelijke vervanging van de aansluitkabel mag alleen door een vakkundig monteur worden uitgevoerd. - Page 55 S Als de koelmachine loopt, kan zich op verschillende plaatsen van de vriesroosters snel een laagje rijp vormen. Dit heef geen invloed op het functioneren of het stroomverbruik. Ontdooien is pas noodzakelijk als zich op het hele oppervlak van het vriesrooster een laag rijp of ijs heeft gevormd met een dikte van meer dan 5 mm.
-
Page 56: Maximale Invriescapaciteit
Vriestableau Afb. 5/B Ijsblokjes maken Afb. 6 Invriezen en opslaan van diepvrieswaren Inkopen van diepvriesproducten Diepvrieswaren opslaan afb. 7 Maximale invriescapaciteit Invriescapaciteit... -
Page 57: Verse Levensmiddelen Invriezen
Verse levensmiddelen invriezen Levensmiddelen zelf invriezen Geschikt om in te vriezen: Niet geschikt om in te vriezen: Blancheren van groente en fruit: Levensmiddelen inruimen afb. 2/5 Attentie! Netto inhoud Verpakken van levensmiddelen Voor verpakking geschikt: Ongeschikt zijn:... -
Page 58: Ontdooien Van Diepvrieswaren
Als sluiting geschikt: Elastiekjes, clips van kunststof, touwtjes, koudebestendig plakband e.d. Zakjes en folie van polyetheen kunnen met een folie lasapparaat worden worden dichtgelast. Vermeld op de pakjes inhoud en datum voordat u ze in de diepvriesruimte legt. Warme dranken en gerechten vóór het inladen in de diepvriesruimte op kamertemperatuur laten afkoelen. -
Page 59: Apparaat Uitschakelen En Buiten Werking Stellen
Apparaat uitschakelen en buiten werking stellen Uitschakelen van het apparaat Hoofdschakelaar afb. 2/2 indrukken. Het groene controlelampje gaat uit. Buiten werking stellen van het apparaat Als u het apparaat langere tijd niet gebruikt: S Stekker uit het stopcontact trekken resp. de zekering uitschakelen of losdraaien. -
Page 60: Tips Om Energie Te Besparen
Attentie! Geen schoonmaakmiddelen gebruiken die zand of zuren resp. oplosmiddelen bevatten. De deurafdichting alleen met schoon water afnemen en grondig droogwrijven. Het sop mag niet in het bedieningspaneel terechtkomen. Geen onderdelen van het apparaat in de afwas automaat reinigen. De delen kunnen vervormen! Tips om energie te besparen... -
Page 61: Kleine Storingen Zelf Verhelpen
Kleine storingen zelf verhelpen Ga, alvorens de Servicedienst in te schakelen, aan de hand vande volgende punten eerst even na of u de storing zelf kunt verhelpen. Als u om een monteur vraagt, en het blijkt dat hij alleen maareen advies (bijv. over de bediening of het onderhoud van hetapparaat) hoeft te geven om de storing te verhelpen, dan moetu, ook in de... - Page 64 E-Nr. FD-Nr.
Need help?
Do you have a question about the GID18A20GB and is the answer not in the manual?
Questions and answers