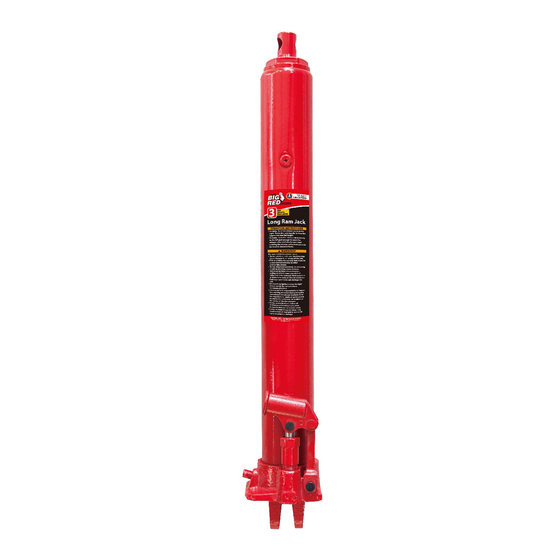
Summary of Contents for Torin BIG RED JACKS TR80303
Page 1
WARNING: Questions, problems, missing parts? Before returning to your retailer, call our customer service department at 1-888-44-TORIN (1-888-448-6746), 8 a.m.- 5 p.m., PST, Monday-Friday. Read carefully and understand all ASSEMBLY AND OPERATION INSTRUCTIONS before operating. Failure to follow the safety rules and other basic safety precautions may result in serious personal injury.
IMPORTANT Before You Begin Register This Product. For future reference, record the model name, model number, date of manufacture and purchase date of this product. You can find this information on the product. Model Name ____________________________________________ Model Number ____________________________________________ Date of Manufacture ____________________________________________ Date of Purchase ____________________________________________...
TECHNICAL SPECIFICATIONS Item Maximum Minimum Maximum Maximum Minimum Maximum Model Capacity Height Height Inch Capacity Height Height MM Inch 3 Ton Long Ram Jack TR80303 6,000 42-15/16 2,727 1090 (Flat Bottom) 3 Ton Long Ram Jack T30306 6,000 24-3/8 43-7/8 2,727 1115 (Clevis Bottom)
Page 4
JACK USE AND CARE Do not modify the Jack in any way. Unauthorized modification may impair the function and/or safety and could affect the life of the equipment. There are specific applications for which the Jack was designed. • Always check of damaged or worn out parts before using the Jack. Broken parts will affect the Jack operation.
SAFETY Always follow safety precautions when installing and operating this jack. Keep all decals on the unit clean and visible. Before proceeding ensure that you fully understand and comprehend the full contents of this manual. Failure to operate this equipment as directed may cause injury or death. The distributor is not responsible for any damages or injury caused by improper use or neglect.
GENERAL SAFETY INSTRUCTIONS Position the jack to only lift on the areas of the vehicle as specified by the vehicle manufacturer. Always Use Jack Stands After lifting the vehicle always support the load with appropriately rated vehicle Jacks stands before working on the vehicle.
Page 7
GENERAL SAFETY INSTRUCTIONS If you use and maintain your equipment properly, it will give you many years of service. Follow the maintenance instructions carefully to keep your equipment in good working condition. Never perform any maintenance on the equipment while it is under a load. Inspection You should inspect the product for damage, wear, broken or missing parts (e.g.: pins) and that all components function before each use.
TROUBLESHOOTING JACK JACK JACK POOR JACK WILL NOT LIFT WILL NOT WILL NOT WILL NOT LIFTING TO FULL CAUSES AND SOLUTIONS LIFT HOLD LOWER EXTENSION LOAD LOAD Release valve is not completely closed (Turn handle clockwise). ...
Page 9
FLAT BASE LONG RAM JACK ASSEMBLY 1. Familiarize yourself with the jack. 2. Use handle (21) to Turn release valve (28) counterclockwise on full turn to the open position. Page 9 of 48...
Page 10
FLAT BASE LONG RAM JACK 3. Line up the handle to the handle socket located on the side of the jack, then insert the handle inside the handle socket. 4. Secure the handle in place inside the handle socket. Without any vehicle on the jack. Cycle the lift up and down several times to insure the hydraulic system is operating properly.
Page 11
FLAT BASE LONG RAM JACK SYSTEM AIR PURGE PROCEDURE IMPORTANT: BEFORE FIRST USE Perform the following Air Purge Procedure to remove any air that may have been introduced into the hydraulic system as a result of product shipment and handling. This step is to be completed without any weight on the jack.
FLAT BASE LONG RAM JACK 3. Purge air trap in the system by opening the attached oil vent, do not remove oil vent. Oil vent Is to stay open at all times when in use. (Oil vent is closed during shipping) For units with rubber oil plugs: {With a flat blade screwdriver, push the oil fill plug slightly to the side to purge trapped air from system.
FLAT BASE LONG RAM JACK OPERATION RAISING THE JACK 1. Position the jack near desired lift point. 2. Assemble the handle, ensure that handle aligns with handle socket. 3. Close the release valve by turning it clockwise until it is firmly closed. 4.
Page 14
FLAT BASE LONG RAM JACK LOWERING THE JACK 1. Grasp the handle firmly with both hands. Securely hold on to the jack handle so your hands do not slip and ensure the release valve does not rapidly lower. 2. Carefully open the Release Valve by slowly turning the handle counterclockwise. (Do not allow bystanders around the jack or under the load when lowering the jack.
Page 15
FLAT BASE LONG RAM JACK TO ADD JACK OIL: 1. Position the jack on level as shown and lower the ram. 2. Remove the oil plug. 3. Fill the oil case until oil level is just beneath the lower rim of the oil fill hole. 4.
Page 16
FLAT BASE LONG RAM JACK TO REPLACE JACK OIL: 1. Position the jack on level as shown and lower the ram. 2. Open release valve by turning handle counter-clockwise (4 full turns). 3. Remove the oil fill plug. 4. Turn the jack on its side so that old oil will drain from the oil fill hole. 5.
FLAT BASE LONG RAM JACK 7. Replace oil plug. 8. Perform the Air Purge Procedure. ADDITIONAL WARNINGS: ▪ DO NOT USE MOTOR OIL IN THE JACK. ▪ ONLY USE ANTI-FOAMING JACK OIL. ▪ ALWAYS USE A GOOD GRADE HYDRAULIC JACK OIL. ▪...
FLAT BASE LONG RAM JACK PARTS LIST Part Description Part No. Top Nut TR80803-1 0-Ring TR80803-2 Sealing Gasket TR80803-3 Oil Tank TR80803-4 Oil Plug TR80803-5 Seal Ring TR80803-6 TR80803-7 Bowl Washer TR80803-8 0-Ring TR80803-9 Cylinder TR80803-10 Copper Washer TR80803-11 Ball GB308-84 Valve Block TR80803-12...
Page 20
CLEVIS BASE LONG RAM JACK ASSEMBLY 3. Familiarize yourself with the jack. 4. Use handle (21) to Turn release valve (28) counterclockwise one full turn to the open position. 3. Line up the handle to the handle socket located on the side of the jack, then insert the handle inside the handle socket.
Page 21
CLEVIS BASE LONG RAM JACK 4. Secure the handle in place inside the handle socket. Without any weight on the jack, cycle the lift up and down several times to insure the hydraulic system is operating properly. (Perform to the Air Purge Procedure before first use.) SYSTEM AIR PURGE PROCEDURE IMPORTANT: BEFORE FIRST USE...
Page 22
CLEVIS BASE LONG RAM JACK 8. Purge air trap in the system by opening the attached oil vent, do not remove oil vent. Oil vent Is to stay open at all times when in use. (Oil vent is closed during shipping) For units with rubber oil plugs: {With a flat blade screwdriver, push the oil fill plug slightly to the side to purge trapped air from system.
Page 23
CLEVIS BASE LONG RAM JACK BEFORE USE 5. Before using this product, read the owner's manual completely and familiarize yourself thoroughly with the product and the hazards associated with its improper use. 6. Perform the air purge procedure. (See previous instructions for system purge procedure.) 7.
Page 24
CLEVIS BASE LONG RAM JACK WARNING: STOP PUMPING WHEN THE RAM RISES TO THE RED STOP MARK ON THE RAM. THIS WILL PREVENT THE JACK FROM POSSIBLE MALFUNCTION AND IMPROPER USE. CAUTION: NEVER WIRE, CLAMP OR OTHERWISE DISABLE THE LIFT CONTROL VALVE TO FUCTION BY ANY MEANS OTHER THAN BY USING THE OPERATOR'S HAND.
Page 25
CLEVIS BASE LONG RAM JACK TO ADD JACK OIL: 6. Position the jack on level as shown and lower the ram. 7. Remove the oil plug. 8. Fill the oil case until oil level is just beneath the lower rim of the oil fill hole. Page 25 of 48...
Page 26
CLEVIS BASE LONG RAM JACK 9. Replace oil plug. 10. Perform the Air Purge Procedure. TO REPLACE JACK OIL: 9. Position the jack on level as shown and lower the ram. 10. Open release valve by turning handle counter-clockwise (4 full turns). Page 26 of 48...
Page 27
CLEVIS BASE LONG RAM JACK 11. Remove the oil fill plug. 12. Turn the jack on its side so that old oil will drain from the oil fill hole. 13. Position the jack on level ground and with the ram in the lowered position. 14.
Page 28
CLEVIS BASE LONG RAM JACK 15. Replace oil plug. 16. Perform the Air Purge Procedure. ADDITIONAL WARNINGS: ▪ DO NOT USE MOTOR OIL IN THE JACK. ▪ ONLY USE ANTI-FOAMING JACK OIL. ▪ ALWAYS USE A GOOD GRADE HYDRAULIC JACK OIL. DO NOT USE HYDRAULIC BRAKE FLUID, ALCOHOL, GLYCERINE, DETERGENT, MOTOR OIL OR ▪...
Page 29
CLEVIS BASE LONG RAM JACK ASSEMBLY DIAGRAM Page 29 of 48...
Page 30
CLEVIS BASE LONG RAM JACK PARTS LIST Index # Description Part No. Qty. T30306-01 T30306-06 Wire ring T30306-10 T30306-12 Split washer T30306-11 Y-Ring T30306-09 Wire ring T30306-03 Cylinder QYL3.2-12 Copper Washer T90403-35 Tube GB308-84 Ball QYL8-13 Copper Washer QYL8-10 Pump Cylinder QYL8-09 Seal Ring QYL8-28...
Page 31
AIR/HYDRAULIC CLEVIS BASE LONG RAM JACK ASSEMBLY 1. Familiarize yourself with the jack. Page 31 of 48...
Page 32
AIR/HYDRAULIC CLEVIS BASE LONG RAM JACK 2. Use handle to turn release valve counterclockwise one full turn to the open position. 3. Line up the handle to the handle socket located on the side of the jack, then insert the handle inside the handle socket.
Page 33
AIR/HYDRAULIC CLEVIS BASE LONG RAM JACK SYSTEM AIR PURGE PROCEDURE IMPORTANT: BEFORE FIRST USE Perform the following Air Purge Procedure to remove any air that may have been introduced into the hydraulic system as a result of product shipment and handling. This step is to be completed without any weight on the jack.
Page 34
AIR/HYDRAULIC CLEVIS BASE LONG RAM JACK 3. Purge air trap in the system by opening the attached oil vent, do not remove oil vent. Oil vent Is to stay open at all times when in use. (Oil vent is closed during shipping) For units with rubber oil plugs: {With a flat blade screwdriver, push the oil fill plug slightly to the side to purge trapped air from system.
Page 35
AIR/HYDRAULIC CLEVIS BASE LONG RAM JACK BEFORE USE 1. Before using this product, read the owner's manual completely and familiarize yourself thoroughly with the product and the hazards associated with its improper use. 2. Perform the air purge procedure. (See previous instructions for system purge procedure.) 3.
Page 36
AIR/HYDRAULIC CLEVIS BASE LONG RAM JACK OPERATION RAISING THE JACK 1. Position the jack near desired lift point. 2. Assemble the handle, ensuring that handle aligns with handle socket. 3. Close the release valve by turning it clockwise until it is firmly closed. 4.
Page 37
AIR/HYDRAULIC CLEVIS BASE LONG RAM JACK LOWERING THE JACK 1. Grasp the handle firmly with both hands. Securely hold on to the jack handle so your hands do not slip and ensure the release valve does not rapidly lower. 2. Carefully open the Release Valve by slowly turning the handle counterclockwise. (Do not allow bystanders around the jack or under the load when lowering the jack.
Page 38
AIR/HYDRAULIC CLEVIS BASE LONG RAM JACK TO ADD JACK OIL: 1. Position the jack on level as shown and lower the ram. 2. Remove the oil plug. Page 38 of 48...
Page 39
AIR/HYDRAULIC CLEVIS BASE LONG RAM JACK 3. Fill the oil case until oil level is just beneath the lower rim of the oil fill hole. 4. Replace oil plug. 5. Perform the Air Purge Procedure. Page 39 of 48...
Page 40
AIR/HYDRAULIC CLEVIS BASE LONG RAM JACK TO REPLACE JACK OIL: 1. Position the jack on level as shown and lower the ram. 2. Open release valve by turning handle counter-clockwise (4 full turns). 3. Remove the oil fill plug. Page 40 of 48...
Page 41
AIR/HYDRAULIC CLEVIS BASE LONG RAM JACK 4. Turn the jack on its side so that old oil will drain from the oil fill hole. 5. Position the jack on level ground and with the ram in the lowered position. Page 41 of 48...
Page 42
AIR/HYDRAULIC CLEVIS BASE LONG RAM JACK 6. Fill the oil case until oil level is just beneath the lower rim. KEEP DIRT AND OTHER MATERIAL CLEAR WHEN POURING. 7. Replace oil plug. 8. Perform the Air Purge Procedure. Page 42 of 48...
Page 43
AIR/HYDRAULIC CLEVIS BASE LONG RAM JACK ADDITIONAL WARNINGS: ▪ DO NOT USE MOTOR OIL IN THE JACK. ▪ ONLY USE ANTI-FOAMING JACK OIL. ▪ ALWAYS USE A GOOD GRADE HYDRAULIC JACK OIL. ▪ DO NOT USE HYDRAULIC BRAKE FLUID, ALCOHOL, GLYCERINE, DETERGENT, MOTOR OIL OR DIRTY OIL.
Page 44
AIR/HYDRAULIC CLEVIS BASE LONG RAM JACK ASSEMBLY DIAGRAM Page 44 of 48...
Page 45
AIR/HYDRAULIC CLEVIS BASE LONG RAM JACK PARTS LIST Index # Description Part No. Qty. Top Nut TQ30806-02 Rectangular ring QYL8-03 Reservoir TQ30806-05 Oil plug QYL8-29 Trapezoidal ring QYL8-15 Cylinder TQ30806-04a O-Ring33.5X3.55 GB3452.1 TQ30806-01 Switch assembly TQ22001.9a Hose assembly TQ22001-07 Rotary joint assembly TQ22001.8 Pump assembly TQ22001.2a...
Part # are available for purchase. For assistance with the operation or the availability of replacement parts, contact our Parts and Warranty Department at: 1-888-44-TORIN (1-888-448-6746). Please have available a copy of your receipt, the model number of the product, serial number, and specific details regarding your question.
Page 47
Manufacturer reserves the rights to make design changes and or improvements to this product lines and manual without notice. We at Torin have taken every effort to ensure complete and accurate instructions have been included in this manual. However, possible product updates, revisions and or changes may have occurred since this printing.
Page 48
1-888-44-TORIN (1-888-448-6746) De 8 heures à 17 heures, heure du Pacifique, du lundi au vendredi Comuníquese conel Servicio de Atención al Cliente de Torin® directamente por teléfono al: 1-888-44-TORIN (1-888-448-6746) De lunes a viernes de 8:00 a. m. a 5 p. m. hora del Pacífico Torin Inc.
Need help?
Do you have a question about the BIG RED JACKS TR80303 and is the answer not in the manual?
Questions and answers