Table of Contents
Advertisement
Quick Links
Advertisement
Table of Contents

Related Manuals for Leica Geosystems DISTO E7500i


Summary of Contents for Leica Geosystems DISTO E7500i
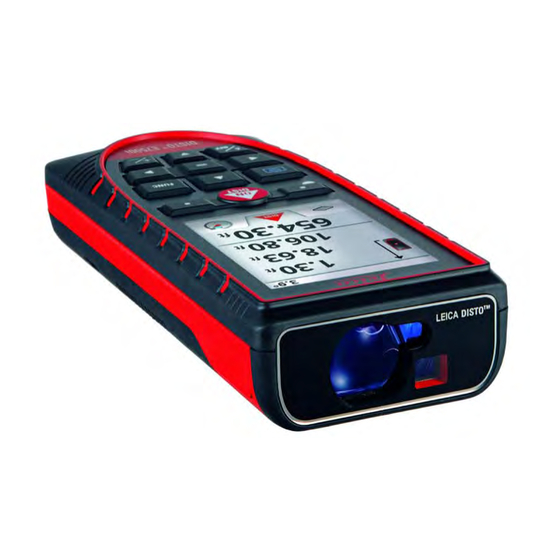
- Page 1 Leica DISTO E7500i The original laser distance meter...
-
Page 2: Table Of Contents
Table of Contents Instrument Set-up Memory- - - - - - - - - - - - - - - - - - - - - - - - - - - - - - - - - - - - - - 14 - - - - - - - - - - - - - - - - - - - - - - - - - - 2 Measuring single distance - - - - - - - - - - - - - - - - - - - - - - - - - - 15 Introduction - - - - - - - - - - - - - - - - - - - - - - - - - - - - - - - - - - - 2... -
Page 3: Instrument Set-Up
Instrument Set-up Introduction Overview The safety instructions and the user manual should be read through carefully before the product is used for the first time. Display The person responsible for the product must ensure that all users understand these directions and adhere to them. The symbols used have the following meanings: WARNING Indicates a potentially hazardous situation or an unintended use... -
Page 4: Basic Measuring Screen
Instrument Set-up Basic measuring screen Selection screen Status bar Page indicator Function / Settings Main line Active function Favorites Settings Help function Leica DISTO E7500i 792324... -
Page 5: Pointfinder (Viewscreen)
Instrument Set-up Pointfinder (Viewscreen) Insert batteries To ensure a reliable use, do not use zinc- Zoom stage carbon batteries. We recommend using high quality batteries. Change batteries when battery symbol is flashing. Illumination Crosshair adjustment with navigation keys left and right Zoom (1x, 2x, 4x) with navigation... -
Page 6: Operations
Operations Switching ON/OFF Clear Message Codes Press ON button If the info icon appears with a 2 sec to start number, observe the instructions in continuous laser section "Message Codes". mode. If no key is Example: pressed for 180 2 sec sec, the device Leave actual func- switches off au-... -
Page 7: Add / Subtract
Operations Add / Subtract This process can be repeated as required. The same process can be used for adding or subtracting areas or volumes. The next meas- The next meas- 7.332 m urement is added urement is sub- 20.179 m 7.332 m 12.847 m to the previous... -
Page 8: Settings
Settings Overview Tilt units Distance units Beep Digital level Keypad lock Favorites Illumination Bluethooth ® Tilt calibration Reset Offset Tilt units Switch between the following units: Exit settings. Confirm setting. ± 90.0° 0.00 % ± 180.0° 0.0 mm/m 360.0° 0.00 in/ft Leica DISTO E7500i 792324... -
Page 9: Distance Units
Settings Distance units Switch between the following units: 0.0000 m 0‘00‘‘ 1/4 0.000 m 0.0 in 0.00 m 0 in 1/32 0.0 mm 0 in 1/16 Confirm setting. Exit settings. 0.00 ft 0 in 1/8 0‘00‘‘ 1/32 0 in 1/4 0‘00‘‘... -
Page 10: De-/Activate Keypad Lock
Settings De-/Activate keypad lock Unlock keypad To deactivate, repeat procedure. within Exit settings. 2 sec Personalized favorites Select your favorite functions for quick access. Short cut: Press selection Press 2 sec on a selection-key in key left or right. the measuring mode. Function is set as Exit settings. -
Page 11: De-/Activate Bluetooth Smart
Settings De-/Activate Bluetooth Smart Default mode: Bluetooth is switched on. Bluetooth icon in status line is dis- played if device is connected with Bluetooth. To switch ON, Exit settings. repeat procedure. ™ Switch on Bluetooth Smart in Settings. We provide no warranty for free DISTO software and offer no sup- Connect the device with your smart phone, pad, laptop,…... -
Page 12: Calibration Of Tilt Sensor (Tilt Calibration)
Settings Calibration of tilt sensor (Tilt Calibration) 180° Place device on absolutely flat surface. 180° Turn the device horizontally by 180° Place device on absolutely flat surface. and place it again on absolutely flat surface. After 2 sec the device 180°... -
Page 13: Reset
Settings Reset Second confirmation with selection keys: Reset returns the instrument to the factory settings. All custom- Refuse: Confirm: ized settings and memories are lost. Exit settings. Reset device? Offset 1.012 m 1.012 m Approve Select digit. Adjust digit. value. An offset adds or subtracts a specified value automatically to or from all measurements. -
Page 14: Functions
Functions Overview Timer Height-profile Measurement Measuring on sloped objects Calculator Area Height Tracking Adjusting measuring reference Volume Trapezium Memory Triangle area Stake out Single Distance Measurement Long Range Mode Pythagoras 1 Smart Horizontal Mode Inclination Tracking Pythagoras 2 Timer The self release starts if ON/Measure key is pressed. -
Page 15: Adjusting Measuring Reference/Tripod
Functions Adjusting measuring reference/tripod Distance is measured from the rear of the device (standard setting). Distance is measured from the front of the device (lock symbol = permanently). Distance is measured from the tripod thread permanently. If device is switched off, reference goes back to standard setting (rear of the device). -
Page 16: Measuring Single Distance
Functions Measuring single distance Target surfaces: Measuring errors can occur when measuring to colourless liquids, glass, styrofoam or semi-permea- ble surfaces or when aiming at high gloss surfaces. Against dark 8.532 m surfaces the measuring time in- Aim active laser at target. creases. -
Page 17: Height-Profile Measurement
Functions Height-profile measurement Aim at reference point (REF). Aim at additional points 1-x. Ideal for measuring of height differences to a reference point. Can be also used to meas- ure profiles and terrain sections. After meas- uring the reference point, the horizontal Horizontal distance to distance and height is displayed for each fol- 2.042 m... -
Page 18: Area
Functions Area Aim laser at first Aim laser at sec- target point. ond target point. The result is shown in the main line and the 6.228 m First distance measured value above. Partial Measurements / Painter function: 3.9I0 m Second distance Press + or - after starting the first measure- ment. -
Page 19: Volume
Functions Volume Aim laser at first Aim laser at sec- Aim laser at third target point. ond target point. target point. 80.208 m Circumference 208.70 3 m Wall areas 24.224 m Ceiling/floor area Use Up/Down 78.6 94 m navigation keys to Volume show more re- sults. -
Page 20: Triangular Area
Functions Triangular area Aim laser at sec- Aim laser at third Aim laser at first ond target point. target point. target point. 23.563 m Circumference 89.90° Angle between first and second Use Up/Down measurement 23.8 13 m navigation keys to Triangular area show more re- sults. -
Page 21: Inclination Tracking
Functions Inclination tracking Inclination is permanently displayed. 89.3° Instrument beeps at 0° and 90°. Ideal for horizontal or vertical adjustments. 90° 0° Sloped objects Aim laser at lower target Aim laser at upper target point. point. Indirect distance measuring be- 5.944 m Horizontal distance between both points tween 2 points with additional re-... -
Page 22: Height Tracking
Functions Height tracking Aim laser at low- Aim laser at upper points and angle/ er point. height tracking starts automatically. 6.932 m 9.82 7 m = Tracking height if device is Stops height tracking and displays turned on tripod last measurement. Heights of buildings or trees without suitable reflective points can be deter- mined. -
Page 23: Trapezium
Functions Trapezium Aim laser at upper Aim laser at 2nd point. point. 22.70° 78.257 m Trapezium area Use Up/Down 5.90 7 m navigation keys to show more re- sults. Leica DISTO E7500i 792324... -
Page 24: Stake Out
Functions Stake out Two different a = b a = b distances (a and b) can be entered to mark off de- fined measured lengths. 1.012 m 1.012 m Approve Adjust Select digit. Adjust digit. value "a". value "b". 0.240 m is Move device When approaching a stake missing up to... -
Page 25: Pythagoras (2-Point)
Functions Pythagoras (2-point) Aim laser at first Aim laser at second target. target. The result is shown in the main line. Pressing the measuring key for 2 sec in the function ac- tivates automatically Minimum or Maximum measure- ment. Use Up/Down We recommend to use the pythagoras only for indirect 8.29 4 m navigation keys to... -
Page 26: Pythagoras (3-Point)
Functions Pythagoras (3-point) Aim laser at sec- Aim laser at Aim laser at first ond target. third target. target. The result is shown in the main line. Pressing the measuring key for 2 sec in the function activates automatically Minimum or Maximum meas- urement. -
Page 27: Technical Data
Technical Data * applies for 100 % target reflectivity (white painted wall), Distance measurement Functions low background illumination, 25 ºC Typical Measuring Tolerance* ± 1.0 mm / ~1/16" *** Distance measuring ** applies for 10 to 100 % target reflectivity, high background Maximum Measuring ±... -
Page 28: Message Codes
Responsibilities of the manufacturer Warranty following instructions: of the original equipment: Cause Correction Lifetime Manufacturer's Warranty Leica Geosystems AG Transverse tilt greater Hold the instrument Warranty coverage for the entire usage time Heinrich-Wild-Strasse than 10° without any transverse tilt. of the product according to Leica Geosys-... -
Page 29: Permitted Use
Safety Instructions Permitted use Hazards in use Disposal • Measuring distances WARNING CAUTION • Tilt measurement Watch out for erroneous measurements if Flat batteries must not be disposed of with ® • Data transfer with Bluetooth the instrument is defective or if it has been household waste. -
Page 30: Fcc Statement (Applicable In U.s.)
Safety Instructions FCC statement (applicable in Use of the product with Blue- Laser classification ® U.S.) tooth This equipment has been tested and found to WARNING comply with the limits for a Class B digital Electromagnetic radiation can cause distur- device, pursuant to part 15 of the FCC Rules. -
Page 31: Labelling
Safety Instructions Labelling Laser Radiation Do not stare into the beam Laser class 2 acc. IEC 60825-1:2007 Maximum radiant power: <1mW Emitted wavelength: 620-690nm Beam divergence: 0.16 x 0.6 mrad Impulse duration: 0.2 x 10 s - 0.8 x 10 Subject to change (drawings, descriptions and technical data) without prior notice. - Page 32 Quality Management and Quality Systems (ISO standard 9001) and Environ- mental Management Systems (ISO standard 14001). Total Quality Management - Our commitment to total customer satisfaction. Ask your local Leica Geosystems agent for more information about our TQM program. Copyright Leica Geosystems AG, Heerbrugg,...
Need help?
Do you have a question about the DISTO E7500i and is the answer not in the manual?
Questions and answers