Table of Contents
Advertisement
Quick Links
Advertisement
Table of Contents

Subscribe to Our Youtube Channel
Related Manuals for Midea MTM207W


Summary of Contents for Midea MTM207W
- Page 1 Top Mount Refrigerator USER MANUAL MTM207W MTM239W MTM268W...
-
Page 3: Table Of Contents
CONTENTS Safety information ........2-3 Identifying parts of the fridge ........4 Transporting ........5 Installation ........5 Reversing the door ........6-7 Operating instructions ........8 Cleaning & Maintenance ........8-9 Energy saving tips ........10 Disconnection of the appliance ........ -
Page 4: Safety Information
The appliance has not been designed or manufactured for professional use. Midea declines all responsibility for damage deriving from improper use of the appliance. The refrigerator has undergone the necessary tests on the tightness of the refrigeration circuit and complies with the safety regulations. - Page 5 SAFETY INFORMATION Safety Precautions The refrigerator is designed to operate on a single phase power supply within a voltage range of 220-240V/50Hz. Do not allow any sharp objects to come in contact with the refrigerant system to avoid damage to the refrigerant circuit. This product is for indoor use only.
-
Page 6: Identifying Parts Of The Fridge
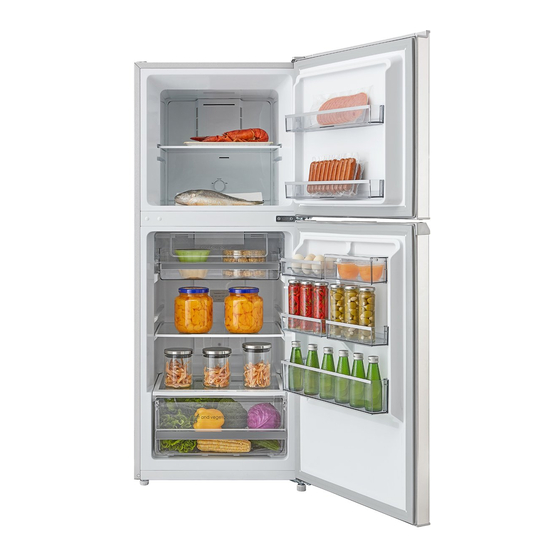
IDENTIFYING PARTS OF THE FRIDGE NOTE: Photo for reference only. The interior of different model may vary slightly. Freezer glass shelf Knob of freezing ventilation door Deli compartment Refrigerator temperature control panel Refrigerator LED light Refrigerator glass shelf Fruit & vegetable drawer Freezer door bin Refrigerator sealed door bin Refrigerator small bottle bin... -
Page 7: Transporting
TRANSPORTING Keep the refrigerator upright and avoid squeezing or vibration during transport. Avoid a slanting angle over 45 degrees during handling. Avoid the door or top cap from being under excessive stress when moving, otherwise it may become deformed. Do not connect your refrigerator to the power supply immediately after it is placed vertically. -
Page 8: Reversing The Door
REVERSING THE DOOR Please ensure the refrigerator is unplugged from the main power source and any items are removed from inside the refrigerator and door bins before reversing the door. WARNING Follow below steps to reverse the door from the supplied position. 1. - Page 9 REVERSING THE DOOR Step 8 8. Install the adjustable feet to the right side in front of the refrigerator, mount the lower hinge subassembly to the left side in front of the refrigerator. Step 9 9. Remove the hinge bushing and door stop of the R-door and F-door with screw driver, and install them to the other side of the doors.
-
Page 10: Operating Instructions
OPERATING INSTRUCTIONS Controlling the temperature Refrigerator temperature: Press SET key to select temperature from level 1 to Level Level Level Level 4 Level 5 level 5 (coldest). The refrigerator will run under the setting temperature after 15 seconds automatically. When the refrigerator is powered on, all temperature level LED will light on for 3 seconds, and then the current setting temperature level displays. -
Page 11: Cleaning & Maintenance
Replacing the Interior light The refrigerator light can only be replaced by an authorised service agent. If the light stops working, please contact Midea Service (refer to page 12). Please check the points below after maintenance: (1) Is there any damage to the power lead? -
Page 12: Energy Saving Tips
ENERGY SAVING TIPS Reduce opening the door frequently. This will increase the appliance efficiency and reduce power consumption. To maintain good air circulation within the refrigerator cabinet, keep the shelves, fruit and vegetable drawer in the original positions as supplied. There should always be some space between food items for proper air circulation. -
Page 13: Troubleshooting Guide
TROUBLESHOOTING GUIDE If you think something may be wrong with your refrigerator, you can carry out some easy checks before calling for service. Y ou may locate the problem and spare yourself from inconvenience, saving time and money. SYMPTOM SUGGESTION efrigerator is not operating ·... -
Page 14: Repairs, Service & Warranty
Please refer to the enclosed warranty card or visit www.mideaappliances.com.au for warranty information. Ensure you have the appliance model number and proof of purchase handy before calling Midea Customer Care to enquire about a warranty claim. Complete and retain the following information for your records: Model No. -
Page 15: Specifications
SPECIFICATIONS Model MTM207W MTM239W MTM268W Climate Class Classification of Protection Against Electric Shock Refrigerator 140L 172L 201L Rated Total Gross Volume Freezer Voltage 220-240V / 50Hz 220-240V / 50Hz 220-240V / 50Hz Refrigerant type R600a R600a R600a Ambient Operating 43°C 43°C...
Need help?
Do you have a question about the MTM207W and is the answer not in the manual?
Questions and answers