Miele CombiSet CS 1112 Operating And Installation Instructions
Hide thumbs
Also See for CombiSet CS 1112:
- Operating and installation instructions (52 pages) ,
- User manual (45 pages) ,
- Operating and installation manual (52 pages)

Related Manuals for Miele CombiSet CS 1112


Summary of Contents for Miele CombiSet CS 1112
- Page 1 Operating and Installation Instructions Ceramic Combiset CS 1112 CS 1122 en - US To prevent accidents and appliance damage, read these instructions before installation or use. M.-Nr. 07 346 400...
-
Page 2: Table Of Contents
Contents IMPORTANT SAFETY INSTRUCTIONS....... . . 3 Description of the combiset ......... 7 CS 1112 . -
Page 3: Important Safety Instructions
IMPORTANT SAFETY INSTRUCTIONS Only use the combiset for residential WARNING- When using your gas cooking, and for the purposes appliance follow basic described in this manual. precautions, including the Other uses are not permitted and can following: be dangerous. Persons who lack physical, sensory This gas combiset conforms to all or mental abilities, or experience with uniform safety codes and... - Page 4 Before servicing, disconnect the appliance from the main power supply. Installation, repair and maintenance work should be performed by a Miele Do not operate any appliance with a authorized service technician. Work by damaged cord or plug, or if the...
- Page 5 IMPORTANT SAFETY INSTRUCTIONS Be sure that the power cord does Never use the appliance to heat a not come in contact with any "hot spots" room. Due to the high temperatures after installation. radiated, objects left near the appliance could catch fire. Safety Do not use the appliance until it has been properly installed in the...
- Page 6 IMPORTANT SAFETY INSTRUCTIONS Make certain that the power cords of Before using glass, glass/ceramic, small appliances do not come in ceramic, earthenware or other glazed contact with the appliance. The cookware verify that they can be used insulation of the cable could become on a cooking surface.
-
Page 7: Description Of The Combiset
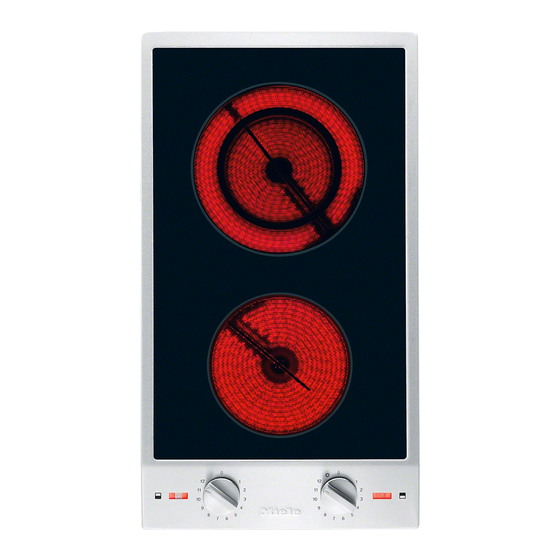
Description of the combiset CS 1112 a Variable burner : Control knobs for the burners: C 4" or 7" (100 mm or 180 mm) - f Standard burner (front) Power: 700 W or 1800 W g Variable burner (rear) b Standard burner : "... - Page 8 Description of the combiset CS 1122 a Extended burner Control knobs for the burners: C 7" or 7" x 10 " f Standard burner (front) (180 mm or 180 mm x 265 mm) - g Extended burner (rear) Power: 1500 W / 2400 W b Standard burner "...
-
Page 9: Before Using For The First Time
Before using for the first time Clean the combiset Metal components of the appliance have a protective coating which may ^ Remove any protective coverings or give off a slight odor the first time the stickers. appliance is heated. ^ Before using for the first time, clean The smell will dissipate after a short the appliance with a damp cloth and time and does not indicate a faulty... -
Page 10: How The Burners Work
How the burners work One-ring burners use one heating strip, One-ring burner and two-ring burners and grill zones use two heating strips. Depending on the model, the heating strips may be separated by a certain distance. See the illustrations. Every burner is equipped with overheat protection (inside temperature limiter), to prevent the glass ceramic combiset from overheating (see the section on... -
Page 11: Use
Turning a burner On/Off Turning on the second ring on a Variable/Extended burner ^ To turn a burner on, press the control knob down and turn it clockwise a ^ Press the control knob down and turn to the desired setting. it clockwise past "12"... -
Page 12: Residual Heat Indicator
Residual Heat Indicator When a cooking zone is switched on, the On/Off indicator will light followed by the residual heat indicator. When the cooking zone is switched off, the On/Off indicator goes out. The residual heat indicator will turn off once the cooking zone is safe to the touch. -
Page 13: Settings
Settings Use for Power level* Melt butter, chocolate, etc. 1 - 2 Dissolving gelatine Prepare yogurt Warming small quantities of food/liquid 1 - 3 Keeping delicate dishes warm Cooking rice, Thawing frozen vegetables Warming liquid or half-set foods 3 - 5 Thickening sauces, e.g., hollandaise sauce Cooking rice pudding Defrosting frozen foods... -
Page 14: Overheat Protection
Overheat protection Each cooking zone is equipped with a temperature limiter. This feature automatically turns off the heating element before the glass ceramic becomes too hot. Once the ceramic surface has cooled to a safe temperature the heating element will automatically turn back on. -
Page 15: Selecting Cookware
Selecting cookware Following these tips will allow you to Pots and pans make the most of your ceramic Special cookware is not required, but combiset. as is true with all types of cooking appliances, the better the cookware, The cooking surface the better the performance. - Page 16 Selecting cookware Copper bottom and aluminum pans may leave a residue on the combiset in the form of metallic lines. This is normal. These lines can be removed using a non-abrasive ceramic combiset cleaner or a shielded scraper blade. Be sure to clean the combiset after each use.
-
Page 17: Cleaning And Care
Cleaning and care Do not use a steam cleaner to clean Be sure that pot and pan bases are this appliance. Steam could clean and dry. penetrate electrical components and cause a short circuit. Pressurized After cleaning dry the ceramic steam could cause permanent surface with a soft cloth to prevent a damage to the surface. - Page 18 Soak baked or hardened spills first to ^ Apply a ceramic cleaner (available loosen them. from Miele) using a soft cloth or paper towel. Stainless steel surfaces can be cleaned using a non-abrasive stainless steel ^ To remove any limescale deposits or cleaner (available from Miele).
-
Page 19: Frequently Asked Questions
What if the appliance does not heat up after it is turned on? Possible fault Solution The circuit breaker has tripped. Check whether a fuse is blown. If the problem persists contact Miele. What if a heating element turns off then on again? Possible fault Solution The overheating protection has See "Overheating protection". -
Page 20: Technical Service
Technical Service In the event of a fault which you cannot easily fix yourself, please contact the Miele Technical Service Department at the address on the back of this booklet. When contacting Technical Service please quote the serial number and model of the appliance. - Page 21 Miele appliance. Please note that unless expressly approved in writing by the Miele Ser- vice department, Extended Service Contracts offered by other providers for Miele products will not be recognized by Miele.
- Page 23 Installation Instructions IMPORTANT: SAVE FOR THE LOCAL ELECTRICAL INSPECTOR'S USE Information is subject to change. Please refer to our website to obtain the most current product specification, technical & warranty information. To prevent accidents and appliance damage read these instructions before installation or use.
-
Page 24: Important Installation Safety Instructions
IMPORTANT INSTALLATION SAFETY INSTRUCTIONS Note to the installer: This appliance must not be used in Please leave this instruction book a non-stationary location (e.g. on a ship). with the consumer for the local electrical inspector’s use. Do not install this appliance above an oven unless the countertop is at The minimum distances given in least 1... - Page 25 IMPORTANT INSTALLATION SAFETY INSTRUCTIONS Safety distances above the appliance The minimum safety distance given by the hood manufacturer must be maintained between the combiset and the hood above it. See the installation instructions of the hood for these safety measurements. If the hood manufacturers instructions are not available or if flammable objects are installed over the combiset (e.g.
- Page 26 IMPORTANT INSTALLATION SAFETY INSTRUCTIONS Safety distances to the sides of the appliance The appliance should only be installed as shown in the illustrations, while 2 " (50 mm) maintaining the required safety distances shown. Do not install the appliance between two tall cabinets, this is a fire hazard.
-
Page 27: Installation
Installation Safety distance from the wall covering If a wall covering is installed, a minimum safety distance must be maintained between the countertop cut-out and the covering, since high temperatures can damage these materials. If the covering is made of a combustible material (such as wood), the distance between the countertop cut-out and the wall covering must be a minimum of 2"... -
Page 28: Installation Dimensions Cs 1112
Installation Installation dimensions CS 1112 a Spring clips b Appliance front c Installation height d Power supply box with connection cable, L = 78 3/4" (2000 mm) e Rating label... -
Page 29: Installation Dimensions Cs 1122
Installation Installation dimensions CS 1122 a Spring clips b Appliance front c Installation height d Power supply box with connection cable, L = 78 3/4" (2000 mm) e Rating label... - Page 30 Installation Cut out If during installation the seal around ^ Make the countertop cut-out for the the frame does not sit flush with the desired number of appliances countertop in the corners, the corner according to the dimensions radius, maximum "...
-
Page 31: Installation Of Multiple Appliances
Installation Installation of multiple appliances When installing more than one combiset appliance, a support bar b must be installed between the appliances. Countertop cut-out Countertop cut-out two appliances three appliances For the installation of two appliances For the installation of three appliances the width of the countertop cut-out D is the width of the countertop cut-out D is the sum of A and C. - Page 32 Installation Sample calculations for a countertop cut-out for three appliances appliance width appliance width appliance width Countertop minus 5/16" minus 5/16" cut-out (8 mm) (8 mm) 11" (280 mm) 11 5/16" (288 mm) 11" (280 mm) 33 3/8" (848 mm) 11"...
- Page 33 Installation a Spring clips b Support bars c Space between support bar and countertop d Cover The illustration represents the attachment of spring clips a and support bars b for 3 appliances. An additional support bar is required for each additional appliance. The position for attachment of an additional support bar depends on the width of appliance B.
-
Page 34: Attach The Spring Clips And Support Bars
Installation Attach the spring clips and support bars Wood or solid surface countertops ^ Place the supplied spring clips a and the support bars b at the marked positions as shown above, by laying them on the upper edge of the cut-out and then securing them with the "... - Page 35 Installation Granite countertop The screws are not needed for granite countertops. ^ Coat the side and lower edges of the spring clips between a and b with silicone. ^ Fill the space e between the support ^ Position and attach the spring clips bars b and the countertop with a and support bars b with strong, silicone.
- Page 36 Installation ^ Place the front edge of the next Installing the appliance(s) appliance into the cut-out. ^ Feed the power cord down through ^ Connect the appliance(s) to the main the cut-out. power supply (see "Electrical ^ Place the front edge of the appliance connection").
-
Page 37: Sealing
Installation Sealing Tiled surfaces The appliance must not be The grouting a and shaded area under permanently sealed into the countertop the appliance frame must be flat and when installed. The sealing strip under even so that the frame will lie evenly the edge of the appliance provides a and the sealing strip under the edge of sufficient seal for the countertop. -
Page 38: Electrical Connection
Electrical connection Power supply CAUTION: Before installation or ^ Be sure your electrical supply servicing, disconnect the power matches the rating label. supply by either removing the fuse, shutting off the main power or The rating label is located on the manually "tripping"... -
Page 39: Help Protect Our Environment
Help protect our environment Disposal of packing materials Disposal of an old appliance The cardboard box and packing Old appliances contain materials that materials are biodegradable and can be recycled. Please contact your recyclable. Please recycle. local recycling authority about the possibility of recycling these materials. - Page 40 Alteration rights reserved / 3911 M.-Nr. 07 346 400 / 04 M.-Nr. 07 346 400 / 04 INFORMATION IS SUBJECT TO CHANGE. PLEASE REFER TO OUR WEBSITE TO OBTAIN THE MOST CURRENT PRODUCT SPECIFICATIONS, TECHNICAL & WARRANTY INFORMATION.
Need help?
Do you have a question about the CombiSet CS 1112 and is the answer not in the manual?
Questions and answers