
Related Manuals for Walker Edison BS64MOR5


Summary of Contents for Walker Edison BS64MOR5
- Page 1 BS64MOR5 Please visit our website for the most current instructions, assembly tips, report damage, or request parts. www.walkeredison.com Revised 01/06/2020(C) Walker Edison ® © Copyright 2020, by Walker Edison Furniture Co., LLC. All rights reserved.
-
Page 2: General Assembly Guidelines
A Phillips head screwdriver is required for the assembly of this product . VII. Power tools should not be used to assemble this product. VIII. Drill may be needed for securing product to wall. © Copyright 2020, by Walker Edison Furniture Co., LLC. All rights reserved. -
Page 3: Parts List
Parts List © Copyright 2020, by Walker Edison Furniture Co., LLC. All rights reserved. -
Page 4: Hardware List
Glue tube Philips head screwdriver required for assembly (not included) The hardware quantities listed above are required for proper assembly. Some extra hardware may also have been included. © Copyright 2020, by Walker Edison Furniture Co., LLC. All rights reserved. - Page 5 Step 1 Insert wooden dowel (A) into parts (1,2,3,5,6), then secure cam bolt (B) into parts (1,3,5,6) with Philips head screwdriver as per diagram. © Copyright 2020, by Walker Edison Furniture Co., LLC. All rights reserved.
- Page 6 Step 2 Using Cam lock(C) secure parts (5,6) to part (2) with Philips head screwdriver as per diagram. © Copyright 2020, by Walker Edison Furniture Co., LLC. All rights reserved.
- Page 7 Step 3 Using Screw (E) attach part (8) into parts (2,5,6) with hex key (H) as per diagram. © Copyright 2020, by Walker Edison Furniture Co., LLC. All rights reserved.
- Page 8 Step 4 Using Screw (E) attach part (7) into parts (2,5,6) with hex key (H) as per diagram. © Copyright 2020, by Walker Edison Furniture Co., LLC. All rights reserved.
- Page 9 Step 5 Using Cam lock(C) secure parts (1,3) to part (2) with Philips head screwdriver as per diagram. © Copyright 2020, by Walker Edison Furniture Co., LLC. All rights reserved.
- Page 10 Step 6 Using Screw (E) attach part (7) into parts (1,2,3) with Hex key (H) as per diagram. © Copyright 2020, by Walker Edison Furniture Co., LLC. All rights reserved. P.10...
- Page 11 Step 7 Using Screw (E) attach part (4) into parts (1,2,3) with Hex key (H) as per diagram. © Copyright 2020, by Walker Edison Furniture Co., LLC. All rights reserved. P.11...
- Page 12 Step 8 Using Bolt (F) attach part (9) to parts (4,7,8) with Hex key (H) as per diagram. Note: Do not fully tighten all bolts . © Copyright 2020, by Walker Edison Furniture Co., LLC. All rights reserved. P.12...
- Page 13 Step 9 Using Bolt (J) attach part (9) to parts (5) with Hex key (H) as per diagram. © Copyright 2020, by Walker Edison Furniture Co., LLC. All rights reserved. P.13...
- Page 14 Step 10 Using Bolt (G) attach part (9) into part (11) with Hex key (H) as per diagram. © Copyright 2020, by Walker Edison Furniture Co., LLC. All rights reserved. P.14...
- Page 15 Step 11 Using Screw (P) attach part (8) into part (11) with Philips head screwdriver as per diagram. © Copyright 2020, by Walker Edison Furniture Co., LLC. All rights reserved. P.15...
- Page 16 Step 12 Using Bolt (F) attach part (10) into parts (4,7,8) with Hex key (H) as per diagram. © Copyright 2020, by Walker Edison Furniture Co., LLC. All rights reserved. P.16...
- Page 17 Using Bolt (J) attach part (10) into part (6) ,then using Bolt (G) attach part (10) to part (11) with Hex key (H) as per diagram. Note: Fully tighten all bolts. © Copyright 2020, by Walker Edison Furniture Co., LLC. All rights reserved. P.17...
- Page 18 Step 14 Place sticker (D) cover the holes ,then using Bolt (F) attach Bracket (K) to part (4) with Hex key (H) as per diagram. © P.18 Copyright 2020, by Walker Edison Furniture Co., LLC. All rights reserved.
- Page 19 Wall Using Screw (M) attach Flat washer (L) ,Bracket (K) and wall anchor (N) to Wall with Philips head screwdriver as per diagram. © Copyright 2020, by Walker Edison Furniture Co., LLC. All rights reserved. P.19...
-
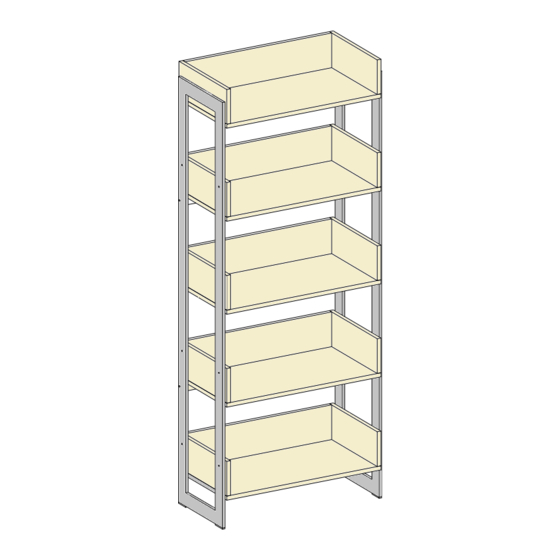
Page 20: Final Assembly
Step 16 Final Assembly © Copyright 2020, by Walker Edison Furniture Co., LLC. All rights reserved. P.20...
Need help?
Do you have a question about the BS64MOR5 and is the answer not in the manual?
Questions and answers