Omega OF910FXCOM Instruction Manual
Free standing oven
Hide thumbs
Also See for OF910FXCOM:
- Instruction manual (24 pages) ,
- Instruction manual (23 pages) ,
- Instruction manual (28 pages)
Table of Contents
Advertisement
Advertisement
Table of Contents

Subscribe to Our Youtube Channel
Related Manuals for Omega OF910FXCOM


Summary of Contents for Omega OF910FXCOM
- Page 1 Instruction Manual Free Standing Oven OF910FX, OF910FXCOM, OF995FXCOM...
- Page 2 Thank you for purchasing an Omega appliance Tailored for the modern aesthetic and lifestyle of busy people, your new Omega Appliance will make a welcome addition to the family. Omega caters to style-savvy customers who look for balance between stunning form and clever function.
-
Page 3: Table Of Contents
The manufacturer will not be responsible for any damage to property or to persons caused by incorrect installation or improper use of the appliance. Due to continual product development, Omega reserves the right to alter specifications and appearances without notice. -
Page 4: Important Safety Warnings
Important Safety Warnings Please read these operating instructions carefully. Installation and repair should always be performed by an authorised person. The manufacturer and supplier shall not be held responsible for operations performed by unauthorized persons. The oven should be used according to the operating instructions. Keep children below the age of 8 and pets away whilst operating. - Page 5 Important Safety Warnings Food can spill when foot of oven is dismantled or gets broken, be careful. It may cause personal injuries. During usage, the internal and external surfaces of the oven get hot. As you open the oven door, step back to avoid the hot vapour coming out from the interior.
- Page 6 Important Safety Warnings Gas Safety This appliance is not connected to burning products evacuation apparatus. This appliance must be connected and installed according to the installation regulations in force. Conditions regarding ventilation must be considered. When a gas cooking appliance is used; humidity, heat and burning products are generated in the room.
-
Page 7: Product Information
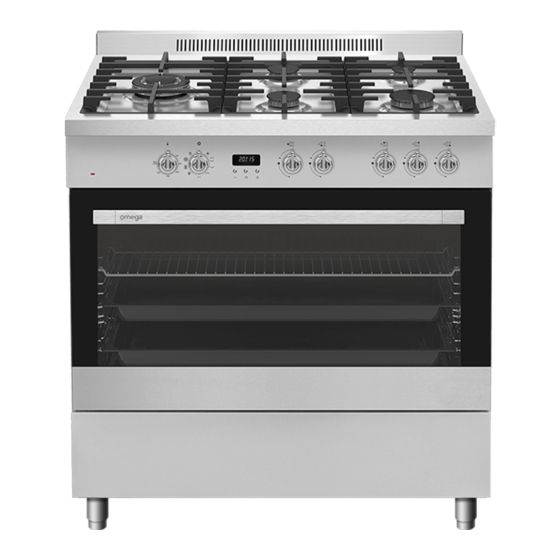
Product Information 1. Oven control knobs 9. Lamp 2. Hob control knobs 10. Grill 3. Wire grill 11. Deep tray 4. Deep tray 12. Large burner 5. Door 13. Middle burner 6. Handle 14. Auxiliary burner 7. Lower cabinet door 15. -
Page 8: Technical Data
Technical Data Specifications 90x60 Outer width 900 mm Outer depth 610 mm Outer height 925 mm Lamp power 15-25 W Bottom heating element 2000 W Top heating element 1500 W Grill heating element 2500 W / 3250 W Turbo heating element 1250 W x 2 Supply voltage 220-240V AC/380-415V AC 50/60 Hz... -
Page 9: Accessories
Accessories Deep tray Used for pastries, deep fried foods and stew recipes. In case of frying directly on the grill for cakes, frozen foods and meat dishes, it can be used as an oil catchment tray. Wire grill Used for placing the foods to be baked on the desired rack. -
Page 10: Installation Instructions
Installation Instructions Electrical Connection Your oven requires 16 Amp fuse and must be installation by a qualified electrician. Your oven is adjusted in compliance with 220-240V AC/380-415V AC 50/60Hz. electric supply. If the mains are different from this specified value, contact your authorized service. Electrical connection of the oven should only be made by the sockets with earth system installed in compliance with the regulations. - Page 11 Installation Instructions WARNING: Before placing the appliance, check that the local distribution conditions (gas type and pressure) conform to the product settings. Ensure the appliance is at the correct height to the benchtop. If required, adjust the legs in order the make level with the benchtop.
- Page 12 Changing the Gas Injection Nozzle Use a socket driver to remove and install the nozzle as in Figure 3. Remove the nozzle (figure 4) from the burner with nozzle driver and install a new nozzle (Figure Figure 4 Figure 5 Figure 3 Ventilation of Room This product requires adequate ventilation.
- Page 13 Installation Instructions Check that the appliance has been properly connected to the power supply. If the electrical installation is not suitable, call an electrician and plumber to arrange the utilities as necessary. The manufacturer and supplier shall not be held responsible for damages caused by operations performed by unauthorized persons.
- Page 14 Burner flames should be clear blue, with no yellow tipping. If the burners show any abnormality check that the burners are correctly located. If satisfactory performance cannot be obtained, contact Omega service. Check the gas pressure at the test point (refer to the rating plate for specified pressure) with the Wok burner set on the highest position.
-
Page 15: Operating Instructions
Operating Instructions Controls 1. Digital timer 5. Rear left heater 2. Thermostat 6. Far left heater (Wok burner or hotplate) 3. Function selection button 7. Rear right heater 4. Front left heater 8. Front right heater Note: The control panel above is only for illustration purposes. Consider the control panel on your device. Oven Thermostat Control: The oven thermostat control is used to select the desired temperature for cooking. - Page 16 Operating Instructions Oven Timer Control OVEN STATUS ICON If on, oven is ready for cooking, or is cooking. If off, the oven is not cooking MINDER ICON If on, the Minute Minder is running. If flashing, the minute minder can be adjusted using the minus &...
- Page 17 Operating Instructions CHILD LOCK The child lock is intended to stop any unauthorised adjustment of the timer functions, and comes on 30 seconds after a timer function is set. To deactivate it (to adjust a timer function), press and hold the central timer button for 3 seconds (the child lock icon will turn off and the buttons can be used).
- Page 18 Operating Instructions Using Gas Burners The flame cut-off safety device (FFD); operates instantly when the safety mechanism activates due to overflown liquid over the upper hobs. The valves controlling the gas cookers have a special security mechanism. To light the cooker, hold down the switch and turn it counterclockwise. All of the lighters will operate and the cooker you are controlling will light.
- Page 19 Operating Instructions Function Dial This is used for determining the cooking function to be used. The cooking functions are described below. All cooking functions may not be available in all models. Defrost Function You can start the defrost operation by putting the frozen food into oven and bringing the function control knob to the indicated mark.
- Page 20 Operating Instructions Fan Assist Function This is the function where the heat coming from the lower and upper heating elements is circulated into the oven by the fan motor and blade. Adjust the function control knob so it indicates the Fan Assist Function symbol and adjust the oven timer to the recommended time for cooking. Adjust the thermostat control knob to the temperature required on the cooking table for the Fan Assist Function and preheat oven for 10 minutes.
- Page 21 Operating Instructions Conventional Cooking Function The Conventional function allows heat to radiate evenly from the lower and upper elements into the oven ensuring even cooking of both sides of the food. Adjust the function control so it indicates the conventional Cooking function symbol. Adjust the thermostat control knob of your oven to a temperature recommended on the cooking table for the cooking operation you wish to perform.
-
Page 22: Maintenance And Cleaning
Maintenance and Cleaning WARNING: Disconnect the appliance from the electrical supply before performing any maintenance or cleaning. While the oven is operating or shortly after it starts operating, it is extremely hot. Avoid touching the heating elements. Do not use harsh cleaners such as hard wire brushes, abrasive cleaners or detergents. Use a soft, damp, soapy cloth to clean the interior of the oven. - Page 23 Maintenance and Cleaning Cleaning And Maintenance of the Oven’s Front Door Glass Remove the profile by pressing the plastic latches on both left and right sides as shown in figure 20 and pulling the profile towards yourself as shown in figure 21. Then remove the inner-glass as shown in figure 22.
-
Page 24: Troubleshooting
Troubleshooting You may solve the problems you may encounter with your product by checking the following points before calling the technical service. Problem Possible Cause What to Do Power supply not available. Check for power supply. Check if main gas valve is open. Check if gas pipe is bent or kinked. -
Page 25: Australian & New Zealand Product Warranty Statements Of Standard Warranty Conditions
The Damage which occurs during delivery or installation. product will be repaired or replaced at the option of Omega, and 10. Claims to product surface coating due to liquid or solid all costs of installation, removal, cartage, freight travelling spill-overs, accidental damage or damage caused from expenses and insurance are to be paid by the customer. - Page 26 IM v4.0...
Need help?
Do you have a question about the OF910FXCOM and is the answer not in the manual?
Questions and answers