Table of Contents
Advertisement
Quick Links
Advertisement
Table of Contents

Related Manuals for AVer AVerVision F50-8M


Summary of Contents for AVer AVerVision F50-8M
- Page 1 AVerVision F50-8M User Manual...
- Page 2 © 2016 - 2017 AVer Information Inc. All rights reserved. All rights of this object belong to AVer Information Inc. Reproduced or transmitted in any form or by any means without the prior written permission of AVer Information Inc. is prohibited. All information or specifications are subject to change without prior notice.
- Page 3 WARNING T O R E D U C E R I S K O F F I R E O R E L E C T R I C S H O C K , D O N O T E X P O S E T H I S A P P L I A N C E T O R A I N O R M O I S T U R E .
-
Page 4: Table Of Contents
Package Contents ....................1 Optional Accessories ..................1 Get Familiar with the AVerVision F50-8M ............2 Right Panel ......................2 Rear Panel....................... 3 Left Panel ........................ 3 Control Panel ......................4 Remote Control ....................... 6 Making the Connections ................... 9 Set the TV-RGB Switch Setting ................ - Page 5 4 8 B A uto Image ....................... 23 5 3 B E xposure......................23 5 4 B W hite Balance ....................23 5 0 B F ocus ........................ 23 Presentation ......................24 5 7 B S potlight ......................24 6 0 B V isor........................24 6 2 B P IP ........................
- Page 6 Annotation ......................33 Connecting a USB mouse ..................33 Using the Annotation ..................... 34 Transfer Captured Images/Videos to a computer ..........35 Technical Specifications ................. 36 Image ........................ 36 Optics ....................... 36 Power ....................... 36 Lighting ......................36 Input/Output ...................... 36 Dimension ......................
-
Page 7: Package Contents
* The power adapter will vary depending on the standard power outlet of the country where it is sold. Remote Control (batteries included) AVerVision F50-8M RS-232/CVBS Cable Software & Manual CD Carrying Bag Anti-glare Sheet Microscope Adapter ( 28mm and 34mm Rubber Coupler are included) -
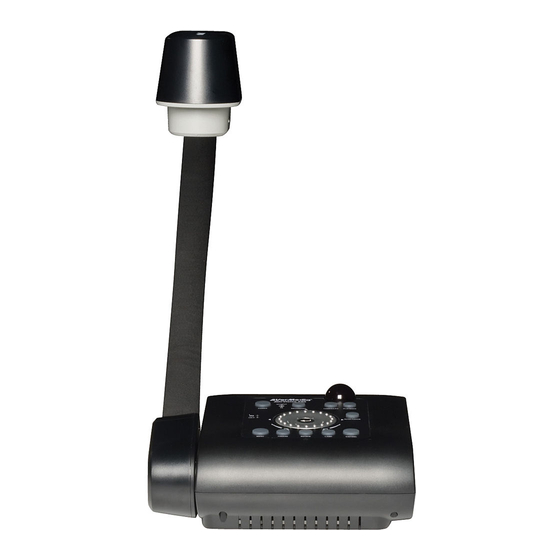
Page 8: Get Familiar With The Avervision F50-8M
(fig. 1.1) Name Function Camera head Contain the camera sensor. Camera lens Focus the image in the camera. LED light Provide light to enhance the lighting condition. Flexible arm Provide adjustable viewing coverage. Connections for HDMI output/input external display device, Left panel microphone, speaker, USB flash drive/USB mouse, and USB switch. -
Page 9: Rear Panel
RGB OUTPUT port Connect the AVerVision F50-8M to any display device with RGB cable. Connect the RS-232/CVBS cable (optional) into this port. The RCA jack outputs the video signal from the camera to a TV or video equipment. -
Page 10: Control Panel
Cont ro l P an el (10) OUTPUT (11) POWER RECORDING CAMERA / PC PLAYBACK (12) AUTO FOCUS (13) Wi - Fi (14) (15) MENU FREEZE ROTATE LAMP CAP / DEL (fig. 1.5) Name Function POWER Turn the unit on/standby mode. OUTPUT LED Indicate TV-RGB switch selection to show which port the video signal is sent out. - Page 11 Name Function - Make a selection in Playback mode and OSD menu. - Start/Pause video playback. FREEZE - Pause or resume image display in Camera mode. - Stop audio & video playback in Playback mode. MENU Open and exit the OSD menu and submenu. ROTATE Turn the image by 0/180°...
-
Page 12: Remote Control
Re mot e Cont ro l The remote control requires two (2) “AAA” size batteries (supplied), make sure batteries are installed properly before use. You can access all the features of AVerVision F50-8M with the remote. Name Function POWER Turn the unit on/standby. - Page 13 Name Function ▲,▼,◄, & ► - Pan and zoom-in image (above digital zoom level) in both live and playback (12 ) mode. (13 ) (14 ) - Select options in OSD menu. (15 ) - Use ▲&▼ to increase and decrease (16 ) the video playback volume.
- Page 14 Name Function OK – press (15) SPOTLIGHT for the setting to take (12 ) effect. If you select ON, the frame will (13 ) appear and blink, use the ▲,▼,◄, & ► (14 ) buttons to adjust the frame size and (15 ) press to set the desired size;...
-
Page 15: Making The Connections
AVerVision F50-8M with. The TV-RGB switch determines the display output selection. Switch it to RGB (right) to output signal using RGB/HDMI connection and TV (left) to output signal using RCA connection. -
Page 16: Connect To A Monitor Or Lcd/Dlp Projector With Hdmi Output Interface
Locate the HDMI input port of the display device and connect it to HDMI out port of AVerVision F50-8M. Make sure the TV/RGB switch is set to RGB. Locate the VIDEO or SCART RGB (if applicable) input port of the TV or Video equipment (i.e., VCR) to record your presentation and connect it to RCA jack of RS-232/CVBS cable... -
Page 17: Connecting The Power
Locate the RGB (VGA) output port of the computer or laptop and connect it to RGB IN port of AVerVision F50-8M. The video signal from the RGB IN port is streamed to RGB OUT. - To display computer image, press Camera/PC button on the control panel or remote control to switch AVerVision F50-8M to computer mode. -
Page 18: Connect To A Computer With Hdmi Input Interface
- Make sure the TV/RGB switch is set to RGB. - To display computer image, press Camera/PC button on the control panel or remote control to switch AVerVision F50-8M to computer mode. - For laptop to output display image, use the keyboard command (FN+F5) to switch between the display modes. -
Page 19: Connect An Amplified Speaker
Take caution when using earphones. Adjust the volume down on the remote to prevent hearing damage due to loudness. Connect the AVerVision F50-8M to a microscope enables you to examine microscopic objects on a big screen. Change the image display mode to Microscope. - Page 20 Select the appropriate rubber coupler size for the microscope eyepiece and insert it in the microscope adapter. Remove the microscope eyepiece from the microscope and connect it to the microscope adapter with the rubber coupler inserted. Fasten the 3 bolts until the adapter secures the eyepiece.
-
Page 21: Setting Up Avervision F50-8M
This section provides useful tips on how to adjust the AVerVision F50-8M to meet your needs. The gooseneck design allows you to freely bend the arm and store the camera head in the camera holder. Once you have properly secured the camera head to the camera holder,... -
Page 22: Shooting Area
The shooting area can view an area of 400x300mm which allows you to show an A4 size portrait paper. If the camera head is in upright position, press ROTATE on the control panel or remote control twice to rotate the image in 180°. To mirror the image, press MENU >... -
Page 23: Overhead Light
Press LAMP button on the control panel or remote control to turn on and off light. Aim the remote control at the infrared sensor to operate the unit. -
Page 24: Mounting The F50-8M On A Flat Surface
Measure and mark the horizontal of 75 mm from the center line distance between the holes on the flat surface as describe in the illustration below. Use 2 pieces of M4.0 screws for 6 mm holes and secure the F50-8M on the flat surface. 75mm The anti-glare sheet is a special coated film that helps eliminate any glare that maybe encountered while displaying very shiny objects or glossy surfaces such as magazines and... -
Page 25: External Memory Storage
(FAT32). We recommend using SDHC card with class-6 or above for high quality recording. Connect the USB flash drive in the USB slot. AVerVision F50-8M can support USB flash drive from 2GB to 64GB (FAT32). U B est to format the USB flash drive using AVerVision... -
Page 26: Osd Menu
There are 4 tabs on the OSD menu: IMAGE, PRESENTATION, SETTING and SYSTEM. In Playback mode, you can access PLAYBACK OSD menu to enable the Slide Show feature and modify Slide Show interval and transition setting if desire. For TV output, the RESOLUTION will be disabled in SETTING menu list. IMAGE PRESENTATION SETTING... -
Page 27: Navigate The Menu And Submenu
1. Press MENU button on the remote or control panel. 2. Press ► and ◄ to toggle between tabs 3. Press ▼ and ▲ to choose a selection in the menu list. 4. Press to make a selection. 5. Use ► and ◄ to adjust the setting or make a selection. -
Page 28: 9 B M Ode
Menu Screen Function M ode 4 9 B Select from the various image display settings. Sharp - adjust the contrast along the edges making text appear more visible. Graphics - adjust the gradient of image. Motion - increase frame rate. Sufficient lighting is required when using this mode. -
Page 29: 8 B A Uto Image
Menu Screen Function A uto Image 4 8 B Select ON or OFF to automatically adjust the white balance and exposure setting, and correct the color and exposure compensation. E xposure 5 3 B Select the exposure setting. AUTO - automatically adjust the camera exposure and the amount of light required. -
Page 30: Presentation
Menu Screen Function S potlight 5 7 B Spotlight overlays a frame on the presentation screen. You can move the Spotlight around the presentation screen using the ▲,▼,◄, & ► buttons. Select Execute to call the Spotlight submenu. In the Spotlight submenu, the following options are available. ON/OFF –... -
Page 31: 2 B P Ip
Divide the screen into two parts. Half of the screen displays the 8-thumbnail images and the other half display the image from the AVerVision F50-8M camera. Select the display location of the 8- thumbnail playback images. Select OFF to cancel Split Screen. -
Page 32: Setting
Menu Screen Function C apture 4 8 B Select to set the capture resolution, quality, type and interval settings. R esolution 6 6 B Select the capture size. In 8M setting, the capture resolution size is 3840 X 2160. Q uality 6 7 B Select the capture compression setting. -
Page 33: 2 B S Torage
Format to delete all the data in the selected memory. U SB to PC 7 6 B Select the status of the AVerVision F50-8M when it is connected to the computer via USB. Camera - can be used as a computer webcam or with our bundled software to record video and capture still image. -
Page 34: Mic Volume
Menu Screen Function MIC Volume Adjust volume input of recording or USB audio input. Menu Screen Function L anguage 7 4 B Change and select different language. O utput Display 7 5 B Set the resolution to display the image on screen. This selection will be disabled in TV output mode. -
Page 35: 8 B S Ave Setting
Menu Screen Function S ave Setting 7 8 B Save current setting in the selected profile number. Only effect, mode, brightness and contrast settings can be saved. Recall Setting Restore the setting back to the selected profile number. I nformation 8 0 B Display the product information. -
Page 36: Playback
Menu Screen Function S lide Show 8 1 B Display all captured still pictures in an automated slide show. The video file will be skipped. Interval Set the interval before displaying the next picture. The length can be set up to 100 sec. E ffect 8 3 B Select the slide show transition effect. -
Page 37: Wifi
WiFi is an optional function. Only WiFi dongle is installed and WiFi button is pressed (on control panel), the WiFi function page will show. OUTPUT POWER RECORDING CAMER A / PC PLAYBACK AUTO FOCUS Wi - Fi MENU FREEZE ROTATE LAMP CAP / DEL Menu Screen... -
Page 38: 8 B C Onnect Ap
Menu Screen Function C onnect AP 7 8 B ▼ button move to “Connect” and press to start connection. When connection is successful, the AP information is displayed. To disconnect, select “Disconnect” and press To remember this AP account, mark Remember Me. To back to WiFi page, select “OK”... -
Page 39: Annotation
In single image playback mode and preview mode, you can use the annotation feature to overlay straight line or freeform line on the captured image with the USB mouse connected to the USB port of AVerVision F50-8M. It comes with the following selections: Color Palette, Line Thickness, Line, Freehand, Capture, Eraser, and Hide/Show icons. -
Page 40: Using The Annotation
1. In camera mode, press (Freeze/Stop) button to call out annotation menu. on the remote. Then, use the ▲,▼,◄, & ► In playback back mode, Press buttons and select the image you want to annotate in the 16-thumbnail preview. Press to make a selection and display the image in full screen. -
Page 41: Transfer Captured Images/Videos To A Computer
This enables you to transfer the captured image from the built-in memory or SD to a computer. The instruction below MUST be read and followed BEFORE connecting the USB cable. 1. MUST set the USB to PC as STORAGE before connecting the USB cable. 2. -
Page 42: Technical Specifications
Image Sensor 1/3.2” CMOS Pixel Count 8 megapixels Frame Rate 60 fps (max.) White Balance Auto / Manual Exposure Auto / Manual Image mode Sharp / Graphics / Motion / Microscope / Macro / Infinite Effect Color / B/W / Negative / Mirror / Rotate / Freeze 1920x1080, 1280x1024, 1280x720, 1024x768, 1280 x 800, RGB output 1366x768... -
Page 43: External Storage
USB Flash Drive 2GB ~ 64GB (FAT32) AVerVision F50-8M can be controlled using a computer or any centralized control panel through RS-232 connection. The command code for RS-232 is provided for the system integrator to be able to incorporate it with the system program. -
Page 44: Rs-232 Cable Specifications
Make sure the RS-232 cable matches the cable specification design. :1 bit Start bit :8 bit Data bit :1 bit Stop bit :None Parity bit :None X parameter :9600bps Baud rate (Communication speed) Send Device 0x52 Code(1 Byte) Type Code... -
Page 45: Rs-232 Send Command Table
Send Format︰0x52 + 0x0B + 0x03 + Data[0] + Data[1] + Data[2] + 0x53 + CheckSum*1 Receive Format︰0x53 + 0x00 + 0x02+ *2 + 0x00 + 0x52 + ReCheckSum*4 Abnormal Receive Format︰0x53 + 0x00 + 0x01 + *3 + 0x52 + ReCheckSum*5 xor : Exclusive-or operator *1 :CheckSum = 0x0B xor 0x03 xor Data[0] xor Data[1] xor Data[2] xor 0x53 *2 :Receive Success Check Code : 0x0B(Success Command),0x03(Invalid Command) - Page 46 Function Data[0] Data[1] Data[2] CheckSum PREVIEW MODE: MOTION 0x0A 0x02 0x00 0x53 PREVIEW MODE: MICROSCOPE 0x0A 0x03 0x00 0x52 PREVIEW MODE: MACRO 0x0A 0x04 0x00 0x55 PREVIEW MODE: INFINITE 0x0A 0x05 0x00 0x54 PREVIEW MODE CAPTURE 0x0B 0x00 0x00 0x50 PLAYBACK DELETE 0x0C 0x00...
- Page 47 Function Data[0] Data[1] Data[2] CheckSum WHITE BALANCE RED INCREASE 0x17 0x00 0x00 0x4c WHITE BALANCE RED DECREASE 0x17 0x01 0x00 0x4d FLICKER: 50Hz 0x18 0x00 0x00 0x43 FLICKER: 60Hz 0x18 0x01 0x00 0x42 SPOTLIGHT: OFF 0x19 0x00 0x00 0x42 SPOTLIGHT: ON 0x19 0x01 0x00...
- Page 48 Function Data[0] Data[1] Data[2] CheckSum RECORDING: OFF 0x23 0x00 0x00 0x78 RECORDING: ON 0x23 0x01 0x00 0x79 MOVIE FAST REWIND 0x25 0x00 0x00 0x7e MOVIE FAST FORWARD 0x25 0x01 0x00 0x7f MOVIE VOL INC 0x26 0x00 0x00 0x7d MOVIE VOL DEC 0x26 0x01 0x00...
- Page 49 Function Data[0] Data[1] Data[2] CheckSum SLIDESHOW: OFF 0x34 0x00 0x00 0x6f SLIDESHOW: ON 0x34 0x01 0x00 0x6e SLIDESHOW EFFECT: EFFECT 0 0x35 0x00 0x00 0x6e SLIDESHOW EFFECT: EFFECT 1 0x35 0x01 0x00 0x6f SLIDESHOW EFFECT: EFFECT 2 0x35 0x02 0x00 0x6c SLIDESHOW EFFECT: EFFECT 3 0x35...
-
Page 50: Rs-232 Get Command Table
Function Data[0] Data[1] Data[2] CheckSum VALUE[ 1 ~ SATURATION VALUE 0x4B 0x02 Send Format︰0x52 + 0x0A + 0x01 + Data[0] + 0x53 + CheckSum Receive Format︰0x53 + 0x0C + 0x01 + ReData[0] + 0x52 + ReCheckSum*1 xor : Exclusive-or operator *1 :ReCheckSum = 0x0C xor 0x01 xor ReData[0] xor 0x52 *2 : Get Power Off Status Receive Format : 0x51 + 0xFF + 0x01 + 0x0A + 0x51 + 0xA5 Function... -
Page 51: Troubleshooting
3. Verify the setting of the display output device. 4. If you are presenting from a notebook or computer through the display output device, check the cable connection from computer RGB (VGA) output to RGB input of AVerVision F50-8M and make sure AVerVision F50-8M is in PC Mode. -
Page 52: Limited Warranty
You as the original purchaser. Except for the foregoing, the Product is provided “AS IS.” In no event does AVer warrant that You will be able to operate the Product without problems or interruptions, or that the Product is suitable for your purposes. Your exclusive remedy and the entire liability of AVer under this paragraph shall be, at AVer’s option, the repair or replacement... - Page 53 Governing Law and Your Rights This warranty gives you specific legal rights; You may also have other rights granted under state law. These rights vary from state to state. For warranty period, please refer to the warranty card.
Need help?
Do you have a question about the AVerVision F50-8M and is the answer not in the manual?
Questions and answers