Advertisement
Quick Links
G
e
t
F
a
m
i
l
i
a
G
e
t
F
a
m
i
l
i
a
(1)
(2)
(3)
Name
(1)
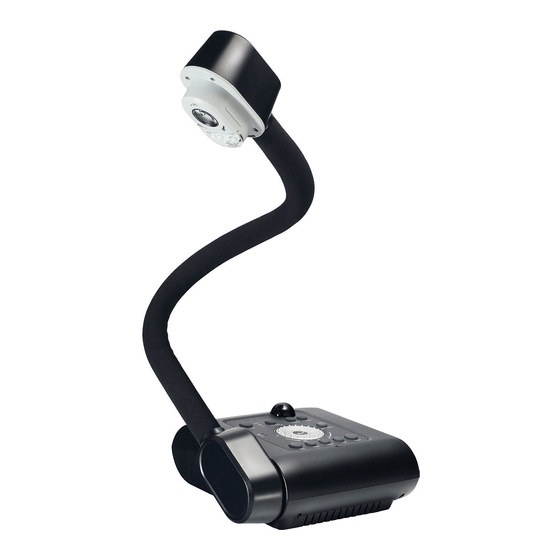
Camera head
(2)
Camera lens
(3)
LED light
(4)
Flexible arm
(5)
Left panel
(6)
Control panel
(7)
IR sensor
(8)
Rear panel
(9)
Right panel
Righ t P an el
(1)
Name
(1)
Camera Holder
(2)
SD card slot
(3)
TV-RGB switch
(4)
Antitheft Slot
r
w
i
t
h
t
h
e
A
r
w
i
t
h
t
h
e
A
Function
Contain the camera sensor.
Focus the image in the camera.
Provide light to enhance the lighting condition.
Provide adjustable viewing coverage.
Connections for DVI-I external display device, microphone, speaker,
USB flash drive/USB mouse, and USB switch.
Easy access to various functions.
Receive remote control commands.
Connections for power, computer, RGB/RCA external display device,
RS-232, and USB to PC.
Connections for the camera head holder, SD card, TV-RGB display
output switch, and antitheft Kensington security lock compatible slot.
Function
Hold the camera head for storage.
Insert the SD card with the label facing up.
TV switch to output display video from RS232/CVBS (via RCA
connection), and RGB to RGB OUT and DVI-I OUT ports.
Attach a Kensington compatible security lock or antitheft device.
V
e
r
V
i
s
i
o
n
F
V
e
r
V
i
s
i
o
n
F
(2)
(3)
(4)
(fig. 1.2)
2
ENGLISH
5
0
5
0
(4)
(5)
(6)
(7)
(8)
(9)
(fig. 1.1)
Advertisement

Related Manuals for AVer AVerVision F50


Summary of Contents for AVer AVerVision F50
- Page 1 ENGLISH (fig. 1.1) Name Function Camera head Contain the camera sensor. Camera lens Focus the image in the camera. LED light Provide light to enhance the lighting condition. Flexible arm Provide adjustable viewing coverage. Connections for DVI-I external display device, microphone, speaker, Left panel USB flash drive/USB mouse, and USB switch.
-
Page 2: Left Panel
USB flash drive or use a USB mouse to annotate. Switch to for audio video recording directly to a USB flash drive or use a USB mouse to annotate and when connecting USB switch AVerVision F50 to a computer using a USB cable from the rear USB port. -
Page 3: Control Panel
ENGLISH Name Function Connect the AVerVision F50 to any display device with DVI cable. DVI-I OUTPUT port If the display device does not support DVI-I, you can only view in Camera and Playback mode. Cont ro l P an el... - Page 4 ENGLISH Name Function Shuttle Wheel move to the next or previous single full screen preview in Playback mode, or to make a selection and adjustment on the OSD main- menu and sub-menu (See Menu Functions for more details). - Use ▲&▼ to increase and decrease the video playback volume. - Use ◄&►...
- Page 5 ENGLISH Locate the RGB (VGA) input port of the graphics display device and connect it to RGB OUT port of AVERVISION F50. Make sure the TV/RGB switch is set to RGB. Locate the DVI-I input port of the display device and connect it to DVI-I OUT port of AVerVision F50.
- Page 6 ENGLISH Locate the VIDEO or SCART RGB (if applicable) input port of the TV or Video equipment (i.e., VCR) to record your presentation and connect it to RCA jack of RS-232/CVBS cable. Connect the power adapter to a standard 100V~240V AC power outlet. The unit automatically in standby mode once the power is connected.
-
Page 7: C O N N E C T T O A C O M P U T E R V I A U Sb
ENGLISH Locate the RGB (VGA) output port of the computer or laptop and connect it to RGB IN port of AVerVision F50. The video signal from the RGB IN port is streamed to RGB OUT and DVI-I OUT port. - To display computer image, press Camera/PC button on the control panel or remote control to switch AVerVision F50 to computer mode.
Need help?
Do you have a question about the AVerVision F50 and is the answer not in the manual?
Questions and answers