
Related Manuals for Kett MT-730


Summary of Contents for Kett MT-730
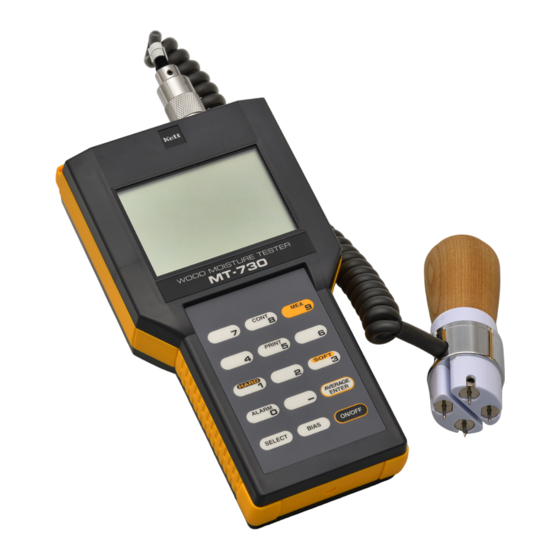
- Page 1 Wood Moisture Tester MT-730 Operating Manual Thank you for purchasing this product. Please read the operating manual carefully and use this product properly.
- Page 2 Safety Precautions If the safety precautions for the wood moisture tester are not observed, injuries or damage to property may result. While the safety of the product has been given considerable attention, please read the precautions in the operating manual and use the instrument properly. •...
-
Page 3: Table Of Contents
CONTENTS 1. Features ................4 2. Specifications ..............5 3. Part Names ................ 6 4. Display ................7 5. Description of Keypad ............8 6. Directions ................9 6-1. Before Measurement ..........9 6-2. Measurement Method ..........10 6-3. Setting the Measurement Mode ........ 13 6-4. -
Page 4: Features
1. Features • Built-in calibrations for hardwood and softwood In addition to the calibrations for the 16 wood groups up to now, calibrations corresponding to the overall hardwood and softwood can be selected with the single push of a button. • Automatic temperature compensation Compensation for the temperature of the wood is automatically performed by means of a built-in temperature sensor. -
Page 5: Specifications
2. Specifications Measurement Principle : Electrical resistance Applications : Veneer/wood Calibrations : For hardwood and softwood use* (Reference method: ISO 13061-1) 16 wood group classifications* Measurement Range* : 6 to 40% (hardwood), 7 to 40% (softwood) 4 to 40% (when wood groups 1-16 are selected, varies with group type* Measurement Precision : Below 20%: ±0.5%, 20% and higher: ±2.0% (precision with respect to base resistance) -
Page 6: Part Names
3. Part Names <Main body> <Accessories> Connector Display Needle probe Spare needle (10) Conductive rubber (2) Needle probe Control Panel Wrench Shoulder strap 1.5 V battery (AA) (6) Needle Battery cover (back) Carrying case Operating manual Wood group number table... -
Page 7: Display
4. Display Description of display Item No. Name of display area Description Wood group number Displays set wood group number. Battery indicator Comes on when battery is depleted. Measuring times Displays the number of times measured. “HRD” or “SFT” Displays the wood group selected. Displays the set-point value for the alarm for the upper moisture limit that Alarm set-point value was set. -
Page 8: Description Of Keypad
5. Description of Keypad Function Power On and Off Bias correction Selection of wood group number Average value and number input <Control panel> Setting of upper and lower alarm limit Making measurement Continuous measurement For inputting numerical values (This unit has no print function.) Selection of hard wood Selection of soft wood Entering a minus input... -
Page 9: Directions
6. Directions 6-1. Before Measurement 1. The unit is powered by six 1.5 V batteries (AA, alkaline). Remove the rear battery cover, place the batteries into the compartment taking care to correctly orient the positive ( ) and negative ( ) terminals. Then attach the battery cover. • is displayed when the batteries are depleted. Replace all six with new batteries. 2 Tighten the lock ring 2. -
Page 10: Measurement Method
6-2. Measurement Method 1. Press the key to turn on the power. All elements of the LCD will be displayed for approximately three seconds. Subsequently, the “Wood group or wood group number”, “TIMES”, and “%” will be displayed. • The display will indicate “HRD” for HARD (hardwood) or “SFT” for SOFT (softwood). - Page 11 B. When selecting a wood group number: Select and set the wood group to be measured from “8. Wood Group Number Table” on p. 20 or from an additional “Wood group number table”. First, press the key. The wood group number will blink.
- Page 12 4. Press the key. The decimal point will blink. After about 3 seconds a “beep” will sound and the “Measurement number”, “Moisture value”, and “Bar graph” will be displayed. • The bar graph displays a 50% full scale in 2% increments. • If the moisture value is outside of the measuring range, “HI” will be displayed if the content is higher than the measuring range, and “LO”...
-
Page 13: Setting The Measurement Mode
6-3. Setting the Measurement Mode There are two measurement modes: “Normal measurement mode” and “Continuous measurement mode”. Immediately after pressing the key and turning on the power, the unit will be set to “Normal measurement mode”. If the unit is set to “Continuous measurement mode”, measurements can be made without pressing the key for each measurement. -
Page 14: Displaying The Average Value
6-4. Displaying the Average Value When the number of measurements is from 2 to 9, and you press , the “AVE”, “average value”, and “measurement number” will be displayed. At this time, the “AVE”, “average value”, and “measurement number” remain displayed, but if you proceed to make a measurement, the “measurement number”... -
Page 15: How To Make Bias Adjustment
6-5. How to make Bias Adjustment The moisture value scale of this unit has been prepared by determining the relationship between the overall drying method and the electrical resistance for each wood group and statistically processing these results. However, depending on various conditions, there are cases where the standard measurement method and the moisture value do not agree. -
Page 16: Setting The Alarm
6-6. Setting the Alarm An upper limit moisture alarm can be set. When wood is measured having moisture higher than the set moisture value, the alarm sounds with a beeping tone. 1. Press the key. The numbers to the right of “ALARM” will blink. 2. -
Page 17: Spare Needle, Conductive Rubber Replacement
6-7.Spare needle, Conductive rubber Replacement To replace needles in the needle probe or to install a conductive Sensor needle rubber piece, use the included wrench, and replace them by (spare needle) Conductive rubber loosening the mounting screw. When installing a sensor needle, orient the concave part of the needle so that it comes in contact with the head of the screw as shown in the diagram. -
Page 18: Error Display
7. Error Display When there is a problem with the unit or with the measurement conditions, the following errors will be displayed for 4 seconds, and then the power will turn off. 1. There is a problem with the temperature sensor. Servicing is required. 2. There is a problem with the electronic circuit used for moisture measurement. - Page 19 3. The measurement cannot be made because the temperature of the unit is below –5°C. Bring the temperature of the unit up to the operating temperature range (0 to 40°C), and make the measurement again. 4. The measurement cannot be made because the temperature of the unit is above 50°C.
-
Page 20: Wood Group Number Table
8. Wood Group Number Table Number Representative wood type Measurement range Oak, Zelkova, Maple 5 to 40% Japanese oak, Linden, Chestnut, Beech tree, Cherry 5 to 40% Katsura tree, Birch, Paulownia 5 to 40% Apitong, Keruing, Kabul, Sengyan 4 to 40% Ramin, Kempas, Chinese quince 6 to 30% Japanese ash, Elm, Ash... - Page 24 Caution ● It is strictly prohibited to transfer part or all of this manual without permission. ● The contents of this manual are subject to change without notice. ● The appearances, screens, etc. of the product and accessories displayed on this manual may differ from the actual ones, however, operations and functions are not affected. ● All efforts have been made to ensure the contents of this manual are accurate. However, if you notice any part to be unclear, incorrect, omitted, or the like in this manual, please contact us. ● Be aware that we are not liable for the effects resulting from opera- tions according to this manual regardless of the items above. 060393...
Need help?
Do you have a question about the MT-730 and is the answer not in the manual?
Questions and answers