
Related Manuals for Artus ARTUS-301A


Summary of Contents for Artus ARTUS-301A
- Page 1 User’s Manual ARTUS-301A Safety precautions are intended to protect the user's safety and prevent property damage. Please read the instructions before use and use them correctly.
-
Page 2: Table Of Contents
5.2 Treatment and Maintenance 5.3 Troubleshooting Chapter 6. Warranty Thank you for purchasing the Ankle CPM(ARTUS-301A). Please refer to the manual in the box to view the components contained within the box when opening the box. Be sure to familiarize yourself with this manual before connecting and powering down the parts, and keep the manuals handy for future use. -
Page 3: Chapter 1. Warning And Caution
Chapter 1. Warning and Caution Safety precautions are intended to be used safely and correctly to prevent accidents or risks, so please ensure that you read and protect them carefully. Cautions are divided into ‘warning ’ and ‘ caution ’, each meaning : Warning : If there is a possibility of death or serious injury to the person in violation of the instructions... -
Page 4: Caution
1.2 Caution Please do not disconnect the power or communication cables during operating. This could cause injury. Elderly people and people with disabilities should use it under supervision of product manager such as doctor or physical therapist. This could cause injury. ... -
Page 5: Information Of Electro-Magnetic Compatibility (Emc)
Warning : Do not use ARTUS-301A near high-power wireless equipment such as mobile phone, this could cause malfunction. Caution : ARTUS-301A is compliant with medical device regulations 93/42 / EEC and it is designed to protect it from electromagnetic signals. ... -
Page 6: Chapter 2. Product
So it is necessary to exercise properly for the quick recovery of surgical area. ARTUS-301A is the rehabilitation equipment to recover the function of ankle joint quickly through continuous passive movement. -
Page 7: Purpose Of Artus-301A
The ARTUS-301A should be used in a properly equipped environment such as a hospital and must be handled by trained professional who have the proper qualifications like physical therapists or medical specialists. -
Page 8: Product Configuration
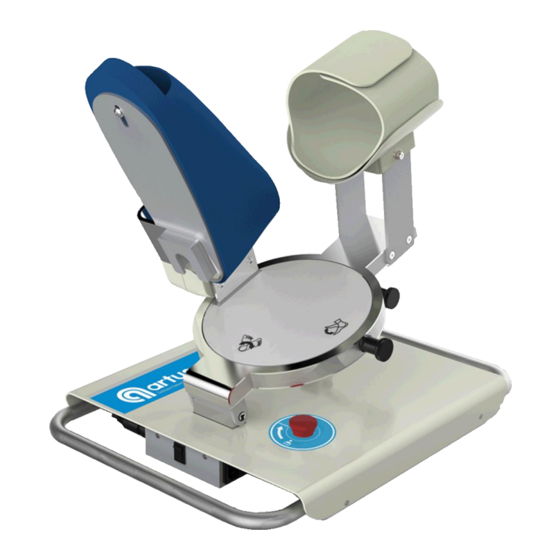
2.8 Product Configuration Please check the product and accessories before installation. Hand Controller(H/C) Power Cable Main product Component name <Main Unit> 1) Calf support pad 2) Ankle motor 3) Footplate 4) Knee angle adjustment fixture 5) Ankle motor rotator 6) Rotator fixture 7) Frame 8) Connection for Hand controller... -
Page 9: Label
2.9 Label H/C Label 2.10 Product specifications Division Contents Type of Protection Class I, Type B Rated Power AC 100V~240V, 50/60Hz Power Consumption 40VA Operating Temperature / Humidity +10°C ~ +40°C / 80% or less Storage Temperature 0°C ~ +60°C Atmospheric Pressure 700~1060 hPa Size... -
Page 10: Explanation Of Terms
Chapter 3. Explanation of Terms and Symbols 3.1 Explanation of Terms Term Explanation Upper limit Limit angle of flexion of ankle Lower limit Limit angle of extension of ankle Upper pause Pause time at Upper limit angle Lower pause Pause time at Lower limit angle Automatically and progressively increase the flexion and extension Progressive angle until programmed angle. -
Page 11: Chapter 4. Operation
Chapter 4. Operation Refer to 2.8 Product configuration. Please review warning and caution in Chapter 1. Please check the connection of the power switch (cord) and the hand controller. Explanation of symbols in the control unit is covered in Chapter 3. How to adjust the device according to the Exercise Dorsiflexion/Plantaflexion Abduction/Adduction... - Page 12 4.1.3 For Dorsiflexion/Plantaflexion of Ankle (changing device setting to Dorsiflexion/plantaflexion from Abduction/adduction mode) ※ Proceed in the opposite sequence from the method of clause 4.2. Step 1. Adjust the angle of the ankle motor by using the ‘Manual’ function of Hand Controller(refer to clause 5.2.6) before changing the setting of the device to make it easier to mount and separate the ‘footplate’.
-
Page 13: How To Use Hand Controller And Set The Exercise
How to use Hand Controller and set the exercise 4.2.1 Explanation of full screen <Touch and Display area> 1) Timer/Lower pause/Upper limit 2) Angle/Bypass/Manual 3) Counter/Upper pause/Lower limit 4) Up/Down arrow 5) Exercise setting 6) Speed/Uniform/Acceleration 7) Progressive, Oscillation 8) Symbol of Touch Locked 9) Exercise status ... - Page 14 4.2.2 Set the Exercise Dorsiflexion / Plantaflexion Abduction / Adduction < Fig 4.2.1 > ※ The name of each touch area refer to clause 4.2.1. 1) Press and hold [Exercise setting] display area(5) for 2 seconds to set the exercise, when the exercise symbol is flickering, select exercise using [Up/Down] arrow(4).
- Page 15 4.2.4 Set the Exercising Speed and Uniform or Accelerative exercising ※ Refer to Fig 4.2.1. 1) Exercising Speed ● It means operating(moving) speed of device. ● Touch the [Speed] display area(6), and select speed level with [Up/Down] arrow(4) when the number is flickering. ●...
- Page 16 4.2.5 Set the exercise time and the number of exercise < Fig 4.2.2 > ※ The name of each touch area refer to clause 5.2.1. ※ If touch the symbol [M](9) at the screen of Fig 4.2.1, the screen is changed like Fig 4.2.2.
- Page 17 ● Touch the [Angle] or [Counter] display area, and change the angle or the number of the [Progressive] with [Up/Down]arrow(4). ● [Angle] is the range of angle to be done the [Progressive] function at the Upper and Lower limit. [Counter] is the number of repetitive movement every 1° increment. ●...
- Page 18 ● The range between the [Upper and Lower limit] angle should be 2 times larger than the programmed [Oscillation] angle. ● When the [Oscillation] function is used, the [Upper and Lower limit] angle is adjusted automatically if the programmed range between [Upper and Lower limit] angle is not 2 times larger than the programmed [Oscillation] angle.
- Page 19 2) Manual < Fig. 4.2.6 > ● The [Manual] function is used to adjust exercise range at the stop mode. ● Touch the [Angle] display area(2) while exercise is stopped, [Manual] is displayed like screen Fig 4.2.6. ● Pressing and holding the [Up arrow] increase current angle, if it is reached at desired angle, touch [Upper limit] display area(1) to set as [Upper limit] angle.
-
Page 20: Chapter 5. Maintenance And Troubleshooting
Chapter 5. Maintenance and Troubleshooting 5.1 Storage conditions ● Please shutdown the main power switch of the product before cleaning. ● Please use a dry cloth while cleaning to protect the inside of the product from liquid. 5.2 Treatment and Maintenance ●... -
Page 21: Chapter 6. Warranty
※ If the error message continues to appear even though you have taken suggested course of actions from above, you should seek after sale service. Chapter 6 : Warranty This product is manufactured through its strict quality control and inspection process. Standard of Compensation for product repair and replacement are that comply with "compensation criteria for consumer’s damages"... - Page 22 ● This user’s manual cannot be changed or reproduced without prior consent of our company. ● This user's Manual is subject to change without prior notice. Service Information Developer & Manufacturer : CST Co., Ltd. 325, Daeyulnaechu-gil, buki-myun, Cheongwon-gu, Cheongju-si, Chungbuk-do, R.O.
- Page 23 Sep. 2017 printed CST. CO., LTD.
Need help?
Do you have a question about the ARTUS-301A and is the answer not in the manual?
Questions and answers