
Related Manuals for Artus 704ES


Summary of Contents for Artus 704ES
- Page 1 User’s Manual ARTUS-704ES Safety precautions are intended to protect the user's safety and prevent property damage. Please read the instructions before use and use them correctly.
-
Page 2: Table Of Contents
6.2 Treatment and Maintenance 6.3 Troubleshooting Chapter 7. Warranty Thank you for purchasing the Shoulder CPM(ARTUS-704ES). Please refer to the manual in the box to view the components contained within the box when opening the box. Be sure to familiarize yourself with this manual before connecting and powering down the parts, and keep the manuals handy for future use. -
Page 3: Chapter 1. Warning And Caution
Chapter 1. Warning and Caution Safety precautions are intended to be used safely and correctly to prevent accidents or risks, so please ensure that you read and protect them carefully. Cautions are divided into ‘warning ’ and ‘ caution ’, each meaning : Warning : If there is a possibility of death or serious injury to the person in violation of the instructions... -
Page 4: Caution
1.2 Caution Please do not disconnect the power or communication cables during operating. This could cause injury. Elderly people and people with disabilities should use it under supervision of product manager such as doctor or physical therapist. This could cause injury. ... -
Page 5: Information Of Electro-Magnetic Compatibility (Emc)
Warning : Do not use ARTUS-704ES near high-power wireless equipment such as mobile phone, this could cause malfunction. Caution : ARTUS-704ES is compliant with medical device regulations 93 / 42 / EEC and it is designed to protect it from electromagnetic signals. ... -
Page 6: Chapter 2. Product
So it is necessary to exercise properly for the quick recovery of surgical area. ARTUS-704ES is the rehabilitation equipment to recover the function of shoulder joint quickly through continuous passive movement. -
Page 7: Purpose Of Artus-704Es
The ARTUS-704ES should be used in a properly equipped environment such as a hospital and must be handled by trained professional who have the proper qualifications like physical therapists or medical specialists. -
Page 8: Product Configuration
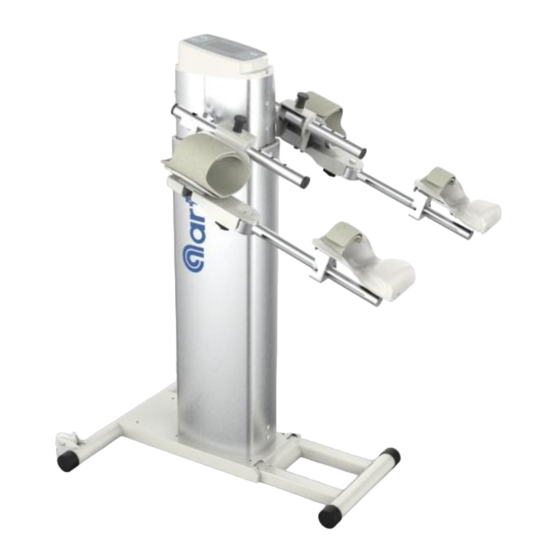
2.8 Product Configuration Please check the product and accessories before installation. Basic composition for shoulder exercise of Flexion/Extension and Abduction/Adduction Emergency Stop Switch Power Cable Body (with basic splinter) Optional composition Optional composition for elbow Flexion/Extension for shoulder rotation Left/Right Upper arm Upper arm splinter Hand Splinter... -
Page 9: Label
2.9 Label HC label Side label Control box label 2.10 Component name Main body 1. Hand splinter location adjustment locking screw. 2. Hand splinter 3. Elbow angle adjustment locking screw 4. Upper arm splinter location adjustment fixture 5. Operation controller 6. -
Page 10: Product Specifications
1. Start/Stop Button 2. Display and touch screen 3. Shoulder height adjustment switch 4. Connect to Emergency switch 5. Locking mount of USEF 2.11 Product specifications Division Contents Rated Power AC 100V~240V, 50/60Hz Power Consumption 50VA Operating Temperature / Humidity 0°C ~ +40°C / 80% or less Storage Temperature 0°C ~ +60°C... -
Page 11: Chapter 3. Explanation Of Terms And Symbols
Division Specification Flexion / Extension 20° ~ 180° Shoulder Abduction / Adduction 20° ~ 160° Exercise Rotation -60° ~ 90° Elbow Exercise Flexion / Extension 0° ~ 150° Speed 1 ~5 step(75°~150°/min) Pause time (at upper or lower limit angle) 0 ~ 9 sec Timer 1~99 min... -
Page 12: Explanation Of Terms
3.1 Explanation of Terms Term Explanation Limit angle of flexion and abduction of shoulder Upper limit Limit angle of flexion of elbow Limit angle of inner rotation of Elbow Limit angle of extension and adduction of shoulder Lower limit Limit angle of extension of elbow Limit angle of outer rotation of Elbow Upper pause Pause time at Upper limit angle... -
Page 13: Chapter 5. Operation
<Fig 4.3> Remark : The Body is packaged in the assembled state as shown in the illustration. Step 1. Place the Body of ARTUS-704ES on the floor.(Fig 4.1) Step 2. Connect the “Power cable” like Fig.4.2 Step 3. Connect the “Emergency stop switch” like Fig 4.3 Warning : Tighten the fixing screw (knob) firmly to prevent the device from separation during exercise. -
Page 14: How To Adjust The Device According To The Exercise
Please review warning and caution in Chapter 1. Please check the connection of the power cable. Explanation of symbols in the control unit is covered in Chapter 3. 5.1 How to adjust the device according to the exercise Warning : Tighten the fixing screw (knob) firmly to prevent the device from separation during exercise. - Page 15 <Fig 5.1.1> Explain based on right arm treatment Step 1. A patient sit comfortably in the separate chair placed left side of device and has his back tightly attached to the chair back. Step 2. Adjust height of Shoulder motor axis to the patient’s shoulder using height adjustment switch being upper side of Operation Controller.
- Page 16 <Fig. A> <Fig. B> <Fig 5.1.2> Explain based on right arm treatment Step 1. Insert USSR to upper arm splinter of basic splinter like <Fig. A>. Step 2. Tighten the locking screw(1) to fix USSR on upper arm splinter. Step 3.
-
Page 17: How To Use Operation Controller And Set The Exercise
< Fig 5.1.3> <Fig A> < Fig B> <Fig C> Explain based on right arm treatment Step 1. Loosen locking screw of Hand Splinter(see. Fig A) of Basic Splinter and pull out the Hand Splinter. Step 2. Insert HSEF instead of Hand Splinter.(see Fig B) Step 3. - Page 18 5.2.1 Explanation of full screen <Touch, setting and Display area> 1) Timer/Lower pause/Upper limit 2) Present Angle/Bypass/Manual 3) Counter/Upper pause/Lower limit 4) Up/Down arrow 5) Available Exercises 6) Speed/Uniform/Acceleration 7) Progressive exercise 8) Symbol of Touch Locked 9) Exercise status ...
- Page 19 : Flexion / Extension of Shoulder : Abduction / Adduction of shoulder : Rotation of Elbow : Flexion / Extension of Elbow 1) To set the exercise to do, press and hold [exercise setting] area(5) for 2 seconds. Symbol of shoulder Flexion/Extension is flickering and the other exercise symbols are displayed.
- Page 20 (angle) with [Up/Down] arrow(4). ● Touch the symbol [M](9) or just wait for 6 seconds to complete setting of limit angle. 2) Upper pause (time) and Lower pause (time) ● It is the exercise pause time at the upper or lower limit angle. ●...
- Page 21 ● Acceleration(Accel) Mode : The device moves by two steps faster than the set speed in the middle 50% of the ROM. 5.2.5 Set the exercise time and the number of exercise ※ The name of each touch area refer to clause 5.2.1. 1) Exercise duration time ●...
- Page 22 1) Bypass mode <Fig 5.2.1> <Fig 5.2.2> <Fig 5.2.3> ● The [Bypass] function is used to adjust exercise range during exercise operating. ● Touch the [Angle] display area(2) in screen <Fig 5.2.1> while exercise is operating, [Bypass] is displayed like screen <Fig 5.2.2>. ●...
- Page 23 desired angle, touch [Upper limit] display area(1) to set as [Upper limit] angle. The <Fig 5.2.5> shows the setting being changed from 110° to 130°. ● Pressing and holding the [Down arrow] decrease current angle, if it is reached at desired angle, touch [Lower limit] display area(3) to set as [Lower limit] angle.
- Page 24 ● With the progressive range of angle is already set, if the range between [Upper and Lower limit] angle is set to less than 3 times the progressive range of angle, then the [Progressive] function is automatically disabled. ● [Progressive] is disabled after completion of function. ●...
-
Page 25: Chapter 6. Maintenance And Troubleshooting
Chapter 6. Maintenance and Troubleshooting 6.1 Storage conditions ● Please shutdown the main power switch of the product before cleaning. ● Please use a dry cloth while cleaning to protect the inside of the product from liquid. 6.2 Treatment and Maintenance ●... -
Page 26: Chapter 7. Warranty
Chapter 7. Warranty This product is manufactured through its strict quality control and inspection process. Standard of Compensation for product repair and replacement are that comply with "compensation criteria for consumer’s damages" which is announced by Korean Government. The warranty period for this product has been defined as one year. In case of a failure in normal use, we will repair it free of charge during the warranty period at its service center. - Page 27 ● This user’s manual cannot be changed or reproduced without prior consent of our company. ● This user's Manual is subject to change without prior notice. Service Information Developer & Manufacturer : CST Co., Ltd. 325, Daeyulnaechu-gil, buki-myun, Cheongwon-gu, Cheongju-si, Chungbuk-do, R.O.
Need help?
Do you have a question about the 704ES and is the answer not in the manual?
Questions and answers