Table of Contents
Advertisement
Quick Links
Advertisement
Table of Contents

Subscribe to Our Youtube Channel
Related Manuals for Grizzly G9862


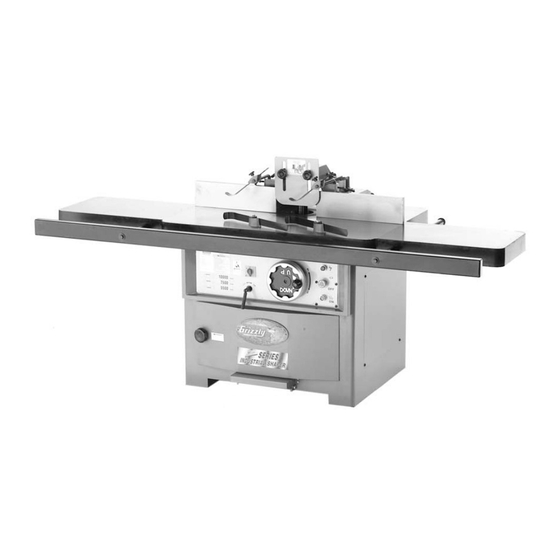
Summary of Contents for Grizzly G9862
-
Page 1: Instruction Manual
MODEL G9862/G9968 INSTRUCTION MANUAL Model G9862 Model G9968 COPYRIGHT © MARCH, 2002 BY GRIZZLY INDUSTRIAL, INC. WARNING: NO PORTION OF THIS MANUAL MAY BE REPRODUCED IN ANY SHAPE OR FORM WITHOUT THE WRITTEN APPROVAL OF GRIZZLY INDUSTRIAL, INC. PRINTED IN TAIWAN... - Page 2 WARNING Some dust created by power sanding, sawing, grind- ing, drilling, and other construction activities contains chemicals known to the State of California to cause cancer, birth defects or other reproductive harm. Some examples of these chemicals are: • Lead from lead-based paints. •...
-
Page 3: Table Of Contents
SWITCH ...19 REVERSE SWITCH ...20 SPINDLE HEIGHT ...21 STRAIGHT SHAPING ...21-22 RUB COLLARS ...23 TABLE EXTENSION...24 PATTERN WORK & JIGS ...24-25 FREEHAND SHAPING ...26 SHAPER ACCESSORIES ...26 MAINTENANCE ...27 GENERAL...27 TABLE...27 LUBRICATION ...27 V-BELT ...27 SCHEDULE ...27 MAINTENANCE NOTES ...28 WIRING DIAGRAMS ...29-30... -
Page 4: Safety
G9862/G9968 Shaper VISITORS... - Page 5 13. NEVER OVERREACH. Keep proper foot- ing and balance at all times. G9862/G9968 Shaper 14. MAINTAIN TOOLS WITH CARE. Keep 15. DISCONNECT TOOLS before servicing 16. REDUCE THE RISK OF UNINTENTION- LENGTH 17.
-
Page 6: Additional Safety Instructions For Shapers
Use this and other machinery with caution and respect. Failure to do so could result in serious per- sonal injury, damage to equipment or poor work results. G9862/G9968 Shaper... -
Page 7: Circuit Requirements
SECTION 2: CIRCUIT REQUIREMENTS Model G9862 The Model G9862 Shaper is prewired with a 5 H.P. single-phase motor. Under normal use, the motor draws approximately 30 amps at 220V. We recommend using a 30 amp circuit. This includes the appropriate wiring and circuit breaker. If fre- quent circuit failure occurs when using the shaper, contact our service department. -
Page 8: 440V Operation
440V Operation The Model G9968 Shaper is furnished with a 7 H.P. three-phase motor that can be wired to 440V. Under normal use, the motor draws approximately 10 amps at 440V. We recommend using a 10 amp circuit. This includes the appro- priate wiring and circuit breaker. -
Page 9: General Information
When used according to the guidelines stated in this manual, you can expect years of trouble-free, enjoyable operation. The Model G9862 and the Model G9968 are the same machine with the exception of the motor size/phase difference and the absence/presence of table extension wings. -
Page 10: Unpacking
(e.g. a nut or a washer), we would be glad to replace them, or, for the sake of expedi- ency, replacements can be obtained at your local hardware store. Figure 4. Model G9968 Hardware. (Model G9862 miter gauge and hold-down assemblies not shown.) G9862/G9968 Shaper... -
Page 11: Hardware Recognition Chart
Hardware Recognition Chart Use this chart to match up hardware pieces during the assembly process! G9862/G9968 Shaper... -
Page 12: Clean Up
Remove this protective coating with a sol- vent cleaner or citrus-based degreaser such as Grizzly’s G7895 Degreaser. To clean thoroughly, some parts may need to be removed. Avoid chlo- rine-based solvents as they may damage painted surfaces should they come in contact. -
Page 13: Site Considerations
Site Considerations FLOOR LOAD Your Model G9862/G9968 Shaper represents a very large weight load in a moderate sized foot- print. Most commercial shop floors will be ade- quate for the 1600 lb. weight of the Model G9862/G9968. Some floors may require addition- al support. -
Page 14: Assembly
SECTION 4: ASSEMBLY Beginning Assembly Most of your Model G9862/G9968 Shaper has been assembled at the factory, but some parts must be assembled or installed after delivery. We have organized the assembly process into steps. Please follow along in the order presented in this section. -
Page 15: Fence Guard
Fence Guard The Model G9862/G9968 comes with a fence guard to reduce operator exposure to the spin- ning cutter. To install the fence guard: Place the fence guard against the face of the guard assembly and thread the (2) 1" star knobs through the guard and into their respective holes as shown in Figure 7. -
Page 16: Adjustments
Failure to com- ply may result in serious personal injury. Speed Changes The Model G9862/G9968 Shaper is equipped with three groove pulleys that control the speed of the spindle. To change spindle speeds: Unplug the machine. Turn the belt tensioning lever (shown in Figure 9) counterclockwise to loosen the adjustment bracket. -
Page 17: Fence Adjustment
Each fence moves toward the front and back of the shaper and to the left and right. To adjust the front-to-back controls of the fence, see the control location in Figure 11 and follow the instructions below: Loosen the fence lock handle. -
Page 18: Table Inserts
Table Inserts The Model G9862/G9968 is supplied with two inserts (shown in Figure 13). Use the smallest opening that a particular cutter will allow. This offers more support for the workpiece and reduces the amount of chips that can fall into the machine. -
Page 19: Cutter Installation
Failure to do this may result in seri- ous personal injury. Cutter Installation Your shaper operates at speeds of 5500, 7500 and 10,000 R.P.M. 3 ⁄ " or larger cutters must be operated at the slowest speed. Always use the largest spindle size possible. -
Page 20: Foot Brake
Strange or unnatural noises should be inves- tigated and corrected before operating the machine further. Run the Model G9862/G9968 for a short time to ensure that the moving parts are working proper- ly with no excessive vibration. If any problem develops, correct it before attempting to use the machine. -
Page 21: Operation
NOTICE The following section was designed to give instructions on the basic operations of this shaper. However, it is in no way compre- hensive of every shaper application. There are many different jigs that can be built to increase safety, accuracy, and types of cuts. -
Page 22: Reverse Switch
Always check the direction of cutter rota- tion before beginning any shaping opera- tion. -20- with Figure 18A. Forward/reverse switch. This machine was designed to be started and stopped with the START/STOP but- tons—not the reversing switch. NOTICE G9862/G9968 Shaper... -
Page 23: Spindle Height
Do not over-tighten the lock knob. A snug fit is all that is needed to keep the spindle from moving during shaper use. G9862/G9968 Shaper Straight Shaping Read the entire manual before making any cuts with... - Page 24 8'' then stopped. Once the shaper is turned off and the cutter has come to a complete stop, adjust the out- feed fence to support the new profiled edge as shown in Figure 21.
-
Page 25: Rub Collars
There are two types of rub collars—solid and ball- bearing. We recommend against the use of solid rub collars. Grizzly carries an extensive line of ball bearing rub collars designed for use with Grizzly shapers. See the current catalog for list- ings. -
Page 26: Table Extension
Planning ahead, you can most effectively decide which rub collars are best suit- ed for your application. Pattern Figure 28. Rub collar determines depth of cut. G9862/G9968 Shaper Rub Collar... - Page 27 Workpieces must be solid, stable, and secured to the jig; or kickback may occur, causing personal injury. G9862/G9968 Shaper Irregular shaping takes a high degree of skill and dexterity. The fence assembly is not used during irregular shaping, so rub collars must be used.
-
Page 28: Freehand Shaping
We highly recommend using a power feeder with your shaper! Check the current Grizzly catalog for available power feeders. Because of the wide range of fences and guards that can be built in the shop, explaining their con- struction is beyond the scope of this manual. -
Page 29: Maintenance
General Regular periodic maintenance on your Model G9862/G9968 Shaper ensures its optimum per- formance. Make a habit of inspecting your shaper each time you use it. Check for the following conditions and repair or replace when necessary. -
Page 30: Maintenance Notes
Maintenance Notes Date Approximate Hours Of Use Maintenance Performed -28- G9862/G9968 Shaper... -
Page 31: Wiring Diagrams
G9862/G9968 Shaper -29-... - Page 32 -30- G9862/G9968 Shaper...
-
Page 33: Closure
However, due to Grizzly’s policy of continuous improvement, changes may be made at any time with no obligation on the part of Grizzly. Whenever possible, though, we send manual updates to all owners of a particular tool or machine. -
Page 34: Machine Data
Customer Service #: (570) 546-9663 • To Order Call: (800) 523-4777 • Fax #: (800) 438-5901 GRIZZLY MODEL G9862 5 H.P. SHAPER Design Type... Floor Model Overall Dimensions: Working Table Size (Each Side) ...44 Height (Includes Fence) ...45" Height From Table To Floor ...33"... -
Page 35: Machine Data
Customer Service #: (570) 546-9663 • To Order Call: (800) 523-4777 • Fax #: (800) 438-5901 GRIZZLY MODEL G9968 7 Design Type... Floor Model Overall Dimensions: Working Table Size (Each Side) ...91 Height (Includes Fence) ...45" Height From Table To Floor ...33"... -
Page 36: Parts Breakdown And Parts Lists
-34- G9862/G9968 Shaper... - Page 37 Table for G9862 G9862/G9968 Shaper -35-...
- Page 38 -36- G9862/G9968 Shaper...
- Page 39 G9862/G9968 Shaper -37-...
- Page 40 -38- G9862/G9968 Shaper...
- Page 41 G9862/G9968 Shaper -39-...
- Page 42 CAP SCREW M8-1.25 X 10 HEX BOLT M8-1.25 X 25 HEX NUT M8-1.25 LOCKING KNOB PHLP SCREW M6-1.0 X 10 ID LABEL (G9968) ID LABEL (G9862) UNPLUG LABEL SAFETY GLASSES LABEL READ MANUAL LABEL HANDLE SCREW BALL TYPE KNOB HEX NUT...
- Page 43 RUB COLLAR 1 410 P9968410 RUB COLLAR 1 411 P9968411 RUB COLLAR 1 412 P9968412 RUB COLLAR 1 413 P9968413 RUB COLLAR G9862/G9968 Shaper 501 P9968501 502 P9968502 503 PB10M ⁄ " 504 PN01M 505 P9968505 506 PN05 507 PB26...
-
Page 44: Warranty And Returns
WARRANTY AND RETURNS Grizzly Industrial, Inc. warrants every product it sells for a period of 1 year to the original purchaser from the date of purchase. This warranty does not apply to defects due directly or indirectly to misuse, abuse, negligence, accidents, repairs or alterations or lack of maintenance. - Page 45 Do you think your purchase represents good value? ___Yes Would you recommend Grizzly Industrial to a friend? ___Yes Would you allow us to use your name as a reference for Grizzly customers in your area? Note: We never use names more than three times. ___Yes Comments:_______________________________________________...
- Page 46 FOLD ALONG DOTTED LINE FOLD ALONG DOTTED LINE Send a Grizzly Catalog to a friend: Name_______________________________ Street_______________________________ City______________State______Zip______ GRIZZLY INDUSTRIAL, INC. P.O. BOX 2069 BELLINGHAM, WA 98227-2069 TAPE ALONG EDGES--PLEASE DO NOT STAPLE Place Stamp Here...
Need help?
Do you have a question about the G9862 and is the answer not in the manual?
Questions and answers