Table of Contents
Advertisement
Quick Links
OPERATOR'S MANUAL
A Division of Snow Joe
, LLC
®
THANKS
OF A REMANUFACTURED PRODUCT.
To make sure you get the most out of
your product, be sure to register online at
to enjoy full product support.
CORDLESS LAWN + GARDEN
MULTI-TOOL SYSTEM
R
24-VOLT MAX* | POLE HEDGE TRIMMER | POLE CHAIN SAW | POLE GRASS TRIMMER
Model GTS4002C-RM
FOR
snowjoe.com
PASTE UPC LABEL HERE
YOUR
Form No. SJ-GTS4002C-RM-880E-V1
PURCHASE
Advertisement
Table of Contents

Related Manuals for SNOWJOE Sunjoe GTS4002C-RM


Summary of Contents for SNOWJOE Sunjoe GTS4002C-RM
- Page 1 , LLC ® Form No. SJ-GTS4002C-RM-880E-V1 THANKS YOUR PURCHASE OF A REMANUFACTURED PRODUCT. To make sure you get the most out of your product, be sure to register online at snowjoe.com to enjoy full product support. PASTE UPC LABEL HERE...
-
Page 2: General Safety
Contact the Snow Joe ® They can get caught in moving parts. Protective rubber + Sun Joe customer service center at 1-866-SNOWJOE ® gloves and non-slip footwear are recommended when (1-866-766-9563) for assistance. working outdoors. -
Page 3: Cleaning The Tool
® ® 22. Carry the power tool by the handle with the cutting blade/ at 1-866-SNOWJOE (1-866-766-9563) for all maintenance chain stopped. When transporting or storing the power or operations not foreseen in this manual. Any operation tool, always keep the blades/chain covered. - Page 4 Storage Kickback WARNING! Kickback may occur when the nose or tip WARNING! Do not at any time let brake fluids, gasoline, of the guide bar touches an object, or when the wood closes petroleum-based products, penetrating oils, etc., come in in and pinches the saw chain in the cut.
-
Page 5: Battery & Charger Safety Instructions
4. Maintain a firm grip on the handle and the pole/auxiliary 16. If the grass trimmer + edger strikes a foreign object or handle while cutting with the blade. Keep the blade away becomes entangled with it, stop the tool immediately. from body. -
Page 6: Information About The Battery
® ® 9. Avoid damage and shocks. Immediately replace batteries 1-866-SNOWJOE (1-866-766-9563) for assistance. that have been dropped from a height of more than • Battery chemicals cause serious burns – Never let a 3 feet (1 meter) or those that have been exposed to violent shocks, even if the housing of the battery pack appears damaged battery pack contact the skin, eyes or mouth. -
Page 7: Protection From Environmental Influences
® ® 5. Do not keep the battery charger in places where the customer service center at 1-866-SNOWJOE temperature is liable to reach over 104°F (40°C). In (1-866-766-9563). particular, do not leave the battery charger in a car that is parked in the sunshine. -
Page 8: Safety Symbols
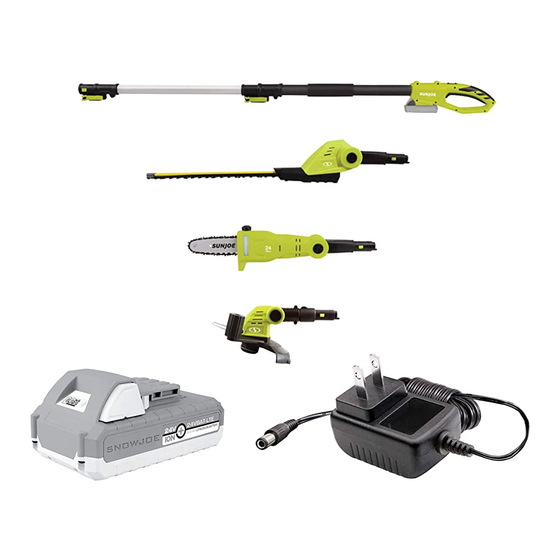
Safety Symbols The following table depicts and describes safety symbols that may appear on this product. Read, understand, and follow all instructions on the machine before attempting to assemble and operate. Symbols Descriptions Symbols Descriptions READ THE OPERATOR'S MANUAL(S) – Read, understand, SAFETY ALERT –... - Page 9 Know Your Cordless Lawn + Garden Multi-tool System Read the owner’s manual and safety instructions carefully before operating the cordless multi-tool system. Compare the illustration below to the cordless multi-tool system in order to familiarize yourself with the location of the various controls and adjustments.
-
Page 10: Technical Data
® ® Weight (with Battery Installed) ..7.7 lbs (3.5 kg) 1-866-SNOWJOE (1-866-766-9563). Pole Hedge Trimmer NOTE: Do not discard the shipping carton and packaging material until you are ready to use your new cordless Motor ..........250 W multi-tool system. -
Page 11: Charger Operation
Charging the Battery 1. Push the push lock button on the battery to pull the battery pack out from the battery compartment (Fig. 1). Lights Light Indicators Fig. 1 Charge level button The battery is at 30% capacity Push button and requires charging The battery is at 60% capacity and requires charging soon... -
Page 12: Pole Chain Saw
IMPORTANT! Never allow the battery pack to become fully discharged as this will cause irreversible damage to Fig. 5 the battery. Pole Chain Saw Assembly Chain/sprocket DANGER! Never start the motor before installing the end cover guide bar, chain, and chain/sprocket end cover. Without all these parts in place, the clutch can fly off or explode, exposing 3. - Page 13 NOTE: Make certain of the direction of the chain information on chain tensioning, see the Maintenance + If the chain is mounted backwards, the saw will vibrate Care section beginning on pg. 17. abnormally and will not cut. Fig. 11 Fig.
-
Page 14: Operation
3. To remove the chain saw head, release the On/Off switch and remove the battery. Unlock the assembly lock. Fig. 16 Push the lock tabs on both sides, and pull the chain saw Pull Pull head out (Fig. 13). Operation Starting and Stopping 1. -
Page 15: Adjusting The Auxiliary Handle
3. Re-assemble the auxiliary handle lock knob and the bolt Back Side Fig. 19 on (Fig. 21). Fig. 21 Rotating button Front Side Rotating button To Adjust the Position of the Auxiliary Handle 1. Disconnect the saw from the power supply by removing the battery from the compartment. - Page 16 To Adjust the Angle of the Auxiliary Handle auxiliary handle, and the other hand on the handle with your thumbs and fingers encircling the pole and handle. A firm grip 1. Stop the saw by releasing the On/Off switch. combined with proper positioning of the handle against your 2.
- Page 17 Basic Cutting Procedure can cause loss of saw control, which can throw the operator off balance and result in serious injury. Do not rely exclusively This unit with the chain saw head is designed for trimming upon the safety devices built into the saw. As a user, you small branches and limbs up to recommended 6.5 in.
-
Page 18: Maintenance & Care
+ Sun Joe dealer or call the Snow Joe ® ® ® + Sun Joe customer service center at 1-866-SNOWJOE ® (1-866-766-9563). Sharpening is necessary when: • The sawdust looks like dust; • Cutting becomes more difficult; • The cut is not straight;... -
Page 19: Guide Bar Maintenance
Guide Bar Maintenance An authorized service center will sharpen the chain using the right tools to ensure minimum removal of material and even When the guide bar shows signs of wear, turn it over on the sharpness on all the cutting edges. saw to distribute the wear for maximum bar life. -
Page 20: Troubleshooting Tips
If you continue to experience problems or need repairs beyond these minor To help maintain your pole chain saw for optimum adjustments, please call 1-866-SNOWJOE (1-866-766-9563) performance, we recommend you complete this checklist prior for assistance. - Page 21 Connecting to the Telescoping Pole Grass Trimmer + Edger 1. Open the assembly lock on the telescoping pole, and push the grass trimmer + edger head into the opening on the end of the pole (Fig. 33). Assembly Grass trimmer Fig.
- Page 22 Operation 3. Lock the pole in position by closing the telescoping lock (Fig. 38), and ensure that the pole is secured. Starting and Stopping Fig. 38 1. Slide the battery into the battery compartment until it clicks to lock into position (Fig. 35). Fig.
- Page 23 Adjusting the Multi-Angle Head NOTE: It's recommended to not remove the auxiliary handle when operating the grass trimmer + edger for better The grass trimmer + edger head can be rotated for 5 different maneuverability and easier operation. cutting angles for 0°, 15°, 30°, 45° and 60°. Follow the below To Adjust the Position of the Auxiliary Handle instructions to adjust angles.
-
Page 24: Operation Tips
Operation Tips To convert the unit, follow the instruction below: 1. To convert the grass trimmer to an edger, slide the • Wear non-slip gloves for maximum grip and protection. converting switch on the trimmer head up, meanwhile turn • For the best cutting action against walls, fences, and in the lower part of the trimmer head to the side until the high grass, move the grass trimmer slowly so grass is cut trimmer head is locked into position (Fig. - Page 25 CAUTION! Always wear eye protection. Fig. 51 1. Hold the trimmer at an angle of approximately 10 – 30 degrees to the work area (Fig. 48). Fig. 48 Edging wheel Advancing Lines 10º – 30º NOTE: Your trimmer uses 0.055 in. (1.4 mm) diameter nylon line to cut grass and weed quickly and easily.
- Page 26 Contact your authorized Snow Joe + Sun Joe dealer or call the Snow Joe ® ® ® + Sun Joe customer service center at 1-866-SNOWJOE ® (1-866-766-9563) for assistance. Spool Replacing the Spool + Clearing Jams Slot and Tangled Lines WARNING! Remove the battery from the unit before changing the trimmer line.
- Page 27 2. To remove the spool from the trimmer hub, follow steps CAUTION! Catapulted pieces of nylon line may 1 and 2 from the section "Replacing the Spool + Clearing cause injury. Jams and Tangled Lines" beginning on page 25. NOTE: The maximum recommended length of line is 3.
-
Page 28: Pole Hedge Trimmer
Operation Pole Hedge Trimmer Starting and Stopping Assembly 1. Slide the battery into the battery compartment until it clicks to lock into position (Fig. 61). Connecting to the Telescoping Pole Fig. 61 The hedge trimmer head comes fully assembled. To use the machine as a pole hedge trimmer, connect the hedge trimmer head with the telescoping pole as indicated below. - Page 29 3. Lock the pole in position by closing the telescoping lock To Adjust the Position of the Auxiliary Handle (Fig. 64), and ensure that the pole is secured. 1. Disconnect the hedge trimmer from the power supply by removing the battery from the compartment. Fig.
-
Page 30: Before Operation
Adjusting the Multi-Angle Head Cutting Tips The hedge trimmer head can be rotated for 10 different cutting WARNING! Always hold the pole hedge trimmer with angles for -45º, -30º, -15º, 0º, 15º, 30º, 45º, 60º, 75º, and 90º. both hands. Never hold shrubs with one hand and operate the Follow the below instructions to adjust angles. -
Page 31: Care & Maintenance
CAUTION! Do not use the pole hedge trimmer for Fig. 70 cutting stems greater than 0.6 inch (1.5 cm) thick. Use the pole hedge trimmer only for cutting normal shrubbery found around houses and buildings. Do not force the pole hedge trimmer through dense growth. A slight back and forth sawing action may ease the cutting of larger, more dense growth. -
Page 32: Model + Serial Number
1-866-SNOWJOE (1-866-766-9563) for assistance. • When replacing old appliances with new ones, the retailer is legally obligated to take back your old appliance for Model + Serial Number disposal at least free of charge. - Page 33 NOTE: Accessories are subject to change without any obligation on the part of Snow Joe + Sun Joe to provide notice of such ® ® changes. Accessories can be ordered online at sunjoe.com or via phone by contacting the Snow Joe + Sun Joe customer ® ® service center at 1-866-SNOWJOE (1-866-766-9563).
- Page 34 NOTES...
- Page 35 To obtain a replacement part or product, please visit warranty. Some states do not allow exclusions of incidental or snowjoe.com/help or email us at help@snowjoe.com for consequential damages so the above exclusions may not apply instructions. Please be sure to register your unit beforehand to in all states.
- Page 36 sunjoe.com...
Need help?
Do you have a question about the Sunjoe GTS4002C-RM and is the answer not in the manual?
Questions and answers