
Related Manuals for Litecraft BeamX.7 IP


Summary of Contents for Litecraft BeamX.7 IP
- Page 1 Aktuellste Online Version latest online version Bedienungsanleitung V2.3 user manual V2.3...
-
Page 2: Table Of Contents
Vielen Dank für den Kauf dieses LITECRAFT-Produktes. Dieses Gerät wurde unter hohen Qualitätsanforderungen entwickelt und gefertigt. Zu Ihrer eigenen Sicherheit und für die optimale Nutzung Ihres neuen Produktes lesen Sie bitte vor der ersten Inbetriebnahme diese Bedienungsanleitung sorgfältig durch. Die aktuellste Version dieser Bedienungs- anleitung erhalten Sie, wenn Sie den QR-Code auf dem Cover dieser Anleitung scannen. - Page 3 Thank you for purchasing this LITECRAFT product. This device was developed and manufactured under high quality requirements. For your own safety and to ensure optimal use of your new product, please read these operating instructions carefully before using it for the first time. You can obtain the latest version of this user manual by scanning the QR code on the cover of this user manual.
-
Page 4: Lieferumfang
LIEFERUMFANG powerCON TRUE1 Anschlusskabel Infrarot-Fernbedienung Frostfilter 25° 4x Befestigungsschrauben für Frostfilter 25° SICHERHEITSHINWEISE Jede Person, die mit der Installation, dem Einsatz oder dem Service des Gerätes betraut ist, muss: qualifiziert sein den Anweisungen dieser Bedienungsanleitung folgen. ACHTUNG! Seien Sie vorsichtig beim Einsatz des Gerätes. -
Page 5: Bestimmungsgemäße Verwendung
BESTIMMUNGSGEMÄßE VERWENDUNG Bei diesem Produkt handelt es sich um einen Scheinwerfer, der ausschließlich für den professionellen Einsatz auf Bühnen, in Diskotheken, in Theatern, etc. bestimmt ist. Dieses Produkt ist für den Anschluss bis max. 240 V Wechselspannung zugelassen und wurde zur Verwendung, aber nicht zur permanenten Installation, im Außenbereich konzipiert. -
Page 6: Montage
MONTAGE Bei der Montage des Scheinwerfers sind spezifische Bestimmungen wie die DGUV V17/18 (vormals BGV C1) oder auch länderspezifische Baurichtlinien zu beachten. Die Montage darf nur durch qualifizierte Personen erfolgen! Die Aufhängevorrichtung des Scheinwerfers muss so gebaut und bemessen sein, dass sie eine Stunde lang ohne dauernde und schädliche Deformierung das 10-fache der Nutzlast aushalten kann. -
Page 7: Elektrischer Anschluss
ELEKTRISCHER ANSCHLUSS Der Anschluss an die Spannungsversorgung darf ausschließlich durch qualifiziertes Personal vorgenommen werden. Schließen Sie das Gerät an die Spannungsversorgung an. Vergewissern Sie sich, dass die Leistungsangaben übereinstimmen. Der Schutzleiter muss unbedingt in der gesamten Installation angeschlossen sein! ACHTUNG! Vor der ersten Inbetriebnahme muss die Installation durch einen Sachverständigen geprüft werden! REINIGUNG UND WARTUNG... -
Page 8: Bedienung
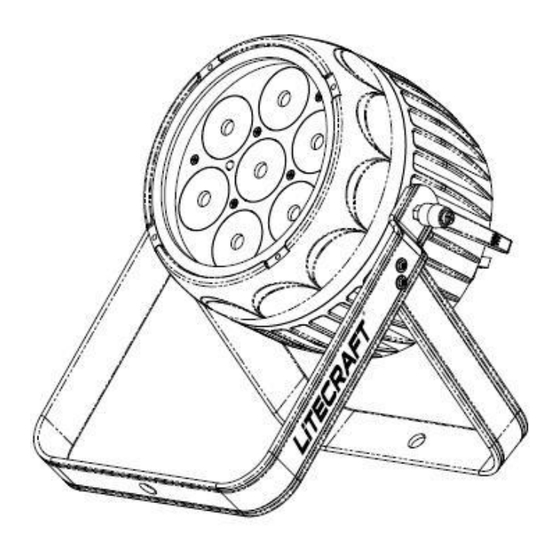
BEDIENUNG Dieses Gerät besitzt verschiedene DMX- und Stand-Alone-Modi. Im DMX-Modus können mehrere Geräte miteinander verbunden und von einem Controller gesteuert werden. Das Gerät übernimmt die Einstellungen des DMX-Controllers, sobald die entsprechende DMX-Startadresse eingestellt wurde. Slave Modus: Verbinden Sie den DMX-Ausgang des Master-Gerätes (XLR female) mit dem DMX-Eingang des Slave-Gerätes (XLR male). - Page 9 Bügel IR-Sensor C. Feststellschraube D. DMX-Eingang 5 pol LC-Display Öse für Sicherheitsfangseil G. Druckausgleichsventil H. DMX-Ausgang 5 pol Menu-Taste Up-Taste Netz-Eingang Down-Taste M. Netz-Ausgang N. Enter-Taste...
-
Page 10: Display-Modus
DISPLAY-MODUS Display Funktion DEF. SET DEF. SET Rücksetzen aller Parameter auf <***> Werkseinstellungen *** = <NO> <YES> DMX Addr DMX Addr Anzeige der DMX-Adresse <***> (2 Ch = <001-511>) *** = DMX-Adresse (3 Ch = <001-510>) (4 Ch = <001-509>) (5 Ch = <001-508>) (10 Ch = <001-503>) (Standard Einstellung = 1) - Page 11 ColMac ColMac 43 vorprogrammierte Farbkombinationen <**> wählbar ** = (Deaktivierung aller Programme über Menüpunkt Master/Slave!) <00-43> ColProgr ColProgr 31 vorprogrammierte Programme wählbar <**> (Deaktivierung aller Programme über Menüpunkt Master/Slave!) ** = <00-31> Speed Geschwindigkeit in 30 Schritten für das <**> eingestellte Programm wählbar ** = <00-30>...
-
Page 12: Dmx-Modus
DMX-MODUS Modus Display Funktion 2 Kanal < 2 Ch> K1 = Farbmakro Modus 000-255 stufenloser RGB-Farbmix K2 = Master Dimmer 000-255 stufenlose Helligkeit 3 Kanal < 3 Ch> K1 = Dimmer Rot Modus 000-255 stufenlose Helligkeit Rot K2 = Dimmer Grün 000-255 stufenlose Helligkeit Grün K3 = Dimmer Blau 000-255 stufenlose Helligkeit Blau... -
Page 13: Photometrische Daten
K8 = Geschwindigkeit 000-255 stufenlose Geschwindigkeit K9 = Dimmer Modus 000-020 Modus lt. Display Einstellung 021-049 OFF = Dimmer linear 050-099 1 = Dimmer verzögert 1 100-149 2 = Dimmer verzögert 2 150-199 3 = Dimmer verzögert 3 200-255 4 = Dimmer verzögert 4 K10= Master Dimmer 000-255 stufenlose Helligkeit PHOTOMETRISCHE DATEN... -
Page 14: Technische Spezifikationen
TECHNISCHE SPEZIFIKATIONEN Optisches System Optiken feste optische Systeme Abstrahlwinkel 10° (Frostfilter 25° inklusive) LED-Lichtquellen LEDs 7x Multichip-LEDs Farben 7x rot, 7x grün, 7x blau, 7x weiß Lebensdauer LEDs > 50.000 Stunden Farbmischung RGBW Temperaturbereiche Umgebungstemperatur -10°/+45° C Kühlung Konvektionskühlung Steuerung & Programmierung Protokoll DMX 512, IR-Fernbedienung DMX 512-Kanäle... -
Page 15: Accessories Included
ACCESSORIES INCLUDED powerCON TRUE1 mains cable IR remote frostfilter 25° 4x fixing screws for frost filter 25° SAFETY NOTES Each person being responsible for the installation, the use or service of this unit must: be qualified ... -
Page 16: Designated Use
DESIGNATED USE This product is a spotlight, which is designed only for professional use on stages, discotheques, theatres, etc. This product is approved for mains connection up to 240 VAC and designed for outdoor use, but not for permanent outdoor installation. The protection class is classified as IP 65. ... -
Page 17: Installation
INSTALLATION There are specific regulations like DGUV V17/18 (old BGV C1) or country related regulations which need to be respected during the installation. Only skilled persons may install the device. Suspension device has to be built and calculated in order to handle up to 10 times its specific load limit over a time of one hour without permanent or harmful deformation. -
Page 18: Electrical Connection
ELECTRICAL CONNECTION Connection to the mains is only allowed by skilled persons. Before connecting the fixture to the mains, assure that the specifications are corresponding. Electrical grounding has to be used in the whole installation! ATTENTION! Installation has to be approved by an authorized person before first operation! CLEANING AND MAINTENANCE Installer has to make sure all safety and machinery installations are approved by skilled persons at least once a year. -
Page 19: Operation
OPERATION This device has several DMX and stand alone modes. In DMX mode, multiple devices can be connected and controlled by a controller. The device accepts the settings of the DMX controller, as soon as the corresponding start address is set. ... - Page 20 Yoke IR-Sensor C. Locking Screw D. DMX-Input 5 pin LC-Display Safety Attachment Point G. DMX-Output 5 pin H. Air-Vent Menu-Button Up-Button Mains-Input Down-Button M. Mains-Output N. Enter-Button...
-
Page 21: Display-Mode
DISPLAY-MODE Display function DEF. SET DEF. SET reset all parameter to factory defaults <***> *** = <NO> <YES> DMX Addr DMX Addr display the DMX-adress <***> (2 Ch = <001-511>) *** = DMX-adress (3 Ch = <001-510>) (4 Ch = <001-509>) (5 Ch = <001-508>) (10 Ch = <001-503>) (default setting = 1) - Page 22 ColMac ColMac 43 pre-programmed colors combinations <**> available ** = (deactivation of all pre-programmed chasers by menu Master/Slave!) <00-43> ColProgr ColProgr 31 pre-programmed chasers available (deactivation of all pre-programmed chasers <**> ** = by menu Master/Slave!) <00-31> Speed setting speed in 30 steps for the pre- <**>...
-
Page 23: Dmx-Mode
DMX-MODE Mode display function 2 channel < 2 Ch> ch1 = color macro mode 000-255 stepless rgb color mix ch2 = master dimmer 000-255 stepless brightness 3 channel < 3 Ch> ch1 = dimmer red mode 000-255 stepless brightness red ch2 = dimmer green 000-255 stepless brightness green ch3 = dimmer blue... -
Page 24: Beam Specs
ch9 = dimmer mode 000-020 mode set on display 021-049 off = dimmer linear 050-099 1 = dimmer delayed 1 100-149 2 = dimmer delayed 2 150-199 3 = dimmer delayed 3 200-255 4 = dimmer delayed 4 ch10= master dimmer 000-255 stepless brightness BEAM SPECS 4.690 lx... -
Page 25: Technical Specifications
TECHNICAL SPECIFICATION optical system optics fixed optical system beam angle 10° (frost filter 25° inclusive) LED-sources LEDs 7x multichip LEDs colors 7x red, 7x green, 7x blue, 7x white life time LEDs > 50.000 hours Color mixing RGBW temperature range ambient temperature -10°/+45°... -
Page 26: Ce-Zertifikation
Low Voltage Directive 2014/35/EU. It is possible to use CE marking to demonstrate the conformity with this LVD. Submitter: LMP Lichttechnik GmbH EUT: LITECRAFT LED Light M/N: BeamX.7 IP Test Standard : EN 60598-2-17: 1989+A2: 1991 EN 60598-1: 2015... - Page 27 The following product has been tested by us with the listed standards and found in conformity with the EMC Directive 2014/30/EU. It is possible to use CE marking to demonstrate the conformity with this EMC Directive. Submitter: LMP Lichttechnik GmbH EUT: LITECRAFT LED Light M/N: BeamX.7 IP Test Standard: EN 55032: 2015 EN 61000-3-2: 2014...
Need help?
Do you have a question about the BeamX.7 IP and is the answer not in the manual?
Questions and answers