Table of Contents
Advertisement
Quick Links
Thank you for purchasing this Alpine product. Please take a moment to protect your purchase by
registering your product now at the following address: www.alpine-usa.com/registration.
You will be informed of product and software updates (if applicable), special promotions, news
about Alpine.
Merci d'avoir acheté ce produit Alpine. Nous vous invitons à consacrer un moment à la protection
de votre achat en enregistrant votre produit dès maintenant à l'adresse suivante :
www.alpine-usa.com/registration.
Vous serez tenu informé des mises à jour des produits et des logiciels (le cas échéant), des
promotions spéciales et de l'actualité d'Alpine.
Gracias por adquirir este producto Alpine. Con solo unos pocos pasos podrá proteger su producto,
registrándolo a través de la siguiente dirección: www.alpine-usa.com/registration.
Recibirá información sobre nuevos productos y software, promociones especiales y novedades
sobre Alpine.
ALPINE ELECTRONICS OF AMERICA, INC.
19145 Gramercy Place, Torrance,
California 90501, U.S.A.
Phone 1-800-ALPINE-1 (1-800-257-4631)
iLX-107
• OWNER'S MANUAL
Please read before using this equipment.
• MODE D'EMPLOI
Veuillez lire avant d'utiliser cet appareil.
• MANUAL DE OPERACIÓN
Léalo antes de utilizar este equipo.
R R
EN
Designed by ALPINE Japan
68-30368Z57-B
Advertisement
Table of Contents

Related Manuals for Alpine 9ZUA148


Summary of Contents for Alpine 9ZUA148
- Page 1 • MANUAL DE OPERACIÓN Léalo antes de utilizar este equipo. Thank you for purchasing this Alpine product. Please take a moment to protect your purchase by registering your product now at the following address: www.alpine-usa.com/registration. You will be informed of product and software updates (if applicable), special promotions, news about Alpine.
- Page 2 ALPINE ELECTRONICS MARKETING, INC. ALPINE ELECTRONICS OF AUSTRALIA PTY. LTD. ALPINE ITALIA S.p.A. 1-7, Yukigaya-Otsukamachi, Ota-ku, 161-165 Princes Highway, Viale Cristoforo Colombo, 8 Tokyo 145-0067, JAPAN Hallam Victoria 3803, Australia 20090 Trezzano sul Naviglio MI, Italy Phone: 03-5499-4531 Phone 03-8787-1200 Phone +39 02 484781 ALPINE ELECTRONICS France S.A.R.L.
-
Page 3: Table Of Contents
Using Siri ............9 Adjusting Fader (Between Front and Rear) ..17 About Hands-Free Phone ....... 10 Setting the Bass Level ........17 Applying Alpine TuneIt App ......10 Setting the Treble Level ........17 Adjusting the sound Settings using Alpine Tunelt App ..........10 Setting the Subwoofer ........17... - Page 4 Apple CarPlay Setting ........24 Display Setup Setting the WLAN ON/OFF ....... 24 Display Setup Operation ......... 19 Registering the Apple CarPlay Device ..24 Switching Display Modes ......19 Steering wheel Setting ......... 24 Adjusting Brightness ........19 Setting the Siri Microphone Effect ....24 Adjusting Color of Picture ......
-
Page 5: Operating Instructions
Failure to do so may cause personal injury or damage to the the vehicle and cause an accident. product. Return it to your authorized Alpine dealer or the nearest Alpine Service Center for repairing. DO NOT OPERATE ANY FUNCTION THAT TAKES YOUR ATTENTION AWAY FROM SAFELY DRIVING YOUR VEHICLE. - Page 6 • This unit does not support Flash memory’s Audio/Video playback or photo browse. CAUTION Alpine accepts no responsibility for lost data, etc., even if data, etc., is lost while using this product. • iPhone, iTunes and CarPlay are trademarks of Apple Inc., registered in the U.S.
-
Page 7: Features
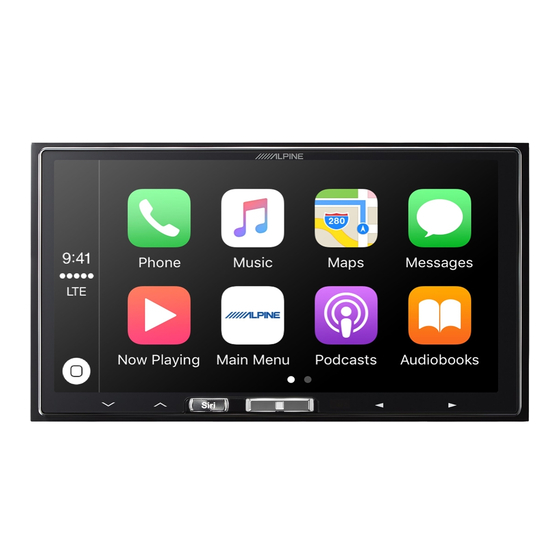
Features About Apple CarPlay or later Apple CarPlay allows your iPhone 5 to operate smoothly from this head unit. About Home Screen The Home Screen for this unit gives direct access to those applications designed to work with Apple CarPlay. The Apple CarPlay icon will indicate whether the appropriate iPhone is connected. -
Page 8: Getting Started
10 seconds. Steering Wheel remote interface compatible With an optional Alpine Steering Wheel Remote Control Interface Box (not included), this unit is controllable from the vehicles steering wheel controls. For details, contact your Alpine dealer. -
Page 9: Turning The System On
Turning the System On Operating an Item in a List With the Alpine system, when the ignition key is turned to ACC or ON, To scroll through a list, touch the screen and slide the opening screen will be automatically displayed. -
Page 10: About Hands-Free Phone
This unit’s sound tuning is programmable from a connected iPhone. It is also possible to download specific parameters for certain vehicles from Alpine’s TuneIt database stored in the Cloud. Using the Alpine TuneIt App, customized parameters can also be uploaded for others to share and rate. -
Page 11: Listening To The Radio
Listening to the Radio Presetting Stations Automatically The tuner can automatically seek and store 6 strong stations in the Press the Home button. selected band in order of frequency from low to high. The Home screen is displayed. After selecting the desired band, touch and hold Touch [Radio]. -
Page 12: Apple Carplay (Optional)
Make sure to turn on WLAN on your iPhone and iLX-107. Also turn on Bluetooth on your iPhone before making this connection. Select the “Alpine iLX-107” from the Bluetooth pairing list of your iPhone for pairing. Make sure the unit is on Apple CarPlay devices screen for paring. -
Page 13: Auxiliary Device (Optional)
Example for AUX main screen Auxiliary Device (Optional) Operating Auxiliary Devices (Optional) To operate devices connected to the AUX terminals of iLX-107, follow the procedure described below. • Turn on the “AUX In”. Refer to “Setting the Auxiliary (AUX) Mode” Calls up the Display Setup screen. -
Page 14: Camera Operation (Optional)
Touch [Guide Off] on the Rear camera display Camera Operation screen. The guide disappears, and then the [Guide Off] switch changes to [Guide On]. (Optional) Touch [Guide On] to turn on the guide. The video from an optional camera can be viewed from this head unit’s Adjusting the Caution Display Location display. - Page 15 • The marks do not move in synchronization with the - When sunlight or headlights directly strike the camera lens. steering wheel. Error between the screen and the actual road surface • Set the marks to suit the car’s width. In the following conditions, errors are produced between the screen 2 Distance guidance marks guidance and the actual road surface.
-
Page 16: Other Camera Operation
• For details on how to operate the list screen, refer to page 9. About Alpine TuneIt App You can also set the Audio Setup of this unit through the Alpine TuneIt App installed to your iPhone. It is also possible to download specific parameters for certain vehicles from Alpine’s TuneIt database. -
Page 17: Adjusting Balance (Between Left And Right)
Using the different levels available, the Bass impact can be adjusted for different types of music. Setting the Bass Level • Using the Alpine TuneIt App, you can download the optimal Bass Engine SQ tuning data for your speaker system. You can emphasize or weaken the bass level. -
Page 18: Adjusting The Bass Engine Sq Level
Factory Audio * When set this item via Alpine TuneIt App. This corrects information that was omitted at the time of About Setup when the external power amplifier is compression. -
Page 19: Display Setup
Switching Display Modes Display Setup Setting item: Display Mode Setting contents: WIDE (Initial setting) / NORMAL Display Setup Operation To display the Display Setup Menu screen: Your vehicle must be parked with the ignition key in the ACC or ON position. To do this, follow the procedures below. 1 Bring your vehicle to a complete stop at a safe location. -
Page 20: Saving And Calling The Adjusted Picture Quality
Touch [ ] to return to the main application screen. Saving and calling the adjusted picture Touch [ ] to return to the previous screen. quality • Immediately after changing the settings of General Setup (While the system is writing data automatically) do not turn the ignition key to When adjusting Camera, you can store the settings made for “Adjusting OFF. -
Page 21: Text Scroll Setting
• When “Auto” or “On” is set, the setting is also applied for the button this product and BLUETOOTH information. Make note of the version lighting in “Button Backlighting Adjustment” (page 21), and information and refer to it whenever you contact Alpine Tech Support or “Display Backlighting Adjustment” (page 21). an Alpine-authorized dealer. -
Page 22: Initializing The System
Touch [ ] on the Home screen. Initializing the System The Setup main screen is displayed. You can initialize all data, to restore the factory settings. Remove the Touch [Application]. USB Flash memory, from the system before operation The Application Setup screen appears. Setting item: Clear All Settings Select the desired item. -
Page 23: Adjusting The Rear Camera Guide
Adjusting the Rear Camera Guide Camera Interrupt Setting (Power OFF Mode) (Rear Camera Only) If you select “Rear,” you can adjust the camera guide position. You can set whether to display the rear camera image when the gear Setting item: Guide Adjustment lever is moved to the reverse (R) position while the unit is turned off. -
Page 24: Apple Carplay Setting
Setting the Siri Microphone Effect Apple CarPlay Setting You can turn on or off the Siri Microphone Effect. [Apple CarPlay] is selected on the Application setup menu in step 3. Setting item: Microphone EC / NR Refer to “Application Setup Operation” (page 22). Setting contents : ON (Initial setting:) / OFF Setting the WLAN ON/OFF Selecting the Output Speaker... -
Page 25: Idatalink Operation
Adjust or confirm the item/information accordingly. iDataLink • Operable functions and displays may differ depending on the vehicle. Operation iDataLink Function Screen example Climate screen example This unit allows communication with the vehicle’s iDataLink module, You can control the temperature inside the vehicle, etc. when available. -
Page 26: About Parking Sensor Screen
Vehicle Information screen example Parking Sensor Camera interlock screen example (Rear camera) You can check for open doors, check the tire pressure, the battery life, You can check for obstacles through an interlocked camera image by etc. for the vehicle. connecting a Front or Rear Camera. -
Page 27: External Accessory Control Operation
When changing the name: External Accessory Control Operation Touch the icon name, then input characters into Edit Name (Keypad). You can also select a basic name from the [Template] of the Keypad. (When a basic name is selected from the Template, the You can set the headlights to ON/OFF or adjust the air suspension from icon will be changed according to the basic name.) this unit by connecting the optional External Accessory Control... -
Page 28: Information
• Demonstration function is set to “ON”. This product uses software that can be updated through a Flash Memory - Set the Demonstration function to “OFF”. (Page 22) device. Download the software from the Alpine website and update the product using the Flash Memory device. Radio Unable to receive stations. -
Page 29: Specifications
Audio/Visual Specifications Connected USB Device is not supported. • An iPhone that is not supported by the unit is connected. - Connect an iPhone that is supported by the unit. MONITOR SECTION - Reset the iPhone. • A USB device that is not supported by the unit is connected. Screen Size 7.0"... -
Page 30: Installation And Connections
Failure to do so may result in damage to KEEP SMALL OBJECTS SUCH AS SCREWS OUT OF THE the unit and/or the vehicle. When in doubt, consult your Alpine dealer. REACH OF CHILDREN. -
Page 31: Installation
Mounting the Microphone. Installation For safe use, make sure of the following: • Location is stable and firm. • Driver’s view and operations are not obstructed. Note on installation • Microphone is located where the driver’s voice can be easily •... -
Page 32: Fix The Cables Etc
Fix the Cables etc. Fix the cables carefully. Do not damage them by tucking them into movable parts, such as a seat rail, or by locating them against sharp or pointed edges. - Page 33 • Connect the ground lead securely to a bare metal spot (remove any paint, dirt or grease if necessary) of the car chassis. • If you add an optional noise suppressor, connect it as far away from the unit as possible. Your Alpine dealer carries various noise suppressors, contact them for further information.
-
Page 34: Connections
Connections Vehicle Antenna GPS Antenna (Included) SPEED SENSOR To the vehicle speed pulse line (Green/White) CAMERA To Front, Rear or Side camera IDATALINK I/F To iDataLink module AUX INPUT To Video/Audio (R, L) Output terminal REMO To amplifier or equalizer (Blue/White) Interface cable To plus side of the back-up lamp... - Page 35 Such failures may result in an accident Battery Lead (Yellow) and loss of life. We strongly recommend that the installation Connect this lead to the positive (+) post of the vehicle’s be performed by a trained, authorized Alpine dealer. battery. CAMERA Input Connector Ground Lead (Black) Connect this lead to a good chassis ground on the vehicle.
-
Page 36: System Example
System Example Connection of an iPhone iPhone (Sold separately) USB Connector USB Extension Cable (Included) Lightning to USB Cable (Included with iPhone) * About iPhone models usable with this unit, refer to Apple CarPlay section (page 12). • Do not leave an iPhone in a vehicle for a long time. Heat and humidity may damage the iPhone and you may not be able to play it again. - Page 37 Connection of an External device CAN I/F OUT Connector To Video Output Terminal (Yellow) (Red) DVD Player,etc (sold separately) (White) To Audio Output Terminal 1 Video/Audio Input Connector (AUX INPUT) 3 RCA Extension Cable (Sold Separately) • When you use this connector, an optional AV/RCA interface cable should be used.
- Page 38 Connection of an External Amplifier Power Supply Connector PRE OUT Connector REMO REMOTE ON (Blue/White) (Blue/White) Amplifier 4 ch (Sold separately) Front speakers Input Input Rear speakers REMOTE ON (Blue/White) Input Subwoofer Amplifier for subwoofer (Sold separately) 1 Front Output RCA Connectors 3 Subwoofer RCA Connectors RED is right and WHITE is left.
- Page 39 Connection of camera CAN I/F Connector To Video Output terminal Camera with RCA video output (sold separately) HCE-C155, etc. CAMERA Cable 1 CAMERA Input Connector 2 RCA Extension Cable (sold separately) • When a rear camera is used, make sure REVERSE cable is connected correctly.
-
Page 40: Limited Warranty
ALPINE ELECTRONICS OF AMERICA, INC. (“Alpine”), is dedicated to quality craftsmanship and is pleased to offer this Warranty. We suggest that you read it thoroughly. Should you have any questions, please contact your Dealer or contact Alpine at one of the telephone numbers listed below. - Page 41 N’oubliez pas de consacrer un moment à la protection de votre achat en enregistrant votre produit dès maintenant à l’adresse suivante : www.alpine-usa.com/registration. Recuerde que con solo unos pocos pasos podrá proteger su producto, registrándolo a través de la...
Need help?
Do you have a question about the 9ZUA148 and is the answer not in the manual?
Questions and answers