Table of Contents
Advertisement
Quick Links
Advertisement
Table of Contents

Related Manuals for Electrolux EOB9S31WX


Summary of Contents for Electrolux EOB9S31WX
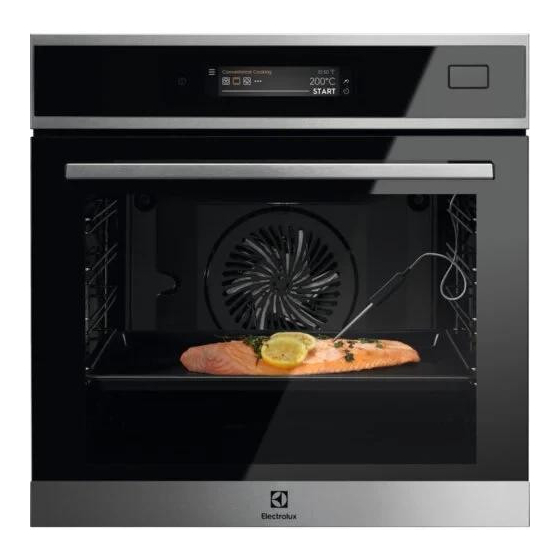
- Page 1 EOB9S31WX Steam oven User Manual...
- Page 2 WE’RE THINKING OF YOU Thank you for purchasing an Electrolux appliance. You’ve chosen a product that brings with it decades of professional experience and innovation. Ingenious and stylish, it has been designed with you in mind. So whenever you use it, you can be safe in the knowledge that you’ll get great results every time.
-
Page 3: Table Of Contents
CONTENTS 1. SAFETY INFORMATION................5 1.1 Children and vulnerable people safety............. 5 1.2 General Safety....................5 2. SAFETY INSTRUCTIONS................7 2.1 Installation......................7 2.2 Electrical connection..................7 2.3 Use........................7 2.4 Steam Cooking....................8 2.5 Care and cleaning.....................9 2.6 Internal lighting....................9 2.7 Service......................9 2.8 Disposal...................... - Page 4 CONTENTS 11. CARE AND CLEANING................39 11.1 Notes on cleaning..................39 11.2 Recommended cleaning products..............39 11.3 How to remove: Shelf supports..............39 11.4 How to use: Steam Cleaning................ 40 11.5 How to use: Cleaning Reminder..............40 11.6 How to use: Descaling.................. 40 11.7 How to use: Descaling reminder..............41 11.8 How to use: Steam generation system - Rinsing..........41 11.9 How to use: Drying reminder................
-
Page 5: Safety Information
• from the appliance unless continuously supervised. Do not let children play with the appliance and mobile • devices with My Electrolux. Keep all packaging away from children and dispose of it • appropriately. Keep children and pets away from the appliance when it •... - Page 6 SAFETY INFORMATION WARNING: The appliance and its accessible parts become • hot during use. Care should be taken to avoid touching heating elements. Always use oven gloves to remove or put in accessories or • ovenware. Before carrying out any maintenance, disconnect the •...
-
Page 7: Safety Instructions
2. SAFETY INSTRUCTIONS 2.1 Installation WARNING! Only a qualified person must install this appliance. • Remove all the packaging. • Do not install or use a damaged appliance. • Follow the installation instructions supplied with the appliance. • Always take care when moving the appliance as it is heavy. Always use safety gloves and enclosed footwear. -
Page 8: Steam Cooking
SAFETY INSTRUCTIONS • Do not change the specification of this appliance. • Make sure that the ventilation openings are not blocked. • Do not let the appliance stay unattended during operation. • Deactivate the appliance after each use. • Be careful when you open the appliance door while the appliance is in operation. Hot air can release. -
Page 9: Care And Cleaning
SAFETY INSTRUCTIONS 2.5 Care and cleaning WARNING! Risk of injury, fire, or damage to the appliance. • Before maintenance, deactivate the appliance and disconnect the mains plug from the mains socket. • Make sure the appliance is cold. There is the risk that the glass panels can break. •... -
Page 10: Product Description
3. PRODUCT DESCRIPTION 3.1 General overview Control panel Display Water drawer Socket for the food sensor Heating element Lamp Descaling pipe outlet Shelf support, removable Shelf positions 3.2 Accessories Wire shelf For cookware, cake tins, roasts. Baking tray For cakes and biscuits. 10/60... - Page 11 PRODUCT DESCRIPTION Grill- / Roasting pan To bake and roast or as a pan to collect fat. Food Sensor To measure the temperature inside food. Telescopic runners For inserting and removing trays and wireshelf more easily. Steam set One unperforated and one perforated food container.
-
Page 12: How To Turn Oven On And Off
4. HOW TO TURN OVEN ON AND OFF 4.1 Control panel Function Comment On / Off Press and hold to turn the oven on and off. Display Shows the current settings of the oven. Gestures Press Move Press and hold Touch the surface with finger‐... - Page 13 HOW TO TURN OVEN ON AND OFF The display with maximum number of functions B C D set. Conventional cooking H G F E A. Menu / Back B. Wi-Fi C. Time of Day D. Information E. Timer F. Food Sensor G.
- Page 14 HOW TO TURN OVEN ON AND OFF Display indicators Door function indicators The oven door is locked. Wi-Fi indicators - the oven can be connected to Wi-Fi. Wi-Fi connection is turned on. Wi-Fi connection is turned off. 14/60...
-
Page 15: Before First Use
5. BEFORE FIRST USE WARNING! Refer to Safety chapters. 5.1 Initial Cleaning Step 2 Step 1 Step 3 Clean the oven and the ac‐ Remove all accessories and Put the accessories and the cessories before the first use. removable shelf supports from removable shelf supports Refer to "Care and cleaning"... -
Page 16: Software Licences
You can download the source code of the open source software by following the hyperlink present on the product web page. Look for the oven model and Wi-Fi Module Software version on http://electrolux.opensoftwarere‐ pository.com inside "NIUX" folder. 5.5 How to set: Water hardness When you connect the oven to the mains you have to set the water hardness level. - Page 17 BEFORE FIRST USE Step 1 Step 2 Step 3 Step 4 Step 5 Take the four Put all the re‐ Shake the Wait one minute Set water hardness: colour test action zones strip to re‐ and check water Menu / Settings / strip supplied of the strip in‐...
-
Page 18: Daily Use
6. DAILY USE WARNING! Refer to Safety chapters. 6.1 How to set: Heating Functions Step 1 Turn on the oven. Step 2 Select a heating function. The display shows the default heating functions. To see more heating functions press Step 3 Press Display goes into the temperature settings. - Page 19 DAILY USE Step 4 Move the finger on the slider to set the temperature. Type of the steam heating function depends on the set temperature. Steam for Steaming For steaming vegetables, grains, legumes, seafood, 50 - 100 °C terrines and spoon desserts. Steam for Stewing For cooking stewed and braised meat or fish, bread 105 - 130 °C...
-
Page 20: How To Set: Assisted Cooking
DAILY USE Step 10 Turn off the oven. Step 11 Empty the water drawer after steam cooking is completed. Refer to the cleaning function: Tank emptying. Step 12 Residual water can condensate in the cavity. After cooking, open the door carefully to avoid the water spillage. -
Page 21: Heating Functions
DAILY USE 6.4 Heating Functions Standard Heating Functions Heating function Application To grill flat food and to toast bread. Grill To roast larger meat joints or poultry with bones on one shelf posi‐ tion. To make gratins and to brown. Turbo Grilling To bake on up to three shelf positions at the same time and to dry food.Set the temperature 20 - 40 °C lower than for Conventional... - Page 22 DAILY USE Special Heating Functions Heating function Application To preserve vegetables (e.g. pickles). Preserving To dry sliced fruit, vegetables and mushrooms. Dehydrating To preheat plates for serving. Plate Warming To defrost food (vegetables and fruit). The defrosting time depends on the amount and size of the frozen food. Defrost For dishes such as lasagna or potato gratin.
- Page 23 DAILY USE Steam Oven Functions Heating function Application Food reheating with steam prevents surface drying. Heat is distrib‐ uted in a gentle and even way, which allows to recover taste and aroma of food as just prepared. This function can be used to re‐ Steam Regenerating heat food directly on a plate.
-
Page 24: Clock Functions
7. CLOCK FUNCTIONS 7.1 Clock functions description Clock function Application Cooking time To set the length of cooking. Maximum is 23 h 59 min. Start Criteria To set when the timer starts counting. End Criteria To set what happens when the timer ends counting. Set start time To postpone the start and / or end of cooking. - Page 25 CLOCK FUNCTIONS How to choose cooking start / end option Step 1 Choose an oven function and set the temperature. Step 2 Press to set cooking time. Step 3 Press Step 4 Press Start Criteria / End Criteria. Step 5 Choose preferred Start Criteria / End Criteria.
- Page 26 CLOCK FUNCTIONS How to delay start and end of cooking Step 2 Move the dot on the slider or press the preferred time icon. Step 3 Press Take a shortcut! How to delay start without setting the end of cooking Step 1 Set a heating function and the temperature.
- Page 27 CLOCK FUNCTIONS How to set extra time Step 2 Move the dot on the slider or press one of the preferred time icons to set the time. Step 3 Press How to change timer settings Step 1 Move the dot on the slider or use shortcuts to change the timer value. Step 2 Press or press...
-
Page 28: How To Use: Accessories
8. HOW TO USE: ACCESSORIES 8.1 Inserting accessories A small indentation at the top increases safety. The indentations are also anti-tip devices. The high rim around the shelf prevents cookware from slipping of the shelf. With the telescopic runners you can put in and remove the shelves more easily. Wire shelf: Push the shelf between the guide bars of the shelf support. - Page 29 HOW TO USE: ACCESSORIES • the food core temperature. CAUTION! Use only the accessory supplied and the original replacement parts. Directions for the best results: • Ingredients should be at room temperature. • The Food Sensor cannot be used for liquid dishes. •...
- Page 30 HOW TO USE: ACCESSORIES How to use: Food Sensor Insert the tip of the Food Sensor into the cen‐ Insert the tip of the Food Sensor exactly in the tre of meat, fish, in the thickest part if possible. centre of the casserole. The Food Sensor Make sure that at least 3/4 of the Food Sensor should be stabilized in one place during baking.
-
Page 31: Using Telescopic Runners
HOW TO USE: ACCESSORIES How to use: Food Sensor Step 7 Press When food reaches the set temperature, the signal sounds. You can choose to stop or to continue cooking to make sure the food is well done. Step 8 Remove the Food Sensor plug from the socket and remove the dish from the oven. - Page 32 HOW TO USE: ACCESSORIES Deep pan: Put the deep pan on the telescopic runners. Wire shelf and Place the wire shelf and the deep pan together on the telescopic runner. deep pan togeth‐ 32/60...
-
Page 33: Additional Functions
9. ADDITIONAL FUNCTIONS 9.1 Automatic Switch-off For safety reasons the oven turns off automatically after some time, if a heating function works and you do not change any settings. (°C) 30 - 115 12.5 120 - 195 200 - 230 The Automatic Switch-off does not work with the functions: Light, Food Sensor, Duration, End Time. -
Page 34: Hints And Tips
10. HINTS AND TIPS WARNING! Refer to Safety chapters. 10.1 Cooking recommendations Your oven may bake or roast differently to the oven you had before. The tables below show recommended settings for temperature, cooking time and shelf position for specific types of the food. -
Page 35: Cooking Tables For Test Institutes
HINTS AND TIPS Ramekins Pizza pan Baking dish Flan base tin Ceramic Dark, non-reflective Dark, non-reflective Dark, non-reflective 8 cm diameter, 28 cm diameter 26 cm diameter 28 cm diameter 5 cm height 10.4 Cooking tables for test institutes Information for test institutes Tests according to: EN 60350, IEC 60350. - Page 36 HINTS AND TIPS BAKING ON ONE LEVEL. Biscuits Use the third shelf position. (°C) (min) Short bread / Pastry strips True Fan Cooking 25 - 40 Short bread / Pastry strips, Conventional Cooking / 20 - 30 preheat the empty oven Top / Bottom Heat Small cakes, 20 per tray, True Fan Cooking...
- Page 37 HINTS AND TIPS GRILL Preheat the empty oven for 5 minutes. Grill with the maximum temperature setting. (min) Toast Grill 1 - 3 Beef steak, turn halfway Grill 24 - 30 through Information for test institutes Tests for the function: Full Steam. Tests according to IEC 60350.
- Page 38 HINTS AND TIPS Set the temperature to 100 °C. Container (min) (Gastro‐ norm) Peas, frozen 2 x 2/3 perfo‐ 2 x 1500 2 and 4 Until the Put the baking rated tempera‐ tray on the first ture in the shelf position. coldest spot rea‐...
-
Page 39: Care And Cleaning
Do not use abrasive sponges or aggressive detergents. It can cause damage to the enamel and the stainless steel parts. You can buy our products at www.electrolux.com/shop and at the best retailer shops. 11.3 How to remove: Shelf supports Before maintenance, make sure that the oven is cold. There is a risk of burns. -
Page 40: How To Use: Steam Cleaning
CARE AND CLEANING Step 2 Pull the front end of the shelf support away from the side wall. Step 3 Pull the supports out of the rear catch. Install the shelf supports in the opposite sequence. 11.4 How to use: Steam Cleaning When the oven is cold, remove the food remains. -
Page 41: How To Use: Descaling Reminder
CARE AND CLEANING Step 4 Fill the remaining part of the water drawer with water to the maximum level. Step 5 Insert the water drawer. Step 6 Select the function from the menu: Cleaning. Follow the instructions on the dis‐ play. -
Page 42: How To Use: Drying Reminder
CARE AND CLEANING 11.9 How to use: Drying reminder After steam cooking the display shows a message prompting to dry the oven. Press YES to dry the oven. 11.10 How to use: Drying After steam cooking or steam cleaning you can dry the cavity with this function. Step 1 Make sure the oven is cold. - Page 43 CARE AND CLEANING Step 3 Close the oven door to the first opening position (approximately 70° an‐ gle). Step 4 Hold the door trim (B) on the top edge of the door at the two sides and push inwards to release the clip seal. Step 5 Pull the door trim to the front to remove it.
-
Page 44: How To Replace: Lamp
CARE AND CLEANING Step 10 A B C Make sure that you put the glass panels (C, B and A) back in the cor‐ rect sequence. First, insert panel C, which has a square printed on the left side and a triangle on the right side. You will also find those sym‐ bols embossed on the door frame. - Page 45 CARE AND CLEANING The top lamp Step 1 Turn the lamp glass cover to remove it. Step 2 Clean the glass cover. Step 3 Remove the metal ring and clean the glass cover. Step 4 Replace the lamp with a suitable 300 °C heat-resistant lamp. Step 5 Attach the metal ring to the glass cover.
-
Page 46: Troubleshooting
12. TROUBLESHOOTING WARNING! Refer to Safety chapters. 12.1 What to do if... The oven does not turn on or does not heat up Possible cause Remedy The oven is not connected to an electrical sup‐ Check if the oven is correctly connected to the ply or it is connected incorrectly. -
Page 47: How To Manage: Error Codes
TROUBLESHOOTING Problems with Wi-Fi signal Possible cause Remedy Trouble with wireless network signal. Check your wireless network and router. Restart the router. New router installed or router configuration To configure oven and mobile device again, re‐ changed. fer to "Before first use" chapter, Wireless con‐ nection. -
Page 48: Service Data
TROUBLESHOOTING Code and description Action F602, F603 - Wi-Fi is not available. Turn the oven off and on. When one of these error messages continues to appear on the display, it means a faulty subsystem may have been disabled. In such a case contact your dealer or an Authorized Service Centre. -
Page 49: Energy Efficiency
13. ENERGY EFFICIENCY 13.1 Product Information Sheet Product information according to EU 65-66/2014 Supplier's name Electrolux Model identification EOB9S31WX 944184831 Energy Efficiency Index 61.9 Energy efficiency class Energy consumption with a standard load, conventional 1.09 kWh/cycle mode Energy consumption with a standard load, fan-forced 0.52 kWh/cycle... - Page 50 ENERGY EFFICIENCY When the cooking duration is longer than 30 minutes, reduce the oven temperature to minimum 3 - 10 minutes before the end of cooking. The residual heat inside the oven will continue to cook. Use the residual heat to warm up other dishes. Keep food warm Choose the lowest possible temperature setting to use residual heat and keep a meal warm.
-
Page 51: Menu Structure
14. MENU STRUCTURE 14.1 Menu Press on the display to open Menu. Choose dish Cleaning Options Menu Menu item Application Assisted Cooking Contains a list of automatic pro‐ grammes. Cleaning Contains a list of cleaning pro‐ grammes. Options To set the oven configuration. Settings Connections To set the network configuration. -
Page 52: Submenu For: Options
MENU STRUCTURE 14.3 Submenu for: Options Submenu Application Light To turn the lamp on and off. Lamp Icon Visible Lamp icon appears on the screen. Child Lock Prevents accidental activation of the oven. When the option is on, the text "Child Lock" appears on the display when you turn on the oven. -
Page 53: Submenu For: Service
MENU STRUCTURE Submenu Description Key Tones Turns the tone of the touch fields on and off. It is not possi‐ ble to switch off the tone of the ON / OFF and STOP. Alarm / Error Tones Turns the alarm tones on and off . Buzzer Volume Regulates the volume of key tones and signals. -
Page 54: S Easy
15. IT'S EASY! Before first use you have to set: Display Buzzer Language Water hardness Clock Wireless connection Brightness Volume Familiarize yourself with the basic icons on the control panel and the display: Wi-Fi On / Off Menu / Back Information More Timer... - Page 55 IT'S EASY! Use Steamify - Steam cooking 50 - 100 °C 105 - 130 °C 135 - 150 °C 155 - 230 °C Get to know how to cook quickly Use Automatic Programmes to prepare a dish quickly with default settings: Assisted Cooking Step 1 Step 2...
-
Page 56: Take A Shortcut
16. TAKE A SHORTCUT! Here you can see all the useful shortcuts. You can also find them in the dedicated chapters in the user manual. Wireless connection How to set: Oven Functions How to set: Steamify - Steam Cooking How to set: Assisted Cooking How to set cooking time 70°C How to delay start and end of cooking... - Page 57 17. ENVIRONMENTAL CONCERNS Recycle materials with the symbol . Put the packaging in relevant containers to recycle it. Help protect the environment and human health by recycling waste of electrical and electronic appliances. Do not dispose of appliances marked with the symbol with the household waste.
- Page 58 58/60...
- Page 59 59/60...
- Page 60 www.electrolux.com/shop...
Need help?
Do you have a question about the EOB9S31WX and is the answer not in the manual?
Questions and answers