
Subscribe to Our Youtube Channel
Related Manuals for Fujitsu Stylistic ST6010


Summary of Contents for Fujitsu Stylistic ST6010
- Page 1 FCC ID: EJE-WL0012 (IC: 337J-WL0012) APPENDIX H USER MANUAL EMC Technologies Pty Ltd – 176 Harrick Road, Keilor Park, VIC 3042 Australia www.emctech.com.au...
- Page 2 User’s Guide Learn how to use your Fujitsu Stylistic ST6010 Tablet PC...
- Page 3 This product data does not constitute a warranty. Specifications are subject to change without knowledge. Fujitsu and the Fujitsu logo are registered trademarks of Fujitsu Limited; Stylistic is a registered trademark of Fujitsu Computer Systems Corporation.
- Page 4 Copyright 2008 Fujitsu Computer Systems Corporation. All rights reserved. No part of this publication may be copied, reproduced, or translated, without the prior written consent of Fujitsu Computer Systems Corporation. No part of this publication may be stored or transmitted in any electronic form without the prior consent of Fujitsu Computer Systems Corporation.
- Page 5 IMPORTANT SAFETY INSTRUCTIONS This unit requires an AC adapter to operate. Use only UL Listed I.T.E. Class II Adapters with an output rating of 16 VDC, with a current of 3.75 A (60 W). AC adapter output polarity: When using your notebook equipment, basic safety precautions should always be followed to reduce the risk of fire, electric shock and injury to persons, including the following: •...
- Page 6 * To order a new battery for your Fujitsu mobile computer, go to the Fujitsu shopping site at in the US or www.shopfujitsu.com in Canada. www.fujitsu.ca/products/notebooks ** RBRC is an independent third party to which Fujitsu provides funding for battery recycling; RBRC is in no way affiliated with Fujitsu.
- Page 7 Sleep mode, press the Suspend/Resume Button. Energy saving benefits: Fujitsu ENERGY STAR qualified mobile PCs use about half as much electricity as standard equipment – saving half in utility costs. But more than that, ENERGY STAR also makes a difference for the environment.
-
Page 8: Table Of Contents
Fujitsu Contact Information ........15... - Page 9 Fujitsu Driver Update Utility ........43...
- Page 10 Operation of the Bridge Battery ....... . . 68 Memory Stick/SD Card Slot ........69 PC Card Slot .
- Page 11 Dimensions and Weight ........91 Environmental Requirements .
- Page 12 Using the Bluetooth Device........114 What is Bluetooth? .
-
Page 15: Preface
Preface About This Guide ® The Stylistic ST6000 Series Tablet PC is a high- performance, pen-based computer that has been ® ® designed to support Microsoft Windows Vista Business or Windows XP Tablet PC Edition. This manual explains how to operate your Stylistic ST6000 Series Tablet PC hardware and built-in system software. -
Page 16: Fujitsu Contact Information
OR YOUR FILES LEASE READ ALL WARNING INFORMATION CAREFULLY Fujitsu Contact Information Service and Support You can contact Fujitsu Service and Support in the following ways: • Toll free: 1-800-8Fujitsu (1-800-838-5487) • E-mail: 8fujitsu@us.fujitsu.com • Website: http://www.computers.us.fujitsu.com/support Before you place the call, you should have the following information ready so that the customer support representative can provide you with the fastest possible solution: •... - Page 17 OU MUST HAVE AN ACTIVE INTERNET CONNECTION TO USE THE ONLINE LINKS Limited Warranty Your Stylistic ST6010 Tablet PC is backed by a Fujitsu International Limited Warranty. Check the service kit that came with your notebook for the Limited Warranty period and terms and conditions. 16 - About This Guide...
-
Page 18: Getting To Know Your Tablet Pc
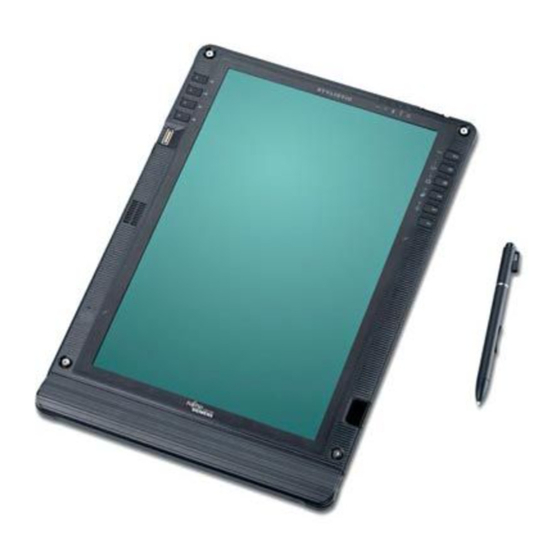
® ® Microsoft Windows XP Tablet PC Edition 2005 or Windows Vista™ Business. This chapter provides an overview of the Stylistic ST6000 Series Tablet PC and its features. Figure 1. Stylistic ST6010 Tablet PC... -
Page 19: Locating The Connectors And Controls
Locating the Connectors and Controls Features and controls that you use to operate the Stylistic ST6000 Series Tablet PC are outlined below and illustrated in Figures 2 through 5. Details on using these features and controls are provided later in this manual. -
Page 20: Front Features
Front Features: System status indicatorss: Indicate the operational status of the Tablet PC and hard disk drive, the charge level of the battery, and the security panel. See “Status Display” on page 27. Application/Security buttons: Allow you to quickly launch pre-defined applications, utilities, and security features by pressing a button. See “Application, Navigation, and Security Buttons”... -
Page 21: Back Features
Wireless LAN module cover Memory module cover System interface connector Battery release latch Battery release latch Removable battery Figure 3. Stylistic ST6000 Series Tablet PC Features (Back View) Back Features: Wireless LAN module cover: Provides protection for the optional wireless LAN radio. See “Configuring the Wireless LAN” on page 108. - Page 22 Battery release latch: Used to release the removable battery. Removable battery: Can be removed and replaced with a charged battery. See “Lithium ion Battery” on page 66. System interface connector: Allows you to connect the optional Stylistic Tablet Dock. Tablet Dock latch point: Allows you to attach the system to an optional Tablet Dock.
-
Page 23: Top Features
Power On/Suspend/Resume switch PC Card slot PC Card eject button Air vents Memory Stick/SD Card slot Infrared port Smart Card slot Pen tether attachment point Figure 4. Stylistic ST6000 Series Tablet PC Features (Top View) Top Features: Power On/Suspend/Resume switch: Allows you to turn on, off, sleep, resume, hibernate or wake the Tablet PC in order to optimize battery life. - Page 24 PC Card slot: Allows you to insert a Type I or Type II PCMCIA Card in the system. See “PC Card Slot” on page 71. † PC Card Eject Button: The PC Card eject button is used to remove a PC Card from the PC Card slot. Air flow vents: Provides secondary cooling for processor.
-
Page 25: Left-Side Features
External monitor connector (behind cover) USB 2.0 ports Security lock slot Headphone jack Microphone jack LAN jack (RJ-45) DC Input connector Figure 1-1. Stylistic ST6000 Series Tablet PC Features (Left Side View) Left-Side Features: Headphone Jack: Allows you to connect a set of stereo headphones. USB 2.0 ports: Allow you to connect Universal Serial Bus-compliant devices (compliant with USB Standard Revision 2.0) to the Tablet PC. - Page 26 Security lock slot: Allows you to attach a compatible security cable. DC input connector: Allows you to connect the AC adapter or auto adapter. LAN jack: Allows you to connect a standard RJ-45 connector to the Tablet PC’s internal local area network (LAN). Microphone Jack: Allows you to connect an external microphone.
-
Page 27: Right-Side Features
Wireless LAN/Bluetooth On/Off switch Pen holder Figure 5. Stylistic ST6000 Series Tablet PC Features (Right Side View) Right-Side Features: Wireless LAN/Bluetooth On/Off switch: For systems with the optional wireless LAN radio or Bluetooth device, this switch toggles the radio on or off. -
Page 28: Status Display
Status Display Icons appear under each of the system status LEDs in the status display indicating the status of system functions such as system power and battery charge level. The location of icons in the Status display is shown in Figure 6. Table 1. - Page 29 In the following table, a “blinking” LED flashes at the rate of once per second; an LED that is “blinking, slow” flashes at the rate of one second on, five seconds off. Icon Mode/State LED State Remarks Charge/DC In • On State Amber AC adapter and battery are available and system is charging.
- Page 30 In the following table, a “blinking” LED flashes at the rate of once per second; an LED that is “blinking, slow” flashes at the rate of one second on, five seconds off. Icon Mode/State LED State Remarks HDD Access • On State (or Green Displayed when hard disk drive is accessed.
-
Page 31: Application, Navigation, And Security Buttons
Escape/App A button application button. The buttons also have Enter/App B button separate tertiary functions that can be used while the Function/Fujitsu Menu button system is booting up. For more information about the tertiary functions, refer to Table 4 on page 35. - Page 32 When you press the Fn + EMail buttons at the same time, you automatically launch the Web browser. The default page to which you go is the Fujitsu home page. If you would Internet EMail like to change your home page, go to the Control Panel->...
- Page 33 Fujitsu Pressing the Fn button twice in succession (within the “sticky” time*), causes the Menu Utility Fujitsu menu to appear on your screen, allowing you to modify certain system settings. Function Button Table 2. Application Buttons - Primary and Secondary Functions * The Fn button has a handy “sticky”...
-
Page 34: Navigation Buttons
Navigation Buttons The four navigation buttons are located on the upper left-hand side of a Page Up/Tab Right vertically-oriented system. Page Down/Tab Left The buttons have dual functions. The secondary functions are activated by Cursor Up/Cursor Right pressing the Function (Fn) button while pressing the application button*. -
Page 35: Tertiary Functions Of Application And Navigation Buttons
The system is booting up while the Fujitsu logo is displayed immediately after turning on the system. The table below indicates how the buttons act while the system is booting up and while you are in the BIOS.. - Page 36 Pressing the Orientation button while the BIOS setup screen is open causes the selected item (if applicable) to change to the next item. Pressing this is the same as tapping the spacebar on a keyboard. Orientation Button Pressing the Esc button while the BIOS is open acts to escape from the BIOS. This is the same as if you had tapped [Esc] on a keyboard.
-
Page 37: Security Functions Of Application Buttons
Security Functions of Application Buttons Five buttons are used when implementing security functions. Four of the buttons are used to enter the password, and the fifth is used as an Enter button. Instructions for using the security feature follow the table. - Page 38 Numbered Buttons Use these buttons to enter your password.(Figure 5) Enter Button After entering the button strokes, push this button to enter the password into the Tablet PC. (Figure 5) Passwords The user and supervisor password may be set on this Tablet PC. A supervisor password is typically the same for all Tablet PC’s and notebooks in a work group, office, or company to allow for system management.
- Page 39 Go to the Start menu. Click on Run. Type in: C:\Program Files\Fujitsu\Security Panel Application\Supervisor\ FJSECS.EXE, then press [Enter] Follow the on-screen instructions to set the Supervisor password. Setting User Password Go to the Start menu. Click on All Programs.
-
Page 40: Using Your Security Panel
Using Your Security Panel The security lock feature is in effect both when the system resumes from Off, Sleep, or Hibernation state. You always need to push the Security Panel buttons to input the user password. Your system will not begin the boot sequence until you enter your supervisor/user password. -
Page 41: Precautions
Precautions Low Battery Operations If your Tablet PC has a low battery, pushing the suspend/resume button does not unlock the Tablet PC. To resume normal operation, first attach a power supply to the system. Then you may unlock the Tablet PC. Uninstalling the Security Panel Application You have two options when uninstalling the security panel application: •... -
Page 42: Reinstalling The Security Panel Application
User: Go to Start Menu. Click on Control Panel. Open Add or Remove Programs (In Vista: Programs and Features) in the Control Panel. Select the Security Panel Application (In Vista: Security Panel) in the list, and click Add/Remove. When the Confirm File Deletion box appears, click Yes. Supervisor: Go to Start Menu, Click on Control Panel. -
Page 43: Installing Click Me
If you forget both passwords, please contact Fujitsu Computer Systems Corporation Service and Support at 1-800-8Fujitsu (1-800-838-5487). Fujitsu Computer Systems Corporation charges a service fee for unlocking a password-restricted Tablet PC. When calling please have a valid credit card and provide proof of ownership. -
Page 44: Fujitsu Driver Update Utility
Your system has a convenient tool called the Fujitsu Driver Update (FDU) utility. With FDU, you can choose to automatically or manually go to the Fujitsu site to check for new updates for your system. For more information about the FDU utility, refer to “Fujitsu Driver Update Utility” on page 43. - Page 45 An infrared receiver built into the Tablet PC allows you to communicate with mouse port a Fujitsu wireless infrared keyboard or mouse. The keyboard infrared port works optimally when it is placed between 10 to 30 cm (approximately 4 in.
- Page 46 Connector/Peripheral Tablet PC Icon Purpose Battery Release Latch The battery release latch allows you to remove the battery from your system for storage or replacement. Wireless LAN/Bluetooth The wireless LAN/Bluetooth switch allows you to turn power to the optional On-Off Switch wireless LAN or Bluetooth devices on and off.
-
Page 47: Using The Stylistic St6000 Series Tablet Pc
Chapter 7 Using the Stylistic ST6000 Series Tablet PC This chapter covers the fundamental concepts, basic system operation and use, and system functions of the Stylistic ST6000 Series Tablet PC. You should familiarize yourself with this information before you attempt to operate the system. RIOR TO USING YOUR SYSTEM BE SURE TO FULLY CHARGE THE BATTERY IF YOU PLAN TO RUN ON BATTERY POWER... - Page 48 • Idle state: Some system functions are regulated or turned off to conserve power. The display screen may be turned off. The system returns to the On state when pen activity or other input is detected. • Sleep mode (S3): System operation is suspended. Most system functions are turned off to conserve power.
- Page 49 Icon Appearance Current State To Change State Power icon † To enter the On state, resume system operation by pressing the Sleep blinking Suspend/Resume button. To enter the Off state, resume system by pressing the Suspend/Resume button, then shut down your system. Power icon not Off State, or, To enter the On state, start your system, or resume system operation by...
-
Page 50: Proper Tablet Pc Orientations
Proper Tablet PC Orientations Your computer can be used in in two Non-functional Non-functional different orientations. orientation orientation Portrait Orientation: Hold the system with the fingerprint sensor positioned vertically on the left. Landscape Orientation: Hold the system with the fingerprint sensor positioned horizontally on the top. -
Page 51: Booting The First Time
When you turn on your tablet for the first time, it will display a Fujitsu logo on the screen. If you do nothing the system will load the operating system, and then the Windows Welcome will begin. - Page 52 You will be prompted to enter your User Name and Password and you will be given a chance to select an icon for your account. The next screen asks for a Computer Name and allows you to choose a desktop background. You will next see a "Help protect Windows automatically"...
- Page 53 Registering Your Stylistic Tablet PC with Fujitsu You can register your tablet by going to our website at: us.fujitsu.com/computers You will need to be set up with an Internet Service Provider (ISP) to register online. 52 - Starting the Tablet PC...
-
Page 54: Shutting Down
Shutting Down Follow these steps to shut down/turn off your system: If system operation has been suspended, resume system operation. See “Resuming System Operation” later in this chapter for details. Save your work and close all running programs. Choose Shut Down from the Windows Start menu. Carry out the Shut Down command. - Page 55 F YOU ARE REPLACING THE BATTERY WAIT UNTIL SYSTEM OPERATION IS SUSPENDED AND THE POWER ICON IS FLASHING BEFORE YOU REMOVE THE BATTERY AILURE TO DO SO COULD RESULT IN LOSS OF . (N BIOS YOUR UNSAVED DATA OTE THAT IF THE ESUME FUNCTION IS ENABLED IN THE SETUP...
- Page 56 Contact a network administrator or help desk, or call Fujitsu Service and Support at 1-800-8Fujitsu (1-800-838-5487) for details on your network log-off parameters.
-
Page 57: Resuming Operation
Resuming Operation To resume operation from either Sleep or Hibernate modes, press the Suspend/Resume button. • From Sleep mode Status lights indicate that the system state is changing. It may take up to a minute before the system returns to the On state and system operation resumes. Note that the display turns on shortly before the pen becomes active due to the power-up sequences observed by the system. -
Page 58: Productivity Applications And Utilities
Office Professional 2007! All you need to do is purchase the appropriate Office 2007 license kit which allows you to "un-lock" the full version of Office that you want. ® Fujitsu offers a Media License Kit for Microsoft Office Small Business 2007. Simply enter your product key and you’re ready to go. -
Page 59: Using The Shock Sensor Utility
Using the Shock Sensor Utility Shock Sensor Utility is designed to decrease the risk of damage to the computer's hard disk drive (HDD) in the event of excessive impact or vibration. The Shock Sensor Utility also improves the security of the computer by automatically locking the computer with a password when it is carried. - Page 60 Ignore keyboard action When the keyboard is used, sensitivity is temporarily lowered. Confirm calibration when user logs on Select [Confirm calibration when user logs on] if you want to recognize the current orientation as horizontal at logon. Perform calibration automatically when user logs on Select [Perform calibration automatically when user logs on] if the system is normally used on a horizontal surface.
-
Page 61: Display Profiles
• Close. Use [Esc] key. Display Profiles The Fujitsu Tablet Controls utility allows you to set different display configurations when the system is undocked, docked in portrait mode, and docked in landscape mode. When the tablet transitions between these three configurations, the selected configuration will automatically be applied. - Page 62 Brightness slider to change the brightness. • Click the Fujitsu Menu icon in the system tray at the bottom right of the screen. (When the cursor is on top of the icon, a message stating “Fujitsu Menu...” is displayed.) Select Tablet and Pen Settings and select the Display tab.
-
Page 63: Using The Pen
Using the Pen You can use the Stylistic ST6000 Eraser switches Barrel switch Series pen to generate and create electronic “ink”, to select items, and to navigate through programs on the Tablet PC. Programs that support handwriting recognition also allow you to write characters directly on the screen with the pen. - Page 64 The rear toggle, eraser, and tip click pressures can be changed by clicking [Start] -> Control Panel, and double-clicking Fujitsu Pen Settings (XP) or Pen and Input Devices (Vista) icon. Note that the rear toggle switch and the eraser switch are both affected by the same settings; they cannot be changed individually.
-
Page 65: Calibrating The Pen
• To move, or “drag”, an object on the screen, place the pen tip directly over the object, then as you hold the pen tip against the screen, move the pen. Calibrating the Pen In order to ensure accurate tracking between the pen and cursor, you must run the Touch Screen Calibration Utility before you use the active digitizer for the first time, or after you change the display resolution. -
Page 66: Replacing The Pen Tip
Insert the flat end of the tip into the barrel and push it in firmly until it is seated. If you need more tips, they can be ordered from the Fujitsu website at: us.fujitsu.com/computers. 65 - Using the Pen... -
Page 67: User-Installable Features
User-Installable Features Lithium ion Battery Charging the Battery The Stylistic ST6000 Series battery can be charged while it is installed in the Tablet PC. To charge the battery: Connect a DC power source, such as the AC adapter, to the DC input connector on the Tablet PC. The DC Input icon appears in the Status display. - Page 68 To remove the battery from the Tablet PC: Choose one of the following: Release latch • If a charged battery is available, you can suspend system operation. A built-in “bridge” battery will maintain the system in Sleep mode for about 5 minutes while the battery is removed;...
-
Page 69: Operation Of The Bridge Battery
Tips for Conserving Battery Power You can extend the charge life of your battery by conserving battery power. (Your results may vary depending on your application and how the system is configured.) Here are some suggestions to help you conserve battery power: •... -
Page 70: Memory Stick/Sd Card Slot
• The bridge battery charges when the AC Adapter is connected and the system is in On or Off states or Sleep mode. It charges from the battery only when the system is in the On state. Memory Stick/SD Card Slot Your Tablet PC supports Memory Stick and SD flash memory cards on which you can store and transfer data to and from a variety of digital devices. - Page 71 See your Memory Stick or SD Card manual for instructions on the insertion of your card. Some cards may require that your system is off while inserting them. Make sure there is no card currently in the slot. If there is, see Removing a Memory SD Card Stick/SD Card.
-
Page 72: Pc Card Slot
PC Card Slot The Stylistic ST6000 Series Tablet PC Card slot allows you to insert a Type I or Type II PCMCIA Card. Inserting a PC Card To insert a PC card, position the side with the arrow facing up (i.e., when looking at the tablet’s display side, the arrow on the card should be visible.) Slide the card into the PC PC Card... -
Page 73: Removing And Installing Memory
Removing and Installing Memory There are two DIMM slots in your Tablet PC. 256 MB, 512 MB, 1 GB, and 2 GB modules are available, so you can install a combination of up to 4 GB in the system • O NOT REMOVE ANY SCREWS FROM THE MEMORY UPGRADE MODULE COMPARTMENT EXCEPT THE ONES SPECIFICALLY SHOWN IN THE DIRECTIONS FOR INSTALLING AND REMOVING THE MEMORY UPGRADE MODULE •... - Page 74 Alignment key Memory module cover Alignment key Figure 16. Accessing the Memory Slot Figure 17. Installing a DIMM Module Removing a Memory Module Finger latch To remove a DIMM module: Ensure that the Tablet PC is off. To do so, carry out the Shut Down command in the Start menu.
-
Page 75: Chapter 2 Care And Maintenance
AILURE TO DO SO COULD RESULT IN A SHORT CIRCUIT SMOKE 1-800-8 (1-800-838-5487), OR FIRE ONTACT UJITSU ERVICE AND UPPORT BY PHONE AT FUJITSU EMAIL AT FUJITSU FUJITSU OR THROUGH THE WEBSITE AT HTTP COMPUTERS FUJITSU SUPPORT TO LEARN HOW TO GET THE SYSTEM REPAIRED •... -
Page 76: Precautions
Precautions Please note the following information regarding proper treatment of your Tablet PC: • Your Tablet PC is a durable but sensitive electronic device. Treat it with respect and care. • Make a habit of transporting the system in a suitable carrying case. •... - Page 77 To obtain additional screen protectors, use Fujitsu part number FPCSP08AP (6-pack) when ordering. Additional information about installation is included with the screen protectors. URING NORMAL USE OF THE ABLET SMALL PARTICLES FROM THE ENVIRONMENT CAN BECOME EMBEDDED IN THE PEN TIP AND SCRATCH THE SCREEN O PREVENT SCRATCHING THE SCREEN PC.
-
Page 78: Storing The Tablet Pc
Protective cover Screen protector Figure 19. Installing the screen protector Figure 20. Removing the protective cover Clean any residue left behind by the protective coating from the exposed surface of the screen protector by wiping gently with a soft cotton cloth dampened with isopropyl alcohol. Wipe the screen protector with a soft dry cloth to remove any low-tack adhesive;... -
Page 79: Avoiding Overheating
Avoiding Overheating O NOT EXPOSE YOUR ABLET TO DIRECT SUNLIGHT FOR EXTENDED PERIODS OF TIME TEMPERATURES COULD DAMAGE YOUR TABLET The Tablet PC monitors its internal temperature. As the internal temperature approaches the tolerable limits of heat-sensitive components, system functions are automatically limited or turned off to prevent damage. -
Page 80: Troubleshooting
(the Power icon is displayed continuously on the Status display), and check the following: • The system brightness may be set too low, causing the screen to appear too dark. To change system brightness, press the Fn button twice to open the Fujitsu menu. Brightness can be adjusted from the menu. - Page 81 If the system responds to a keyboard but not to a pen, contact your local help desk or reseller, or call Fujitsu Service and Support at 1-800-8Fujitsu (1-800-838-5487) for further assistance.
-
Page 82: 81 - Restoring The Included Software Tbd - New Procedure
PARTY S WEBSITE To re-install drivers and/or applications: Boot up the system and insert the DAR CD after Windows has started. A Fujitsu Installer screen is displayed after the CD is inserted. After reading the License Agreement, click [I agree]. - Page 83 PLAYER YOU WILL NEED TO ATTACH AN EXTERNAL PLAYER OR MORE INFORMATION ON AVAILABLE EXTERNAL DEVICES VISIT OUR WEBSITE AT FUJITSU COMPUTERS • HIS DISC CAN ONLY BE USED WITH THE SYSTEM WITH WHICH IT WAS PURCHASED 82 - Restoring the Included Software TBD - NEW PROCEDURE?
-
Page 84: Boot Priority Change
Select Boot Menu, then select “CD/DVD Drive”. Using BIOS Setup Utility Start your system and press the [Ctl-Alt-Del] button when the Fujitsu logo appears. You will enter the BIOS Setup Utility. Using the arrow keys, go to the Boot menu. -
Page 85: Automatically Downloading Driver Updates
Your system has a convenient tool called the Fujitsu Driver Update (FDU) utility. With FDU, you can choose to automatically or manually go to the Fujitsu site to check for new updates for your system. The FDU icon should appear in the system tray at the bottom right of your screen (roll the cursor over the icons to find the correct one). - Page 86 About Fujitsu Driver Update Displays the FDU version number and copyright information Fujitsu Driver Update Readme Displays the FDU readme. 85 - Restoring the Included Software TBD - NEW PROCEDURE?
-
Page 87: Chapter 3 System Specifications
Chapter 3 System Specifications Specifications This section provides the hardware and environmental specifications for your Fujitsu Stylistic Tablet PC. Specifications of particular configurations will vary. Configuration Label The configuration label located on the back of your Tablet PC contains specific information regarding the options you’ve chosen for your Tablet PC. -
Page 88: Microprocessor
Microprocessor Intel® Core™ 2 Duo Ultra Low Voltage processors (Refer to the system label to determine the speed of your processor). Chipset • Intel GS45 • I/O Controller Hub 9 Mobile (ICH9M-SFF-Enhanced) Memory System Memory • DDR2-667 MHz SDRAM dual-channel memory module. •... -
Page 89: Audio
Video RAM Intel® GS45 video graphics controller, with the following amounts of shared video memory using Dynamic Video Memory Technology (DVMT), as determined by the amount of system memory: Operating System System Memory Maximum Graphics Memory Windows Vista 1 GB 271 MB 2 GB 783 MB... -
Page 90: Mass Storage Device Options
Mass Storage Device Options Hard Drive Options • Serial ATA, 150 Mbps data buffer, 5400 rpm, 2.5”, 9.5 mm Serial ATA, 150 Mbps data buffer, 7200 rpm, 2.5”, 9.5 mm • • MLC Solid State Drive, 64 GB, 2.5” • Shock-mounted •... -
Page 91: Device Ports
Device Ports On the Stylistic Tablet PC: • PC Card slot for one Type I or Type II card: PCMCIA Standard 2.1 with CardBus support • Memory Stick/SD Card slot • One 15-pin D-SUB connector for VGA external monitor (see Display specifications) •... -
Page 92: Power
Operating: 20% to 85%, relative, non-condensing. Non-operating: 8% to 85%, relative, non-condensing Altitude Operating: 10,000 feet (3,048 m) maximum Popular Accessories For ordering or additional information on Fujitsu accessories please visit our Web site at www.shopfujitsu.com or call 1-800-FUJITSU. 91 - Specifications... -
Page 93: Included Software
• Google Desktop • Google Tool Bar • Google Picasa • OmniPass Fingerprint application • Fujitsu Driver Update utility • Microsoft Office Ready 2007 (60-day free trial) with Activation Assistant • Microsoft Office OneNote 2007 (on select models) • Evernote 2.0 Plus... - Page 94 Acrobat Reader The Acrobat Reader allows you to view, navigate, and print PDF files from across all of the major computing platforms. ArcSoft Webcam Companion 2 WebCam Companion 2 offers a variety of webcam-optimized functions such as automatically recording movement detected by the cam, launching video chat sessions, capturing still and video images, and editing photos.
- Page 95 Internet experience easier and more pleasant. Fujitsu Driver Update Utility The Fujitsu Driver Update (FDU) utility is pre-installed on your system. With FDU, you can choose to automatically or manually go to the Fujitsu site to check for new updates for your system. See “Automatically Downloading Driver Updates”...
-
Page 96: Regulatory Information
Regulatory Information Notice Changes or modifications not expressly approved by Fujitsu could void this user’s authority to operate the equipment. FCC NOTICES Notice to Users of Radios and Television This equipment has been tested and found to comply with the limit for class B digital devices, pursuant to parts 15 of the FCC Rules. - Page 97 If trouble is experienced with this equipment, for repair or warranty information, please refer to the manual or contact Fujitsu Computer Systems Corporation, Customer Service. If the equipment is causing harm to the telephone network, the telephone company may request that you disconnect the equipment until the problem is resolved.
-
Page 98: Doc (Industry Canada) Notices
The equipment cannot be used on public coin service provided by the telephone company. Connection to party line service is subject to state tariffs. (Contact the state public utility commission, public service commission or corporation commission for information). If your home has specially wired alarm equipment connected to the telephone line, ensure the installation of this computer does not disable your alarm equipment. - Page 99 Repairs to telecommunication equipment should be made by a Canadian authorized maintenance facility. Any repairs or alterations not expressly approved by Fujitsu or any equipment failures may give the telecommunication company cause to request the user to disconnect the equipment from the telephone line.
- Page 100 Les réparations de l’équipement de télécommunications doivent être effectuées par un service de maintenance agréé au Canada. Toute réparation ou modification, qui n’est pas expressément approuvée par Fujitsu, ou toute défaillance de l’équipement peut entraîner la compagnie de télécommunications à exiger que l’utilisateur déconnecte l’équipement de la ligne téléphonique.
-
Page 101: Appendix A: Wlan User's Guide
Appendix A: WLAN User’s Guide FCC Regulatory Information Please note the following regulatory information related to the optional wireless LAN device. Regulatory Notes and Statements Wireless LAN, Health and Authorization for use Radio frequency electromagnetic energy is emitted from Wireless LAN devices. The energy levels of these emissions, however, are far much less than the electromagnetic energy emissions from wireless devices such as mobile phones. - Page 102 Regulatory Information/Disclaimers Installation and use of this Wireless LAN device must be in strict accordance with the instructions included in the user documentation provided with the product. Any changes or modifications made to this device that are not expressly approved by the manufacturer may void the user’s authority to operate the equipment.
- Page 103 003 B / NMB 003 B. Operation is subject to the following two conditions: (1) this device may not cause harmful interference, and (2) this device must accept any interference received, including interference that may cause undesirable operation. Modifications not expressly authorized by Fujitsu Computer Systems Corp. may invalidate the user's right to operate this equipment.
-
Page 104: Before Using The Optional Wireless Lan
Before Using the Optional Wireless LAN This manual describes the procedures required to properly set up and configure the optional integrated Wireless LAN Mini-PCI device (referred to as "WLAN device" in the rest of the manual). Before using the WLAN device, read this manual carefully to ensure it's correct operation. Keep this manual in a safe place for future reference. -
Page 105: Wireless Lan Modes Using This Device
Wireless LAN Modes Using this Device Ad Hoc Mode "Ad Hoc Mode" refers to a wireless network architecture where wireless network connectivity between multiple computers is established without a central wireless network device, typically known as Access Point(s). Connectivity is accomplished using only client devices in a peer-to-peer fashion. That is why Ad Hoc networks are also known as peer-to-peer networks. - Page 106 Access Point (Infrastructure) Mode Infrastructure mode refers to a wireless network architecture in which devices communicate with wireless or wired network devices by communicating through an Access Point. In infrastructure mode, wireless devices can communicate with each other or with a wired network. Corporate wireless networks operate in infrastructure mode because they require access to the WLAN in order to access services, devices, and computers (e.g., file servers, printers, databases).
-
Page 107: Deactivating/Disconnecting The Wlan Device
How to Handle This Device The WLAN device is an optional device that may come pre-installed in your mobile computer. Under normal circumstances, it should not be necessary for you to remove or re-install it. The operating system that your mobile computer comes with has been pre-configured to support the WLAN device. •... -
Page 108: Deactivation Using The Wireless On/Off Switch
Deactivation Using the Wireless On/Off Switch The WLAN device can be deactivated quickly and efficiently by toggling the Wireless LAN/Bluetooth On/Off Switch to the Off position. The switch has no effect on non-Wireless LAN models. WLAN/Bluetooth Switch Figure 23. Wireless LAN/Bluetooth On/Off Switch Location Disconnection Using the Icon in the Taskbar Note that disconnecting via the icon in the system tray does not turn off the radio;... -
Page 109: Configuring The Wireless Lan
Configuring the Wireless LAN The optional WLAN device can be configured to establish wireless network connectivity using the software that is built into Windows Vista. Support for most industry standard security solutions is contained in this software. Pre-defined parameters will be required for this procedure. Please consult with your network administrator for these parameters: Configuring the WLAN Using Windows Vista Click the Start button, then select Control Panel. -
Page 110: Configuring The Wlan Using Windows Xp
Configuring the WLAN Using Windows XP Procedure Click the Start button, then select Control Panel. If the Control Panel is not in Classic View, select Classic View from the left panel. Double-click the Network Connections icon. Select “New Connection” wizard. Click the [Next] button. -
Page 111: Troubleshooting The Wlan
Troubleshooting the WLAN Troubleshooting Causes and countermeasures for troubles you may encounter while using your wireless LAN are described in the following table. If you are unfamiliar with the steps required, consult your System Administrator or go to [Start] -> Help and Support -> Networking and the Web Problem Possible Cause Possible Solution... - Page 112 Problem Possible Cause Possible Solution Unavailable The computer to Check if the computer to be connected is turned ON. network be connected is connection turned off (continued) RF interference The use of identical or overlapping RF channels can cause interference from Access with the operation of the WLAN device.
-
Page 113: Wlan Specifications
WLAN Specifications Specifications Item Specification Type of network The Intel WiFi Link 5300 (533AN_HMW) and Atheros AR9280AL1E (AR5BHB92) Half Mini-Card Wireless network cardconform to IEEE 802.11a, 802.11b/g, and 802.11n (draft-compliant), Wi-Fi based*. Transfer rate (Automatic switching) 54 Mbps maximum data rate (IEEE802.11n to be determined) •... - Page 114 * “Wi-Fi based” indicates that the interconnectivity test of the organization which guarantees the interconnectivity of wireless LAN (Wi-Fi Alliance) has been passed. ** The communication ranges shown above will increase or decrease depending on factors such as number of walls, reflective material, or interference from external RF sources.
-
Page 115: Using The Bluetooth Device
Using the Bluetooth Device The Integrated Bluetooth module (EYTF3CSFT) is an optional device available for Fujitsu mobile computers. What is Bluetooth? Bluetooth technology is designed as a short-range wireless link between mobile devices, such as laptop computers, phones, printers, and cameras. Bluetooth technology is used to create Personal Area Networks (PANs) between devices in short-range of each other. - Page 116 Users are not authorized to modify this product. Any modifications invalidate the warranty. This equipment may not be modified, altered, or changed in any way without signed written permission from Fujitsu. Unauthorized modification will void the equipment authorization from the FCC and Industry Canada and the warranty.
-
Page 117: Appendix B: Fingerprint Sensor Device
Appendix B: Fingerprint Sensor Device Introducing the Fingerprint Sensor Device Your system has a fingerprint sensor device at the top left of the display screen (when holding the display in pportrait mode). Fingerprint Sensor Device Figure 24. Fingerprint sensor With a fingerprint sensor, you can avoid having to enter a username and password every time you want to: •... -
Page 118: Getting Started
After you have “enrolled” - or registered - your fingerprint, you can simply swipe your fingertip over the sensor for the system recognize you. The fingerprint sensor uses Softex OmniPass which provides password management capabilities to Microsoft Windows operating systems. OmniPass enables you to use a "master password" for all Windows, applications, and on-line passwords. - Page 119 System Requirements The OmniPass application requires space on your hard drive; it also requires specific Operating Systems (OS’s). The minimum requirements are as follows: • Windows XP Professional or WIndows Vista operating system • At least 35 MB available hard disk space Installing the OmniPass Application If OmniPass is already installed on your system, go to “User Enrollment”...
- Page 120 Verifying Information about OmniPass After you have completed installing OmniPass and restarted your system, you may wish to check the version of OmniPass on your system. To check the version information of OmniPass: From the Windows Desktop, double-click the key-shaped OmniPass icon in the taskbar (usually located in the lower right corner of the screen), Click the Start button, select Settings, and click Control Panel (if you are using Windows XP you will see the Control Panel directly in the Start menu;...
-
Page 121: User Enrollment
Follow the directions to uninstall the OmniPass application. Once OmniPass has finished uninstalling, reboot your system when prompted. User Enrollment Before you can use any OmniPass features you must first enroll a user into OmniPass. Master Password Concept Computer resources are often protected with passwords. Whether you are logging into your computer, accessing your email, e-banking, paying bills online, or accessing network resources, you often have to supply credentials to gain access. - Page 122 HE ENROLLMENT PROCEDURE ASSUMES YOU HAVE NO HARDWARE AUTHENTICATION DEVICES OR ALTERNATE STORAGE LOCATIONS THAT YOU WISH TO INTEGRATE WITH F YOU DESIRE SUCH FUNCTIONALITY CONSULT THE APPROPRIATE SECTIONS OF THIS DOCUMENT Basic Enrollment The Enrollment Wizard will guide you through the process of enrolling a user. Unless you specified otherwise, after OmniPass installation the Enrollment Wizard will launch on Windows login.
- Page 123 Enrolling a Fingerprint Enrolling a fingerprint will increase the security of your system and streamline the authentication procedure. You enroll fingerprints in the OmniPass Control Center. With an OmniPass user logged in, double-click the system tray OmniPass icon. Select the User Settings tab and click Enrollment under the User Settings area.
-
Page 124: Using Omnipass
F YOU ENABLE ON YOUR SYSTEM YOU MUST SET THE UPERVISOR ASSWORD AND ASSWORD “S ” OOT SETTINGS ETTING THE UPERVISOR ASSWORD AND ASSWORD ON ETTINGS ON PAGE FOR ADDITIONAL INFORMATION Using OmniPass You are now ready to begin using OmniPass. Used regularly, OmniPass will streamline your authentications. - Page 125 When prompted to authenticate, you must supply the appropriate credentials: an enrolled finger for the fingerprint capture window or your master password for the master password prompt (the key icon). Remembering a Password OmniPass can remember any application, GUI, or password protected resource that has a password prompt.
- Page 126 Less secure is the option to Automatically enter this password protected site when it is activated. Do not prompt for authentication. Check the upper box to get this setting, and each time you navigate to this site OmniPass will log you into the site without prompting you to authenticate HIS SETTING IS MORE CONVENIENT IN THAT WHENEVER YOU GO TO A SITE REMEMBERED WITH THIS SETTING YOU WILL BYPASS ANY AUTHENTICATION PROCEDURE AND GAIN INSTANT ACCESS TO THE...
- Page 127 Logging into Windows with a Fingerprint Device When logging into Windows with a fingerprint device, the fingerprint capture window will now appear next to the Windows Login screen. Place your enrolled fingertip on the sensor to authenticate. You will be simultaneously logged into Windows and OmniPass. The capture window will also appear if you have used Ctrl-Alt-Del to lock a system, and the fingerprint device can be used to log back in as stated above.
- Page 128 The two check boxes in Manage Passwords govern whether OmniPass prompts you to authenticate or directly logs you into the remembered site. OmniPass will overwrite an old set of credentials for a website if you attempt to use Remember Password on an already remembered site. The exception to the above rule is when resetting the Windows password.
-
Page 129: Configuring Omnipass
To set the default identity, highlight the identity you want as default and click [Set as Default]; click [Apply] to ensure the settings are saved. If you log in to OmniPass with a fingerprint device, you will automatically be logged in to the default identity for that OmniPass user. You can choose the identity with which you are logging in if you login using "master password". - Page 130 Using OmniPass Control Center, you can export and import users in and out of OmniPass. The export process backs up all remembered sites, credentials, and enrolled fingerprints for an OmniPass user. All OmniPass data for a user is backed up to a single encrypted database file. During the import process, the Windows login of the exported user is required.
-
Page 131: Omnipass Control Center
The credentials that will allow a user profile to be imported are the Windows login credentials of the exported user. They are the credentials that had to be submitted when the user profile was exported. You will need User Name, Password, and Domain. If you don’t remember the value for Domain, in a PC or SOHO environment Domain should be your computer name. - Page 132 • Click the Start button; select the Programs group; select the Softex program group; and click the OmniPass Control Center selection. • Open the Windows Control Panel (accessible via Start button --> Settings --> Control Panel) and double-click the Softex OmniPass icon. User Management The User Management tab has two major interfaces: Add/Remove User and Import/Export User.
- Page 133 The Enrollment interface allows you to enroll fingerprints. For the procedure to enroll and authentication device refer to Chapter 2.3. To enroll additional fingerprints, click Enroll Authentication Device, and authenticate with OmniPass. Select the fingerprint recognition device in the Select Authentication Device screen (it should already be marked by a green check if you have a finger enrolled) and click Next.
-
Page 134: Troubleshooting
Troubleshooting You cannot use OmniPass to create Windows users. You must first create the Windows user, and you will need administrative privileges to do that. Once the Windows user is created, you can add that user to OmniPass using the same username and password Cannot add Windows users to OmniPass If you experience difficulties adding a Windows user to OmniPass, you may need to adjust your local security settings. - Page 135 If you are having difficulties due to the first reason, you will need to update OmniPass with your changed Windows account password. Click Update Password and you will be prompted with a dialog to reconfirm your password. Enter the new password to your Windows user account and click OK. If the error persists, then it is unlikely the problem is due to your Windows user account password changing.
-
Page 136: Index
BIOS display mode button application buttons, for EMail Bluetooth enter button Where to Find Information escape button BOOT Priority Change Fujitsu Menu Utility bridge battery function button built-in microphone Internet orientation button security button calibrating the pen tertiary functions charge/DC input icon... - Page 137 OmniPass microphone jack user enrollment Microsoft Works using OmniPass modem fingerprint sensor device connection Fujitsu Contact Information Fujitsu Driver Update utility Fujitsu Shopping Online navigation buttons hard disk drive access icon Off state headphone overheating, avoiding headphone jack...
- Page 138 resuming system operation RJ-45 page up/page down PC Card eject button PC card slot SD Card PC Cards removing removing SD Card slot SD Card/Memory Stick Slot installing a pen tether Secure Digital Card not responding removing replacing the tip Security using Security Application Panel...
- Page 139 charge/DC input icon hard disk drive access icon Warranty power icon, blinking Windows Vista power icon, system states indicated by configuring the WLAN storing the system unit Windows XP Stylistic ST5000 configuring the Wireless LAN features Windows XP Tablet PC Edition storing Wireless LAN suspend mode, determining...
Need help?
Do you have a question about the Stylistic ST6010 and is the answer not in the manual?
Questions and answers