Eloma JOKER Manual
Hide thumbs
Also See for JOKER:
- Original operating instructions (80 pages) ,
- Translation of the original operating instructions (308 pages)

Related Manuals for Eloma JOKER


Summary of Contents for Eloma JOKER
- Page 1 JOKER with ST control Sizes: 6-23, 6-11, 6-43 ENERGY TYPE: ELECTRICS Translation of the original operating instructions Subject to technical changes. Read carefully before use. Keep safe for future use.
- Page 2 82216 Maisach Germany T. +49 (0) 8141 395-0 F. +49 (0) 8141 395-130 You can find application tips and recipes on our website www.eloma.com. You are also welcome to contact our application consulting service: T. +49 (0) 8141 395-150 E. application@eloma.com You can contact us almost 24 hours a day, 7 days a week, 365 days a year: T.
-
Page 3: Table Of Contents
Table of contents os: 12 /953-Eloma/Standard texts Document type independent/IHZ @ 10\mod_1389601392776_258.doc @ 113658 @ @ 1 Table of contents General information Intended use of the devices Warranty and limitation of liability How to use this document Safety Requirements for the operating personnel... - Page 4 Table of contents Ongoing Operation - Cooking/Baking Manual cooking in the hot-air unit Manual baking without / with humidification module Manual cooking screen with fresh steam system module Programme list Programme list options Changing and starting the programmes Special programmes Special programmes screen (only for Live Steam System module) Cleaning and care 10.1...
-
Page 5: General Information
General information Intended use of the devices Eloma cooking and baking appliances are exclusively intended for commercial purposes and may only be used for the thermal preparation of food products, using accessories (grills, containers, trays, slide-in inserts, etc.) which are suitable for the variously sized appliances. -
Page 6: How To Use This Document
• The original operating instructions and their translation are always included in the scope of delivery of the appliances and contain information and instructions about how to safely operate, clean and service JOKER, as well as measures for troubleshooting. •... - Page 7 General information 1.3.2 Structure of the warnings, symbols and signs used for the appliances Hazard warnings and warning notices are marked with a pictogram and a signal word. The type and source and the consequences of the hazard are stated and information is provided on how avert the hazard.
- Page 8 General information Symbol Explanation WARNING! “Dangerous electrical voltage!” WARNING! “Hot surface up to 150°C!” WARNING! “Hot cooked product/hot fluids in insert containers!” WARNING! “Do not open the door whilst the autoclean programme is in progress!” MARKING! “Equipotential bonding connection” MARKING! “Connections for hard and soft water”...
- Page 9 General information 1.3.3 Use of figures INFORMATION: Figures are shown as examples and may differ from the appliances delivered.
-
Page 10: Safety
Safety Safety All Eloma devices comply with the relevant safety standards. However, this does not mean that all residual risks, such as those caused by incorrect operation, can be ruled out. Requirements for the operating personnel Operating staff must be familiar with and adhere to the respective valid regional regulations when operating the device. -
Page 11: Safety Notes
Close the operating company's water tap. Have repairs are carried out by an authorised Eloma service partner and/or qualified specialists only. DANGER! Detection of smoke development and fires! ... - Page 12 Safety WARNING! Risk of burns from hot surfaces! Wear protective clothing (e.g. long-sleeved clothing and protective gloves). Lock the hanging rack securely. Do not touch the hanging rack when removing the food products. Do not touch the door glass or housing. ...
- Page 13 Safety CAUTION! Material damage due to improper or non-intended use! Use accessories in the cooking chamber properly in order to prevent damage to the door glass. Make sure that there are no objects in the pivoting range of the cooking chamber door.
- Page 14 Safety 2.2.3 During cleaning WARNING! Risk of burns from hot surfaces! Allow the device to cool down slowly before cleaning. WARNING! Risk of chemical burns due to cleaning lye, detergents and rinse aids! Follow the safety instructions and safety data sheets for the prescribed cleaning additive and rinse aid.
- Page 15 2.2.6 Maintenance WARNING! Risk of fire due to improper maintenance! Make sure that maintenance work is only carried out by an authorised Eloma service partner. Comply with the recommended maintenance intervals and schedules. Comply with the rules of conduct in the event of a fire.
-
Page 16: Appliance Description And Modularity
Appliance description and modularity Description of the Hot air unit (basic appliance) The new JOKER in its basic version as a hot-air unit can also be configured as an oven or combi-steamer in various sizes - GN 2/3, GN 1/1 and BN43. - Page 17 Appliance description and modularity NOTICE! Proper use! The appliance is solely intended for the thermal preparation of food. Foodstuffs containing highly flammable and combustible substances (e.g. alcohol) are excluded. The device can be operated without supervision. The appliance is intended for commercial use.
-
Page 18: Cooking Chamber Module: Size, Position, Operation And Dimensions
Appliance description and modularity Cooking chamber module: Size, position, operation and dimensions JOKER 6-23 JOKER 6-43 JOKER 6-11 Cooking chamber interior dimensions Width 440 mm [17 3/8”] 440 mm [17 3/8”] 440 mm [17 3/8”] Depth 368 mm [14 1/2”] 498 mm [19 5/8”]... -
Page 19: Operation Module
Working simply and systematically is the code word here. Using the functions of the MT module you can not only bake and cook, but also plan and standardise processes. With the MT technology, you can keep not only JOKER, but your daily work as well, completely under control. -
Page 20: Water Module
Appliance description and modularity Water module Directional valve Orifice plate Flow measuring device Complete water supply pipe Fig. 1: Hydraulic diagram of the water module (live steam system/humidification depending on the mode selected) - Page 21 Good baking is a matter of attitude! Humidification can be adjusted to the millimetre in the cooking chamber of the new JOKER. Manually adding moisture is still possible at any time. For perfect gloss and best uniformity. Fresh water reaches the humidification pipe according to the set humidification quantity and is evaporated at the appropriate cooking chamber temperature by the heated recirculating air that is flowed in by the fan.
-
Page 22: Module Cleaning
Appliance description and modularity Module cleaning 3.5.1 autoclean® PRO Directional valve Orifice plate Injection pipe Pressure switch Pump Drainage pump Fig. 2: Hydraulic diagram for the autoclean® PRO cleaning module Both liquid cleaners can be used for this fully automatic circulation system with extremely low consumption (water, detergent, energy). - Page 23 Appliance description and modularity 3.5.2 Hose with spray head Directional valve Check valve Directional valve Fig. 3: Hydraulic diagram for the hose-spray-nozzle cleaning module Simple and effective for slight impurities (e.g. crumbs or flour after baking): use the handy hose spray nozzle with automatic return to quickly rinse out the cooking chamber.
- Page 24 Appliance description and modularity 1. Directional valve 2. Orifice plate 3. Injection pipe 4. Check valve 5 Directional valve 6 Pressure switch 7 Pump 8 Drainage pump 9 Orifice plate 10 Orifice plate 11 Flow measuring device Fig. 4: Hydraulic diagram Waste water without autoclean® PRO...
-
Page 25: Design Module
Appliance description and modularity Design module 3.6.1 Unit back cover The appliance’s rear panel can be customised by the user as a design module by attaching static advertising or a screen to it, in addition to its actual purpose of safely covering and protecting the equipment connections. - Page 26 Appliance description and modularity 3.6.3 Device colour Taking into account a minimum purchase quantity, appliances can be delivered in the colour desired by the customer (appliance housing and door panel).
-
Page 27: Appliance Structure And Functions
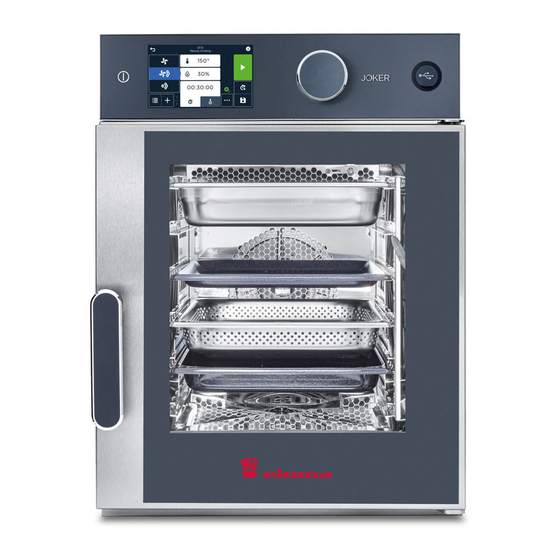
Appliance structure and functions Appliance structure and functions Appliance general structure Fig. 7: Device overview Door handle with quick release Cooking chamber door Intermediate door Inner door Drip tray Cooking chamber Hose spray nozzle (optional) Connection for external KT sensor (optional) Operation module LED cooking chamber lighting Supply air opening... -
Page 28: Operation Module Structure
Appliance structure and functions Operation module structure 4.2.1 Operation module – horizontal INFORMATION: Available for right- or left-hinged doors. Fig. 8: Operation module horizontal elements ON/OFF key – Switch the appliance on or off Touchscreen (appliance display in standby) –... - Page 29 Appliance structure and functions 4.2.2 Operation – Vertical INFORMATION: Available for • left-side operation module and right-hinged door • right-side operation module and left-hinged door ON/OFF key – Switch the appliance on or off Touchscreen (appliance display in standby) –...
-
Page 30: Operating Modes And Functions
Appliance structure and functions Operating modes and functions 4.3.1 Convection mode The food is cooked or roasted by dry hot air. This operating mode is suitable for preparing all foods which are supposed to be crispy and browned. 4.3.2 Operating modes hot air with live steam system module In combi-cooking mode a combination of humidity and temperature is used to create the ideal cooking chamber atmosphere. - Page 31 Appliance structure and functions 4.3.4 Use appliance with drip tray A pipe system with a drip tray is installed in the following device configurations: • Appliances that do not contain the following modules: – Fresh steam system – Steam injection –...
- Page 32 Appliance structure and functions Empty drip tray Fig. 11: Empty drip tray Tilt the drip tray. Remove the pins from the spring clips. Position the drip tray upright. Empty drip tray. – The opening in the pipe system outlet that limits the fill level of the drip tray can be used to empty the drip tray.
-
Page 33: General Notes On Operation And Function
Appliance structure and functions General notes on operation and function 4.4.1 Switching on the device NOTICE! Condensation due to a change in ambient temperature! Make sure that the ambient temperature of the device is above +4°C. Open the operating company's water connection. Press the On/Off key. - Page 34 Appliance structure and functions INFORMATION: • Power outage while the cooking/baking programme is running: In case of a short interruption the programme is continued. During longer interruptions, the screen for unexpected shutdown appears. Further instructions (continue or exit cooking programme) are displayed. •...
- Page 35 Appliance structure and functions Door opener with single step door lock Wait approximately 3 seconds after the programme or cleaning ends. Push the door handle to the left or right. Slightly open the door. Allow steam to escape. ...
- Page 36 Always remove the containers in a horizontal position and, wherever possible, only move them with a cover attached. Size Maximum load JOKER 6-23 20 kg (max. 10 kg per insert) JOKER 6-11 30 kg (max. 15 kg per insert) JOKER 6-43 30 kg (max.
- Page 37 Appliance structure and functions Remove the grill/container. WARNING! Risk of scalding from hot steam! Danger of burns from hot plates and containers! Wear protective clothing (e.g. long-sleeved clothing and protective gloves). Open the cooking chamber door carefully. Allow steam to escape.
- Page 38 Appliance structure and functions Connection socket Hose spray nozzle (optional) Drip tray Fig. 16: Connection socket for external core temperature sensor on the appliance CAUTION! Risk of burns from hot temperature probe! Minor skin burns. Wear protective gloves. CAUTION! Risk of injury from the tip of the temperature probe! Stab wounds to the skin and eyes.
- Page 39 USB uploading/downloading process on the device! Data transfer from appliance to USB stick The following data can be copied from the device to the USB stick. This data can also be analysed, edited and printed using Eloma's ProConnect software: • Cooking programmes •...
-
Page 40: Start Screen
Start screen INFORMATION: The appearance of JOKER’s operation depends on the selected appliance configuration (e.g. hot air, cooking/baking with/without live steam system/humidification). The screen is arranged according to the Operation module position. If the Operation module is on the right or left side of the appliance, the screen will be arranged vertically. -
Page 41: Start Screen
Start screens, horizontal depending on the module water Fig. 18: Start screens, vertically dependent on water module INFORMATION: The JOKER has the following entry options: • Touch screen by touching the input and confirmation fields • Rotary encoder with print function for input and confirmation INFORMATION: ... - Page 42 Notes & Errors (on all screens only in case of errors/malfunctions) Switch to the specific error code by touching it. Tab. 6: Elements of the JOKER ST start screen NOTICE! Touch screen! Touch the desired function field on the touch screen to continue.
-
Page 43: Manual Cooking/Manual Baking
Manual Cooking/Manual Baking Manual Cooking/Manual Baking Manual cooking in the hot-air unit Fig. 19: Screens Manuelles Kochen mit Garzeit (Manual cooking with cooking time) (left) and Kerntemperaturkontrolle (Core temperature control) (right) Symbol Designation/function Cooking chamber temperature Field Display and select the cooking chamber temperature (°C/°F) Kerntemperatur (Core temperature) Field... - Page 44 Manual Cooking/Manual Baking Symbol Designation/function Display field Programmschritt von Schritten (Programme step procedure) − Current programme step is displayed at the top. − Total number of steps is displayed below. Zusatzfunktionen (Additional functions) Field Call up the Zusatzfunktionen (Additional functions) screen Fan speed Field...
- Page 45 Manual Cooking/Manual Baking Function Default value Setting range Temperature 180°C 30°C … 300°C 320°F 86°F … 572°F Active dehumidification control deactivated (default) Level 5 Active dehumidification control activated (levels 1 to 5, if set) Cooking time 00:30 h 00:01h … 23:59h or continuous operation Core temperature 70°C...
- Page 46 Manual Cooking/Manual Baking Working steps Touchscreen Rotary encoder Select the value field in the Manual Touch the value field in the Cooking screen by turning the Manuelles Kochen (Manual rotary encoder and confirm with Cooking) screen for temperature. axial pressure. The temperature input screen appears.
- Page 47 Manual Cooking/Manual Baking 6.1.2 Setting/changing cooking time Fig. 22: Screen Einstellen/Ändern der Garzeit (Set/change cooking time) Working steps Touchscreen Rotary encoder Select the value field for the time Touch the value field for the time in the Manual Cooking screen by in the Manual Cooking screen.
- Page 48 Manual Cooking/Manual Baking Touchscreen Rotary encoder Confirm Select the field ( ) by Confirm your entry with ( ) or turning the rotary encoder and close with ( confirm with axial pressure. Back to the Manual Cooking screen. Tab. 10: Work procedures Set/change cooking time INFORMATION: ...
- Page 49 Manual Cooking/Manual Baking 6.1.3 Setting/changing core temperature Fig. 24: Screen Einstellen/Ändern der Kerntemperatur (Set/Change core temperature) Working steps Touchscreen Rotary encoder Touch the Kerntemperatur (Core temperature) field to switch to the Manuelles Kochen (Manual cooking) screen. The input screen for the core temperature appears. Reduce or increase the Enter/change the temperature temperature in 1°...
- Page 50 Manual Cooking/Manual Baking 6.1.4 Select additional functions Fig. 26: Zusatzfunktionen nicht aktiv/aktiv (Additional functions screen not active/active) - not active (toggle left, display grey)/active (toggle right, display green) Symbol Designation/function Fan speed Field Activate the fan speed (select levels 1 to 5). Fan speed pulsing Field ...
- Page 51 Manual Cooking/Manual Baking Symbol Designation/function Back Field Switch to the last screen display. Tab. 12: Elements on the Additional Functions screen Work procedures Selection of additional function Touchscreen Rotary encoder Zusatzfunktionen (Additional Functions) Touch the ) field on the Manuelles Kochen (Manual cooking) screen.
- Page 52 Manual Cooking/Manual Baking Switching fan speed pulsing on/off Fig. 28: Fan speed pulsing set Set preheating INFORMATION: The preheating temperature is factory set to +10% of the cooking chamber Settings & Service temperature and can only be changed in Fig.
- Page 53 Manual Cooking/Manual Baking Switch the SPS® - Steam Protection System on/off Fig. 31: SPS® additional function set Setting/changing the ADC (Active Dehumidification Control) Fig. 32: ADC additional function with level selection set.
- Page 54 Manual Cooking/Manual Baking 6.1.5 Step overview - single- and multi-step programmes Touching the ( ) icon displays the Step overview screen. Fig. 33: Step overview with one- / three-step programmes Fig. 34: Manual cooking screen with three-step programme (display of step 2) Symbol Designation/function Start...
- Page 55 Manual Cooking/Manual Baking Symbol Designation/function Convection Setting value of the cooking step (e.g. temperature) Cooking time of the cooking step Tab. 14: Elements on the Step overview screen Work procedures Adding cooking step INFORMATION: • A maximum of 9 cooking steps can be defined for a programme. •...
- Page 56 Manual Cooking/Manual Baking Work procedures deleting cooking step Select the cooking step to be deleted in the Step overview screen. Delete Use the ) cooking step field to delete the step. The selected cooking step is deleted. The number of cooking steps is decreased by value 1. 6.1.6 Setting/changing start time Fig.
- Page 57 Manual Cooking/Manual Baking Working steps Touchscreen Rotary encoder Start-/end time Touch the ) field on the Manual cooking screen. Start selection screen appears. The Hours value field is Enter/edit the Hours value field in highlighted in light grey on the the 00:23 h to 23:00 h hour value screen;...
- Page 58 Manual Cooking/Manual Baking Fig. 36: Screen display Start-/Endzeit (Start/end time) after programme start 6.1.7 Saving programmes INFORMATION: Requirements: • The Gareinstellungen für Manuelles Kochen (Manual cooking settings) screen is displayed. • The settings for one or several cooking steps are defined. •...
- Page 59 Manual Cooking/Manual Baking Work procedures Saving new programme Touchscreen Rotary encoder Save Select the ) field. – Programme number entry screen appears. – The next free programme number is displayed. Accept programme number or Accept the programme number or change it by turning the rotary change it using the numeric encoder.
- Page 60 Manual Cooking/Manual Baking Fig. 39: Screens for work procedures Save programme/save programme as Touchscreen Rotary encoder Call up existing programme number. The Manual Cooking screen with the previous programme number appears. Save Select the field ( Programme Number Selection screen appears. Save A Save as Touch the...
-
Page 61: Manual Baking With/Without Module Humidification
Manual Cooking/Manual Baking Manual baking with/without module humidification Fig. 40: Screens Manual baking without humidification via baking time (left), via core temperature control (right) Fig. 41: Screens Manuelles Backen mit Beschwadung (Manual baking with humidification) via baking time (left), via core temperature control (right) Symbol Designation/function Baking without humidification... - Page 62 Manual Cooking/Manual Baking Symbol Designation/function Start programme Field Starts the programme. Stop programme Field End programme. Rest period Field Selecting a rest period Start Field Sets the start time (h:min). Save programme Field Saving programme. Programmschritt hinzufügen (Add programme Field step)
- Page 63 Manual Cooking/Manual Baking Function Default value Setting range Temperature 180°C 30°C … 300°C 356°F 86°F … 572°F Core temperature 70°C 20°C … 100°C 158°F 68°F … 212°F Active dehumidification control deactivated (default) Level 5 Active dehumidification control activated (levels 1 to 5, if set) Cooking time 00:30 h 00:00h ...
- Page 64 Manual Cooking/Manual Baking 6.2.1 Setting/changing temperature Fig. 42: Screen Einstellen/Ändern der Temperatur (Set/change temperature) Working steps Touchscreen Rotary encoder Select the value field in the Manual Touch the value field for the baking screen by turning the temperature in the Manual Baking rotary encoder and confirm with screen.
- Page 65 Manual Cooking/Manual Baking Fig. 43: Note “Temperature entry outside the setting range” 6.2.2 Setting/changing baking time Fig. 44: Set/change baking time screen Working steps Touchscreen Rotary encoder Select the value field in the Manual Touch the value field for the time baking screen for the baking time in the Manual Baking screen.
- Page 66 Manual Cooking/Manual Baking Touchscreen Rotary encoder The value field for entering The value field for entering minutes is active (light grey). minutes is active (light grey). Turning to the left/right increases Touch the other value fields (h or or decreases the minutes; sec) before your entry (appears if 59 minutes are exceeded, the highlighted in light grey).
- Page 67 Manual Cooking/Manual Baking Fig. 45: Note “Baking time entry outside the setting range” 6.2.3 Setting/changing the rest time (baking with humidification) Fig. 46: Set/Change the rest time screen Working steps Touchscreen Rotary encoder Rest time Select the ) field in the Manuelles Backen mit Beschwadung (Manual baking with humidification) screen.
- Page 68 Manual Cooking/Manual Baking Touchscreen Rotary encoder Confirm Select the field ( ) by 4. Confirm your entry with ( ) or turning the rotary encoder and close with ( confirm with axial pressure. Go back to the Manual Baking screen. Tab.
- Page 69 Manual Cooking/Manual Baking Touchscreen Rotary encoder Reduce or increase the Enter/change the temperature temperature in 1° steps by turning value exactly in degrees using the the rotary encoder to the left/right numeric keypad or in one-degree and confirm with axial pressure. steps via +/-.
- Page 70 Manual Cooking/Manual Baking Working steps Touchscreen Rotary encoder Select the value field for Touch the value field for humidification in screen Manual humidification in the Manuelles baking with humidification by Backen mit Beschwadung (Manual turning the rotary encoder and Baking with humidification) confirm with axial pressure.
- Page 71 Manual Cooking/Manual Baking 6.2.6 Select additional functions Fig. 52: Zusatzfunktionen nicht aktiv/aktiv (Additional functions screen not active/active) - not active (toggle left, display grey)/active (toggle right, display green) Fig. 53: Manual baking with humidification (all additional functions activated) Symbol Designation/function Fan speed Field ...
- Page 72 Manual Cooking/Manual Baking Symbol Designation/function Bestätigen (Confirm) Field Confirm your entry and close the screen. Schließen (Close) Field Cancel your entry and close the screen. Back Field Switch to the last screen display. Tab. 27: Elements on the Additional Functions screen Work procedures Selection of additional function Touchscreen Rotary encoder...
- Page 73 Manual Cooking/Manual Baking Setting/changing the fan speed Fig. 54: Screen Lüftergeschwindigkeit einstellen (Set Fan Speed) Switching fan speed pulsing on/off Fig. 55: Fan speed pulsing set Set preheating INFORMATION: The preheating temperature is factory set to +10% of the cooking chamber Settings &...
- Page 74 Manual Cooking/Manual Baking Switch E/2 (energy saving function) on/off Fig. 57: Additional function E/2 set Setting/changing the ADC (Active Dehumidification Control) Fig. 58: ADC additional function with level selection set.
- Page 75 Manual Cooking/Manual Baking 6.2.7 Step overview - single- and multi-step programmes Touching the ( ) icon displays the Step overview screen. Fig. 59: Step overview with one- / three-step programmes Fig. 60: Manual baking screen with three-step programme (e.g. step 2 display) Symbol Designation/function Start...
- Page 76 Manual Cooking/Manual Baking Symbol Designation/function Baking without steam injection Baking with steam injection Setting temperature of the baking step Humidification of the baking step Baking time of the baking step with rest time Tab. 29: Elements on the Step overview screen Work procedures Adding baking step INFORMATION: ...
- Page 77 Manual Cooking/Manual Baking Work procedures Duplicating baking step Select the baking step to be duplicated in the Schrittansicht (Step View) screen. Copying a step with field Backschritt Duplizieren (Baking step duplicate) ( The duplicated baking step is placed at the end. The number of baking steps is increased by value 1.
- Page 78 Manual Cooking/Manual Baking Symbol Designation/function Back Field Switch to the last screen display. Bestätigen (Confirm) Field Confirm entry. Schließen (Close) Field Cancel your entry and close the screen view. Start Field Display the Start/End time selection screen. Tab.
- Page 79 Manual Cooking/Manual Baking Fig. 62: Screen display Start-/Endzeit (Start/end time) after programme start 6.2.9 Saving programmes INFORMATION: Requirements: • The Gareinstellungen für Manuelles Kochen (Manual cooking settings) screen is displayed. • The settings for one or several cooking/baking steps are defined. •...
- Page 80 Manual Cooking/Manual Baking Fig. 64: Information “Selected programme memory number already assigned! INFORMATION: If the selected programme memory number has already been assigned, the message “Selected programme memory number already assigned! After confirmation, the screen for entering the programme number appears.
- Page 81 Manual Cooking/Manual Baking Touchscreen Rotary encoder Save A Save as Touch the s field if you Select the field with rotary want to save the programme with encoder if the programme is to be a new number. saved with a new number. Save Save Touch the...
-
Page 82: Manual Cooking Screen With Fresh Steam System Module
Manual Cooking/Manual Baking Manual cooking screen with fresh steam system module Selecting the operating mode INFORMATION: Manuelles Kochen (Manual Cooking) By selecting the field in the home screen, Manuelles Kochen (Manual Cooking) with the screen changes to • Convection •... - Page 83 Manual Cooking/Manual Baking Function Default value Setting range Temperature 180°C 30°C … 300°C 356°F 86°F … 572°F Cooking time 00:30 h 00:01h … 23:59h or continuous operation Core temperature 70°C 20°C … 100°C 158°F 68°F … 212°F Active dehumidification control deactivated (default) Level 5 Active dehumidification control...
- Page 84 Manual Cooking/Manual Baking Function Default value Setting range activated (levels 1 to 5, if set) Preheat editable (only in parameter settings) Tab. 35: Default values and setting ranges for combination steam 6.3.3 Manual cooking with steam Fig. 68: Manuelles Kochen mit Dampf (Manual cooking with steam) screen (with cooking time controller left and core temperature right) Function Default value...
- Page 85 Manual Cooking/Manual Baking Symbol Designation/function Convection mode Switches to convection mode. Combi-cooking mode Change to the Combi Steaming with Hot Air mode. Steaming mode Switches to steam mode. Gar-/Backtemperatur (Cooking/baking Field temperature) Change to the Core temperature (°C/°F) set. Feuchte (Humidity) Field ...
- Page 86 Manual Cooking/Manual Baking Symbol Designation/function Fan speed Field with speed stage Activate the fan at the selected speed (levels 1 to 5). Fan pulsing Field Activate fan pulsing. Preheating Field Set and activate preheating (10%). Eco mode (energy saving) Field ...
- Page 87 Manual Cooking/Manual Baking 6.3.4 Select/change operating mode Working steps Touchscreen Rotary encoder Navigate between the blue fields Touch the blue field of the start of the start display by turning and Manual Cooking display Manual Cooking confirm the field with axial pressure. Mode Selection screen appears.
- Page 88 Manual Cooking/Manual Baking 6.3.5 Setting/changing temperature Fig. 69: Screen Einstellen/Ändern der Temperatur (Set/change temperature) Working steps Touchscreen Rotary encoder Select the value field for the Touch the value field in the temperature in the Operating Operating Mode screen for the mode screen by turning the rotary temperature.
- Page 89 Manual Cooking/Manual Baking Fig. 70: Note “Temperature entry outside the setting range” (hot air/combi-cooking left; steam right) 6.3.6 Setting/changing cooking time Fig. 71: Screen Einstellen/Ändern der Garzeit (Set/change cooking time) Working steps Touchscreen Rotary encoder Select the value field for the time Touch the value field in the in the screen Operating mode by Operating Mode screen for the...
- Page 90 Manual Cooking/Manual Baking Touchscreen Rotary encoder Turning to the left/right increases The value field for entering or decreases the minutes; minutes is active (light grey). if 59 minutes are exceeded, the Touch the other value fields (h or value of the next full hour is sec) before your entry (appears displayed highlighted in light grey).
- Page 91 Manual Cooking/Manual Baking Fig. 73: Display Steam operating mode in continuous mode INFORMATION: When time is entered as 00h:00min:00sec, continuous mode ( ) will be set for Manual cooking. NOTICE! Time entry outside the setting range! If the setting range (24 h) is exceeded, a message will appear and the value will be set to the maximum value (24h:00min:00sec) after confirming the message ( Fig.
- Page 92 Manual Cooking/Manual Baking 6.3.7 Setting/changing core temperature Fig. 75: Screen Einstellen/Ändern der Kerntemperatur (Set/Change core temperature) Working steps Touchscreen Rotary encoder Touch the core temperature field to change in the operating mode screen. The input screen for the core temperature appears. Reduce or increase the Enter/change the temperature temperature in 1°...
- Page 93 Manual Cooking/Manual Baking 6.3.8 Setting/changing the humidification quantity (only for combi-cooking) Fig. 77: Screen Set/change humidification in Combi-cooking mode Working steps Touchscreen Rotary encoder Select the value field for Touch the value field on the humidification on the screen screen Combi-cooking mode for Combi-steam operating mode by humidification.
- Page 94 Manual Cooking/Manual Baking Fig. 78: Note “Humidity value outside the setting range” 6.3.9 Select additional functions Fig. 79: Zusatzfunktionen nicht aktiv/aktiv (Additional functions screen not active/active) - not active (toggle left, display grey)/active (toggle right, display green) Symbol Designation/function Fan speed Field ...
- Page 95 Manual Cooking/Manual Baking Symbol Designation/function – Level 5 Flap completely open Toggle OFF/ON Field Switch additional function on/off. Bestätigen (Confirm) Field Confirm your entry and close the screen. Schließen (Close) Field Cancel your entry and close the screen. Back Field ...
- Page 96 Manual Cooking/Manual Baking Work procedures Selection of additional function Touchscreen Rotary encoder Touch the Additional Functions ( ) field on the Operating Mode screen. The Zusatzfunktionen (Additional functions) screen appears. Select line Additional function by Touching the ON/OFF toggle or turning the rotary encoder and step activates/changes the confirm with axial pressure.
- Page 97 Manual Cooking/Manual Baking Setting/changing the fan speed Fig. 80: Screen Lüftergeschwindigkeit einstellen (Set Fan Speed) Switching fan speed pulsing on/off Fig. 81: Fan speed pulsing set Switch preheating on/off Fig. 82: Set Preheat Screen...
- Page 98 Manual Cooking/Manual Baking Switch E/2 (energy saving function) on/off Fig. 83: Additional function E/2 set Switch the SPS® - Steam Protection System on/off Fig. 84: SPS® additional function set Setting/changing the ADC (Active Dehumidification Control) Fig. 85: Setting the ADC screen and flap opening level...
- Page 99 Manual Cooking/Manual Baking 6.3.10 Step overview - single- and multi-step programmes Touching the icon ( ) displays the Step overview screen. Fig. 86: Step overview with one- / three-step programmes Fig. 87: Screen Betriebsart (Operating mode) with three-step programme (displaying step 2) Symbol Designation/function Start...
- Page 100 Manual Cooking/Manual Baking Symbol Designation/function Convection Combi-cooking Steam Setting value of the cooking step (e.g. temperature) Cooking time of the cooking step Tab. 45: Elements on the Step overview screen...
- Page 101 Manual Cooking/Manual Baking Work procedures Adding cooking step INFORMATION: • A maximum of 9 cooking steps can be defined for a programme. • Baking steps can be added in the Betriebsart (Backen) (Operating Mode, Baking) screen or in the Schrittübersicht (Step Overview) screen. Garschritt hinzufügen (Adding cooking step) Touch the ) field.
- Page 102 Manual Cooking/Manual Baking 6.3.11 Setting/changing start time Fig. 88: Work procedures for the screens Setting start time Symbol Designation/function Back Field Switch to the last screen display. Bestätigen (Confirm) Field Confirm entry. Schließen (Close) Field Cancel your entry and close the screen view. Start Field ...
- Page 103 Manual Cooking/Manual Baking Working steps Touchscreen Rotary encoder Start Time Touch the ) field on the Operating Mode screen. The Start-/Endzeitauswahl (Start/end time selection) screen appears. Select line Start: ( ) by turning Select the time setting by the rotary encoder and terminate Start: touching the ) line.
- Page 104 Manual Cooking/Manual Baking Fig. 89: Screen display Start-/Endzeit (Start/end time) after programme start 6.3.12 Saving programmes INFORMATION: Requirements: • The Manual Cooking screen is displayed. • The settings for one or several cooking steps are defined. • A maximum of 99 programmes can be stored as numbers with up to 9 cooking steps.
- Page 105 Manual Cooking/Manual Baking Fig. 91: Information “Selected programme memory number already occupied! INFORMATION: If the selected programme memory number has already been assigned saving under when , the message “Selected programme memory number already assigned! After confirmation, the screen for entering the programme number appears.
- Page 106 Manual Cooking/Manual Baking Touchscreen Rotary encoder Call up existing programme number. The Manual Cooking screen with the previous programme number appears. Save Select the field ( The Programme Number Selection screen appears. Save A Save as Touch the s field if you Select the field with rotary want to save the programme with...
-
Page 107: Ongoing Operation - Cooking/Baking
Ongoing Operation - Cooking/Baking Ongoing Operation - Cooking/Baking Manual cooking in the hot-air unit 7.1.1 Starting manual cooking Fig. 93: Starting manual settings in the Manual Cooking screen (left) or Step Overview screen (right) Touchscreen Start the manual cooking programme in the Manual Cooking or Step Start Overview screen by touching the field (... - Page 108 Ongoing Operation - Cooking/Baking Fig. 95: Screen “Stop current programme” INFORMATION: Additional functions (e.g. preheating) must be selected before starting the programme. The symbol of the additional function appears below the remaining time on the screen Symbol Designation/function Display remaining programme time Stop...
- Page 109 Ongoing Operation - Cooking/Baking 7.1.3 Preheat Fig. 96: Screen Preheating running (left) and End preheating (right) Fig. 97: Cooling to preheat temperature screen Fig. 98: Screen Garraumtür geöffnet (Cooking chamber door open) INFORMATION: When preheating has been completed, open the door, insert the container with food items and close the door.
- Page 110 Ongoing Operation - Cooking/Baking 7.1.4 Change settings for manual cooking during operation Fig. 99: Changing settings during operation (e.g. time) INFORMATION: During operation, cooking settings can be changed for the cooking step currently running or cooking steps that have not yet been started. Working steps Touchscreen Rotary encoder...
- Page 111 Ongoing Operation - Cooking/Baking Touchscreen Rotary encoder (h, min or sec) on the screen before entering the value (appears highlighted in light grey), increase/decrease the value in steps of 1 h, 5 min or 10 sec by turning it and confirm with axial pressure.
- Page 112 Ongoing Operation - Cooking/Baking 7.1.5 Display of the current actual values for temperature and core temperature Fig. 100: Display screen Actual values for temperature and core temperature Touch the Ist-Temperatur (actual temperature) ( ) field. The actual temperature appears for a short time. ...
- Page 113 Ongoing Operation - Cooking/Baking 7.1.7 Ending manual cooking Earlier end of the cooking programme/continuous mode Fig. 102: Screens Stop the running programme and Prompt to exit INFORMATION: Cooking step/programme has been started and is not yet finished. – Remaining time is displayed.
- Page 114 Ongoing Operation - Cooking/Baking On completion of the cooking programme Fig. 103: End of the expired cooking programme without restarting INFORMATION: The cooking programme ends when the cooking time of the last cooking step has expired (time display: 00:00:00).
-
Page 115: Manual Baking Without / With Humidification Module
Ongoing Operation - Cooking/Baking Manual baking without / with humidification module 7.2.1 Sart manual baking Fig. 104: Start Manuelles Backen ohne Beschwadung (Manual baking without humidification) (left) or mit Beschwadung (with humidification) (right) Fig. 105: Start Manual baking with several steps in the Step Overview screen Touchscreen ... - Page 116 Ongoing Operation - Cooking/Baking 7.2.2 Ongoing operation screen Fig. 106: Screen Programm im laufenden Betrieb (Programme running) (left: Manuelles Backen ohne Beschwadung (Manual baking without humidification)) Fig. 107: Screen Request to exit the running programme INFORMATION: • Additional functions (e.g. preheating) must be selected before starting the programme.
- Page 117 Ongoing Operation - Cooking/Baking Symbol Designation/function Display remaining programme time with green progress bar in the background Stop Field The programme is interrupted. “Betriebsart Backen ohne Beschwadung” (Baking Display field without humidification operating mode) “Betriebsart Backen mit Beschwadung” (Baking with Display field humidification operating mode) Display field cooking (step) temperature...
- Page 118 Ongoing Operation - Cooking/Baking 7.2.3 Preheat Fig. 108: Screen Preheating during operation (left: with humidification) and end of preheating (right: without humidification) Fig. 109: Cooling to preheat temperature screen Fig. 110: Screen Garraumtür geöffnet (Cooking chamber door open) INFORMATION: ...
- Page 119 Ongoing Operation - Cooking/Baking 7.2.4 Change settings for manual baking during operation Fig. 111: Changing settings during operation INFORMATION: During operation, only baking settings for a baking step which is currently in progress or has not yet been started, can be changed. Working steps Touchscreen Rotary encoder...
- Page 120 Ongoing Operation - Cooking/Baking Touchscreen Rotary encoder Enter/change the time (h:min:sec) touch screen must be touched, if exactly using the numeric keypad 59 seconds are exceeded, the or in steps of 1 h, 5 min or 10 sec value of the next full minute is via +/-.
- Page 121 Ongoing Operation - Cooking/Baking 7.2.5 Display of the actual values for temperature and humidification Fig. 112: Display screen Current actual values for temperature, humidification and core temperature actual temperature/actual humidity field Touch the The current temperature/humidity appears for a short time. ...
- Page 122 Ongoing Operation - Cooking/Baking 7.2.7 End manual baking Earlier end of the baking programme/continuous mode Fig. 114: Screens Stop running programme INFORMATION: Baking step/programme was started and is not yet finished. – The remaining time is displayed. – The progress bar is not yet at 100%.
- Page 123 Ongoing Operation - Cooking/Baking On completion of the baking programme Fig. 115: End of the expired baking programme INFORMATION: • The baking programme ends when the baking time of the last baking step has expired.
-
Page 124: Manual Cooking Screen With Fresh Steam System Module
Ongoing Operation - Cooking/Baking Manual cooking screen with fresh steam system module 7.3.1 Starting manual cooking Fig. 116: Starting manual settings in the Manual Cooking screen (left) or Step Overview screen (right) Touchscreen Start the manual cooking programme in the Manual Cooking or Step Start Overview screen by touching the field (... - Page 125 Ongoing Operation - Cooking/Baking INFORMATION: Additional functions (e.g. preheating) must be selected before starting the programme. The symbol of the additional function appears on the progress line of the screen. Symbol Designation/function Display remaining programme time with green progress bar in the background Stop Field...
- Page 126 Ongoing Operation - Cooking/Baking 7.3.3 Preheat Fig. 119: Screen Preheating running (left) and End preheating (right) Fig. 120: Cooling to preheat temperature screen Fig. 121: Screen Garraumtür geöffnet (Cooking chamber door open) INFORMATION: If the current cooking chamber temperature is above the selected preheating temperature, the cooking chamber is cooled down.
- Page 127 Ongoing Operation - Cooking/Baking 7.3.4 Change settings for manual cooking during operation Fig. 122: Changing settings during operation INFORMATION: During operation, cooking settings can be changed for the cooking step currently running or cooking steps that have not yet been started. Working steps Touchscreen Rotary encoder...
- Page 128 Ongoing Operation - Cooking/Baking Touchscreen Rotary encoder Enter/change the time (h:min:sec) When setting the seconds, the exactly using the numeric keypad touch screen must be touched, or in steps of 1 h, 5 min or 10 sec if 59 seconds are exceeded, the via +/-.
- Page 129 Ongoing Operation - Cooking/Baking 7.3.5 Display of the actual values for temperature. Humidification and core temperature Fig. 123: Display screen Current actual values for temperature, humidity (left) and core temperature (right) actual values of temperature, humidity Touch the The actual values appear for a short time. ...
- Page 130 Ongoing Operation - Cooking/Baking 7.3.7 End the programme Earlier end of the cooking programme/continuous mode Fig. 125: Screens Cancel running programme INFORMATION: • Cooking step/programme has been started and is not yet finished. – Progress line shows less than 100%. –...
- Page 131 Ongoing Operation - Cooking/Baking On completion of the cooking programme Fig. 126: End of the expired cooking programme without restarting INFORMATION: The cooking programme ends when – the cooking time of the last cooking step has elapsed. – the progress line is complete...
-
Page 132: Programme List
Programme list Programme list Programme list options INFORMATION: Programmes are displayed according to programme numbers. Fig. 127: Programme list screen with details and start Touchscreen Favourites is accessed by touching ( ) on the home screen. Rotary encoder ... - Page 133 Programme list Symbol Designation/function Start Field Starts the programme. Back Field Switch to the last screen display. Tab. 59: Elements of the programme list screen...
-
Page 134: Changing And Starting The Programmes
Programme list Changing and starting the programmes 8.2.1 Viewing/changing programme details Fig. 128: Work procedures View or change a programme in the programme list INFORMATION: The Manuelle Einstellungen (Manual settings) screen for the programme appears and all values and additional functions for all programme steps can be changed. - Page 135 Programme list Touchscreen Rotary encoder Use the Back ( ) field to return to the Programme List screen. Tab. 60: Work procedures for Setting/changing setting values in the programme list 8.2.2 Field Programmstart (Programme start) Start Touch the ) field to start the programme from the Programme List Overview.
-
Page 136: Special Programmes
Special programmes Special programmes INFORMATION: Special programmes are recommended, useful cooking programmes with recommended presets that can be changed as desired. Special programmes are only possible with the Live Steam System module. Touchscreen Special programmes are called up by touching field ( ) on the home screen. -
Page 137: Special Programmes Screen (Only For Live Steam System Module)
Special programmes Special programmes screen (only for Live Steam System module) Fig. 129: Selection screen Special programmes for units with live steam system Symbol Designation/function Low temperature (LT) cooking Field Select low temperature (LT) cooking. Delta-T cooking Select Delta-T cooking. Regeneration Field ... - Page 138 Special programmes Fig. 131: Screens Voreinstellungen und Schrittübersicht mit Sonderprogramm (Presets and step overview with special programme) (e.g. steam operating mode) Working steps Touchscreen Rotary encoder Touch the Low Temperature Call up the line Low temperature Cooking line ( cooking ( ) through axial pressure.
- Page 139 Special programmes Touchscreen Rotary encoder Starts the programme with ( Scroll to the field ( ) by turning and start special programme with axial pressure. Tab. 62: Work procedures Set and start low temperature cooking 9.1.2 Delta-T cooking INFORMATION: Delta-T cooking is a special form of low-temperature cooking.
- Page 140 Special programmes Touchscreen Rotary encoder Touch the desired Betriebsart Navigate to the desired line (Operating mode) line. Operating mode by turning and confirm with axial pressure The “Betriebsart mit Vorgabewerten” (Operating Mode with Default Values) screen appears. If necessary: Touch the value field to be Select the value field to be changed for temperature, changed by turning and confirm...
- Page 141 Special programmes 9.1.3 Regeneration INFORMATION: Regeneration can be used to reheat fully cooked foods gently after they have cooled. Only for units with live steam system Fig. 134: Regenerate screen selection Fig. 135: Regeneration presets screen (e.g. Combi steam mode) Working steps Touchscreen Rotary encoder...
- Page 142 Special programmes Touchscreen Rotary encoder with the utmost accuracy using steps by turning the rotary the numeric keypad or in 5% steps encoder and close with axial via +/-. pressure. Touch the respective size field Enter/change time from 00:01h to (h or min) on the screen before 23:59h via the numeric keypad or entering a value (it appears...
-
Page 143: Cleaning And Care
Cleaning and care Cleaning and care 10.1 General cleaning Depending on the degree of contamination and how often cleaning is required, the appliance may be equipped with different modules: • Basic appliance – manual cleaning supported • With the hose-spray-nozzle module –... - Page 144 Cleaning and care Symbol Designation/function Water filter Indicates the condition of the water filter. Indicates that water filter has to be replaced. Select the field to reset after replacing the water filter. Start/end time Setting the start/end time. Active-Temp ...
- Page 145 • Eloma Multi-Clean PRO • Eloma Multi-Clean rinsing agent • Eloma Multi-Clean PRO cleaner tabs • Eloma Multi-Clean PRO finisher tabs INFORMATION: The warranty will be rendered null and void with immediate effect if the stipulated cleaning and maintenance products are not used.
- Page 146 Cleaning and care CAUTION! Risk of chemical burns from cleaners, rinsing agents, cleaner and finisher tabs! Chemical burns to the skin and eyes. Please observe the specifications in the safety data sheet. Adhere to the safety notes for the stipulated cleaner, rinsing agent, cleaner and finisher tabs.
-
Page 147: Manual Cleaning Of The Cooking Chamber
Cleaning and care 10.2 Manual cleaning of the cooking chamber CAUTION! Risk of burns from hot surfaces! Skin burns. Allow the device to cool down before cleaning. CAUTION! Risk of scalding from hot lye or hot steam! Skin burns ... - Page 148 Cleaning and care 10.2.2 Basic appliance manual cleaning INFORMATION: Removal of the racks is recommended for cleaning all appliances without autoclean® PRO and a spray hose. Clean and rinse the racks separately. Requirement • The cooked/baked goods have been removed. •...
- Page 149 Cleaning and care 10.2.3 Manual cleaning with the hose-spray-nozzle module Requirement • The cooked/baked goods have been removed. • Accessories (e.g. containers) have been removed. Working steps Heat/cool cooking chamber to cleaning temperature (below 60°C). Open door after signal. Use the spray hose to remove coarse food and grease residues from the cooking chamber.
- Page 150 Cleaning and care 10.2.4 Recommendation for cleaning the cooking chamber behind air baffles INFORMATION: Clean the cooking chamber behind the vents on a weekly basis or when contaminated. Fig. 136: Release for swivelling air baffle (shown without cooking chamber housing) Requirement •...
-
Page 151: Manual Cleaning Of Other Parts Of The Appliance
Cleaning and care 10.3 Manual cleaning of other parts of the appliance 10.3.1 Destruction of the screen. NOTICE! Excessive pressure on the screen surface! Mechanical destruction of the screen. Only apply gentle pressure when cleaning. NOTICE! Use of washing-up liquids and cleaning agents for screens! Destruction of the screen. - Page 152 Cleaning and care 10.3.2 Cleaning the door seal INFORMATION: Regularly check the door seal for damage. Damaged door seals need to be replaced immediately. Requirement • The device has been switched off. • The device has cooled down. Clean the door seal with a cloth and mild degreasing cleaning agent by hand.
-
Page 153: Semi-Automatic Cleaning
Cleaning and care 10.4 Semi-automatic cleaning Select the Cleaning and Maintenance ( ) field on the home screen to start the cleaning and maintenance programme. Semi-automatic cleaning Fig. 138: screen Requirement • The cooked/baked goods have been removed. • Accessories (e.g. - Page 154 Cleaning and care Drying phase ( ) starts to dry the cooking chamber (if selected). Select the Stop ( ) field. The Start Cleaning & Care screen appears. Open the door and bring it into the locked position. 10.4.2 Semi-automatic cleaning with humidification and hose-spray-nozzle modules Working steps Start semi-automatic cleaning.
-
Page 155: Fully Automatic Cleaning (Autoclean® Pro)
Cleaning and care 10.5 Fully automatic cleaning (Autoclean® PRO) INFORMATION: Clean and rinse the cooking chamber on a daily basis with at least a quick clean. Clean all external parts and surfaces manually. Select the Cleaning and Maintenance ( ) field on the home screen to start the cleaning and maintenance programme. - Page 156 Cleaning and care Cleaning & Care screen appears. The “Cleaning complete” notification will appear. Cleaning complete Fig. 139: Screen Open the door and bring it into the locked position. INFORMATION: Frequently repeated cleaning programmes can be defined in the Wochenprogrammierung PRO (Weekly programme PRO) INFORMATION: ...
- Page 157 Cleaning and care Cleaning programme Application 00:16:00 h during the daily routine This is not a complete cleaning programme and cools the appliance down Rinsing out For light soiling or between cooking procedures during the daily routine 00:07:00 h Warm rinsing For light soiling or between cooking procedures during the daily routine 00:11:00 h...
- Page 158 Cleaning and care INFORMATION: Number of cleaner and finisher tabs: • Basic: 1 cleaner tab; 0 finisher tabs • Intensive: 1 cleaner tab; 0 finisher tabs • Maintenance: 1 cleaner tab; 1 finisher tab • Quick clean: 1 cleaner tab; 0 finisher tabs •...
- Page 159 Cleaning and care INFORMATION: The drying stage is not available for the short programmes quick clean, rinse and warm rinse. In order to prevent calcification, the maintenance programme must be completed at regular intervals. The frequency depends on the water hardness determined during installation and configured in the appliance: Water Number of cleans possible...
- Page 160 Cleaning and care Please run maintenance programme now Fig. 143: screen This notification will disappear once the maintenance programme is complete. INFORMATION: The warranty shall not apply to appliance faults caused by failure to adhere to the stipulated cycles for the maintenance programme. ...
- Page 161 Cleaning and care Cleaning and servicing programmes Cleaning programme Application Basic Light to medium (normal) soiling from preparation of steamed vegetables, meat 01:00:00 h products, baked goods or fish and occasional preparation of roast or grilled products Intensive Medium to heavy soiling from preparation of steamed vegetables, meat products, baked 02:00:00 h goods, fish or roast and grilled products...
-
Page 162: Exiting Cleaning
Cleaning and care 10.6 Exiting cleaning 10.6.1 Cancel semi-automatic cleaning INFORMATION: Semi-automatic cleaning can be stopped at any time. Press the Stop ( ) field. Confirm programme stop screen appears. Semi-Automatic Cleaning Stop Confirmation Fig. 145: Screen... - Page 163 Cleaning and care 10.6.2 Cancelling fully automatic cleaning (autoclean® PRO) INFORMATION: autoclean® PRO fully automatic cleaning can be stopped at any time. It is continued with a safety flushing cycle. Fig. 146: Screens Stopp autoclean® PRO-Reinigung (Stop autoclean® PRO cleaning) Start Sicherheitsausspülen (Start safety flushing) ...
-
Page 164: Settings & Service
Settings & service without password release Fig. 147: Selection screen Settings/Service without password release Line/symbol Designation/function Device: Display Appliance type (e.g. JOKER) Serial number Display Serial no. of appliance Version: Display of the appliance’s software version General settings Line ... - Page 165 Fig. 148: Selection screen Settings/Service with password release Symbol Designation/function Device: Display Appliance type (e.g. CompactClassST) Serial number Display serial no. of the JOKER Version: Display of JOKER’s software version General settings Line Switch to Screen Allgemeine Einstellungen (General Settings)
- Page 166 Settings & Service Touch the desired selection line. Selected screen appears. To change the basic settings, the following access data is required: • Password: 1234 11.1.1 Changing the general settings Fig. 149: General Settings Screen Line Designation/function Date/Time Date/Time Line ...
- Page 167 Settings & Service 11.1.2 Setting/changing the date/time and time zone Date/time and time zone Fig. 150: Enter/change date and time zone Working steps date/time Select the line in General Settings with ( The Calendar screen appears. Select month, year and day and confirm with ( ) or close with ( Current date is highlighted in green.
-
Page 168: Protocol Management
Protocol management In addition to the HACCP protocols for the expired cooking/baking and cleaning programmes, other appliance analysis protocols for JOKER are available for the last thirty days and can be downloaded to a USB stick. With the ProConnect software, this data can be archived, printed or edited. Archived protocols can also be read in again via the upload/download management. - Page 169 Settings & Service 11.2.1 Screen view of protocols Fig. 153: Selection of protocol by date and display of programmes Fig. 154: Protocol View screen (e.g. HACCP)
- Page 170 Select the line of the (e.g. HACCP) ( List of the last 30 days appears. day(s) Select line(s) of the List of programmes for that day(s) appears. Plug the USB stick into JOKER’s socket. Download the protocol(s). When finished, the Protocol List screen appears...
-
Page 171: Setting/Changing Parameters And Customisation
Settings & Service 11.3 Setting/changing parameters and customisation All programme and appliance properties are stored in an internal parameter list. In this list, in addition to the time and temperature format, other operation and safety-relevant adjustments can be activated and made. 11.3.1 Edit parameters/customisation Fig. - Page 172 Settings & Service Working steps Settings and Service Select the line. Password Entry screen with keyboard appears. Enter the password and confirm ( The Advanced Settings/Service screen appears. Parameter Customisation Select the line. The List of All Parameters screen appears. Scroll to the desired parameter line and select it.
- Page 173 Settings & Service No.: Text Selection option/default Description 031: Preheating end EndCombiProgram To mark the end of preheating, sound EndProgram a sound will be heard for a EndStep certain time. The user can select KeepWarm a sound from a number of ReachPreheat different tones StartCombiProgram...
- Page 174 Settings & Service No.: Text Selection option/default Description 052: Step End from volume level 0 to volume level 10 The volume of the sound at the Volume Default: 5 end of the cooking/baking step can be adjusted. 053: Step end sound from 0 s to 999 s The playback time of the sound duration...
- Page 175 Fan speed Default: 2 166: Auto Temp Fan Level 1 Set fan speed for Auto Temp. speed Default: 2 167: Cooking cool Choice: Auto Temp Set type of cool down before down cooking. Manual Temp Tab. 74: Parameter list JOKER ST...
-
Page 176: Upload/Downloadmanager
Settings & Service 11.4 Upload/DownloadManager Use the Upload/Download Manager to upload/download from/to JOKER • Cooking/baking programmes • Operating and signal sounds • Customer backups and software backups. Fig. 158: Upload/Download Manager selection screen Fig. 159: Screens Download/Upload Back/cooking programmes Fig. 160: Screen Upload Tones Fig. - Page 177 Field Delete selected ones. Tab. 75: Upload/Download Manager elements Working steps Plug the USB stick into Joker’s USB socket. Settings and Service Select the line. Password Entry screen with keyboard appears. Enter the password and confirm ( The Advanced Settings/Service screen appears.
-
Page 178: Sound Management
Settings & Service 11.5 Sound management With the Sound Manager, certain events can be assigned specific tones with time duration and volume, as well as their triggering times. Fig. 162: Screen Selection List Sound Management Fig. 163: Event Selection (left) and Volume Adjust/Change (right) screens Fig. -
Page 179: Error Messages & Troubleshooting
Black stains in the The water quality is poor. replace the water filter cooking chamber currently in use. Use Eloma PRO special The wrong cleaner has been cleaner. Damage caused by used. the wrong cleaner cannot be remedied. ... -
Page 180: Troubleshooting
(15%) The rinsing agent is empty. (30%) Replace the water softener. The water softener is empty. Contact an Eloma service The water pressure is partner. too low. Close the cooking chamber The cooking chamber door. door is open. - Page 181 Error messages & troubleshooting CODE/SYMBOL POSSIBLE CAUSE MEASURE Contact an Eloma service The motor is not partner. running. open the operating The water pressure is company's water tap. too low. Check the operating company's water pressure. ...
-
Page 182: Maintenance Instructions
The container sizes can be set and the fill level monitoring can be activated via the fill level monitor. The connections for Eloma liquid detergent PRO (black) and Eloma rinse aid (blue) are marked on the appliance. Fig. 165:... - Page 183 Maintenance instructions Confirm your entry with ( ) or close with ( Level indicator for liquid detergent/rinse aid is set to 100% when confirmed. Return to the last screen INFORMATION: Cleaning programme Always start commissioning after changing the liquid detergent canister.
- Page 184 Maintenance instructions 13.1.3 Starting up the cleaning programme INFORMATION: Cleaning programme Always start up the cleaning programme upon initial installation and after changing the liquid detergent canister. Fig. 167: Screens Cleaning start-up progress bar display Fig. 168: Screen End of cleaning Start-up Requirement •...
-
Page 185: Disposal And Environmental Protection
Strict adherence to the legal rules, quality standards and regulations, and a high environmental awareness form the basic standards for development, production and servicing of the JOKER on our premises. However, as well as valuable recyclable materials, these devices with electronic circuits also contain harmful substances which were necessary for their function and safety. - Page 186 Disposal and environmental protection...
- Page 187 Disposal and environmental protection...
- Page 188 APPLICATION ADVICE ____________ T. +49 8141 395-150 applications@eloma.com TECHNICAL SERVICE _____________ T. +49 35023 63-888 F. +49 8141 359-156 service@eloma.com Eloma GmbH • Otto-Hahn-Str. 10 • 82216 Maisach/Germany T. +49 8141 395-0 • F. +49 8141 395-130 • sales@eloma.com eloma.com...
Need help?
Do you have a question about the JOKER and is the answer not in the manual?
Questions and answers