StarTech.com SV431HDU3A2 Quick Start Manual
4-port kvm switch for hdmi computers usb 3.0
Hide thumbs
Also See for SV431HDU3A2:
- Quick start manual (2 pages) ,
- Manual (14 pages) ,
- Quick start manual (2 pages)
Table of Contents
Advertisement
Quick Links
Quick start guide
4-Port KVM Switch for HDMI Computers - USB 3.0
SV431HDU3A2
FR: Guide de l'utilisateur - fr.startech.com
DE: Bedienungsanleitung - de.startech.com
ES: Guía del usuario - es.startech.com
NL: Gebruiksaanwijzing - nl.startech.com
PT: Guia do usuário - pt.startech.com
IT: Guida per l'uso - it.startech.com
Packaging contents
• 1 x 4-port HDMI® KVM switch
• 4 x rubber feet
• 1 x universal power adapter (NA/EU/UK/AU)
• 1 x quick start guide
System requirements
• Host computer with a USB 2.0 or USB 3.0 port
• Computer system equipped with an HDMI port
• Display device (for example, monitor, TV, and so on) equipped with
an HDMI port
• USB keyboard and mouse support
The maximum resolution for this KVM switch is 1920x1080.
Note: To obtain the maximum USB throughout, you must use a
computer with a USB 3.0 port.
System requirements are subject to change. For the latest
requirements, please visit www.startech.com/SV431HDU3A2.
About USB 3.0 and USB 3.1 Gen 1
USB 3.0 is also known as USB 3.1 Gen 1. This connectivity standard
offers speeds up to 5 Gbps.
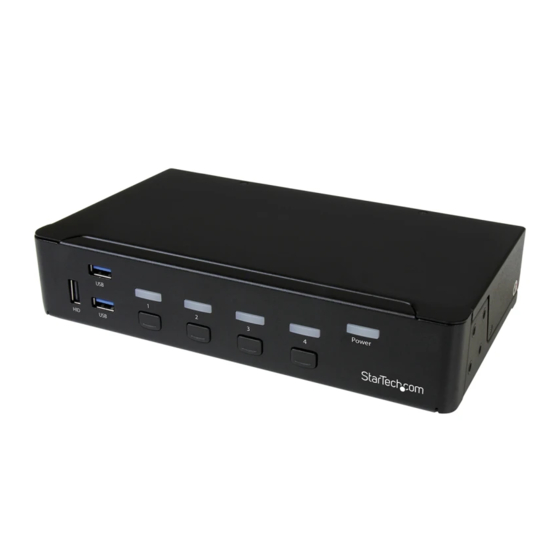
Product diagram
Front view
Console USB
Port selection/link LEDs
keyboard and
mouse port
USB 3.0 ports
Port selection buttons
For the latest information, technical specifications, and support for
this product, please visit www.startech.com/SV431HDU3A2.
Power button
*actual product may vary from photos
Rear view
Console HDMI
connector
Power input
port
Console USB
keyboard and
mouse ports
Attach the rubber feet
To affix the rubber feet to the bottom of the KVM switch, peel off the
backing on each rubber foot and stick the feet to the bottom of the
KVM switch in the indicated areas.
Connect the console to the KVM switch
1. Turn off your computer and any devices or peripherals that are
connected to it (for example, printers, external hard drives, and so
on).
2. Connect a monitor to the Console HDMI connector on the KVM
switch.
3. Connect a USB keyboard and mouse to the Console USB
keyboard and mouse ports on the KVM switch.
4. If necessary, connect speakers or a headset to the Console audio
port on the KVM switch.
Connect computers to the KVM switch
You can connect up to four computers to the KVM switch.
1. Connect a male-to-male HDMI cable from the port on the
computer to one of the numbered PC connection ports on the
KVM switch.
2. Connect a USB A to B cable from the USB port on the computer to
the corresponding numbered PC USB port on the KVM switch.
3. If you're using audio, connect a set of audio cables from the
speaker port on your computer to the corresponding PC audio
port on the KVM switch.
4. Repeat steps 2 and 3 for any additional computers that you want
to connect to the KVM switch.
5. Connect the keyboard and mouse that you want to share
between computers to the Console USB keyboard and mouse
ports.
Note: If you want to use USB 3.1 Gen 1 peripherals between all of the
connected computers, make sure that the peripherals are connected
to the USB 3.0 ports on the KVM switch.
6. Connect the universal power adapter from a wall outlet to the
power input port on the KVM switch.
PC audio port
PC connection
(x4)
ports
PC USB ports
USB 3.0 port
Console audio
port
Manual Revision: 04/22/2016
Advertisement
Table of Contents

Related Manuals for StarTech.com SV431HDU3A2


Summary of Contents for StarTech.com SV431HDU3A2
- Page 1 Quick start guide 4-Port KVM Switch for HDMI Computers - USB 3.0 Rear view SV431HDU3A2 PC audio port FR: Guide de l’utilisateur - fr.startech.com Console HDMI PC connection (x4) DE: Bedienungsanleitung - de.startech.com connector ports ES: Guía del usuario - es.startech.com NL: Gebruiksaanwijzing - nl.startech.com...
- Page 2 This manual may make reference to trademarks, registered trademarks, and other protected names and/or symbols of third-party companies not related in any way to StarTech.com. Where they occur these references are for illustrative purposes only and do not represent an endorsement of a product or service by StarTech.com, or an endorsement of the product(s) to which this manual applies by the third-party company in question.
Need help?
Do you have a question about the SV431HDU3A2 and is the answer not in the manual?
Questions and answers