
Related Manuals for Siemens TE501505DE/08


Summary of Contents for Siemens TE501505DE/08
- Page 1 TE 501.. siemens-home.com/welcome Gebrauchsanleitung Instruction manual Mode d’emploi Istruzioni per l’uso Register your product online...
- Page 2 ���������������������������������������������������������������������������������������������������������������������������������2 �������������������������������������������������������������������������������������������������������������������������������20 �������������������������������������������������������������������������������������������������������������������������������38 �������������������������������������������������������������������������������������������������������������������������������57 Lieferumfang (siehe Seite 2) Included in delivery (see page 20) Contenu de l’emballage (voir page 38) Contenuto della confezione (ved� pagina 57) E-Nr. ……… FD… …...
-
Page 6: Table Of Contents
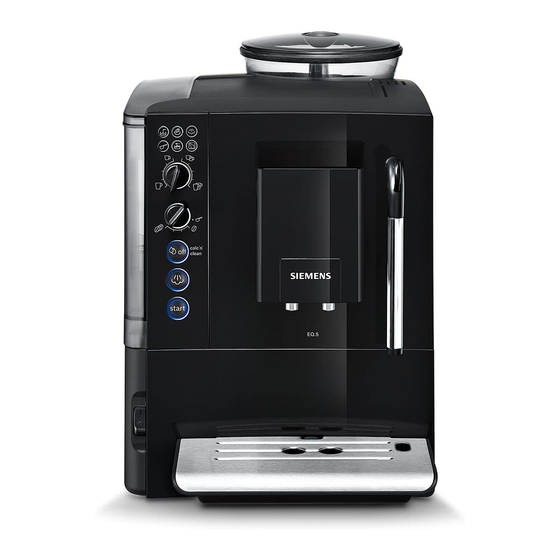
Kaffeesatzbehälter c) Tropfschale Kaffeeauslauf sehr geehrter Kaffeeliebhaber� Herzlichen Glückwunsch zum Kauf dieses d) Tropfblech Kaffeeauslauf Kaffeevollautomaten aus dem Hause e) Schwimmer Siemens� 9 Netzschalter O / I 10 Starttaste 11 Dampftaste Lieferumfang 12 Servicetaste 13 Drehknopf „Kaffeestärke“ (siehe Übersichtsbild am Anfang der 14 Drehknopf „Getränkeauswahl“... -
Page 7: Sicherheitshinweise
Sicherheitshinweise Die Gebrauchsanleitung bitte sorgfältig durchlesen, danach handeln und auf bewahren! Bei Weitergabe des Geräts diese Anleitung beilegen. Dieses Gerät ist für die Verarbeitung haushaltsüblicher Mengen im Haushalt oder in haushaltsähnlichen, nicht-gewerblichen Anwendungen bestimmt. Haushaltsähnliche Anwendungen umfassen z. B. die Verwendung in Mitarbeiterküchen von Läden, Büros, landwirtschaftlichen und anderen gewerblichen Betrieben, sowie die Nutzung durch Gäste von Pensionen, kleinen Hotels und ähnlichen Wohneinrichtungen. - Page 8 Gerät oder Netzkabel niemals in Wasser tauchen. Nur benutzen, wenn Zuleitung und Gerät keine Beschädigungen aufweisen. Im Fehlerfall sofort den Netzstecker ziehen oder die Netzspannung ausschalten� A Erstickungsgefahr! Kinder nicht mit Verpackungsmaterial spielen lassen� ¡ Verbrühungsgefahr! Der Auslauf des Milchschäumers (6) wird sehr heiß. Nach Benutzung zuerst abkühlen lassen und erst dann berühren�...
-
Page 9: Bedienelemente
Bedienelemente Anzeige LED Das Leuchten und Blinken der jeweiligen Netzschalter O / I LEDs zeigt folgendes an: Mit dem Netzschalter O / I (9) wird das Gerät eingeschaltet oder vollständig ausge leuchtet Der Wassertank ist leer und schaltet (Stromzufuhr wird unterbrochen)� muss wieder gefüllt werden�... -
Page 10: Vor Dem Ersten Gebrauch
Vor dem ersten Gebrauch Drehknopf „Kaffeestärke“ Mit diesem Drehknopf (13) Allgemeines wird die Kaffeestärke einge Nur reines, kaltes Wasser ohne Kohlen stellt oder die Auswahl für säure und ausschließlich geröstete Pulverkaffee eingestellt� Bohnen (vorzugsweise Espresso oder VollautomatenBohnenmischungen) in die Sehr mild entsprechenden Behälter füllen. -
Page 11: Wasserfilter
Ausnahme: Wenn nur Heißwasser oder Dampf bezogen wurde, schaltet das Gerät aus, ohne zu spülen� Um das Gerät vorher manuell auszu schalten, drücken Sie die Servicetaste (12). Das Gerät spült und schaltet aus. Hinweis: Bei der ersten Benutzung, nach 5� Wassertankdeckel (17) hochklappen� der Durchführung des Serviceprogramms 6�... -
Page 12: Einstellungen
2� Wassertank (16) bis zur Markierung Info: Mit dem FilterIndikator können Sie max mit Wasser füllen� den Monat markieren, in dem Sie den Filter 3� Drehknopf (13) auf Position eingesetzt haben� Sie können auch den stellen� Monat markieren, in dem Sie den Filter das 4�... - Page 13 Soll eine andere Wasserhärte als die 3� Starttaste (10) nun so oft drücken voreingestellte eingegeben werden, oder bis die gewünschte Abschaltzeit wird ein Wasserfilter eingesetzt, wie folgt aufleuchtet: vorgehen: = 15 Minuten 1� Drehknopf (13) auf Position = 30 Minuten stellen�...
-
Page 14: Zubereitung Mit Kaffeebohnen
Zubereitung mit Hinweis: Wird innerhalb von 90 Sekunden keine Taste betätigt, geht das Gerät ohne Kaffeebohnen Speicherung in die Kaffeebereitschaft� Die vorher gespeicherte Brühtemperatur bleibt erhalten� Dieser Kaffeevollautomat mahlt für jeden Brühvorgang frischen Kaffee� Mahlgrad einstellen Mit dem Drehwähler (3) für Mahlgradein Tipp: Vor zugsweise Espresso... -
Page 15: Zubereitung Mit Gemahlenem Kaffee
Zubereitung mit Milchschaum zubereiten gemahlenem Kaffee Verbrennungsgefahr! Der Milchschäumer (6) wird sehr heiß. Dieser Kaffeevollautomat kann auch mit Milchschäumer (6) nur am Kunststoffteil gemahlenem Kaffee (kein löslicher Kaffee) anfassen� betrieben werden� Tipp: Erst die Milch aufschäumen und dann Wichtig: Täglich frisches Wasser in den Kaffee beziehen oder die Milch separat Wassertank (16) füllen�... -
Page 16: Pflege Und Tägliche Reinigung
Pflege und ● Schwimmer (8e) ausbauen und mit einem feuchten Tuch reinigen� tägliche Reinigung Stromschlaggefahr! Vor der Reinigung den Netzstecker ziehen. Das Gerät niemals in Wasser tauchen. Keinen Dampfreiniger benutzen� ● Das Gehäuse mit einem weichen, feuchten Tuch abwischen� Die folgenden Bauteile nicht in den ●... - Page 17 Milchschäumer zum Reinigen zerlegen: 7� Funktionskern im Uhrzeigersinn drehen, 1� Zum Abnehmen an der Metallhülse bis die Markierungen nebeneinander anfassen und nach unten abziehen� liegen� 8� Milchschäumer auf das Dampfventil aufsetzen� Darauf achten, dass die rote Markierung am Dampfventil verdeckt ist� 2�...
-
Page 18: Tipps Zum Energiesparen
Brüheinheit reinigen 7� Das Sieb der Brüheinheit unter dem Brüheinheit regelmäßig reinigen! Wasserstrahl gründlich reinigen� Brüheinheit automatisch vorreinigen: Servicetaste (12) kurz drücken. Das Gerät spült, wenn vorher Kaffee bezogen wurde� Anschließend schaltet es sich aus� Zusätzlich zum automatischen Reinigungs programm sollte die Brüheinheit (5a) regel mäßig zum Reinigen entnommen werden (Bild E am Anfang der Anleitung)�... -
Page 19: Serviceprogramm
● Lauwarmes Wasser in den leeren be nutzen� Sicherheitshinweise auf der Wasser tank (16) bis zur Markierung Ver packung der Reinigungsmittel beachten. 0,5l einfüllen und eine Siemens Das Serviceprogramm keinesfalls unter Entkalkungs tablette TZ80002 darin brechen! Flüssigkeiten nicht trinken! auflösen. Bei Verwendung von TZ60002 Niemals Essig, Mittel auf Essigbasis, unbedingt zwei Tabletten auflösen. -
Page 20: Frostschutz
Zubehör Das Serviceprogramm läuft jetzt ca. 8 Minuten� Folgendes Zubehör ist über den Handel leuchtet auf� und Kundendienst erhältlich. ● Tropfschale (8) leeren und wieder einsetzen� Zubehör Bestell nummer Wenn ein Filter verwendet wird, diesen jetzt Handel / wieder einsetzen� Kundendienst Das Gerät ist fertig gereinigt, entkalkt und Reinigungstabletten... -
Page 21: Entsorgung
Entsorgung Garantiebedingungen Entsorgen Sie die Verpackung umwelt Für dieses Gerät gelten die von unserer gerecht. Dieses Gerät ist entsprechend der jeweils zuständigen Landesvertretung europäischen Richtlinie 2012 / 19 / EG über her ausgegebenen Garantiebedingungen Elektro und Elektronikaltgeräte (waste des Landes, in dem das Gerät gekauft electrical and electronic equipment –... -
Page 22: Einfache Probleme Selbst Beheben
Einfache Probleme selbst beheben Problem Ursache Abhilfe Mahlwerk mahlt keine Bohnen fallen nicht ins Leicht an den Bohnen behälter Kaffeebohnen� Mahl werk (zu ölige Bohnen)� (1) klopfen� Even tuell Kaffeesorte wechseln� Bei geleertem Bohnen behäl ter (1) diesen mit einem trockenen Tuch auswischen�... - Page 23 Problem Ursache Abhilfe Der Wassertank ist nicht Den Wassertank richtig einsetzen� Die LED blinkt� richtig eingesetzt oder der Blinkt die LED weiterhin, einen Wasserfilter verbraucht. neuen Wasserfilter einsetzen und spülen, siehe Kapitel „Wasserfilter“. Kohlensäurehaltiges Wassertank mit frischem Wasser im Wassertank� Leitungswasser füllen�...
-
Page 24: Included In Delivery
Grate for coffee outlet Dear Coffee Connoisseur� e) Float Congratulations on purchasing this fully 9 Power on/off switch O / I automatic espresso machine from Siemens� 10 Start button 11 Steam button Included in delivery 12 Service button 13 “Coffee strength” rotary knob 14 “Drink selection”... -
Page 25: Safety Instructions
Safety instructions Please read and follow the operating instructions carefully and keep them for later reference. Enclose these instructions when you give this appliance to someone else. This appliance is designed for the preparation of normal household quantities in the home, or in household-like, non-commercial environments. Household-like environments include staff kitchens in shops, offi ces, agricultural and other small businesses or for use by guests at bed-and-breakfast establishments, small hotels and... - Page 26 ¡ Risk of suffocation! Do not allow children to play with packaging material. ¡ Risk of scalding! The milk frother outlet (6) gets very hot. After use, allow to cool down first before touching. Use this appliance only after the milk frother (6) has been fully assembled and installed.
-
Page 27: Controls
Controls LED display The various LEDs light up and flash to Power on/off switch O / I indicate the following: The power on/off switch O / I (9) is used to switch the appliance on or to switch it off lights up The water tank is empty and completely (power supply off). -
Page 28: Before Using For The First Time
Before using for “Coffee strength” rotary knob the first time This rotary knob (13) is used to adjust the coffee strength or select the setting for pre General ground coffee� Fill the appropriate container using only pure, cold, uncarbonated water and only roasted beans (preferably espresso or Very mild coffee bean blends for fully automatic coffee... -
Page 29: Water Filter
4� Assemble the milk frother. Only use Exception: The appliance switches off the appliance when the milk frother (6) without rinsing if only hot water or steam is completely assembled and fitted. was dispensed� To switch the appliance off manually before this, press the service button (12)�... -
Page 30: Settings
3� Turn the rotary Information: You can use the filter indicator knob (13) to position to mark the month in which you inserted the 4� Press and hold buttons (11) and filter. You can also mark the month in which (12) simultaneously for at least you will need to replace the filter next 5 seconds�... - Page 31 If you wish to change the default degree of 3� Now press the start button (10) repeat water hardness, or if you have inserted a edly until the required number of LEDs water filter, proceed as follows: light up to indicate the switchoff time: 1�...
-
Page 32: Preparation Using Coffee Beans
Preparation using Adjusting the grind settings The selector (3) for grind setting adjusts the coffee beans grind settings from coarse to fine. Warning! This fully automatic espresso machine Adjust the grinding unit only while it is grinds beans freshly for each brew. running! Otherwise the appliance may be damaged�... -
Page 33: Preparation Using Ground Coffee
Preparation using Preparing milk froth ground coffee Risk of burns! The milk frother (6) gets very hot. Hold the This fully automatic espresso machine can milk frother (6) by the plastic part only. also be operated using ground coffee (not instant coffee powder)�... -
Page 34: Maintenance And Daily Cleaning
Maintenance and ● Remove float (8e) and clean with a damp cloth� daily cleaning Risk of electric shock Unplug the appliance before cleaning it� Never immerse the appliance in water� Do not use a steam cleaner� ● Wipe the housing with a soft, damp cloth�... - Page 35 Cleaning the milk frother 5� Rinse all parts with clean water and dry. The milk frother (6) must be cleaned after 6� Fit the steam nozzle (6d) and frothing each use in order to remove residues� tube (6c) back into the metal sleeve� Important: Let the milk frother cool down before you remove it.
-
Page 36: Tips On Saving Energy
Cleaning the brewing unit Important: Do not clean with detergent or Clean the brewing unit regularly. other cleaning agents and do not put it in the dishwasher� To preclean the brewing unit automatically: 8� Wipe out the inside of the appliance Press the service button (12) briefly. -
Page 37: Service Programme
The appliance should be cleaned and ● Open the drawer (4)� descaled immediately using the service ● Drop a Siemens cleaning tablet into programme. If the service programme is the drawer (4) and close it� not run as instructed, the appliance may ●... -
Page 38: Frost Protection
Accessories The appliance has been cleaned, descaled and is ready for use again. The following accessories are available Important: Wipe down the appliance using from retailers or from customer service: a soft, damp cloth to immediately remove Accessories Ordering number any descaler residue. -
Page 39: Disposal
Disposal Guarantee Dispose of packaging in an environmentally The guarantee conditions for this appliance friendly manner. This appliance is labelled are as defined by our representative in the in accordance with European Directive country in which it is sold. Details regarding 2012/19/EG concerning used electrical these conditions can be obtained from and electronic appliances (waste electrical... -
Page 40: Simple Troubleshooting
Simple troubleshooting Problem Cause Remedy Grinding unit does not Beans are not falling into Gently tap the bean container grind the beans� the grinding unit (beans too (1). Change the type of coffee if oily). necessary. When the bean container (1) is empty, wipe it with a dry cloth. - Page 41 Problem Cause Remedy The water tank is not Correctly install the water tank. flashes. correctly installed or the If the LED continues to flash, filter is worn. install a new filter and rinse, see chapter “Filter”. Carbonated water in the Fill the water tank with fresh tap water tank�...
-
Page 42: Contenu De L'emballage
Egouttoir bec verseur du café cher amateur de café� e) Flotteur Félicitation pour avoir choisi la cafetière 9 Interrupteur électrique O / I Siemens� 10 Bouton Start (Démarrage) 11 Bouton Vapeur Contenu de l’emballage 12 Bouton Service 13 Bouton rotatif « Intensité du café »... -
Page 43: Consignes De Sécurité
Consignes de sécurité Lire attentivement ce mode d’emploi, s’y conformer lors de l’utilisation et le conserver ! Veuillez joindre ce mode d’emploi si vous passez l’appareil à quelqu’un d’autre. Cet appareil est conçu pour la préparation de quantités usuelles, dans le cadre d’un foyer ou d’un usage non commercial de type domestique. - Page 44 Ne jamais plonger l’appareil ou le cordon électrique dans l’eau� N’utiliser la machine que lorsque le cordon électrique et l’appareil ne présentent aucun dommage� En cas de défaut, débrancher immédiatement la fi che secteur ou couper la tension du réseau. ¡...
-
Page 45: Eléments De Commande
Eléments de commande Affichage par LED La signification de l’allumage et du clignote Interrupteur électrique O / I ment des LED est la suivante : L’interrupteur électrique O / I (9) sert à Le réservoir d’eau est vide mettre l’appareil sous tension ou hors est allumée et doit être rempli. -
Page 46: Avant La Première Utilisation
Avant la Bouton rotatif « Intensité du café » première utilisation Ce bouton rotatif (13) permet de régler l’intensité du café ou de sélectionner le café en Généralités poudre� Utiliser exclusivement de l’eau pure, froide, sans gaz carbonique et exclusivement Très doux du café... - Page 47 4� Monter le mousseur de lait� N’utiliser Mise hors tension de l’appareil l’appareil que si le mousseur de lait (6) La machine à expresso automatique est est complètement assemblé et monté� programmée en usine de façon à fonc tionner de manière optimale� La machine s’arrête automatiquement après une durée définie (la durée est réglable, voir «...
-
Page 48: Filtre Eau
Filtre eau Information : Le rinçage du filtre a, par la même occasion, activé le réglage pour Un filtre à eau peut diminuer l’entartrage. le signalement Changer filtre (= la LED Un filtre à eau neuf doit être rincé avant de clignote)�... -
Page 49: Réglages
Réglages Important : En cas d’utilisation du filtre à eau (voir point « Accessoires »), procéder comme Les réglages peuvent être personnalisés. suit, voir point « Filtre eau ». Les réglages possibles sont les suivants : Remarque : Si aucun bouton n’est actionné Dureté... - Page 50 Régler la température de percolation ● Lorsque le broyeur est en marche, La température de percolation peut elle régler le sélecteur (3) entre une mouture aussi être réglée. fine (a : rotation dans les sens inverse 1� Placer le bouton des aiguilles d’une montre) et une rotatif (13) sur mouture grossière (b : rotation dans le...
-
Page 51: Préparation Avec Du Café En Grains
Préparation avec du Préparation avec du café en grains café moulu Cette machine à espresso automatique Cet appareil peut également fonctionner mout du café frais pour chaque préparation� avec du café moulu (pas avec du café soluble)� Conseil pratique : Utiliser de préférence un mélange de café... -
Page 52: Préparer De La Mousse De Lait
Préparer de la Entretien et nettoyage mousse de lait quotidiens Risque de brûlure ! Risque de choc électrique ! Le mousseur de lait (6) devient très brûlant� Avant tout nettoyage, débrancher la fiche Ne saisir le mousseur de lait (6) que par la électrique�... - Page 53 ● Démonter le flotteur (8e) et le nettoyer Pour nettoyer le mousseur de lait, il faut le avec un chiffon humide� démonter : 1� Pour le retirer, saisir la douille métallique et la retirer vers le bas� Ne pas mettre les éléments suivants au lavevaisselle : cache (8a), flotteur (8e), tiroir à...
- Page 54 6� Assembler le cœur (6d) et le tube (6c) Nettoyer l’unité de percolation dans la douille métallique� Nettoyer régulièrement l’unité de percolation ! Prénettoyage automatique de l’unité de percolation : Appuyer brièvement sur le bouton Service 7� Tourner le cœur dans le sens des (12)�...
-
Page 55: Conseils Pour Économiser L'énergie
Conseils pour 7� Nettoyer soigneusement le tamis de l’unité de percolation sous le jet d’eau� économiser l’énergie ● Mettre l’appareil hors tension s’il n’est pas utilisé. Pour ce faire, appuyer sur le bouton Service (12)� L’appareil effectue un rinçage et se met hors tension� ●... - Page 56 Si un filtre est utilisé, le remettre maintenant ● Y placer une pastille de nettoyage en place� Siemens et fermer le tiroir (4)� L’appareil est nettoyé, détartré et de ● Appuyer sur le bouton Démarrage (10). nouveau prêt à fonctionner.
-
Page 57: Protection Contre Le Gel
Protection contre le gel Mise au rebut Afin d’éviter les problèmes dus au Eliminez l’emballage en respectant l’envi gel lors du transport et du stockage, ronnement� Cet appareil est marqué selon vider entièrement l’appareil au la directive européenne 2012/19/CE relative préalable. -
Page 58: Eliminer Soimême
Eliminer soi-même les problèmes simples Problème Cause Remède Le broyeur ne moud Les grains ne tombent pas Tapoter légèrement sur le réservoir à pas les grains� dans le broyeur (grains trop grains (1)� Changer éventuellement gras)� de café� Après avoir vidé le réservoir à grains (1), l’essuyer avec un chiffon sec. - Page 59 Problème Cause Remède Le café est trop « amer ». La mouture est trop fine ou Régler une mouture moins fine le café en poudre est trop ou utiliser un café en poudre fin. moins fin. Le café ne convient pas� Changer de café�...
-
Page 60: Caractéristiques Techniques
Problème Cause Remède Gouttes d’eau à l’intérieur Bac collecteur (8) retiré Attendre quelques secondes de l’appareil avec le bac trop tôt� avant de retirer le bac collec collecteur (8) retiré� teur (8) après la préparation de la dernière boisson� Les réglages usine ont été Des réglages personnels, Mettre l’appareil hors tension modifiés et doivent être... -
Page 61: Contenuto Della Confezione
Gentili amanti del caffè� c) Vassoio di sgocciolamento Congratulazioni per aver acquistato questa macchina automatica per espresso della uscita caffè d) Griglia di sgocciolamento uscita caffè società Siemens� e) Galleggiante 9 Interruttore di rete O / I Contenuto della 10 Tasto avvio confezione... -
Page 62: Avvertenze Di Sicurezza
Avvertenze di sicurezza Leggere, osservare e conservare le istruzioni con cura! Se l’apparecchio viene ceduto, allegare anche le presenti istruzioni. Questo apparecchio e destinato alla lavorazione di quantità adeguate all’utilizzo domestico, e in generale per usi domestici e non professionali. Gli utilizzi simili a quelli domestici comprendono, ad es. - Page 63 Non immergere mai l’apparecchio o il cavo di alimentazione in acqua� Utilizzare solo se il cavo e l’apparecchio non presentano danni� In caso di errore, estrarre immediatamente la spina dalla presa di corrente o disinserire la tensione di rete� ¡ Pericolo di soffocamento! Non lasciare che i bambini giochino con il materiale di imballaggio�...
-
Page 64: Elementi Di Comando
Elementi di comando LED indicatori L’illuminazione e il lampeggio dei LED Interruttore di rete O / I indicano: L’interruttore di rete O / I (9) permette di accendere o spegnere completamente è illuminato Il serbatoio dell’acqua è l’apparecchio (l’alimentazione elettrica vuoto e deve essere nuova... -
Page 65: Al Primo Impiego
Al primo impiego Manopola “Intensità caffè” La manopola (13) permette Istruzioni generali di impostare l’intensità del Riempire i corrispondenti contenitori solo caffè o selezionare il caffè in con acqua pulita, fredda, non addizionata polvere� con anidride carbonica e utilizzare esclu sivamente chicchi tostati (preferibilmente Molto delicato miscele per macchine automatiche da caffè... - Page 66 4� Montare l’inserto schiuma� Usare l’ap Spegnere l’apparecchio parecchio solo se l’inserto schiuma (6) è La macchina automatica per espresso completamente assemblato e montato� è programmata già in fabbrica con dei valori standard che garantiscono un funzionamento ottimale� L’apparecchio si spegne automaticamente dopo un tempo preimpostato (durata regolabile, vedere “Spegnimento automatico”...
-
Page 67: Filtro Acqua
Filtro acqua Informazione: Contemporaneamente al risciacquo del filtro viene attivata l’imposta Un filtro dell’acqua può ridurre la presenza zione di visualizzazione Cambio filtro (= il di depositi calcarei� lampeggia)� Prima di usare un filtro dell’acqua nuovo, lavarlo� Procedere come segue: Dopo la visualizzazione Cambio filtro o al 1�... -
Page 68: Impostazioni
Impostazioni 4� Tenere premuto per almeno 5 secondi il tasto avvio (10). I LED impostati Le impostazioni possono essere personaliz lampeggiano; la durezza selezionata per zate� Cosa è possibile impostare: l’acqua è salvata� Durezza acqua Importante: Se si impiega il filtro dell’acqua Questo apparecchio consente di impostare (ved. - Page 69 Nota: Se non viene premuto nessun Impostare il grado di macinatura tasto per 90 secondi, l’apparecchio passa Con il selettore (3) per l’impostazione del alla disponibilità caffè senza eseguire il grado di macinatura è possibile impostare salvataggio. Rimane impostato il tempo di la finezza del caffè...
-
Page 70: Preparazione Con Chicchi Di Caffè
Preparazione con Preparazione con caffè macinato chicchi di caffè La presente macchina automatica per La presente macchina automatica funziona espresso macina caffè nuovo ad ogni anche con caffè macinato (ma non con processo di bollitura� caffè solubile)� Suggerimento: Usare preferibilmente Importante: Riempire il serbatoio miscele di chicchi per caffè... -
Page 71: Preparare La Schiuma Latte
Cura e pulizia quotidiana 3� Interrompere il processo inserendo l’inserto schiuma (6)� Pericolo di scossa elettrica! Prima della pulizia staccare la spina� Preparare la schiuma latte Non immergere mai l’apparecchio in acqua� Non pulire con il vapore� Pericolo di ustione! L’inserto schiuma (6) si riscalda molto�... - Page 72 ● Smontare il galleggiante (8e) e pulirlo Pulire l’inserto schiuma con un panno umido� L’inserto schiuma (6) dovrebbe essere pulito dopo ogni uso, in modo da eliminare i resti� Importante: Prima di estrarre l’inserto schiuma, lasciarlo raffreddare� Per la pulizia smontare l’inserto schiuma: 1�...
- Page 73 5� Lavare tutte le parti con acqua pulita e Pulire l’unità di infusione asciugarle� Pulire periodicamente l’unità di infusione! 6� Inserire l’anima del tubo di servizio (6d) e il tubo di servizio (6c) nel tubo di Per eseguire la pulizia preventiva automa metallo�...
-
Page 74: Suggerimenti Per Risparmiare Energia
Programmi di servizio 7� Pulire a fondo il filtro dell’unità infusione tenendolo sotto il getto dell’acqua� Durata: circa 35 minuti A seconda della frequenza d’uso, il tasto di servizio (12) lampeggia a determinati intervalli� L’apparecchio dovrebbe essere imme diatamente pulito e decalcificato con il programma di servizio�... -
Page 75: Protezione Dal Gelo
(4)� momento di reinserirlo� ● Inserire una compressa di detergente La pulizia e la decalcificazione sono termi Siemens e chiudere il cassetto per il nate e l’apparecchio è di nuovo pronto per caffè in polvere (4)� l’uso� ● Premere il tasto avvio (10)�... -
Page 76: Accessori
Accessori Smaltimento I seguenti accessori sono disponibili presso Si prega di smaltire le confezioni nel rispetto i rivenditori e il Centro di assistenza� dell’ambiente� Questo apparecchio dispone di contrassegno ai sensi della direttiva europea 2012/19/CE in materia di appa Accessori Codice ordinazione recchi elettrici ed elettronici (waste electrical Rivenditori /... -
Page 77: Soluzione Dei Problemi Più Semplici
Soluzione dei problemi più semplici Problema Causa/situazione Soluzione Il macinacaffè non I chicchi non cadono nel maci Battere leggermente il conte macina chicchi� nacaffè (chicchi troppo grassi)� nitore dei chicchi di caffè (1)� Cambiare tipo di caffè� Se il contenitore dei chicchi di caffè... - Page 78 Problema Causa/situazione Soluzione Il caffè è troppo “amaro”. Il grado di macinatura impo Impostare un grado di maci stato è troppo fine oppure natura maggiore o usare il caffè in polvere è troppo caffè in polvere meno fine. fine. Tipo di caffè non adatto� Cambiare il tipo di caffè�...
-
Page 79: Dati Tecnici
Problema Causa/situazione Soluzione Presenza di gocce Il vassoio di sgocciolamento Estrarre il vassoio di d’acqua sul fondo interno (8) è stato estratto troppo sgocciolamento (8) solo dell’apparecchio dopo presto� alcuni secondi dopo l’ultimo aver tolto il vassoio di prelievo di bevanda� sgocciolamento (8)�... - Page 81 Online Auftragsstatus, Pickup mailto:delicnanda@hotmail.com Tel.: 0251 095 546 Service für Kaffeevollautomaten Fax: 0251 095 549 BE Belgique, België, Belgium und viele weitere Infos unter: www.siemens-home.com/cz BSH Home Appliances S.A. www.siemens-home.de Avenue du Laerbeek 74 DK Danmark, Denmark Reparaturservice, Ersatzteile & Laarbeeklaan 74 BSH Hvidevarer A/S Zubehör, Produkt-Informationen:...
- Page 82 Service Consommateurs: Tel.: 01 489 5461 ﻟﺒﻨﺎن LB Lebanon, 0 892 698 110 (0,34 € TTC/mn) Fax: 01 201 8786 Tehaco s.a.r.l mailto:soa-siemens-conso@ mailto:hibabejelentes@bsh.hu Boulevard Dora 4043 Beyrouth bshg.com P.O. Box 90449 Alkatrészrendelés Service Pièces Détachées et Jdeideh 1202 2040 Tel.: 01 489 5463...
- Page 83 Tel.: 021 203 9748 34771 Ümraniye, Istanbul Tel.: 088 424 4020 Fax: 021 203 9733 Tel.: 0 216 444 6688* Fax: 088 424 4845 mailto:service.romania@ Fax: 0 216 528 9188 mailto:siemens-contactcenter@ bshg.com mailto:careline.turkey@bshg.com bshg.com www.siemens-home.com/ro www.siemens-home.com/tr Onderdelenverkoop: *Çağrı merkezini sabit hatlardan RU Russia, Россия...
- Page 84 Siemens Info Line Garantiebedingungen DEUTSCHLAND (DE) (Mo-Fr: 8.00-18.00 Uhr erreichbar) Für Produktinformationen sowie Anwendungs- und Bedienungsfragen zu kleinen Hausgeräten: Die nachstehenden Bedingungen, die Voraussetzungen Tel.: 0911 70 440 044 und Umfang unserer Garantieleistung beschreiben, lassen oder unter die Gewährleistungsverpflichtungen des Verkäufers aus siemens-info-line@bshg.com dem Kaufvertrag mit dem Endabnehmer unberührt.
- Page 85 Beratung bei Störungen • Advice on troubleshooting • Conseils sur les problèmes • Consejos sobre problemas de • Consulenza su problemi Service-Hotlines www.siemens-home.com 0810 700 400 070 222 142 043 455 4095 0911 70 440 044 44 89 89 85...
- Page 86 Siemens-Electrogeräte GmbH Carl-Wery-Str. 34 81739 München www.siemens-home.com © 2014 by Siemens-Electrogeräte GmbH, München 9000 943 331 – 02/14...
Need help?
Do you have a question about the TE501505DE/08 and is the answer not in the manual?
Questions and answers