Table of Contents
Advertisement
Available languages
Available languages
Quick Links
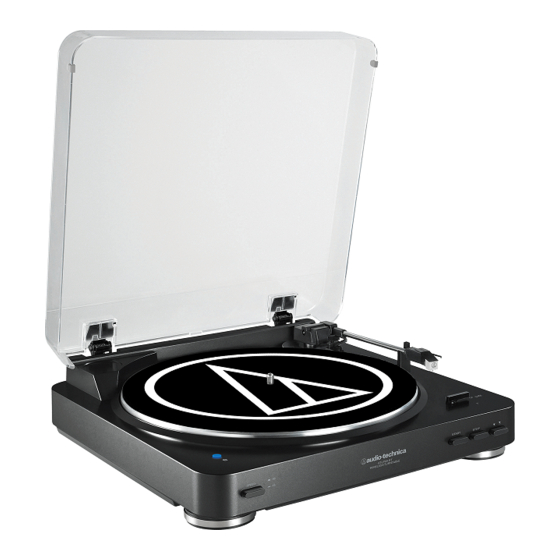
AT-LP60-BT Wireless Turntable
Installation and Operation Pages 2-8
AT-LP60-BT
Tourne-disque sans fil
Installation et utilisation Pages 9-15
AT-LP60-BT
Kabelloser Plattenspieler
Installation und Betrieb Seiten 16-22
AT-LP60-BT
Giradischi wireless
Installazione e funzionamento - Pagine 23-29
AT-LP60-BT
Tocadiscos inalambrico
Instalación y funcionamiento Páginas 30-36
AT-LP60-BT
Vitrola Sem Fio
Instalação e Operação Páginas 37-43
AT-LP60-BT
Беспроводной проигрыватель грампластинок
Установка и эксплуатация Стр. 44-50
®
ATロゴとレジストレーションマーク
使用基準
Advertisement
Table of Contents

Related Manuals for Audio Technica AT-LP60BK-BT


Summary of Contents for Audio Technica AT-LP60BK-BT
- Page 1 AT-LP60-BT Wireless Turntable Installation and Operation Pages 2-8 AT-LP60-BT Tourne-disque sans fil Installation et utilisation Pages 9-15 AT-LP60-BT Kabelloser Plattenspieler Installation und Betrieb Seiten 16-22 AT-LP60-BT Giradischi wireless Installazione e funzionamento - Pagine 23-29 AT-LP60-BT Tocadiscos inalambrico Instalación y funcionamiento Páginas 30-36 AT-LP60-BT Vitrola Sem Fio Instalação e Operação Páginas 37-43...
- Page 2 Wireless Turntable Introduction Important information Thank you for purchasing the AT-LP60-BT wireless turntable. Audio- Warning: Technica has been a leading manufacturer of innovative stereo • To prevent fire or shock hazard, do not expose this apparatus to rain phonograph products for more than 50 years. We are pleased to provide or moisture.
-
Page 3: Main Features
English Main Features 12" SIZE 7" Figure 1 Front Back ANALOG SPEED START STOP PHONO LINE AT-LP60-BT WIRELESS TURNTABLE ANALOG PHONO LINE 12" SIZE 7" 12" SIZE 7" START BUTTON 45-RPM ADAPTER (shown in receptacle) Engages the motor/platter and begins automatic operation. Adapts 7”... -
Page 4: Initial Setup
Initial Setup Assembling the Turntable Figure 2 – Assembling the turntable The AT-LP60-BT requires some assembly before first use. 2a – Drive belt IMPORTANT: Do not connect the AC power cable until assembly is Brass motor pulley Red ribbon complete. Carefully place the turntable platter on the center spindle, making certain the platter is fully seated on the spindle. -
Page 5: Automatic Operation
English Initial Setup (continued) Connecting to Stereo System (Wireless Connection) Connecting to Stereo System (Wired Connection) About Pairing Connect the output cable’s mini-plug to the ANALOG OUT on the rear panel. To connect the turntable to a Bluetooth receiver device, the turntable needs to pair (register) with the device. -
Page 6: Replacing The Stylus
Operation (continued) Figure 6 Caution: When the tone arm reaches the end of the record, it will lift and return to the tone arm rest automatically. When this happens, do not interfere with the tone arm’s motion, or damage to the mechanism may occur. If the tone arm does not return automatically to the tone arm rest after the record has finished playing, simply press the STOP button to complete operation. -
Page 7: Troubleshooting
English Troubleshooting Turntable does not operate Figure 11 – Checking the drive belt Make certain the turntable’s AC cable is plugged into an AC outlet, and that the AC outlet is “live.” Check the drive belt to make certain it is on correctly. (See Fig. -
Page 8: Specifications
Specifications Tips For Better Performance • When opening or closing the turntable cover, handle it gently, moving it either at the center or equally from both sides. • Do not touch the stylus tip with your fingers; avoid bumping the stylus on the turntable mat or a record’s edge. •... - Page 9 Français Tourne-disque sans fil Informations importantes Introduction Merci d’avoir acheté le tourne-disque sans fil AT-LP60-BT. Audio- Avertissement: Technica est depuis plus de 50 ans un leader et un novateur dans • Pour éviter tout risque de choc électrique ou d’incendie, n’exposez la construction de produits phonographiques stéréo.
-
Page 10: Principaux Éléments
12" SIZE Principaux éléments 7" Figure 1 Avant Arrière ANALOG SPEED START STOP PHONO LINE AT-LP60-BT WIRELESS TURNTABLE ANALOG PHONO LINE 12" SIZE 7" 12" SIZE 7" BOUTON DE DÉMARRAGE ADAPTATEUR 45 TR/MIN (placé dans son logement sur l’illustration) Met en marche le moteur/la platine et lance le fonctionnement en mode automatique. -
Page 11: Configuration Initiale
Français Configuration initiale Assemblage du tourne-disque Figure 2 – Assemblage du tourne-disque Vous devez assembler certains éléments du tourne-disque AT-LP60-BT 2a – Courroie d’entraînement avant de pouvoir vous servir de ce dernier. IMPORTANT : Ne branchez Poulie en laiton du moteur Languette rouge pas le câble d’alimentation CA avant d’avoir terminé... - Page 12 Configuration initiale (suite) Connexion au système stéréo (connexion sans fil) Connexion au système stéréo (connexion filaire) À propos de l’appairage Connectez le mini-jack du câble de sortie à la sortie analogique ANALOG OUT sur le panneau arrière. Pour connecter le tourne-disque à un dispositif récepteur Bluetooth, le tourne-disque doit être appairé...
-
Page 13: Remplacement De La Pointe De Lecture
Français Utilisation (suite) Figure 6 Attention : Lorsque le bras de lecture arrive à la fin du disque, le levage du bras et son retour sur le support sont commandés par le mécanisme automatique. Lors de cette opération, ne tentez pas d’agir sur le mouvement du bras de lecture, au risque d’endommager le mécanisme. -
Page 14: Dépannage
Dépannage Le tourne-disque ne fonctionne pas Figure 11 – Vérification de la courroie d’entraînement Vérifiez que le câble d’alimentation CA du tourne-disque est branché sur une prise secteur CA et que la prise est alimentée en courant. Vérifiez que la courroie d’entraînement est correctement mise en place. -
Page 15: Caracteristiques Techniques
Français Caracteristiques techniques Conseils d’optimisation des performances • En ouvrant ou en fermant le couvercle du tourne-disque, veillez à ne pas forcer le mécanisme des charnières : prenez le couvercle par le milieu ou exercez une force égale de part et d’autre si vous le prenez par les côtés. - Page 16 Kabelloser Plattenspieler Wichtige Informationen Einleitung Herzlichen Dank, dass Sie sich für den kabellosen Plattenspieler Warnung: AT-LP60-BT entschieden haben! Audio-Technica ist seit mehr als 50 • Setzen Sie das Gerät weder Regen noch Feuchtigkeit aus, um die Jahren als Hersteller innovativer Stereo-Plattenspieler bekannt. Wir Gefahr eines Brands oder Stromschlags zu vermeiden.
- Page 17 Deutsch 12" SIZE Grundfunktionen 7" Abbildung 1 Vorderseite Rückseite ANALOG SPEED START STOP PHONO LINE AT-LP60-BT WIRELESS TURNTABLE ANALOG PHONO LINE 12" SIZE 7" 12" SIZE 7" START-TASTE Single-Adapter für 45 U/min (in seiner Aufbewahrungsmulde) Setzt den Motor/Plattenteller in Gang und startet den Adapter zum zentrierten Auflegen von 7-Zoll-Schallplatten mit automatischen Betrieb.
- Page 18 Inbetriebnahme Vorbereitung des Plattenspielers Abbildung 2 – Vorbereitung des Plattenspielers Der AT-LP60-BT erfordert vor dem ersten Einsatz einige vorbereitende 2a – Antriebsriemen Handgriffe. Messingriemenscheibe Rotes Band WICHTIG: Schließen Sie das Netzkabel erst dann an, wenn der vorbereitende Zusammenbau abgeschlossen ist. Setzen Sie den Plattenteller vorsichtig bis zum Anschlag auf die Mittelachse und vergewissern Sie sich, dass er fest auf der Achse sitzt.
-
Page 19: Bedienung
Deutsch Inbetriebnahme (Fortsetzung) Verbinden mit der Stereoanlage (kabellos) Verbinden mit der Stereoanlage (über Kabel) Anmerkungen zur Paarungsfunktion Schließen Sie den Ministecker des Ausgangskabels an die Buchse ANALOG OUT an der Rückseite an. Zum Verbinden des Plattenspielers mit einem Bluetooth-Empfangsgerät muss er zunächst mit dem anderen Gerät gepaart (und dort registriert) Verbinden Sie den roten Cinch-Stecker des Ausgangskabels mit werden. -
Page 20: Auswechseln Der Nadel
Bedienung (Fortsetzung) Abbildung 6 Vorsicht: Wenn der Tonarm das Ende der Schallplatte erreicht hat, wird er automatisch angehoben und zur Tonarmstütze zurückgeführt Bei Ablauf dieses Vorgangs darf die Bewegung des Tonarms nicht gestört werden, da dies eine Beschädigung des Mechanismus zur Folge haben kann. -
Page 21: Fehlersuche
Deutsch Fehlersuche Plattenspieler funktioniert nicht Abbildung 11 – Überprüfung des Antriebsriemens Vergewissern Sie sich, dass das Netzkabel des Plattenspielers an einer Steckdose angeschlossen ist und diese Strom liefert. Prüfen Sie, ob der Antriebsriemen richtig sitzt. (Siehe Abb. 11.) A) Entfernen Sie die Matte vom Plattenteller (Abb. 11a). Legen Sie die Matte sicherheitshalber in die Originalverpackung. -
Page 22: Technische Daten
Technische Daten Tipps für störungsfreien Betrieb • Öffnen und schließen Sie die Staubschutzhaube mit der entsprechenden Vorsicht und fassen Sie sie dabei entweder in der Mitte oder an beiden Seiten. • Berühren Sie die Nadelspitze niemals mit den Fingern; senken Sie die Nadel nicht auf die Plattentellermatte oder die Kante einer Schallplatte ab. - Page 23 Italiano Giradischi wireless Informazioni importanti Introduzione Grazie d'aver acquistato il giradischi wireless AT-LP60-BT. Avvertenza: Audio-Technica è leader di prodotti innovativi audio-stereo da oltre • Per evitare il pericolo di incendi o scosse elettriche, non esporre 50 anni. Siamo lieti di offrire questo giradischi, di cui è possibile questo apparecchio alla pioggia o all’umidità.
-
Page 24: Caratteristiche Principali
12" SIZE Caratteristiche principali 7" Figura 1 Parte anteriore Parte posteriore ANALOG SPEED START STOP PHONO LINE AT-LP60-BT WIRELESS TURNTABLE ANALOG PHONO LINE 12" SIZE 7" 12" SIZE 7" PULSANTE START ADATTATORE PER 45 GIRI (mostrato nella sede) Abilita il motore/piatto e avvia il funzionamento automatico. Adatta dischi da 7"... -
Page 25: Configurazione Iniziale
Italiano Configurazione iniziale Assemblaggio del giradischi Figura 2 – Assemblaggio del giradischi L'AT-LP60-BT richiede un minimo di assemblaggio prima di essere 2a – Cinghia di trazione Puleggia del utilizzato per la prima volta. IMPORTANTE: Non collegare il cavo di Linguetta rossa motore in ottone alimentazione CA fino al completamento dell’assemblaggio. -
Page 26: Funzionamento
Configurazione iniziale (continua) Collegamento all'impianto stereo (collegamento wireless) Collegamento all'impianto stereo (collegamento mediante cavi) Informazioni sull'abbinamento Collegare il mini-connettore del cavo di uscita ad ANALOG OUT (USCITA ANALOGICA) sul pannello posteriore. Per collegare il giradischi a un dispositivo ricevitore Bluetooth, è necessario eseguirne l'abbinamento (registrazione). -
Page 27: Sostituzione Della Puntina
Italiano Funzionamento (continua) Figura 6 Attenzione: quando il braccio raggiunge la fine del disco, si solleva e torna automaticamente alla sede di appoggio. Quando questo accade, non interferire con il movimento del braccio, perché quest'ultimo potrebbe danneggiarsi. Se il braccio non torna automaticamente alla sede di appoggio al termine della riproduzione del disco, è... -
Page 28: Risoluzione Dei Problemi
Risoluzione dei problemi Il giradischi non entra in funzione Figura 11 – Controllo della cinghia di trazione Verificare che il cavo CA del giradischi sia inserito in una presa CA sottotensione. Accertarsi che la cinghia di trazione sia fissata correttamente. (Vedere la Fig. - Page 29 Italiano Specifiche Suggerimenti per ottenere prestazioni migliori • Quando si apre o si chiude il coperchio del giradischi è necessario maneggiarlo con delicatezza, tenendolo al centro o da entrambi i lati. • Non toccare l'estremità della puntina con le dita; evitate di far cadere la puntina sul tappetino del giradischi o sul bordo del disco.
- Page 30 Tocadiscos inalámbrico Información importante Introducción Gracias por comprar el tocadiscos inalámbrico AT-LP60-BT. Advertencia: Audio-Technica ha sido el fabricante líder de productos fonográficos • Para evitar el riesgo de que se produzca un incendio o una descarga estéreo innovadores durante más de 50 años. Nos complace ofrecerle eléctrica, no exponga la unidad a la lluvia ni a la humedad.
-
Page 31: Funciones Principales
Español 12" SIZE Funciones principales 7" Figura 1 Parte delantera Parte trasera ANALOG SPEED START STOP PHONO LINE AT-LP60-BT WIRELESS TURNTABLE ANALOG PHONO LINE 12" SIZE 7" 12" SIZE 7" BOTÓN START (INICIAR) ADAPTADOR DE 45 RPM (se muestra en el receptáculo) Acciona el motor/plato e inicia el funcionamiento automático. -
Page 32: Instalación Inicial
Instalación inicial Montaje del tocadiscos Figura 2 – Montaje del tocadiscos Antes de utilizar el AT-LP60-BT por primera vez, es necesario realizar 2a – Correa de transmisión algunas tareas de montaje. IMPORTANTE: No conecte el cable de Polea del motor de bronce Cinta roja alimentación de CA hasta que finalice el montaje. - Page 33 Español Instalación inicial (continuación) Conexión al sistema estéreo (conexión inalámbrica) Conexión al sistema estéreo (conexión con cable) Cómo emparejar Enchufe el miniconector del cable de salida a ANALOG OUT que Para conectar el tocadiscos a un dispositivo receptor de Bluetooth, se encuentra en la parte trasera.
-
Page 34: Sustitución De La Aguja
Funcionamiento (continuación) Figura 6 Precaución: Cuando el brazo de lectura alcanza el final del disco, se levanta y vuelve al soporte de forma automática. En esta situación, no interfiera con el movimiento del brazo de lectura o podrán producirse daños en el mecanismo. Si el brazo de lectura no vuelve automáticamente al soporte una vez finalizada la reproducción del disco, pulse el botón STOP (PARAR). -
Page 35: Solución De Problemas
Español Solución de problemas El tocadiscos no funciona Figura 11 – Comprobación de la correa de transmisión Asegúrese de que el cable de CA del tocadiscos está enchufado en la toma de CA, y que ésta suministra corriente. Compruebe que la correa de transmisión está colocada correctamente. -
Page 36: Especificaciones
Especificaciones Consejos para un mejor rendimiento • Cuando abra o cierre la cubierta del tocadiscos, hágalo con suavidad; desplácela por el centro o de forma homogénea por ambos lados. • No toque la punta de la aguja con los dedos; evite golpear la aguja contra la estera o contra el borde del disco. -
Page 37: Informações Importantes
Português Vitrola sem fio Informações importantes Introdução Obrigado por comprar a vitrola sem fio AT-LP60-BT. A Audio-Technica é Advertência: fabricante líder de produtos fonográficos estéreo inovadores há mais • Para prevenir o perigo de incêndio ou choque eléctrico, não exponha de 50 anos. - Page 38 12" SIZE Principais recursos 7" Figura 1 Frente Trás ANALOG SPEED START STOP PHONO LINE AT-LP60-BT WIRELESS TURNTABLE ANALOG PHONO LINE 12" SIZE 7" 12" SIZE 7" BOTÃO START (INICIAR) ADAPTADOR DE 45 RPM (mostrado no recipiente) Engrena o motor/a bandeja e começa a operação automática. Adapta álbuns de 7"...
-
Page 39: Configuração Inicial
Português Configuração inicial Montagem da vitrola Figura 2 – Montagem da vitrola A vitrola AT-LP60-BT requer montagem antes do primeiro uso. 2a – Correia de transmissão Polia do motor de IMPORTANTE: Não conecte o cabo de alimentação CA até que a Fita vermelha bronze montagem esteja concluída. - Page 40 Configuração inicial (continuação) Conectar ao sistema estéreo (conexão sem fio) Conectar ao sistema estéreo (conexão com fio) Sobre o emparelhamento Conecte o mini-plugue do cabo de saída à ANALOG OUT no painel posterior. Para conectar a vitrola a um dispositivo receptor Bluetooth, a vitrola precisa ser emparelhada (registrada) com o dispositivo.
- Page 41 Português Operação (continuação) Figura 6 Cuidado: Quando o braço chegar ao final do álbum, ele levantará e retornará ao seu suporte automaticamente. Quando isso acontece, não interfira no movimento do braço, ou o mecanismo poderá ser danificado. Se o braço não voltar automaticamente ao suporte após o final da reprodução do álbum, simplesmente pressione o botão STOP para concluir a operação.
-
Page 42: Solução De Problemas
Solução de problemas Vitrola não funciona Figura 11 – Verificação da correia de transmissão Certifique-se de que o cabo CA da vitrola esteja conectado a uma saída CA e de que a saída CA esteja "ativo". Verifique a correia de transmissão para certificar-se de que está ligada corretamente. - Page 43 Português Especificações Dicas para melhor desempenho • Ao abrir ou fechar a tampa da vitrola, faça-o com cuidado, movendo no centro ou igualmente nas laterais. • Não toque na ponta da agulha com os dedos; evite bater a agulha no prato da vitrola ou nas extremidades de um álbum. •...
-
Page 44: Важная Информация
Беспроводный проигрыватель грампластинок Важная информация Введение Благодарим вас за приобретение беспроводного проигрывателя Предупреждение: грампластинок AT-LP60-BT. Audio-Technica более 50 лет остается • Во избежание возгорания или удара электрическим током не ведущим производителем инновационной стереофонографической допускайте попадания дождя или иной влаги на этот аппарат. продукции. -
Page 45: Основные Особенности
Русский 12" SIZE Основные особенности 7" Рисунок 1 Вид спереди Вид сзади ANALOG SPEED START STOP PHONO LINE AT-LP60-BT WIRELESS TURNTABLE ANALOG PHONO LINE 12" SIZE 7" 12" SIZE 7" КНОПКА START (ПУСК) АДАПТЕР НА 45 ОБ/МИН (показан в гнезде) Служит... - Page 46 Первоначальная установка Сборка проигрывателя Рисунок 2 – Сборка проигрывателя Для осуществления первоначальной установки проигрывателя 2a – Приводной ремень Латунный шкив грампластинок AT-LP60-BT необходимы соответствующие Красная лента электродвигателя принадлежности. ВАЖНО: Не подсоединяйте шнур питания переменного тока до тех пор, пока не будет завершена сборка. Осторожно...
- Page 47 Русский Первоначальная установка (продолжение) Подключение к стереосистеме (беспроводное подключение) Подключение к стереосистеме (проводное подключение) О сопряжении Присоедините мини-штекер выходного кабеля к АНАЛОГОВОМУ ВЫХОДУ на задней панели. Для подключения проигрывателя к приемному устройству с использованием интерфейса Bluetooth, необходимо выполнить Присоедините красный штекер RCA на выходном кабеле к входу сопряжение...
- Page 48 Эксплуатация (продолжение) Рисунок 6 Осторожно: По достижении конца пластинки рычаг звукоснимателя поднимается и возвращается на подставку звукоснимателя автоматически. Когда это происходит, не создавайте помех движению рычага звукоснимателя, иначе возможно повреждение механизма. Если по достижении конца пластинки рычаг звукоснимателя не возвращается на подставку автоматически, просто нажмите кнопку STOP (Остановка), чтобы...
-
Page 49: Устранение Неполадок
Русский Устранение неполадок Рисунок 11 – Проверка приводного ремня Проигрыватель не работает Убедитесь в том, что кабель электропитание вставлен в розетку, и что розетка функционирует. Проверьте, должным ли образом установлен приводной ремень. (См. рис. 11) A) Снимите с диска проигрывателя коврик для пластинок (рис. -
Page 50: Технические Характеристики
Технические характеристики Рекомендации по обеспечению наилучших характеристик • Открывая и закрывая крышку проигрывателя, обращайтесь с ней с осторожностью, перемещая ее по центру или равномерно с двух сторон. • Не касайтесь кончика иглы пальцами; избегайте соударений иглы с ковриком для пластинки или с краем пластинки. Регулярно... - Page 52 Visit our Web Site: www.audio-technica.com Two-Years Limited Warranty Audio-Technica products purchased in the UK and EU / Europe are guaranteed for two years from date of purchase by Audio-Technica Ltd. to be free of defects in materials and workmanship. In the event of such defect, product will be repaired promptly without charge or, at our option, replaced with a new product of equal or superior value, if the faulty product is delivered to Audio-Technica Ltd., prepaid, together with the proof of purchase.
- Page 53 Visite nuestra página web: www.audio-technica.com Dos años de garantía limitada Los productos de Audio-Technica comprados en el Reino Unido y en la Unión Europea o en Europa cuentan con una garantía de dos años desde la fecha de compra por parte de Audio-Technica Ltd. que garantiza que están libres de defectos en cuanto a materiales y mano de obra.
- Page 54 Memo...
- Page 55 Memo...
- Page 56 ® ATロゴとレジストレーションマーク 使用基準 株式会社オーディオテクニカ (2009.4) ® Audio-Technica Corporation 45mm 未満は 削除 ©2016 Audio-Technica Corp. 45mm ● ● 169501421C 2016.02...
Need help?
Do you have a question about the AT-LP60BK-BT and is the answer not in the manual?
Questions and answers