
Subscribe to Our Youtube Channel
Related Manuals for Audio Technica AT-LP60XHP


Summary of Contents for Audio Technica AT-LP60XHP
- Page 1 AT-LP60XHP User Manual Automatic Belt-Drive Turntable with Headphone Amplifier AT-LP60XHP...
-
Page 2: Package Contents
Introduction Thank you for purchasing this Audio-Technica product. Before using the product, please read through the Quick Start Guide and Caution Guide, as well as this user manual when necessary, to ensure that you use the product correctly. This product can be used only in the countries where the product is sold. Make sure that the operating voltage and the plug of AC adapter of the product are correct for the country you live in. - Page 3 Safety precautions (turntable) Safety precautions (turntable) Although this product was designed to be used safely, failing For customers in Canada to use it correctly may result in an accident. To ensure safety, observe all warnings and cautions while using the product. IC statement: CAN ICES-3 (B)/NMB-3(B) Important information...
-
Page 4: Notes On Use
Notes on use Turntable body Do not set and use the product in locations that are • considerably hot or humid, dirty, or subject to extreme vibrations. The product should be positioned on a flat, level surface. • When closing the dust cover, close it completely. Do not open •... -
Page 5: Part Names And Functions
Part names and functions Turntable AT-LP60XHP 12 13 45 RPM adapter (shown in receptacle) 3.5 mm (1/8") headphone jack Adapts 7" records with large center holes to fit center Volume control knob spindle. Adjusts the headphone volume. Platter START button Spindle Spins the platter and moves the tonearm. - Page 6 Part names and functions Headphones Headband Housing 3.5 m (11.5') cable Earpad Slider L/R (LEFT/RIGHT) indicator Input plug (3.5 mm (1/8") gold-plated stereo mini-plug) The left side has a protruding part.
-
Page 7: Preparation For Use
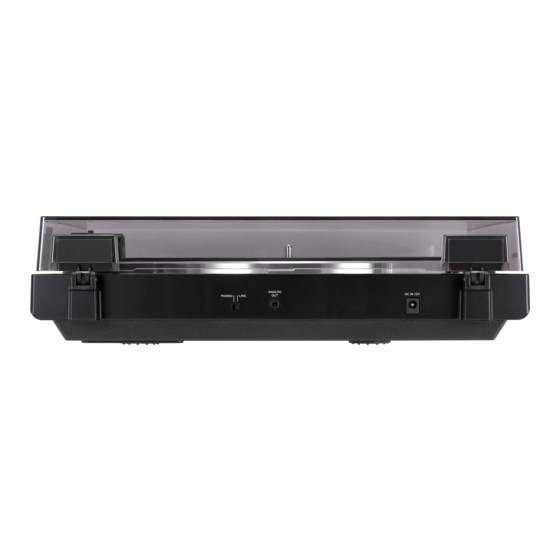
If the product is near equipment (cell phone, etc.) that emits • strong radio waves, noise may occur. Belt Motor pulley (brass-colored) AT-LP60XHP Straight Twisted Installing/removing the dust cover 3. Remove the red ribbon from the belt. When removing the dust cover, slowly pull the dust cover out from the dust cover hinge holders. - Page 8 With PHONO Without PHONO the platter. Tonearm AT-LP60XHP Setting pre-amplifier selector switch This product has a built-in phono equalizer function. You can use the product even if you do not have a phono amplifier or To outlet connectable equipment with a built-in phono amplifier.
-
Page 9: Playing A Record
• the 45 RPM adapter (see the right side of the diagram below). 45 RPM adapter 2. Position the tonearm over the desired location (groove) on AT-LP60XHP AT-LP60XHP the record. Automatic operation Lower the volume of the amplifier, speakers, etc. sufficiently. - Page 10 Stopping the record AT-LP60XHP Once the record has played to the end, the tonearm will automatically return to the tonearm rest. To manually stop the record, do the following.
-
Page 11: Replacing The Stylus
Care Replacing the stylus Turntable body Removing the stylus When the turntable body is dirty or dusty, first disconnect the In addition to the deterioration of sound quality, records may • • AC adapter, and then wipe off the dirt and dust with a soft, also be damaged as the cartridge’s stylus tip wears down. -
Page 12: Replacing The Belt
Place your thumbs in the openings and pull up strongly. • AT-LP60XHP 3. Place the new belt around the inner circle. When the turntable is moved Be careful not to twist the belt while doing this. -
Page 13: Troubleshooting
Playback speed slows down Is the belt stretched out? Replace it with a new belt. • or there is irregular rotation. Dimensions 359.5 AT-LP60XHP (Unit: mm) AT-LP60XHP... -
Page 14: Specifications
Specifications Turntable (AT-LP60XHP) Headphones (ATH-250AV) Type Belt-drive, fully automatic Type Closed-back dynamic operation Driver 40 mm Motor DC servo-controlled Sensitivity 102 dB/mW Speeds 33-1/3 RPM, 45 RPM Frequency response 18 to 22,000 Hz Turntable platter Aluminum Maximum input power 500 mW Wow and flutter <...
Need help?
Do you have a question about the AT-LP60XHP and is the answer not in the manual?
Questions and answers