Table of Contents
Advertisement
Quick Links
Dear customer!
Thank you for choosing this quality product from ASKO. We hope it will
meet your expectations and fulfi l your needs for many years to come.
Scandinavian design combines clean lines, everyday functionality and
high quality. These are key characteristics of all our products and the
reason they are greatly appreciated throughout the world.
Operating instructions
SIVK7QATX HI1774IQ
SIVK6QATX HI1654IQ
SIVK6QFTX HI1634IQ
Advertisement
Table of Contents

Related Manuals for Asko SIVK7QATX HI1774IQ


Summary of Contents for Asko SIVK7QATX HI1774IQ
- Page 1 Dear customer! Thank you for choosing this quality product from ASKO. We hope it will meet your expectations and fulfi l your needs for many years to come. Scandinavian design combines clean lines, everyday functionality and high quality. These are key characteristics of all our products and the reason they are greatly appreciated throughout the world.
- Page 2 Dear customer! Glass-ceramic hob is intended for use in households. Our products are packed in environment-friendly materials which can be recycled, disposed of, or destroyed without imposing any burden on the environment. Instructions for use Instructions for use are intended for the user. They describe the appliance and its operation.
-
Page 3: Table Of Contents
TABLE OF CONTENS IMPORTANT WARNINGS Stand by mode What you should pay attention to Child lock Connection and repair Stop/Go function During use Cooking timer / Minute minder Temperature safety Cooking timer function Cooking-time limiter Switching off the timer/minute minder CONTROL UNIT COOKING Control panel... -
Page 4: Important Warnings
IMPORTANT WARNINGS • Stop using the hob if a break or crack appears. What you should pay attention to Switch the appliance off immediately, unplug Induction cooking is extremely safe. Various safety devices it to avoid electric shocks, and call the service have been incorporated in the hob such as a residual heat department. - Page 5 Setting The cooking zone switches automatically off after: 12 hours 8,5 hours 6,5 hours 5 hours 4 hours 3,5 hours 3 hours 2,5 hours 2 hours 1,5 hours 2 hours 2 hours The cooking-time limiter switches the cooking zones off if the time in the table has elapsed.
-
Page 6: Control Unit
CONTROL UNIT Control panel NOTE! The number of cooking zones depends on the appliance model. IQ - IQcook system (Controls are described in the separately attached instructions for use) ----------------------------------------------------------------- Hotplate power control P - Power boost Child lock Cooking hob ON/OFF button STOP/GO control button Clock setting (+/-) -
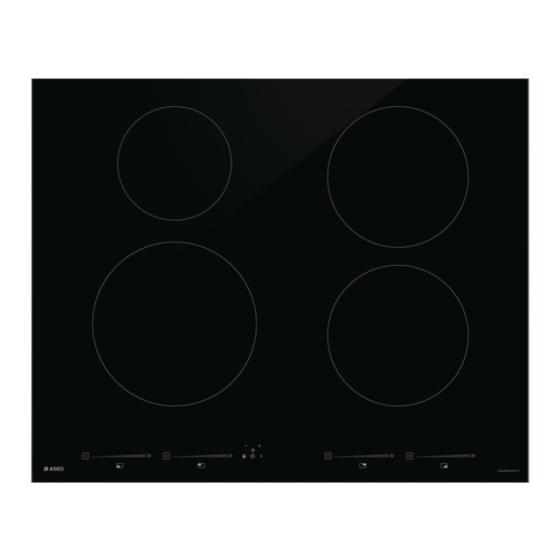
Page 7: Description
Description 1. Cooking zone Φ 145mm; 2,2kW 2. Cooking zone Φ 180mm; 3,0kW 3. Cooking zone Φ 210mm; 3,7kW 4. Cooking zone Φ 180mm; 3,0kW 5. Cooking zone Φ 280mm; 3,7kW... -
Page 8: Use
Getting used to it... NOTE! Using touch sensors The touch sensors only react to the light pressure of a Grains of sand may cause scratches which fi ngertip. cannot be removed. Only put pans with a clean You do not have to apply any pressure. Do not operate base on the cooking surface and always pick the controls with any other objects. -
Page 9: Pans
The electronic controls are accurate Suitable Unsuitable and easy to set. For example, on the Special stainlesssteel pans Earthenware lowest setting you can melt chocolate Class Induction Stainless steel Simple directly in the pan or cook ingredients Hard-wearing enamelled Porcelain that you would normally heat in a bain- pans marie. -
Page 10: Operation
OPERATION Switching on the hob and setting the power Remaining heat indicator The power has 9 settings. There is also a ‘boost’ setting, A hotplate that has been used intensively will retain heat which is indicated by the letter P in the display. for several minutes after it has been switched off... -
Page 11: Boost Function
Boost function Switching off all of the hotplates at the same time The ‘Boost’ function is used to cook at maximum power The hob is in stand-by mode, or one or more of the for a short period of time (maximum 10 minutes). The hotplates are active. -
Page 12: Stop/Go Function
Stop/Go function Switch the hob to (standard) lock mode One or more hotplates are active. Stop / Go 1. Touch and hold the Use the Stop / Go function to 'pause' the whole hob Attention! All previously set cooking processes for 10 minutes while cooking. -
Page 13: Cooking Timer / Minute Minder
Cooking timer / Minute minder Cooking timer function A cooking timer can be set for each cooking zone. All of Cooking timer can be set for each particular hotplate. the cooking timers can be used at the same time. The All timers can be set simultaneously and they can hob also has a minute minder. -
Page 14: Switching Off The Timer/Minute Minder
NOTE! If several cooking timers/minute minders are running, the cooking timer/minute minder display will always show the cooking timer/ minute minder that has the least time remaining. The symbol of that hotplate timer is also fully illuminated while other timer symbols are just dimly illuminated. -
Page 15: Cooking
- simmer bouillon; To ensure your food is fried as healthily as possible, - stew meats; Asko recommends choosing the type of oil according to - simmer vegetables; the frying temperature. Each oil has a diff erent burning - melting chocolate;... -
Page 16: Cleaning And Maintenance
CLEANING AND MAINTENANCE Cleaning Make sure any residues of cleaning agents are After each use of the glass-ceramic hob, wait for it to thoroughly removed, as they could damage the glass- cool down and clean it; otherwise, even the smallest ceramic hob when the cooking zones heat up (Figure food residue will be burnt onto the hot surface next time you use the appliance. - Page 17 Figure 5 NOTE! All damage described above predominantly relates to the aesthetics, i.e. appearance of the appliance and do not aff ect its functionality directly. Such errors cannot be the subject of a warranty claim.
-
Page 18: Troubleshooting
TROUBLESHOOTING General Troubleshooting table If the appliance does not work properly, this does not NOTE! always mean that it is defective. Try to deal with the problem yourself fi rst by checking the points mentioned The service department telephone number can below. -
Page 19: Installation Instructions
INSTALLATION INSTRUCTIONS What you need to consider Installation dimensions Safety instructions for the installation The dimensions and recesses are shown in the • The connection must comply with national and local illustrations beneath. regulations. • The appliance must always be earthed. •... - Page 20 If the hob is wider than the cupboard, with a worktop A Lower kitchen cabinet with a drawer less than 46 mm thick, saw a cut-out in both sides of • An opening at least 140 mm high must be provided the cupboard, so the appliance is detached from the on the back wall of the cabinet, along its entire width.
-
Page 21: Electrical Connection Sivk6
• 3 phases with 1 zero connection (3 1N, 400 V~ / 50 Hz): Electrical connection - The voltage between the phases and the zero is SIVK6, 7, 1 230 V~. The voltage between the phases is 400 V~. Common connection: Fit a connecting bridge between connecting points •... -
Page 22: Building In
Building in Turn the hob over and lay it in the recess. Check that the cabinet and the cut-out meet the Connect the appliance to the mains. A short bleep will dimension and ventilation requirement be heard and all the displays will light up briefl y. The appliance is ready for use. - Page 24 en (08-15)
Need help?
Do you have a question about the SIVK7QATX HI1774IQ and is the answer not in the manual?
Questions and answers