
Related Manuals for Asko HI1884M


Summary of Contents for Asko HI1884M
- Page 1 Instructions for use Induction hob HI1884M / SIVK8DTI HI1884MF / SIVK8DTI HI1994MF / SIVK9FTI...
- Page 2 Manual EN 3 - EN 31 Pictograms used Important information...
-
Page 3: Table Of Contents
TABLE OF CONTENTS Your induction hob Introduction Control panel Description Operation of the touch-sensitive buttons Induction cooking How induction works Induction noises Pans Operation Switching on and power setting Automatic pan detection (APd) Residual heat indicator Boost Two cooking zones one in front of the other Bridge induction Switching off Stand-by mode... -
Page 4: Your Induction Hob
YOUR INDUCTION HOB Introduction This hob has been designed for the real lover of cooking. Cooking on an induction hob has a number of advantages. It is easy, because the hob reacts quickly and can also be set to a very low power level. Because it can also be set to a high power level, it can bring dishes to the boil very quickly. -
Page 5: Control Panel
YOUR INDUCTION HOB Control panel Pause button Pause indication Child lock indication/Eco standby indication Key button (child lock/eco stand by function) Induction menu functions Slide control (12 levels) Level indication Boost indication Time reduction button 10. Time increase button 11. Timer / Kitchen timer 12. -
Page 6: Description
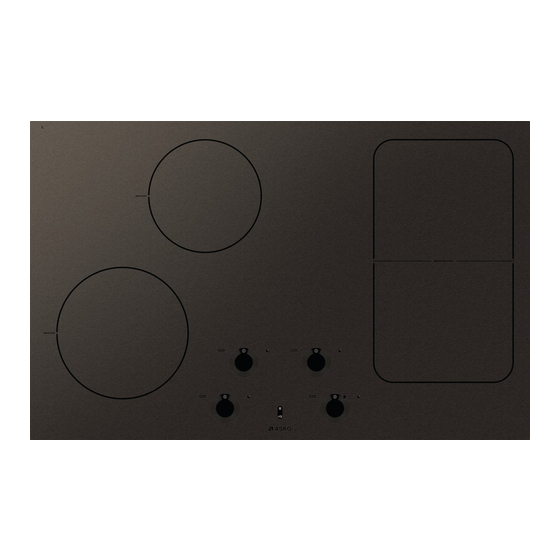
YOUR INDUCTION HOB Description HI1994MF HI1884M / HI1884MF 1. Cooking zone Ø 210 / 3,7 kW 2. Cooking zone Ø 180 / 3,0 kW 3. Cooking zone Ø 260 5.5 kW (double ring) 4. Bridge induction zone 180 x 220 mm 3.7kW (linkable zones) -
Page 7: Use
Operation of the touch-sensitive buttons The operation of the hob by means of the touch-sensitive buttons takes a while getting used to when you’re used to a different operation. For the best effect, place your finger tips flat on the buttons. You don't have to press hard. -
Page 8: How Induction Works
How induction works A magnetic field is generated in the appliance. By placing a pan with an iron base on a cooking zone, a current is induced in the pan base. This induced current generates heat in the base of the pan. Easy The coil (1) in the hob (2) The electronic controls are accurate and easy to set. -
Page 9: Pans
The fan makes a noise The appliance is equipped with a fan in order to increase the service life of the electronic components. If you use the appliance intensively, the fan will be switched on and you will hear a buzzing noise. The fan may still make a noise after you have switched the appliance off. - Page 10 Note Be careful with enamelled thin sheet-steel pans: • the enamel may chip (the enamel comes loose from the steel), if you switch the hob on at a high setting when the pan is (too) dry; • the base of the pan may warp - due, for example, to overheating or to the use of too high a power level.
-
Page 11: Operation
OPERATION Switching on and power setting 1. Press the key button. A single audio signal sounds. 2. Place a pan in the middle of a cooking zone. The APd registers a pan and a flashing ‘-’ appears in the display. If you don’t do anything else, the cooking zone will switch off automatically after 10 seconds. -
Page 12: Residual Heat Indicator
OPERATION Residual heat indicator After a cooking zone has been used it may still remain hot for a while. As long as the cooking zone is still hot an “H” will be visible in the display. Boost You can use the ‘boost’ function to cook at the highest power level during a short period of time (max.10 minutes). -
Page 13: Bridge Induction
The Bridge induction zones can be linked to each other. This creates one large zone that can be used, for example, for the ASKO grill plate, the ASKO teppanyaki, a large fish pan or various pans on the same power. -
Page 14: Switching Off
OPERATION Switching off all cooking zones Press key button to switch off all the cooking zones at the same time. A single beep will be heard. The red childproof lock indicator next to the button will blink very slowly. • The induction hob is now in eco stand-by mode (see also ‘eco stand-by mode’). -
Page 15: Child Lock
OPERATION Did you know that After 30 minutes in the stand-by mode the hob will automatically switch to the eco stand-by mode to prevent unnecessary energy consumption. Child lock Your induction hob is equipped with a childproof lock that lets you lock the appliance. -
Page 16: Recognising A Mode
OPERATION ▷ Any set timers/kitchen timers will stop. ▷ All active cooking zones are switched to setting 1 or 2. ▷ All buttons are inactive except for the key button and the pause button. The on/off buttons of the individual cooking zones also remain active, they do however react with a delay of two seconds so that you can clean the operating panel. -
Page 17: Timer / Kitchen Timer
OPERATION The timer function The kitchen timer function The timer cannot be linked to a The kitchen timer can be linked to cooking zone. a cooking zone. This means the cooking zone switches off if the set time has passed. When the timer/kitchen timer The kitchen timer function can be button is pressed, the timer... -
Page 18: Switching The Audible Signal On And Off
OPERATION The kitchen timer alarm beeps for a quarter of an hour while decreasing as the time passes, while '0.00' and the red upwards arrow keep flashing. Press again the timer/kitchen timer button or remove the pan from the cooking zone to switch off the kitchen timer alarm again. -
Page 19: Automatic Cooking Programmes
OPERATION Automatic cooking programmes Your hob is fitted with 6 automatic cooking programmes. You can set any end time of an automatic cooking programme with the aid of the kitchen timer function (refer to page 20). The cooking programmes are based on regular quantities. The tables are meant as a guideline, because of the large margins you can alter the dish according to your wishes. - Page 20 3.5 l only water 1) After the beep the rice or pasta can be added. * This function works best with pans recommended by ASKO (please refer to www.asko.com). ** These menu functions work best if they are started at the beginning of the cooking process.
- Page 21 High pan (Ø 200) Ø 210 / Vario 4,000 g Large pan (Ø 240) Ø 260 4,000 g Large pan (Ø 240) Ø 260 double * This function works best with pans recommended by ASKO (please refer to www.asko.com). EN 21...
- Page 22 500 - 600 g Frying pan Ø 260 double * This function works best with pans recommended by ASKO (please refer to www.asko.com). ** These menu functions work best if they are started at the beginning of the cooking process.
-
Page 23: Healthy Cooking
Healthy cooking Burning point of the various types of oil Burning point of separate kinds of oil. ASKO advises choosing an oil based on the baking temperature to bake in a healthy way. Every kind of oil has a different burning point at which toxic gases are released. You can see the burning points of different kinds of oil in the table below. -
Page 24: Cooking Settings
OPERATION Cooking power levels Because the settings depend on the quantity and composition of the dish and the pan, the table below is intended as a guideline only. Use level ‘boost’ and setting 11 and 12 to: • bring the food or liquid to the boil quickly; •... -
Page 25: Maintenance
MAINTENANCE Use level 1-3 to: • simmer bouillon; • stew meats; • simmer vegetables; • melt chocolate; • poach; • keep warm; • melt cheese. Cleaning Activate the childproof lock before you start cleaning the hob. Daily cleaning • Regular maintenance straight after use prevents the food working its way in for a long period and causing stubborn stains which are hard to remove. -
Page 26: Faults
Try to deal with the problem yourself first by checking the points mentioned below or check for more information the website ‘www.asko.com’. Note If the square red light above the pause button flashes (and none of the malfunctions below apply), please contact the service department. - Page 27 FAULTS Symptom Possible cause Solution The pans make a noise while This is caused by the energy This is normal for certain cooking. flowing from the hob to the pans at a high cooking saucepan. setting. This is not harmful for the pans or hob.
- Page 28 FAULTS Symptom Possible cause Solution Fault code F8 and F08 / the Appliance overheated. Allow the appliance to cool red lamp next to the child down and lock button is illuminated and start cooking once again. the lamp above the pause button is flashing.
-
Page 29: Service
SERVICE Additional service requirements for the integration (flush installation) of the hob (‘F’ models) • Once it has been integrated, the hob must remain accessible from underneath for service purposes. • If a drawer or oven is built in under the hob it must be easily removable. -
Page 30: Information (Eu) 66/2014
INFORMATION (EU) 66/2014 Information according regulation (EU) 66/2014 Measurements according EN60350-2 Model identification HI1884M HI1884MF HI1994MF Type of hob Induction hob Induction hob Number of electric cooking zones and/or areas Heating technology Induction cooking Induction cooking zones and cooking zones and cooking... -
Page 31: Environmental Considerations
ENVIRONMENTAL CONSIDERATIONS Disposing of the appliance and packaging Sustainable materials have been used when manufacturing this appliance. This appliance must be disposed of responsibly at the end of its service life. The government can provide you with information about this. The packaging of the appliance is recyclable. - Page 32 The appliance identification card is located on the bottom of the appliance. Stick the appliance identification card here. When contacting the service department, have the complete type number to hand. You will find the addresses and phone numbers of the service organisation on the guarantee card.
Need help?
Do you have a question about the HI1884M and is the answer not in the manual?
Questions and answers