Table of Contents
Advertisement
Quick Links
MXL050
Installation & User Instructions
This manual provides information on how to control the Roam Router using your devices
internet browser. Most of these functions can be completed easier and faster using the
Maxview Roam App. See the Roam App instruction manual for more information.
UK contact:
Helpline:
+44 (0)1553 811000
Email:
support@maxview.co.uk
Web:
www.maxview.co.uk
Maxview reserve the right to change specifications without prior notice
9111431 Iss 8
Maxview Roam Powered by
Roam
We have partnered up with one of the largest
suppliers of Wi-Fi products worldwide.
Advertisement
Table of Contents

Subscribe to Our Youtube Channel
Related Manuals for Teltonika MAXVIEW MXL050/G


Summary of Contents for Teltonika MAXVIEW MXL050/G
- Page 1 Roam MXL050 Installation & User Instructions This manual provides information on how to control the Roam Router using your devices internet browser. Most of these functions can be completed easier and faster using the Maxview Roam App. See the Roam App instruction manual for more information. UK contact: Helpline: +44 (0)1553 811000...
-
Page 2: Table Of Contents
Introduction Thank you for purchasing this product, should you have any difficulty using your Roam Mobile 3G/4G Wi-Fi System please contact our friendly Customer Helpline on +44 (0)1553 811000 or email support@maxview.co.uk. Contents Record your Purchase Router - Changing the Primary Internet Source Product Contents from 3G/4G to Wi-Fi Tools Required... -
Page 3: Product Contents
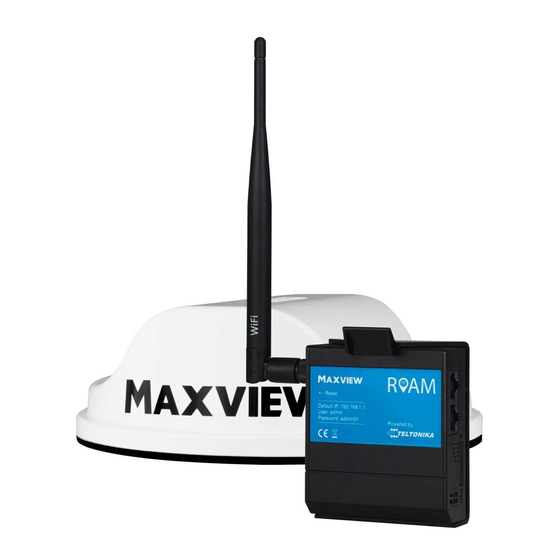
Product Contents Omni-directional Roof Mount 1.5m Ethernet Cable Internal Wi-Fi Antenna Antenna* 0.8m cables with SMA connectors SIM Card Pin Needle 3G/4G and Wi-Fi Router Roof Clamp 12V Vehicle Power Supply Fixing Template Router Mounting Bracket and No. 6 Screws x 3 Fixing Kit *White or Grey Plastics Tools required... -
Page 4: Accessories
Mounting Accessories - Sold separately Roam Bracket Fixing Kit - For roof mounting Roam Suction Mount Base Plate The raiser bracket allows you the flexibility to Fixing to any horizontal, smooth surface. The Suction mount your antenna anywhere on your roof and Pad Base offers a robust and reliable temporary enter the cable at your preferred point using the mounting solution for the Roam. -
Page 5: Installation Instructions
Installation Instructions... -
Page 6: Positioning Your Roam
Positioning your Roam Distance between Router and Antenna For best performance, we recommend mounting the router in close proximity to the roof mounted antenna. For best performance, only use the antennas standard 0.8m coaxial cables. This means, once you have a suitable location for the router inside the vehicle, you must also ensure there is a suitable space on the roof to position the antenna in close proximity to the router. -
Page 7: Fitting The Antenna
Fitting the Antenna These instructions are for the standard through-the-roof installation as supplied. Once you have a suitable position for the antenna, At the marked centre position, drill a 2.5mm pilot cut out the supplied template. Use to mark the 25mm hole through the roof. - Page 8 Front of vehicle Clean the surface where the antenna will be Pass the cables through the hole and remove the installed, ensuring it is free from debris and grease. self-adhesive backing from the 3M seal. Pass the cables through the roof and position the antenna with the embossed arrow facing the front of the vehicle and the outside edge of the antenna aligning with the marks added earlier.
-
Page 9: Inserting Sim Card
Inserting Sim Card Use pin to firmly press on SIM eject button. This is located next to the SIM slot. It is not necessary to apply force to the SIM tray itself. This may damage the router. Micro Standard Nano ✓... -
Page 10: Router Installation
Router Installation Position router bracket and mark hole positions. Attach the antenna coaxial cables to the bottom 2 Depending on material, drill a pilot hole or use a connectors. These are marked ‘mobile’. Note the order bradawl. Mount the router mounting bracket to the of the cables does not matter. - Page 11 Router Getting Connected and Basic Functions...
-
Page 12: Get To Know Your Router
Get to know your Router Mobile network type LEDs Left View Mobile signal strength indication LEDs Ethernet Power Socket Ports Power LED LAN LED WAN LED SIM Holder Right View Reset Button Roam Antenna Wi-Fi Antenna Roam Antenna Connector 2 Connector Connector 1 Credential Router Sticker (Located on the reverse of the router). -
Page 13: Getting Online
Getting Online Now your Roam is installed and you have inserted the SIM card, it’s time to get connected. To do this, you will need to be using a device which can connect to a Wi-Fi network such as a smart phone, Smart TV, tablet or laptop. - Page 14 Option B: QR Code If your device is able to read QR codes (Android 9 or newer and IOS 11 or newer), simply point your device camera at the QR code on the back on the router. When prompted, select ‘join’. Your device will automatically connect to the Roam router.
-
Page 15: Factory Reset
Connecting to a device using an Ethernet Cable If your device does not support Wi-Fi or you would like to maximise the reliability of your connection, you can access the Roam internet connection by connecting the Ethernet Cable between the LAN ports on the router and your device. - Page 16 Router Advanced Functions and Changing Router Settings For most users changing these settings is not necessary. We only recommend accessing and changing settings in the Web User Interface if necessary and we do not recommend changing settings which have not been outlined in this booklet.
-
Page 17: Connecting To The Web User Interface
Advanced Functions and Changing Router Settings All of the settings and functionality of the Roam router are changed using the Web User Interface. This can be accessed using a browser when your device is connected to the Roam Wi-Fi network. The Roam router is very powerful and there are many settings in here which can be adjusted to suit your requirements. - Page 18 Unless necessary, we do not recommend changing any of the dashboard settings. You can return to the Web User Interface dashboard at any time by selecting the Teltonika logo in the top left hand corner of the Web User Interface.
-
Page 19: Logging Out Of The Web User Interface
You will find ‘Language Settings’ half way down top of the page select ‘System’. When the drop down the Administration Settings page. menu appears, select ‘Administration’. Select your preferred language and select ‘Save’. Select Teltonika logo to return to dash board and begin using new language settings. - Page 20 Router Changing the Primary Internet Source from 3G/4G to Wi-Fi Did you know? The functions in this section can be completed easier and faster using the Maxview Roam App. See the Roam App instruction manual for more information.
- Page 21 Changing the Primary Internet Source from 3G/4G to Wi-Fi In some instances during your travels, you will be in a location where there will be a usable Wi-Fi connection which can be used as a source, instead of 3G/4G. This means you can access the internet using the same Roam hotspot, however the source of the connection will be from another Wi-Fi hotspot.
- Page 22 The WAN page should now appear, which lets you determine how the router will be connecting to the internet. Your options here are Mobile (3G/4G), Wi-Fi or Wired. To ensure the Wi-Fi connection is used when available, the Wi-Fi option should be selected as the ‘Main WAN’...
- Page 23 At this point it is important that you wait, while the router updates these settings. This can take 2 to 3 minutes. Once the ‘please wait’ message at the top of the screen disappears, the settings have been applied. It is only necessary to complete steps 2-5 once. Next time you want to add a Wi-Fi network, skip to step 6.
- Page 24 ‘Wireless Station Mode’ password (which will be case sensitive). Select the Teltonika logo to return to the dashboard. You can ensure the router is connected using the Wi-Fi by checking the connection method listed in the WAN section of the dashboard.
-
Page 25: Changing The Routers Lan Ip Address
Changing the Routers LAN IP Address In some cases, the LAN IP Address of the Roam Router will be the same as the source Wi-Fi IP address. If this is the case, using Wi-Fi as the internet source will not work. To fix this, we must change the LAN IP Address of the Roam Router. - Page 26 Router Other Functions Did you know? The functions in this section can be completed easier and faster using the Maxview Roam App. See the Roam App instruction manual for more information.
-
Page 27: Managing And Removing Wi-Fi Connections
Managing and Removing Wi-Fi Connections Navigate to ‘Network’ and then ‘Wireless’. From here, you can then view and manage the most recent Wi-Fi connection listed under the Wireless Station Mode heading. This includes updating the password or removing it completely if it is no longer used. The Router will store the details of the most recently used Wi-Fi connection only. - Page 28 You will then see a list of the Wireless Access Points (hotspots) the router is creating. As standard, this will be just one. Select ‘edit’ on the RUT240_XXXX access point. You will now be transferred to the ‘General Setup’ Input a new password in the ‘key’ box. tab.
- Page 29 Once completed, select ‘save’. The page will show a ‘please wait’ message whilst the settings are saved. Please note - During some operations, the router can take several minutes to load. If you see this symbol please be patient as the router is working to save your settings. When the changes are complete, you will see You can now navigate to your device’s Wi-Fi a web browser error page and your device will no...
-
Page 30: Entering Sim Pin
Entering SIM PIN For security, some SIM cards have a 4-8 digit PIN activated. If your SIM is PIN protected, you will need to input the PIN number into the Web User Interface before it can be used. Please note, if you enter the incorrect PIN 3 times, your SIM card may be blocked. If this happens, you will need to contact your SIM card network provider. - Page 31 To bring you the Roam router, we have partnered with Teltonika. Teltonika have a vast amount of information available for all function of the router and Web UI on their Wiki Support Site. This can be accessed at: https://wiki.teltonika.lt/view/RUT240...
-
Page 32: Router Firmware Update
A list of the latest firmware changes and the associated features can be found at https://wiki.teltonika.lt/view/RUT2xx_Firmware As long as the router has a reliable internet connection, the firmware update can be done from the Teltonika Web User Interface. The time it takes will depend on your connection speed, so we recommend using a fast connection to minimise the time required. -
Page 33: Additional Information
Additional Information General Safety Warnings Read these instructions carefully and become familiar with your Maxview product. Understand the application, limitations and any hazards involved with the installation and operation. Failure to follow all instructions may result in damage to your vehicle and/or serious injury. Maxview declines all responsibility in the event of incident or accident if they are due to a non observation of the installation instructions or the way the product is used. -
Page 34: Maintenance
Maintenance The Roam has been designed to be maintenance and trouble free. For optimum signal strength, keep the cover clean from dirt, bugs, and other debris. Periodic washing of the top cover with mild soap and water is recommended. 1. Do not remove the cover of the antenna as it will void the limited guarantee. 2. -
Page 35: Troubleshooting & Faq's
8. Is there an easier way to change the settings for my router? Most router functionality can be controlled using the Teltonika App. See page 32. 9. Does the Roam work on 5G? The benefits of 5G to our customers are still limited due to the limited number of (mostly urban) areas where the technology is available. - Page 36 IOS 14 or newer highlight this with the ‘weak security’ message. In reality, this protocol remains secure and is the standard used by most routers in the marketplace today. The newer gold standard protocol is WPA3. Maxview are working with Teltonika to ensure this protocol is introduced when available.
- Page 37 17. What are the lights on the side of the Roam router telling me? Basic use and diagnosis using the LED’s has been outlined below. Visit wiki.teltonika.lt/view/RUT240_LEDs for a full list of the LED configurations and what these mean. 18. What does the Maxview Roam App do? The Maxview Roam App is available free of charge to all customers who have purchased a Maxview Roam.
- Page 38 20. What is WAN Failover? Once WIFI has been activated as the internet source, the Roam uses WAN failover as default. This feature is designed to overcome the need to manually switch the internet source between mobile and Wi-Fi. When a Wi-Fi connection has been set up, the Roam router will prioritise this as the source of internet and only use the mobile connection when the Wi-Fi is no longer available.
-
Page 39: Notes
Notes... -
Page 40: Specifications
Specifications Antenna Type: Omni-directional MIMO (multiple in multiple out) Frequency/Gain: 698-6000 MHz/5.9dBi -8.8dBi. Includes all 3G, 4G and 5G frequencies Connector Type: Impedance: 50 Ohm Power: Passive Cable Lengths: 0.8m as standard Housing: Aluminium Base. UV Stable ASA Cover Dimensions: ø: 196mm x H: 65mm Weight: 500g...
Need help?
Do you have a question about the MAXVIEW MXL050/G and is the answer not in the manual?
Questions and answers