Advertisement
Tools needed: Phillips screwdriver,
wrenches instead)
WARNING: Important! Read and understand these instructions before assembling or using the
GF8902 Overbed Table. If you do not understand any part of these instructions, contact a healthcare
professional for direction in the use of this product. If the overbed table is not properly assembled
and adjusted, personal injury and/or damage to the overbed table could result.
WARNING: If components are damaged or missing, contact your dealer immediately. DO NOT
use substitute parts. Use only Lumex replacement parts. Non-Lumex replacement parts could
cause personal injury and/or damage to overbed table.
WARNING: Notice for California Customers- California Proposition 65 WARNING: This product
contains a chemical known to the State of California to cause cancer and reproductive or
developmental harm.
WARNING: GF Health Products, Inc. assumes no responsibility for any damage or injury caused
by improper assembly or use of this product.
ASSEMBLY INSTRUCTIONS
Unpacking
1. Open end of box.
2. Slide contents out of box.
3. Collect base, table top, column, and hardware.
Assembly (see picture at right)
WARNING: Do not remove the black
screw
from the column
13
completely assembled and in upright position; the
table top could rise suddenly and cause serious
personal injury.
WARNING: The column is spring-loaded — DO
NOT disassemble the column; this could cause
serious personal injury.
1
1. Place table top
upside down on level surface.
2. Ensure the release rod (not shown, inside column) is fully
2
inside the column
into the table top bracket
tongue and bracket holes. Insert — but do not tighten
— the two Phillips screws
through bracket into tongue.
3. Position the release lever
side facing table top, and install in column. Match the
release lever and bracket alignment holes, then insert
4
hex bolt
through both to secure release lever to
bracket. Install hex nut
to tighten. Use a Phillips screwdriver to now tighten the
6
Phillips screws
that secure bracket to tongue.
4. Note orientation of base caster holes, facing away
from table top as shown, and place the base
11
bolt plate
, bolt sleeves
bolts.
8
5. Install the casters
6. TURN THE TABLE UPRIGHT and place it on the floor. Use a Phillips screwdriver to remove the black screw
discard it and replace it with the chrome screw
7. Remove protective film from table top surface.
WARNING: Ensure that the table is assembled as described, and that all components are
securely attached, before use.
GF8902-INS-LAB-RevC14
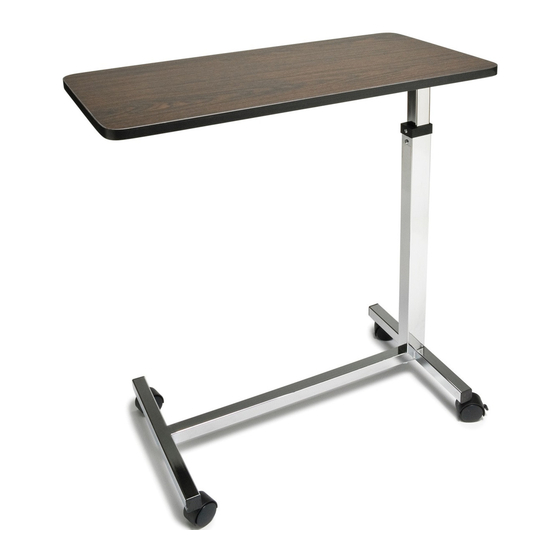
GF8902: OVERBED TABLE, STANDARD NON-TILT
ASSEMBLY & OPERATION INSTRUCTIONS
PLEASE SAVE THESE INSTRUCTIONS FOR FUTURE USE
5
/
wrench, two M6 wrenches (you may wish to use appropriate socket or adjustable
8
before the table is
2
, then insert the column tongue
5
as shown at right. Align the
6
6
and washers
3
as shown, with curved
4
on bolt. Use two M6 wrenches
, base, and into the end of the column as shown. Use a 5 /8 wrench to tighten the
10
9
and
as shown: press the casters in until they lock into place.
11
bolt plate
10
bolt sleeve
(2 each)
2
column
3
release
lever
as shown
alignment hole
4
hex bolt
Assembly
7
above the column. Install the two large hex bolts
14
. Use a Phillips screwdriver to tighten the screw.
12
large hex bolt
(2 each)
8
locking caster (2 each)
9
non-locking caster
(2 each)
7
base
chrome hex head screw —
DO NOT remove
13
black screw — DO NOT remove from column
before table is completely assembled and in
upright position
tongue
4
hex nut
6
Phillips screw
(2 each)
6
washer
(2 each)
5
bracket
1
table top
12
through the
13
;
1
Advertisement
Table of Contents

Related Manuals for Lumex GF8902


Summary of Contents for Lumex GF8902
- Page 1 GF8902: OVERBED TABLE, STANDARD NON-TILT ASSEMBLY & OPERATION INSTRUCTIONS PLEASE SAVE THESE INSTRUCTIONS FOR FUTURE USE Tools needed: Phillips screwdriver, wrench, two M6 wrenches (you may wish to use appropriate socket or adjustable wrenches instead) WARNING: Important! Read and understand these instructions before assembling or using the GF8902 Overbed Table. If you do not understand any part of these instructions, contact a healthcare professional for direction in the use of this product. If the overbed table is not properly assembled and adjusted, personal injury and/or damage to the overbed table could result. WARNING: If components are damaged or missing, contact your dealer immediately. DO NOT use substitute parts. Use only Lumex replacement parts. Non-Lumex replacement parts could...
- Page 2 EXCLUSIONS The warranty does not cover and GF shall not be liable for the following: 1) Defects, damage, or other conditions caused, in whole or in part, by misuse, abuse, negligence, alteration, accident, freight damage, tampering or failure to seek and obtain repair or replacement in a timely manner; 2) Products which are not installed, used, or properly cleaned and maintained as required in the official manual for the applicable product; 3) Products considered to be of a non-durable nature including, but not limited to: casters, filters, fuses, gaskets, lubricants, and charts; 4) Accessories or parts not provided by GF; 5) Charges by anyone for adjustments, repairs, replacement parts, installation or other work performed upon or in connection with such products which are not expressly authorized in writing, in advance, by GF; 6) Any labor or shipping charges incurred in the replacement part installation or repair; 7) Costs and expenses of regular maintenance and cleaning; and 8) Representations and warranties made by any person or entity other than GF. ENTIRE WARRANTY, EXCLUSIVE REMEDY AND CONSEQUENTIAL DAMAGES DISCLAIMER THIS WARRANTY IS GF’S ONLY WARRANTY AND IS IN LIEU OF ALL OTHER WARRANTIES, EXPRESS OR IMPLIED. GF MAKES NO IMPLIED WARRANTIES OF ANY KIND INCLUDING ANY IMPLIED WARRANTIES OF MERCHANTABILITY OR FITNESS FOR A PARTICULAR PURPOSE. IF ANY MODEL OR SAMPLE WAS SHOWN TO THE CUSTOMER, SUCH MODEL OR SAMPLE WAS USED MERELY TO ILLUSTRATE THE GENERAL TYPE AND QUALITY OF THE PRODUCT AND NOT TO REPRESENT THAT THE PRODUCT WOULD NECESSARILY CONFORM TO THE MODEL OR SAMPLE IN ALL RESPECTS. THIS WARRANTY IS LIMITED TO THE REPAIR OR REPLACEMENT OF THE DEFECTIVE PARTS. GF SHALL NOT BE LIABLE FOR AND HEREBY DISCLAIMS ANY DIRECT, SPECIAL, INDIRECT, INCIDENTAL, EXEMPLARY OR CONSEQUENTIAL DAMAGES, INCLUDING, BUT NOT LIMITED TO: DAMAGES FOR LOSS OF PROFITS OR INCOME, LOSS OF USE, DOWNTIME, COVER, OR EMPLOYEE OR INDEPENDENT CONTRACTOR WAGES, PAYMENTS AND BENEFITS. The warranties contained herein contain all the representations and warranties with respect to the subject matter of this document, and supersede all prior negotiations, agreements and understandings with respect thereto. The recipient of this document hereby acknowledges and represents that it has not relied on any representation, assertion, guarantee, warranty, collateral contract or other assurance, except those set out in this document. For additional information on this product or this warranty, please contact a GF Customer Service Representative. NOTES: 1) Additional terms and conditions may apply. 2) Freight claims must be notated on the Bill of Lading and must be made with immediacy. The ICC regulations govern specific requirements for freight claims. Failure to abide by those regulations may result in a denial of the freight claim. GF will assist you in filing the freight claim. 3) Claims for any short shipment must be made within thirty (30) days of the invoice date. GF8902-INS-LAB-RevC14...
Need help?
Do you have a question about the GF8902 and is the answer not in the manual?
Questions and answers