Table of Contents
Advertisement
Quick Links
765000
ALTERNATING PRESSURE MATTRESS SYSTEM
WITH ACTIVE SENSOR TECHNOLOGY
USER MANUAL
Important: Do not operate the Mattress System
without first reading and understanding this manual!
Save this manual for future use.
Note: The most current version of this manual can be
found online at www.grahamfield.com
765000-INS-LAB-RevB10
Advertisement
Table of Contents

Related Manuals for Lumex AltaDyne Sensor Plus 765000


Summary of Contents for Lumex AltaDyne Sensor Plus 765000
- Page 1 765000 ALTERNATING PRESSURE MATTRESS SYSTEM WITH ACTIVE SENSOR TECHNOLOGY USER MANUAL Important: Do not operate the Mattress System without first reading and understanding this manual! Save this manual for future use. Note: The most current version of this manual can be found online at www.grahamfield.com 765000-INS-LAB-RevB10...
-
Page 2: Table Of Contents
SPECIFICATIONS .................. 19 LIMITED WARRANTY ................20 APPENDIX A: EMC INFORMATION ............. 21 Graham-Field, Lumex and AltaDyne are registered trademarks of GF Health Products, Inc. GF Health Products, Inc. (“Graham-Field”) is not responsible for typographi- cal errors. Packaging, warranties, specifications and products are subject to change without notice. -
Page 3: Introduction
INTRODUCTION Use this manual for set-up and operation of the Lumex ® AltaDyne Sensor Plus 765000 Alternating Pressure ® Mattress System with Active Sensor Technology. Read all instructions before using the mattress system. Save this manual for future reference. INTENDED USE OF THIS DEVICE... -
Page 4: Important Safety Precautions
IMPORTANT SAFETY PRECAUTIONS The safety statements presented in this chapter refer to the basic safety information that should be observed by those using this Mattress System. There are additional safety statements in other chapters or sections, which may be the same as or similar to the following, or specific to the operations. DANGER: Indicates an imminent hazard situation that, if not avoided, will result in death or serious injury. - Page 5 WARNING: Always use close supervision when this product is used by, on, or near children or those who require close supervision. WARNING: Use this product only as intended and described in this manual. Do not use attachments or accessories not recommended by Graham-Field. WARNING: Never operate this product if: a) It has a damaged cord or plug.
-
Page 6: Caution
WARNING: Patient entrapment with bed side rails may cause injury or death. The bed frame and its components, including the mattress, bed side rails, head and foot board, bedding, and any accessories added to the bed, can all affect the risk of entrapment. Thorough patient assessment and monitoring are necessary to reduce the risk of entrapment, including establishing whether the use of a bed rail is in the... -
Page 7: Equipment Symbols
EQUIPMENT SYMBOLS Manufacturer Indicates that this product is according to the degree of protection against electric shock for type BF equipment Functional earth (for UL only) Attention! Read the instructions! Disposal of Electrical & Electronic Equipment (WEEE): Do not treat this product as household waste. For more detailed information with regard to returning and recycling this product, please consult your local city office, household waste disposal service, or Graham-Field equipment provider. -
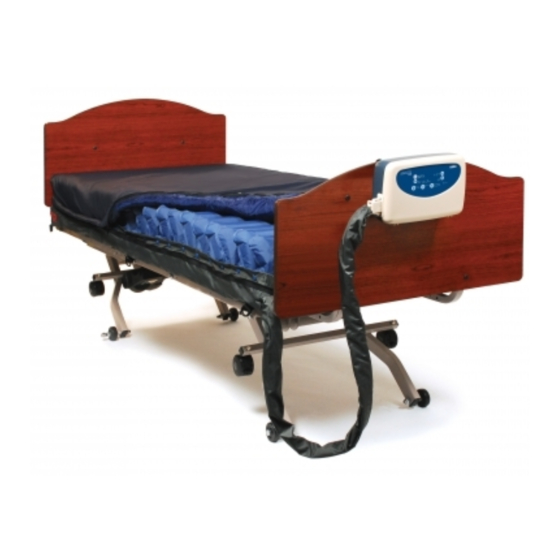
Page 8: Product Description
PRODUCT DESCRIPTION PUMP AND MATTRESS SYSTEM foot end symbol CPR valves mattress pump quick connectors (mattress-pump connectors) pump and mattress system PUMP: FRONT front panel quick connector PUMP: REAR fuse main power switch hanger power cord receptacle filter 765000-INS-LAB-RevB10... -
Page 9: Pump: Front Panel
PUMP: FRONT PANEL Front panel of pump is shown below. Descriptions of but- tons and indicators follow. Low pressure Auto-Adjust button; Tuning button; indicator indicators at right of button indicators at left of button Therapy adjust button; Maxfirm button indicators at right of button Service indicator Panel lock button; indicator at right of button Power failure indicator Power (ON/OFF) button; Alarm mute button indicator at right of button Front panel, first row Auto-Adjust button: The auto-adjust button adjusts the mattress pressure automatically based on the patient's weight. - Page 10 Tuning button: The tuning button fine-tunes the mattress system's auto-adjusted pressure. Three tuning settings are available: 0 System auto-adjusted pressure One level softer than auto-adjusted pressure + One level firmer than auto-adjusted pressure Note: The tuning function is only available in alternate and static therapy modes. Front panel, second row Therapy adjust button: The therapy ad- just button selects the therapy mode. After power-up, the system automatically inflates the mattress, auto-adjusts...
- Page 11 Maxfirm button: The pump will automatically enter maxfirm mode every time the power is turned on. Maxfirm mode ensures the pump is able to reach its maximum oper- ating pressure. Maxfirm mode will last for 20 minutes, and then the system will automatically enter auto-adjust mode. To disable maxfirm mode, press the maxfirm button. When enabled, the maxfirm indicator, at left of button, illuminates. Front panel, third row Panel lock button: The panel lock button sets the panel lock to protect the panel settings from accidental change. Press for two seconds to lock; press FIRMLY for two seconds to unlock. After the panel has been untouched for five minutes, the panel lock locks automatically. When the panel is locked, the panel lock indicator will illuminate.
- Page 12 Low pressure indicator: The low pressure indicator (yellow LED) illuminates, and the alarm sounds, when an abnormally low pressure level occurs. If the low pressure indicator persistently illuminates inappropriately: 1. Check to ensure all connections are properly and se- curely connected per installation instructions. 2. Check for any leakage (tubes or connecting hoses). If necessary, contact your Graham-Field equipment pro- vider to replace any damaged tubes or hoses. 3. If problem persists, contact your Graham-Field equip- ment provider. Note: Sometimes the low pressure indicator will illuminate when a patient gets up to leave the bed.
-
Page 13: Installation
INSTALLATION UNPACKING 1. Carefully remove all components from the carton. 2. Inspect all components. 3. If damage is evident to the contents, please notify the carrier and your Graham-Field equipment provider. PUMP AND MATTRESS SETUP 1. Remove all sheets, blankets, and pillows from the bed. 2. Place the mattress on top of the bed frame; ensure that the foot end symbol faces up at foot end as shown at right. Secure mattress to bed with straps. hanger 3. Fold open the wire hangers on the back of the pump as shown at right. 4. Either hang the pump on the bed's foot end, as shown at right, or place the pump on a flat surface... - Page 14 WARNING: Locate all cords so that they will not be stepped on, tripped over, or otherwise subjected to damage or stress. WARNING: Do not use a household extension cord if the electrical cord does not reach the power outlet. Use of an improper extension cord could result in fire and electric shock.
-
Page 15: Operation
OPERATION GETTING STARTED 1. Turn the main power switch main power to the ON position. switch 2. Press the front panel power button. The power indicator will illuminate. power button Note: The mattress system will automatically enter maxfirm mode for the quickest inflation at set-up; when inflated, it will then automatically enter auto- adjust mode to select the appropriate pressure. -
Page 16: Transport Cap
TRANSPORT CAP In case of power failure or trans- quick connector port: Disconnect the quick connec- tor and cap the mattress with the transport cap to slow deflation. Note: This system is equipped with cell-on-cell technology to provide added support and prevent bottoming out in the event of a transport cap power failure. -
Page 17: Maintenance
MAINTENANCE CLEANING WARNING: To reduce the risk of increased bacterial growth, infection, illness, or injury from contamination, thoroughly clean and dry the mattress system before use and as necessary during use as follows: Pump: Wipe the pump with a clean, damp cloth and mild detergent, and keep it away from dust. Air dry. Caution: Do not use phenolic products or corrosive or powdered cleansers to clean the pump. -
Page 18: Fuse Replacement
Fuse replacement tool needed: small screwdriver 1. If you suspect a blown fuse, discon- nect the plug from the wall outlet immediately. 2. Use a small screwdriver to remove the cover of the fuse holder (fuse lo- fuse cations are shown in picture at right). 3. Insert a new fuse of the correct rating (T1A/250V, VDE approved). -
Page 19: Specifications
SPECIFICATIONS Pump Specification Power Supply (Note: see rating AC 120V 60 Hz 0.17A (for 120V system) label on product) Fuse Rating T1A, 250V Cycle time Fixed / 10 minutes Dimensions (L x W x H) 11.4" x 7.9" x 4.6" (29.1 x 20 x 11.7 cm) Weight 5 lb (2.2 kg) Environment... -
Page 20: Limited Warranty
LIMITED WARRANTY GF Health Products, Inc. warrants the Lumex AltaDyne ® ® Sensor Plus 765000 Alternating Pressure Mattress Sys- tem with Active Sensor Technology for a period of twelve months for defects in workmanship and materials. If a product is deemed to be under warranty, GF Health Prod- ucts, Inc. shall provide, at its option, (1) replacement of any defective part or product or (2) a credit of the original selling price made to GF Health Products, Inc.'s initial cus- tomer. The warranty does not include any labor charges incurred in replacement part(s) installation or any associ- ated freight or shipping charges to GF Health Products, Inc. -
Page 21: Appendix A: Emc Information
APPENDIX A: EMC INFORMATION Guidance and Manufacturer’s Declaration- Electromagnetic Emissions: This device is intended for use in the electromagnetic environment specified below. The user of this device should make sure it is used in such an environment. Emissions Test Compliance Electromagnetic Environment-Guidance Harmonic emissions Class A... - Page 22 Guidance and Manufacturer’s Declaration- Electromagnetic Immunity: This device is intended for use in the electromagnetic environment specified below. The user of this device should make sure it is used in such an environment. IEC60601 test Electromagnetic Immunity Test Compliance level Environment-Guidance Portable mobile...
- Page 23 a The ISM (industrial, scientific and medical) bands between 150 kHz and 80 MHz are 6,765 MHz to 6,795 MHz;13,553 MHz to 13,567 MHz; 26,957 MHz to 27,283 MHz; and 40,66 MHz to 40,70 MHz. b The compliance levels in the ISM frequency bands between 150 kHz and 80 MHz and in the frequency range 80 MHz to 2,5 GHz are intended to decrease the likelihood that mobile/portable communications equipment could cause interference if it is inadvertently brought into patient areas.
- Page 24 USA Corporate Headquarters: GF Health Products, Inc. 2935 Northeast Parkway Atlanta, Georgia 30360 telephone: 800-347-5678, 770-368-4700 fax: 800-726-0601, 678-291-3232 www.grahamfield.com © 2010 GF Health Products, Inc.
Need help?
Do you have a question about the AltaDyne Sensor Plus 765000 and is the answer not in the manual?
Questions and answers