
Subscribe to Our Youtube Channel
Related Manuals for Warmup Portrait 4iE


Summary of Contents for Warmup Portrait 4iE
- Page 1 4iE Portrait Installation & Operating Manual (WiFi & Non-WiFi) For technical help: US: (888) 927-6333 CA: (888) 592-7687 warmup.com warmup.ca...
-
Page 2: Table Of Contents
Contents Pack Contents ............Mounting/Positioning ..........Wiring Connections ............ Assembling the 4iE ............. 4iE Portrait Setup - WiFi Version Getting Started ............Registration ............. 4iE Portrait Setup - Non-WiFi Version Non-WiFi Initial Setup ..........Welcome ..............Programming ............Settings ..............Troubleshooting ............ -
Page 3: Pack Contents
Pack Contents Thermostat Face Back Plate Floor Sensor IMPORTANT INFORMATION: Installation should only be carried out by a qualified and competent electrician and must conform to local electrical code. Conduits are only required where it is mandated by state or provincial code. Please refer to local electrical code for compliant applications. -
Page 4: Mounting/Positioning
Mounting/Positioning 4iE Portrait Step 1 - Install Back Plate Before making any permanent fixtures Warmup recommends identifying your preferred location for the 4iE. It should be located in an area with good ventilation. It should not be beside a window/door, in direct sunlight or above another heat generating device (e.g. -
Page 5: Wiring Connections
Wiring Connections 4iE Portrait Step 2 - Wiring Connections Isolate the thermostat from the mains supply throughout the installation process Heating Load connected to 4iE - Max. 15 Amps SUPPLY WITHOUT GFCI PROTECTION L1-LOAD-L2 L1-LINE HOT (120V) HEATING L2-LINE NEUTRAL (120V) OR (MAX 3600W/ HOT (240V) 15 Amps) - Page 6 Wiring Connections 4iE Portrait Step 2 - Wiring Connections Heating Load connected to Relay 25 - Max. 25 Amps 240V 240V SUPPLY WITHOUT GFCI COIL SUPPLY PROTECTION L1-LOAD-L2 Hot (240V) L1-LINE HEATING Hot (240V) (MAX 3600W/ L2-LINE 15 Amps) 240V GFCI L1-LINE-L2 PROTECTED POWER...
- Page 7 Wiring Connections 4iE Portrait For Larger installations Step 2 - Wiring Connections Heating Load connected to 4iE and Relay 25 - Max. 40 Amps 240V 240V SUPPLY WITHOUT GFCI COIL SUPPLY PROTECTION L1-LOAD-L2 Hot (240V) L1-LINE HEATING Hot (240V) (MAX 3600W/ L2-LINE 15 Amps) L1-LINE-L2...
- Page 8 Wiring Connections 4iE Portrait Step 2 - Wiring Connections Master/relay function: Used to control loads greater than 15A. Heaters will be split across two 4iE’s, one being the master and the other being the relay (slave). Only one floor sensor is required, wired into terminals 1 &...
-
Page 9: Assembling The 4Ie
Assembling the 4iE 4iE Portrait Step 3 - Reattach 4iE Face Reattach the 4iE face to the Back Plate and tighten both screws to secure. You may now restore power to the thermostat and begin setup. -
Page 10: Getting Started
WiFi WiFi network. WiFi network. network and you can continue to Please follow the > Settings device registration. on-screen > Network instructions to Registration can be connect it to WiFi. completed via the MyHeating App or by visiting my.warmup.com. -
Page 11: Registration
The MyHeating App is available for iOS and Android devices via the App Store or Google Play. If you have not done so already, download the “MyHeating” App to your tablet or smartphone. Search ‘MyHeating by Warmup’ Device Number When first registering and setting up your location on MyHeating, you will need the device number of the Thermostat. - Page 12 The Thermostat can be registered via the MyHeating App or by visiting my.warmup.com Below shows the menu structure to follow, when first registering with the MyHeating App or my.warmup.com Location A location needs to be setup before a room can be configured and the 4iE device registered.
-
Page 13: Non-Wifi Initial Setup
Non-WiFi - Initial Setup 4iE Portrait (Non WiFi Version) On initial power up you will have to configure the setup of your 4iE. The settings are detailed below. Language select your chosen language System type select your chosen heating system and enter correct wattage you have connected Set time manually set time... -
Page 14: Welcome
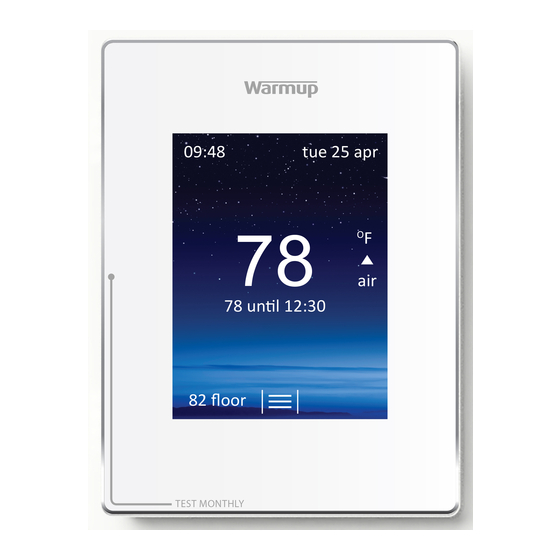
Welcome Time Date 09:48 tue 25 apr Heating Indicator Air Temperature 78 un�l 12:30 Target Temperature Weather* 82 floor Menu Floor Temperature GFCI Test Button TEST MONTHLY * Weather App is only available on Wi-Fi enabled version of the 4iE. Once setup has been completed the thermostat will display the home screen. -
Page 15: Programming
Programming Custom Program Setting a Custom Program allows you to set comfort temperatures at set times throughout the day. set custom set fixed program temperature select preset program Press menu > Program > Select days of the week Set program > Set custom you wish to program. - Page 16 Programming Preset Program Select a Preset Program created by Warmup. See the summary of the Preset Programs below. set custom set fixed program temperature select preset program Press menu > Program Press accept. > Set program > Select preset program.
- Page 17 Programming Fixed Temperature Set a fixed temperature for the thermostat to reach and maintain until you revert back to program mode or switch the heating off. set custom set fixed program temperature select preset program Press menu > Program > Set the target temperature Set program >...
- Page 18 Programming Holiday Mode Holiday Mode allows you to override your schedule with a lower fixed temperature over a set time to save energy. start date off end date off Press menu > Program > Set the holiday start time Holiday mode > Program. and date and press next.
-
Page 19: Settings
Starts heating early so it’s up to temperature at the right time Display/Audio Background Change the background screen (upload your own via MyHeating App or by visiting my.warmup.com) Home screen style Choose a theme for the main screen Display brightness Change the screen brightness for normal use and... -
Page 20: Troubleshooting
Troubleshooting 4iE Portrait Troubleshooting 1. Check that the display/standby brightness is not on Display is blank the lowest settings ‘0’. (Electrician Required) Electrician required to verify power is going to the 4iE and that it is correctly wired. (Electrician Required) Electrician required to verify “er1”... - Page 21 If the 4iE connected to a Set your smartphone up Contact Warmup with mobile hotspot then distance as a mobile hotspot and your router make & from the 4iE to your router is try to connect the 4iE to...
- Page 22 Troubleshooting 4iE Portrait Server Troubleshooting 4iE won’t connect to Warmup Server Download the Has the 4iE been MyHeating App registered? and register the device Remove the front fascia You can now begin If you reboot/ You can now begin and after 10-15 seconds...
-
Page 23: Important Notices
Important Notices FCC Notice This device complies with Part 15 of the FCC Rules. Operation is subject to the following two conditions: (1) this device may not cause harmful interference, and (2) this device must accept any interference received, including interference that may cause undesired operation. Warning: Changes or modifications to this unit not expressly approved by the party responsible for compliance could void the user’s authority to operate the equipment. - Page 24 Important Notices IC Statement This device complies with Industry Canada Licence-exempt RSS-247. Operation is subject to the following two conditions: (1) This device may not cause interference, and (2) This device must accept any interference, including interference that may cause undesired operation of the device. Caution: To maintain compliance with the RF exposure guidelines, place the unit at least 20cm from nearby persons.
-
Page 25: Technical Specifications
Technical Specifications 4iE Portrait Technical Specifications Supply Voltage 120-240V AC 60Hz Dimensions 3.54 x 4.72 x 0.70in Screen size 2.7 x 2.5in GFCI Class A GFCI with 5mA trip level Sensors Air & Floor (Ambient) Sensor Type NTC10k 3m Long (Can Be Extended To 50m) Max. - Page 26 This warranty does not cover removal or re-installation costs, and shall not apply if it is shown by Warmup that the defect or malfunction was caused by failure to follow the instruction manuals, incorrect installation or damage which occurred while the product was in the possession of a consumer.
- Page 27 4iE® Smart Thermostats and Baseboards applications Background • The 4iE® series thermostats are uniquely designed to control Electric Radiant Heating, including baseboard applications. They have been specially engineered to provide energy monitoring in both wattage and cost to ensure optimum power usage. The Wi-Fi capability allows your 4iE® to program itself using your smartphone location and vary your settings by zone. • To have your 4iE® thermostat function properly with baseboard applications, you will have to do a few minor adjustments in the 4iE’s settings menu. Settings Step 1: Set the heating preference to read air. • Menu > settings > heating preference > control air/floor > select air > accept Step 2: Change the PID period to 10 minutes. • Menu > settings > advanced settings > heater settings > heating limits > user defined > PID period > 10 mins > accept How to install the 4iE® NOTE While the thermostat is dual voltage, it is important to be aware of the wattage maximums. • 240V: 3600W • 208V: 3120W • 120V: 1800W...
Need help?
Do you have a question about the Portrait 4iE and is the answer not in the manual?
Questions and answers