Table of Contents
Advertisement
Advertisement
Table of Contents

Related Manuals for Clarity XLC8


Summary of Contents for Clarity XLC8
- Page 2 User Guide Home and cellphone calls MAKE CALLS WITH AND WITHOUT A LANDLINE PAIR UP TO TWO (2) DEVICES 50 DB OF AMPLIFICATION AND FOUR (4) TONE SETTINGS EXPANDABLE UP TO THREE (3) EXTRA HANDSETS (XLC HS®)
-
Page 4: Table Of Contents
TABLE OF CONTENTS Important Safety Instructions Contents & arts Checklist Installation Wall Base - Quick Reference Guide Handset - Quick Reference Guide Battery Placing & Answering Calls Button Phonebook Screen Details Telephone Menu Handset Registration Troubleshooting Technical Information Regulatory Compliance Warranty Information... -
Page 5: Important Safety Instructions
IMPORTANT SAFETY INSTRUCTIONS When using your telephone equipment, basic safety precautions should always be followed to reduce the risk of fire, electric shock and injury to persons, including the following: Read and understand all instructions. 2. Follow all warnings and instructions marked on the telephone. 3. - Page 6 16. Do not attempt to open the AC adapter. There are potentially dangerous voltages inside, and there are no serviceable parts. Discontinue use of product and contact Clarity if the product overheats, has a damaged cord or plug, if the product has been dropped or damaged or if the product has come into contact with liquids.
- Page 7 IMPORTANT SAFETY INSTRUCTIONS BATTERY SAFETY INSTRUCTIONS Dispose of used batteries according to the instructions. Caution: Disconnect telephone line before replacing batteries. Do not dispose of the battery in a fire as it may explode. Check with local codes for possible special disposal instructions. 2.
-
Page 8: Contents & Arts Checklist P
CONTENTS & PARTS CHECKLIST BOOST BACK MUTE MENU FLASH EXIT TALK RD/P Handset Base User Guide Phone cords (1 long, 1 short) User guide Wall mount bracket AC power Belt clip adapter... -
Page 9: Installation
INSTALLATION Your telephone should arrive pre-assembled. To install it: Remove base from package; pull yellow tab in the direction of the arrow. Hold one end of your ’s long phone line cord tightly. The correct end to hold should already be plugged into your phone’s jack. - Page 10 INSTALLATION...
-
Page 11: Wall
WALL MOUNTING YOUR Follow the instructions in the Installation section to remove the base and handset from the base – steps 1, 4, 6. Unplug the long phone line cord from the phone jack located on the back of your . - Page 12 WALL MOUNTING YOUR XL C...
-
Page 13: Base - Quick Reference Guide
BASE - Quick Reference Guide 1 Visual Ringer Lights up when phone rings; Use th turns on when phone is in use. 2 IN USE / CHARGE Light The light turns red when the phone is charging, and it turns green when the phone is in use. -
Page 14: Handset - Quick Reference Guide
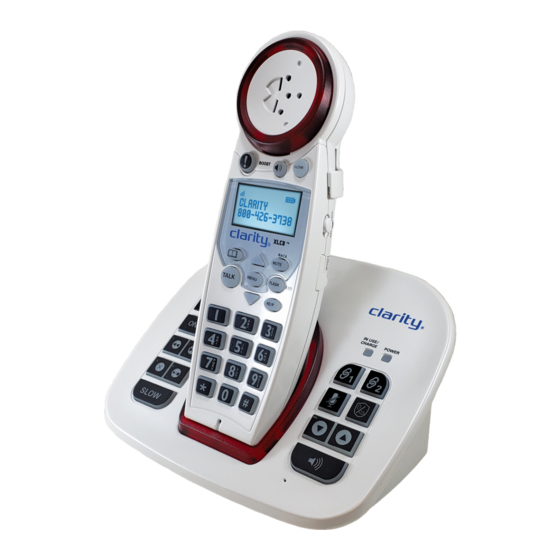
HANDSET - Quick Reference Guide BOOST BACK MUTE MENU FLASH EXIT TALK RD/P 1 VOLUME Control Wheel 3 Speaker Use the rotary control to During a call, press to activate increase or decrease the handset speakerphone. volume of the incoming call. Press again to switch back to The volume level is displayed earpiece. - Page 15 A 3. mm neckloop can be screen. used in the Neckloop Port. (We recommend the Clarity (Edit): When a phone number CE30 Neckloop.) is displayed, allows you to toggle between 7/10/11 digit 17 Belt Clip formats for the number you are viewing.
- Page 16 HANDSET - Quick Reference Guide...
-
Page 17: Battery
BATTERY INFORMATION HANDSET The batteries in the handset must be fully charged for 16 hours before using the telephone for the first time. Battery life: Talk time is 6.5 hours, while standby is 130 hours without usage. Actual times will vary depending on the amplifier settings used. Replace batteries every two years. - Page 18 2 light flashes. Turn on the feature of your cell phone . Once your cell phone finds your Clarity phone (Clarity ), press the appropriate key on your cell phone to continue the pairing process. • Your cell phone may prompt you to enter the PIN of the telephone base.
-
Page 19: Placing & Answering Calls
PLACING & ANSWERING CALLS TO ANSWER A CALL: TO PLACE A CALL: When phone is ringing, press Press TALK, then dial the TALK to answer the call. number using the numeric keypad. See lighting pattern for 2. Adjust the volume and tone of the TALK button on the bottom the incoming voice according to of the page. - Page 20 VOLUME & TONE ADJUSTMENTS The BOOST button engages the amplifier, controlling the loudness of the phone. When the VOLUME dial is adjusted and the BOOST button is pressed, the phone can reach up to 50dB of gain. WARNING: VOLUME MAY BE LOUD. PROCEED WITH CARE. BOOST On / Off The BOOST button controls the loudness of the receiver.
-
Page 21: Button
VOLUME & TONE ADJUSTMENTS Speakerphone To switch to speakerphone mode, press the SPK button . The display shows the speakerphone mode symbol. CALLER ID FUNCTION Your is CID / CWCID compatible (optional service, purchased from your local telephone service provider). When your phone is ringing, the screen shows the name and number of the person calling you. -
Page 22: Phonebook
PHONEBOOK To access your phone’s stored records (Phonebook), and for further details regarding this feature, press the Phonebook button on the handset, and / or follow the instructions under PHONEBOOK SCREEN DETAILS IMPORTANT: In standby mode, the screen displays the date and time, handset number (for the first 10 seconds of inactivity), and date and time (after the first 10 seconds of inactivity). -
Page 23: Telephone Menu
TELEPHONE MENU To start the setup process, press MENU. You will see the list of features to be set up on your new At any point during the navigation of the MENU options, you can press MUTE / BACK to go back to the previous screen, or you can press FLASH / EXIT to return to standby mode (exit setup). - Page 24 MENU - In standby mode, press MENU. Press MENU again to select . Here you will find menu settings for this feature. Device List mode, press MENU to select “Device List”. You will see -enabled devices paired to your Download PB mode, press MENU to select “Download PB”.
- Page 25 MENU - CALLER LIST Review/Call from Caller List If you have new calls, you will notice the New Calls icon to the left of the battery level indicator (upper right corner). In standby mode, press MENU. Scroll down to “Caller List”. Press MENU to select.
- Page 26 MENU - To access your from standby, press MENU once to . Press MENU enter the menu, then scroll down to select again.
- Page 27 MENU -...
- Page 28 MENU - PHONEBOOK To access your phonebook from standby, press MENU once to enter the menu, then scroll down to select Phonebook. Press MENU again. Use UP or DOWN to browse through your saved records. Call from Phonebook To dial one of your saved numbers, select the record and press TALK. Add/Edit/Delete/Delete All from Phonebook To add a number, edit a number, delete a number or delete all numbers, press MENU while viewing a saved record.
- Page 29 MENU - In standby mode, press MENU. Press UP or DOWN MENU - • • • • • On / Off • MENU - In standby mode, press MENU. Press UP or DOWN...
- Page 30 MENU - RINGER SETUP In standby mode, press MENU, then scroll to select “Ring Setup”; press MENU to enter the ringer setup. You will see the available options for your ringer. From here, choose one of the paths described below - for both the home and the cellphone lines: ...
- Page 31 MENU - AUTO BOOST In standby mode, press MENU. Press UP or DOWN to advance the row that reads “Auto Boost”. Press MENU to enter the Auto Boost On / Off setup. Use UP or DOWN to make your selection. Press MENU to save your selection.
- Page 32 MENU - PHONE SETUP selection. The screen will display “OK” and you will hear five beeps. Any Key Answer This feature allows you to answer the call by pressing any numeric key on the handset, rather than pressing TALK and Speakerphone. Press UP or DOWN to advance the row reading “Any Key Ans”.
- Page 33 MENU - DATE & TIME In standby mode, press MENU. Press UP or DOWN arrow to advance the row that reads “Date & Time”. Press MENU to enter the date and time setup. Use the numeric keypad to enter the date (follow format on screen). Press MENU to save your selection.
-
Page 34: Handset Registration
HANDSET REGISTRATION Registering the XLC HS In order to use the XLC HS handset (sold separately), you must register it to the base. Pull the handset’s battery tab located on the bottom of the device, and then press MENU to start registering or deregistering your handset from your system. -
Page 35: Troubleshooting
(see the user’s manual of your cell phone for more information). • Turn off your cell phone or headset, and then turn it on again. • For some cell phones, you must authorize Clarity device in your cell phone’s feature. - Page 36 TROUBLESHOOTING correctly. (The circular metal contacts on battery need to touch the metal springs inside battery compartment.) • Verify the telephone is in the correct dialing mode: Tone (touch) or Pulse (rotary). • Make sure you are in the usable range of the base station. The phone does not ring when you receive a call: •...
- Page 37 TROUBLESHOOTING Your handset screen is displaying “Searching...”: • Verify that the AC adapter is plugged into the base and into the wall outlet. • The handset is out of range or the power to the base is unplugged. • Move closer to the base. •...
- Page 38 Battery information Battery Type: 1.2V NiMH 600mAh rechargeable batteries Battery Life Talk Time: 6.5 Hours Battery Life standby: 130 Hours Contact Clarity customer service for information on purchasing additional handsets or replacement battery. Customer Service: 800-426-3738 Address: 6131 Preservation Dr.
-
Page 39: Regulatory Compliance
If trouble is experienced with this telephone equipment, for repair or warranty information, please contact Clarity, 800-426-3738. If the equipment is causing harm to the telephone network, the telephone company may request that you disconnect the equipment until the problem is resolved. - Page 40 REGULATORY COMPLIANCE h) Connection to party line service is subject to state tariffs. Contact the state public utility commission, public service commission or corporation commission for information. i) If your home has specially wired alarm equipment connected to the telephone line, ensure the installation of this telephone equipment does not disable your alarm equipment.
- Page 41 REGULATORY COMPLIANCE For body worn operation, this handset has been tested and meets the FCC RF exposure guidelines when used with the Clarity accessories supplied or designated for this product. Use of other accessories may not ensure compliance with FCC RF exposure guidlines.
-
Page 42: Warranty Information
WARRANTY INFORMATION Incidental or Consequential Damages: Neither Clarity nor your retailer dealer or selling distributors have any responsibility for any incidental or consequential damages including without limitation, commercial loss of profit, or for any incidental expenses, expenses, loss of time, or inconvenience. - Page 43 Clarity, destruction or alteration, improper electrical voltages or currents, or repair or maintenance attempted by anyone other than Clarity or an authorized service center, is not a defect covered by this warranty. Telephone companies manufacture different types of equipment and Clarity does not warrant that its equipment is compatible with the equipment of a particular phone company.
Need help?
Do you have a question about the XLC8 and is the answer not in the manual?
Questions and answers
How to set up the phone book.
To set up the phone book on the Clarity XLC8:
1. From standby, press MENU once.
2. Scroll down and select "Phonebook," then press MENU again.
3. To add a number:
- Press MENU while viewing a saved record.
- Select “Add Number” and press MENU.
- Enter the number as you would dial it.
- Use MUTE/BACK to delete digits or UP/DOWN to move within the number.
- Press MENU to save the number.
- Enter a name for the number.
4. You can also edit, delete, or delete all numbers by pressing MENU while viewing a record and selecting the desired option.
This answer is automatically generated