Clarity XL50 User Manual
Amplified telephone
Hide thumbs
Also See for XL50:
- Quick start manual (3 pages) ,
- Brochure (2 pages) ,
- User manual (104 pages)

Subscribe to Our Youtube Channel
Related Manuals for Clarity XL50


Summary of Contents for Clarity XL50
- Page 1 User Guide XL50 Amplified Telephone Ñ Ç...
-
Page 3: Table Of Contents
Introduction ..................4 Parts Checklist .................. 6 Quick Reference Guide ..............7 Connecting the phone ..............9 Introduction to Digital Clarity Power ........10 Clarity Power Boost ..............10 Tone Settings ................12 Getting Started Installing backup batteries ............14 Desktop and Wall Mount Installations ........ -
Page 4: Introduction
INTRODUCTION Thank you for purchasing the Clarity Professional XL50 Amplified Telephone. Clarity is proud to offer you the only certified 60dB phone in the market. The Clarity Professional XL50 offers our patented Digital Clarity Power that uses digital technology to enhance the volume and clarity of your phone conversa- tions. - Page 5 Smart-Plexing Technology Smart-Plexing is the new and advanced way that the XL50 deals with possible feedback issues and is unique to Clarity phones. Feedback occurs when the sound coming out of the earpiece is detected by the microphone on the handset and is reprocessed by the telephone.
-
Page 6: Parts Checklist
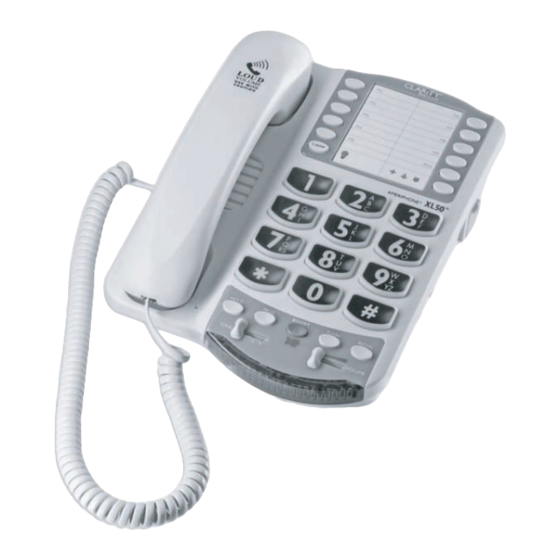
CONTENTS & PARTS CHECKLIST LAMP XL50 AMERIPHONE ® BOOST VOLUME Handset Base unit AC adapter Handset coil cord Telephone line cord Mounting bracket User guide... -
Page 7: Quick Reference Guide
Quick Reference Guide XL50 FEATURES 1 Phone Number Directory 9 Boost/Missed calls Voice Mail/Extension 2 Memory Button 10 Tone Control 3 Redial Button 11 Hold Indicator 4 Flash Button 12 Program Button 5 Volume Slider 13 Hold Button 6 Low Battery Indicator... - Page 8 Quick Reference Guide XL50 FEATURES 1 Ringer Volume Switch 5 Bed Shaker Port 2 Ring Tone Switch 6 Pulse/Tone Switch 3 Audio Output Port 7 Phone Line Connection 4 Wireless Lamp Flasher Port 8 AC Adapter Connection SIDE VIEW BACK VIEW...
-
Page 9: Connecting The Phone
1. Connect one end of the telephone line cord to the “Line” jack on the back of the XL50 and the other end to the phone outlet on your wall. 2. Connect the handset cord to the telephone as shown above. -
Page 10: Introduction To Digital Clarity Power
INTRODUCTION TO DIGITAL CLARITY POWER Digital Clarity Power™ Technology With Digital Clarity Power, the high frequency sounds are amplified more than the low frequency sounds so words are not just louder, but clearer and easier to understand. It also provides intelligent amplification to make soft sounds audible while keeping loud sounds tolerable. -
Page 11: Volume Reset Override
Volume Reset Override On the bottom of the XL50, there is a Volume Reset Override switch. When this is set to “On” the Boost function is automatically enabled every time Volume Reset the phone is picked up. In standard use, when the Override Override is set to “Off”... -
Page 12: Tone Settings
High Frequency Low Frequency The XL50 offers four different tone settings to provide an experience that may be customized to fit a specific users need. The illustration above shows how the four settings relate to each other and the amount of amplification they give to the different frequencies of sound. - Page 13 Amplification Low Frequency High Frequency The third tone setting is our set Clarity Power that begins to focus more on the higher frequency sounds and add speech intelligibility. It is a medium between tone setting two (2) and four (4).
-
Page 14: Getting Started
5. Set up Notification Options. See Page 20. Installing the Backup Batteries If there is a power outage, the XL50 will operate for up to 48 hours with four AA alkaline backup batteries (not included). If the phone is not in use, the batteries will stay charge for several months. -
Page 15: Desktop And Wall Mount Installations
Base Unit, AC Adapter, Mounting Bracket, Han dset Line Cord, and Telephone Line Cord. Choosing a Location • The XL50 requires a modular phone jack and a standard 120 Volt outlet for operation. • The unit should be located in an area where it is easy to see the visual display and lighted ringer. -
Page 16: Wall Mounting Instructions
GETTING STARTED 3. Plug one end of the modular coiled handset cord into the hand set. Plug the other end into the jack located on the left side of the telephone. Place the handset in the cradle. See Figure 3. 4. -
Page 17: Placing And Receiving Calls
1. Lift the handset and dial the number you wish to call. back of the telephone. 2. Press the BOOST button and turn the Clarity Power 2. Insert the plug of the dial to adjust volume. The BOOST button will illumi- AC adapter into the jack nate to indicate amplification is on. -
Page 18: Features
(11) different phone numbers. One space is marked to be used to store an emergency number. LAMP See Figure 9. XL50 AMERIPHONE ® It is important to not store 911 into your phone. This will prevent inadvertently calling an emergency Figure 9 call center. -
Page 19: Telephone Operations
TELEPHONE OPERATIONS Lamp Flasher / Bed Shaker Notification A Wireless Lamp Flasher and Bed Shaker can be con- nected to the phone to allow for a variety of ways to alert the user that the phone is ringing. The Wireless Lamp Flasher will cause any connected light source to flash when the phone rings. -
Page 20: Audio Output
REDIAL button VOLUME once. Your call will be dialed. The last number dialed will be stored in the XL50 for you until you dial another Figure 15 phone number. See Figure 15. -
Page 21: Notification Options
Figure 20 AND CAN DAMAGE YOUR HEARING. NEVER PUT YOUR EAR CLOSE TO THE RINGER. XL50 Low Battery Indicator If the batteries are weak or not installed, the Low Battery indicator will light up. Install fresh batteries according to BOOST the directions above. -
Page 22: Visual Ringer
TELEPHONE OPERATIONS Visual Ringer With the DC power source attached, the visual ringer will flash to alert of an incoming call. BOOST With the backup batteries inserted, the visual ringer will VOLUME appear brighter. See Figure 22. Figure 22 Missed Call / Voice Mail Message Light This light can flash when you have either a missed call or a new voice mail message, or it can be turned off. -
Page 23: Low Battery
PHONE INDICATOR LIGHTS LAMP XL50 AMERIPHONE ® BOOST VOLUME HOLD Boost-Missed Visual Ringer Low Battery Indicator Light Call-VMail Indicator With the DC power Indicator This light will source attached, This light will illuminate when the This light will flash the visual ringer will... -
Page 24: Troubleshooting
It may be necessary to wait for a few seconds after lifting the handset to begin dialing. 3. The XL50 is not compatible with Digital PBX Systems. If a standard, single line phone works on the system, your XL50 should also. - Page 25 TROUBLESHOOTING Unable To Hear Phone Ringer 1. Too many phone or phone devices on a line may cause your phone to not ring. Disconnect one (1) or two (2) of the devices to see if the problem is eliminated. If not, contact your local phone company for load guide lines.
- Page 26 They are recommended in areas of frequent power outages. This phone uses four (4) alkaline batteries. They will sustain the following functions: amplification, keypad backlighting, and loud ringer volume. Still Not Working? If, after going through this checklist, the XL50 is still not functioning properly, call Clarity at 1-800-426-3738.
-
Page 27: Technical Specifications
TECHNICAL SPECIFICATIONS Amplified dB Level 60dB/118 dBSPL Tone control range Full range: 300 to 3000Hz using one slide control. Dimensions Size: 9 1/2” x 7” x 3 1/4” (24.13cm x 17.78cm x 8.25cm) Weight: 2.52 lbs. (1.14 kg) Power Requirements AC Adapter: 9VDC, 300 mA Batteries: 4 AA alkaline batteries (not included) -
Page 28: Safety Instructions
IMPORTANT SAFETY INSTRUCTIONS When using your telephone equipment, 9. Operate this telephone using the basic safety precautions should always electrical voltage as stated on the be followed to reduce the risk of fire, base unit or the owner’s manual. If electric shock and injury to persons you are not sure of the voltage in including the following:... -
Page 29: Important Safety Instructions
IMPORTANT SAFETY INSTRUCTIONS D. If the telephone does not For Handset Unit: 3.6V operate normally by following 600mAHr NiMH the operating instructions. Rechargeable Battery Adjust only those controls that Sanik Battery Co. Ltd.: are covered by the operating 3SNAAA60HSJ1 instructions. Improper adjustment GPI International Ltd.: may require extensive work by GP60AAAH3BMJZ... -
Page 30: Fcc Requirements And Regulations
The REN is used to determine the Clarity, 1-800-552-3368. If the equip- number of devices that may be connected ment is causing harm to the telephone to a telephone line. Excessive RENs on a... - Page 31 REGULATORY COMPLIANCE i) If your home has specially wired alarm This equipment generates, uses and can equipment connected to the telephone radiate radio frequency energy and, if line, ensure the installation of this tele- not installed and used in accordance phone equipment does not disable your with the instructions, may cause harmful alarm equipment.
-
Page 32: Specifications
The party responsible for tions. Repairs to certified equipment regulatory compliance: should be made by an authorized Clarity, A Division of Plantronics, Inc. Canadian maintenance facility desig- 4289 Bonny Oaks Drive, Suite 106 nated by the supplier. Chattanooga, TN 37406... -
Page 33: Warranty And Service
Incidental or date of original purchase (“Warranty Consequential Damages Period”). The obligation of Clarity under this warranty shall be at Clarity‘s Neither Clarity nor your retail dealer or option, without charge, of any part or selling distributors has any responsibil-... -
Page 34: Warranty Service
Include the following listed below. information: In the United States 1. A proof-of-purchase indicating model number and date of Clarity Service Center purchase. 4289 Bonny Oaks Drive, Suite 106 2. Bill-to address. Chattanooga, Tennessee 37406 3. Ship-to address. Tel: (423) 622-7793 or 4.
Need help?
Do you have a question about the XL50 and is the answer not in the manual?
Questions and answers