Ubiquiti UCK-G2 Quick Start Manual
Hide thumbs
Also See for UCK-G2:
- Quick start manual (22 pages) ,
- Quick start manual (37 pages) ,
- Quick start manual (19 pages)
Table of Contents
Advertisement
Quick Links
Advertisement
Table of Contents

Related Manuals for Ubiquiti UCK-G2


Summary of Contents for Ubiquiti UCK-G2
- Page 1 Model: UCK-G2...
-
Page 2: Package Contents
Introduction Thank you for purchasing the Ubiquiti Networks® UniFi® Cloud Key Gen2. This Quick Start Guide is designed to guide you through installation and also includes warranty terms. Package Contents UniFi Cloud Key Gen2 System Requirements • Mobile App: Latest version of the UniFi App (available on the ™... - Page 3 Network Topology Requirement A DHCP-enabled network (for the UniFi Cloud Key to obtain an IP address) UniFi Cloud Key Gen2 (UniFi Controller) UAP-AC-HD UAP-AC-PRO UAP-AC-M-PRO US-16-150W USG-PRO-4 (DHCP Server) Internet Remote Access to UniFi Controller Sample Network Diagram...
-
Page 4: Hardware Overview
Hardware Overview Top Panel Color State Status White Solid Device is ready to be configured Flashing Device is booting up Device is initializing/deinitializing Heartbeat Firmware update in process Blue Solid Device is configured and ready Flashing Main power has been lost and device is counting down. -
Page 5: Front Panel
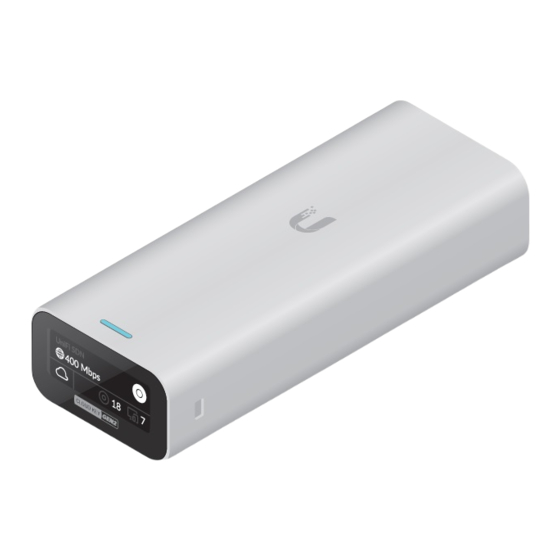
Front Panel Icon Description UniFi SDN Controller name Current WAN bandwidth usage Status of SDN Cloud Access Number of managed UniFi Access Points Number of client devices on the network... -
Page 6: Back Panel
Back Panel Reset Button microSD Slot Power Button Ethernet Port USB Type-C Power Port The Reset Button serves two functions: Reset Button Press and release the Reset button quickly. • Restart • Restore to Factory Default Settings Press and hold the Reset button for more than five seconds, until the status LED begins flashing white. -
Page 7: Side Panel
Side Panel Rack-Mount Notch Rack-Mount Notch Secures the Cloud Key Gen2 into the docking bay of the optional Rackmount Accessory, model CKG2-RM (sold separately). The Rackmount Accessory allows you to install the Cloud Key Gen2 in a standard 19" rack. Bottom Panel 13-Pin Connector... -
Page 8: Hardware Installation
Hardware Installation ) to the Ethernet 1. Connect an Ethernet cable ( not included Port. 2. Connect the other end of the Ethernet cable to a port on a network switch, such as a UniFi PoE Switch. Powering the UniFi Cloud Key Use an 802.3af-compliant switch, such as a UniFi PoE Switch, or a USB power source ( not included... -
Page 9: Optional Rackmount Accessory
Optional Rackmount Accessory Note: If using the optional Rackmount Accessory (sold separately), remove the protective film from the Rackmount Connector before attaching to the rackmount. There is an optional UniFi Rackmount Accessory (sold separately) that can mount the Cloud Key Gen2 in a standard 19”... - Page 10 ) to the Ethernet 2. Connect an Ethernet cable ( not included Port on the front of the Rackmount Accessory. 3. Connect the other end of the Ethernet cable to a port on a compatible PoE switch, such as a UniFi PoE Switch. 4.
- Page 11 5. Insert the Cloud Key Gen2 into the docking bay once the following three conditions are met: a. The 13-pin connector is face up b. The LCD screen is face forward c. There is no Ethernet cable connected to the Ethernet Port on the Cloud Key Gen2 Warning: To prevent creating a loop or other...
-
Page 12: Setting Up Unifi Sdn Via App
Setting Up UniFi SDN via App Download and install the UniFi SDN app to configure the Cloud Key Gen2. Note: Ensure that Bluetooth is enabled on your mobile device. You will need to set up the Cloud Key Gen2 with your mobile device and be within 1.5 m (5’) from where it is installed. - Page 13 2. Once detected, the app will automatically connect to the Cloud Key Gen2 and the LED will begin to flash blue. If more than one controller is detected, swipe through the app screens horizontally until you locate the correct Cloud Key Gen2. Then tap Set up this controller. 3.
- Page 14 4. When the Cloud Controller Access screen appears, select the services you wish to enable by tapping the toggle switch to on, for each of the following items: Enable Cloud Access, Allow Local Login with SSO, and Enable UniFi Protect. When you are finished, tap Next.
- Page 15 5. When the Adopt Devices screen appears, tap the device (or devices) you wish to adopt. To skip the adoption process, tap Finish and proceed to step 8. 6. Once you’ve selected one or more UniFi Access Points to adopt, an additional step will be added to the setup process allowing you to create a wireless network.
- Page 16 7. When the Add Wireless Network screen appears, tap the toggle switch to on and create a wireless network name and password. When you are finished, tap Finish. Note: You may also create an optional guest network by tapping the Enable Guest Access toggle switch to on and following the on- screen instructions.
- Page 17 9. Installation is now complete. When the Setup Complete screen appears, tap Done. 10. The Cloud Key Gen2 will now appear in the list of available controllers.
-
Page 18: Chrome Instructions
Chrome Instructions Use the Chrome web browser to set up your Cloud Key Gen2. 1. Ensure that your host system is on the same Layer-2 network as the Cloud Key Gen2. 2. Launch the Chrome web browser and type the IP address of your Cloud Key Gen2 into the address field. -
Page 19: Setting Up Unifi Sdn
Setting Up UniFi SDN 1. When the UniFi Setup Wizard screen appears, select your country and timezone and click Next. 2. Select each of the devices you would like to configure and click Next. 3. If configuring a UniFi access point during setup, a Configure WiFi screen will prompt you to create a wireless network name (SSID) and password. - Page 20 4. On the Controller Access screen, create an admin account for the SDN controller and click Next. 5. Confirm your SDN settings and click Finish. To update any of these settings, click Back to visit a previous section and make the necessary changes. When you return to this screen, click Finish.
- Page 21 Accessing UniFi SDN 1. Launch the Chrome web browser and type the IP address of your Cloud Key Gen2 into the address field. Press enter (PC) or return (Mac). https://192.168.1.8 2. When the splash screen appears, click Launch under UniFi SDN. 3.
- Page 22 Controller Sections Icon Description The Dashboard screen provides a visual overview of your network’s status, including latency and throughput information for each client and device. The Statistics screen provides a visual representation of the clients and network traffic on your managed UniFi SDN network.
-
Page 23: Specifications
Specifications UCK-G2 27.10 x 46.80 x 119.75 mm Dimensions (1.07 x 1.84 x 4.71") Weight 172 g (6.07 oz) Enclosure Aluminum Management Interface UniFi App; UniFi Controller Networking Interface(s) (1) 10/100/1000 Ethernet Port Buttons (1) Power; (1) Reset to Defaults Power Supply 802.3af PoE or... -
Page 24: Safety Notices
UBIQUITI NETWORKS under normal use and operation. UBIQUITI NETWORKS’ sole and exclusive obligation and liability under the foregoing warranty shall be for UBIQUITI NETWORKS, at its discretion, to repair or replace any Product that fails to conform to the above warranty during the above warranty period. -
Page 25: Warranty Conditions
(VI) has no original Ubiquiti MAC label, or is missing any other original Ubiquiti label(s); or (VII) has not been received by Ubiquiti within 30 days of issuance of the RMA. - Page 26 No Products will be accepted for replacement or repair without obtaining a Return Materials Authorization (RMA) number from UBIQUITI NETWORKS during the warranty period, and the Products being received at UBIQUITI NETWORKS’ facility freight prepaid in accordance with the RMA process of UBIQUITI NETWORKS.
-
Page 27: Limitation Of Liability
Limitation of Liability EXCEPT TO THE EXTENT PROHIBITED BY LOCAL LAW, IN NO EVENT WILL UBIQUITI OR ITS SUBSIDIARIES, AFFILIATES OR SUPPLIERS BE LIABLE FOR DIRECT, SPECIAL, INCIDENTAL, CONSEQUENTIAL OR OTHER DAMAGES (INCLUDING LOST PROFIT, LOST DATA, OR DOWNTIME COSTS), ARISING... -
Page 28: Battery Warning
ISED Canada CAN ICES-3(A)/NMB-3(A) This device complies with ISED Canada licence-exempt RSS standard(s). Operation is subject to the following two conditions: This device may not cause interference, and This device must accept any interference, including interference that may cause undesired operation of the device. This radio transmitter (IC: 6545A-UCKG2) has been approved by ISED Canada. - Page 29 Australia and New Zealand Warning: This is a Class A product. In a domestic environment this product may cause radio interference in which case the user may be required to take adequate measures. CE Marking CE marking on this product represents the product is in compliance with all directives that are applicable to it.
- Page 30 RoHS/WEEE Compliance Statement English European Directive 2012/19/EU requires that the equipment bearing this symbol on the product and/or its packaging must not be disposed of with unsorted municipal waste. The symbol indicates that this product should be disposed of separately from regular household waste streams.
- Page 31 Español La Directiva 2012/19/UE exige que los equipos que lleven este símbolo en el propio aparato y/o en su embalaje no deben eliminarse junto con otros residuos urbanos no seleccionados. El símbolo indica que el producto en cuestión debe separarse de los residuos domésticos convencionales con vistas a su eliminación.
-
Page 32: Declaration Of Conformity
Français [French] Le soussigné, UBIQUITI NETWORKS, déclare que l’équipement radioélectrique du type UCK-G2 est conforme à la directive 2014/53/UE. Le texte complet de la déclaration UE de conformité est disponible à l’adresse internet suivante: www.ubnt.com/compliance Deutsch [German] Hiermit erklärt UBIQUITI NETWORKS, dass der Funkanlagentyp UCK-G2 der... - Page 33 Español [Spanish] Por la presente, UBIQUITI NE TWORKS declara que el tipo de equipo radioeléctrico UCK-G2 es conforme con la Directiva 2014/53/UE. El texto completo de la declaración UE de conformidad está disponible en la dirección Internet siguiente: www.ubnt.com/compliance Svenska [Swedish] Härmed försäkrar UBIQUITI NE TWORKS att denna typ av...
-
Page 34: Online Resources
U logo, the Ubiquiti beam logo, and UniFi are trademarks or registered trademarks of Ubiquiti Networks, Inc. in the United States and in other countries. Apple, the Apple logo, and iPhone are trademarks of Apple Inc., registered in the U.S. and other countries. App Store is a service mark of Apple Inc.
Need help?
Do you have a question about the UCK-G2 and is the answer not in the manual?
Questions and answers